Send Template Messages with Quick Reply Buttons via WhatChimp API
Send templates with quick reply buttons that trigger bot flows
Updated 10 February 2026
Quick Reply buttons let customers tap a button to respond to your template message — and you can bind each button to a bot flow, so tapping the button automatically triggers a specific chatbot sequence. This is how you automate conversations that start from outbound template messages.
Before you begin: Make sure you've read Send Template Messages via WhatChimp API for the basics of sending template messages.
How It Works
- You create a template with Quick Reply buttons in WhatChimp (e.g., "Know More", "Track Order", "Talk to Support")
- You create a bot flow for each button in Bot Manager
- You get the postback IDs for your bot flows via the API
- When sending the template, you pass the postback IDs mapped to each button using
template_quick_reply_button_values - When the customer taps a button, WhatChimp automatically triggers the corresponding bot flow
Without postback binding: The button just sends a text reply (the button label). No automation happens.
With postback binding: The button triggers a full chatbot flow — menus, responses, data collection, API calls — whatever you've built in Bot Manager.
Step 1: Create a Template with Quick Reply Buttons
Step A. Go to Bot Manager > Message Template and click Create
Step B. Fill in your template details — name, category, header, body, footer
Step C. Under Button, select Quick Reply
Step D. Enter the button text (e.g., "Know More"). You can add up to 3 Quick Reply buttons.
Step E. Click Save and wait for Meta to approve the template.
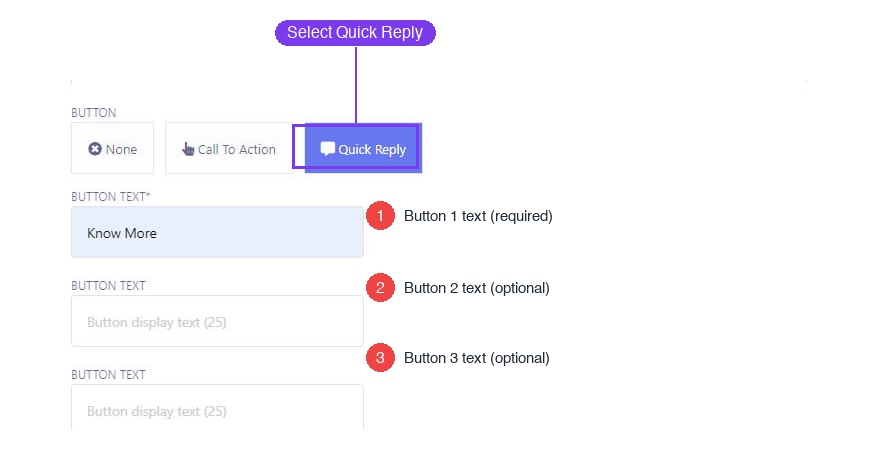
Tip: Keep button text short and action-oriented — "Track Order", "Get Help", "View Catalog". Max 25 characters per button.
Video: https://www.youtube.com/watch?v=A3evOF5xIho
Step 2: Create a Bot Flow to Bind
Each Quick Reply button needs a bot flow to trigger when tapped. You'll create these in Bot Manager.
Step A. Go to Bot Manager and click on Bot Reply

Step B. Click Create to open the Visual Flow Bot Builder

Step C. Build your bot flow — add the messages, menus, or actions you want to trigger when the customer taps the Quick Reply button. For example, a "Know More" flow that sends product details, or a "Track Order" flow that asks for the order number.
Step D. Save the bot flow. Repeat for each Quick Reply button that needs its own flow.
For a detailed walkthrough on building bot flows, see How to Create a Keyword-Based WhatsApp Chatbot in WhatChimp.
The Easy Way: Use the API Console
Now that you have your template (Step 1) and bot flows (Step 2), you need to connect them. The API Developer Console is the easiest way — it auto-detects Quick Reply buttons and lets you map each one to a bot flow from a dropdown.
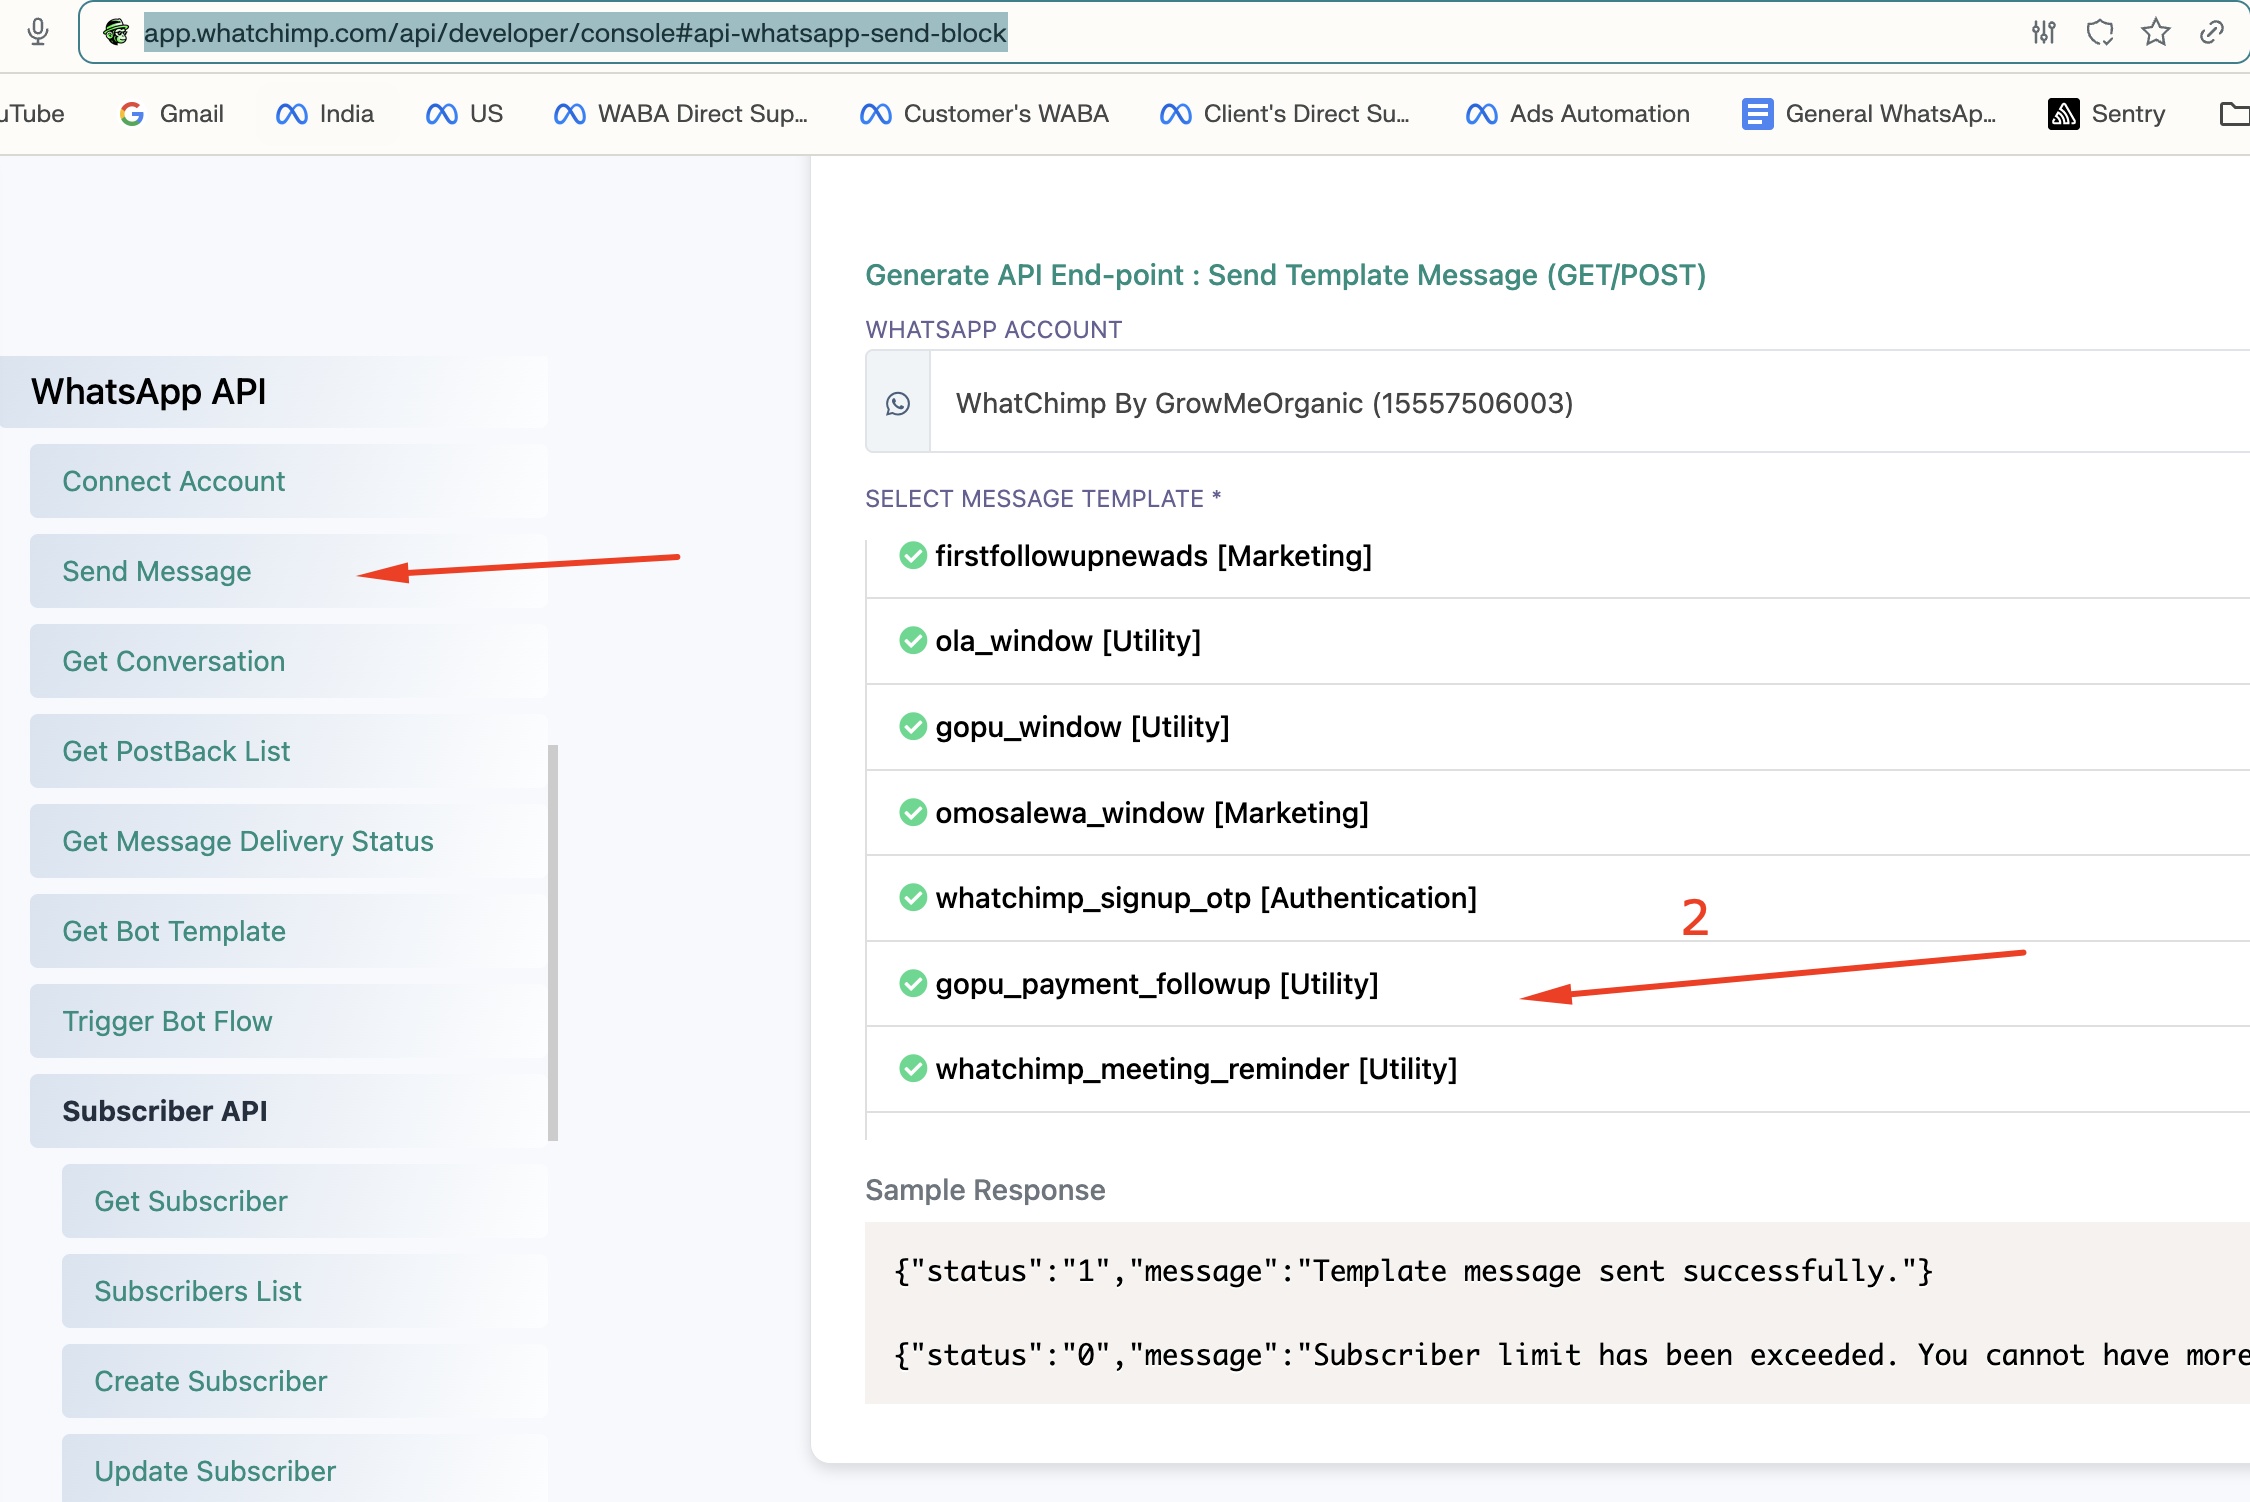
Step A. Go to Settings > API Developer Console > Send Message
Step B. Under Generate API End-point: Send Template Message, select your WhatsApp Account, then select the template that has Quick Reply buttons.
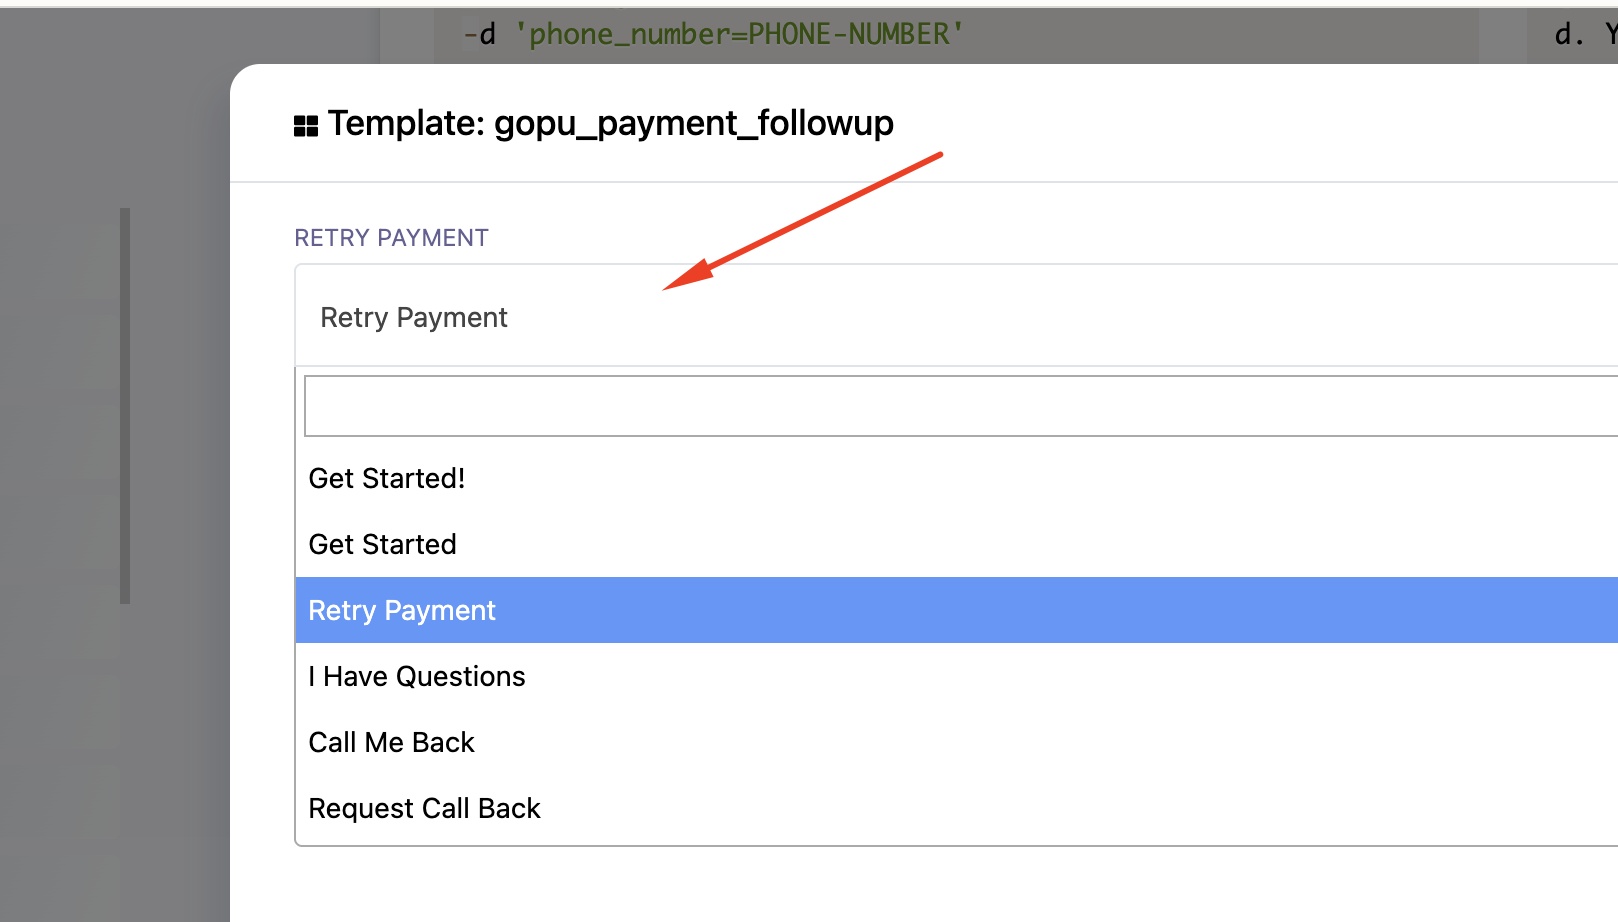
Step C. A template detail panel opens. For each Quick Reply button, you'll see a dropdown with all your bot flows (postbacks). Select which bot flow should trigger when the customer taps that button.
Step D. The console generates the complete API endpoint URL with template_quick_reply_button_values already filled in with the correct postback IDs. Copy it and use it directly.
That's it! For most users, this is all you need. The sections below explain the manual approach — useful if you're building automated integrations and need to construct the API calls programmatically.
Manual Approach: Build the API Call Yourself
If you're integrating WhatChimp into your own system (CRM, e-commerce, custom app), you'll need to fetch postback IDs and build the API call programmatically. Here's how.
Step 3: Get Available Postback IDs
Postback IDs identify your bot flows. You need these to bind Quick Reply buttons to specific flows.
Endpoint: GET /api/v1/whatsapp/get/post-back-list
https://app.whatchimp.com/api/v1/whatsapp/get/post-back-list?apiToken=API-TOKEN&phone_number_id=PHONE-NUMBER-IDExample Response:
{
  "status": "1",
  "message": [
    {
      "id": 1234,
      "name": "Know More Flow",
      "postback_id": "pb_know_more_abc123"
    },
    {
      "id": 1235,
      "name": "Track Order Flow",
      "postback_id": "pb_track_order_def456"
    },
    {
      "id": 1236,
      "name": "Talk to Support",
      "postback_id": "pb_support_ghi789"
    }
  ]
}
Note down the postback_id values — you'll map these to your Quick Reply buttons in the next step.
Step 4: Send Template with Quick Reply Buttons via API
Endpoint: POST /api/v1/whatsapp/send/template
Content-Type: application/x-www-form-urlencoded
Parameters
| Parameter | Required | Description |
|---|---|---|
apiToken | Yes | Your API token |
phone_number_id | Yes | Your WhatsApp phone number ID |
template_id | Yes | Internal template ID (from template list API, not Meta's template ID) |
phone_number | Yes | Recipient phone number with country code, no + sign |
template_quick_reply_button_values | Yes | JSON array of postback IDs, one per Quick Reply button |
templateVariable-{Name}-{Index} | If template has variables | Variable values (see Variables guide) |
template_header_media_url | If template has media header | URL of the header image/video/document |
The Key Parameter: template_quick_reply_button_values
This is a JSON array where each element is a postback ID. The order must match the order of your Quick Reply buttons in the template:
- First postback ID → first Quick Reply button
- Second postback ID → second Quick Reply button
- Third postback ID → third Quick Reply button
["pb_know_more_abc123", "pb_track_order_def456", "pb_support_ghi789"]Complete Example
Say your template order_confirmation has:
- Body: "Hi {{1}}, your order {{2}} is confirmed!"
- Quick Reply button 1: "Track Order"
- Quick Reply button 2: "Know More"
cURL:
curl -X POST "https://app.whatchimp.com/api/v1/whatsapp/send/template" \
  -d "apiToken=YOUR-API-TOKEN" \
  -d "phone_number_id=YOUR-PHONE-NUMBER-ID" \
  -d "template_id=123" \
  -d "phone_number=919999999999" \
  -d "templateVariable-CustomerName-1=John" \
  -d "templateVariable-OrderID-2=ORD-12345" \
  -d 'template_quick_reply_button_values=["pb_track_order_def456","pb_know_more_abc123"]'
Success Response:
{
  "status": "1",
  "wa_message_id": "wamid.HBgNODgwMTcyMzMwOTAwMxUCABEYEjlGQkY3MEFEMEVGODhCNDkxNQA=",
  "message": "Message sent successfully."
}
When the recipient taps "Track Order", WhatChimp triggers the bot flow with postback pb_track_order_def456. When they tap "Know More", it triggers pb_know_more_abc123.
Getting the Template ID
To get the internal template_id (not Meta's template ID), use the template list endpoint:
GET /api/v1/whatsapp/template/list?apiToken=API-TOKEN&phone_number_id=PHONE-NUMBER-IDLook for templates where button_type is "quick_reply" and status is "Approved". Use the id field (not template_id) when sending.
Step 5: Verify the Flow
After sending, test the full flow:
- Check delivery — the API returns a
wa_message_idon success - Tap the button on the recipient's phone — the bot flow should trigger immediately
- Verify in Live Chat — go to Omnichannel Inbox to see the conversation with the button tap and bot response
Code Examples
Node.js
const axios = require('axios');
const qs = require('querystring');

const data = {
  apiToken: 'YOUR-API-TOKEN',
  phone_number_id: 'YOUR-PHONE-NUMBER-ID',
  template_id: '123',
  phone_number: '919999999999',
  'templateVariable-CustomerName-1': 'John',
  'templateVariable-OrderID-2': 'ORD-12345',
  template_quick_reply_button_values: JSON.stringify([
    'pb_track_order_def456',
    'pb_know_more_abc123'
  ])
};

const response = await axios.post(
  'https://app.whatchimp.com/api/v1/whatsapp/send/template',
  qs.stringify(data)
);

console.log(response.data);
Python
import requests
import json

data = {
    'apiToken': 'YOUR-API-TOKEN',
    'phone_number_id': 'YOUR-PHONE-NUMBER-ID',
    'template_id': '123',
    'phone_number': '919999999999',
    'templateVariable-CustomerName-1': 'John',
    'templateVariable-OrderID-2': 'ORD-12345',
    'template_quick_reply_button_values': json.dumps([
        'pb_track_order_def456',
        'pb_know_more_abc123'
    ])
}

response = requests.post(
    'https://app.whatchimp.com/api/v1/whatsapp/send/template',
    data=data
)

print(response.json())
PHP
$data = [
    'apiToken' => 'YOUR-API-TOKEN',
    'phone_number_id' => 'YOUR-PHONE-NUMBER-ID',
    'template_id' => '123',
    'phone_number' => '919999999999',
    'templateVariable-CustomerName-1' => 'John',
    'templateVariable-OrderID-2' => 'ORD-12345',
    'template_quick_reply_button_values' => json_encode([
        'pb_track_order_def456',
        'pb_know_more_abc123'
    ])
];

$ch = curl_init('https://app.whatchimp.com/api/v1/whatsapp/send/template');
curl_setopt($ch, CURLOPT_POST, true);
curl_setopt($ch, CURLOPT_POSTFIELDS, http_build_query($data));
curl_setopt($ch, CURLOPT_RETURNTRANSFER, true);

$response = curl_exec($ch);
curl_close($ch);

echo $response;
Troubleshooting
| Problem | Fix |
|---|---|
| Button tap doesn't trigger bot flow | Check that the postback ID is correct. Get a fresh list from /whatsapp/get/post-back-list and verify the mapping. |
| "Template not found" error | You're using Meta's template_id instead of WhatChimp's internal id. Use the id field from the template list endpoint. |
| Button order is wrong | The JSON array order must match the button order in the template. First array element = first button. |
Variables showing as {{1}} | You're missing templateVariable-{Name}-{Index} parameters. See the Variables guide. |
| Quick reply buttons not showing | Template may not be approved yet, or button_type isn't quick_reply. Check the template list API response. |
Related Articles
- How to Create a Keyword-Based WhatsApp Chatbot in WhatChimp — Detailed bot flow creation walkthrough
- Send Template Messages via WhatChimp API — Basic template sending
- Send Template Messages with Variables via WhatChimp API — Dynamic content in templates
- Creating a WhatsApp Message Template in WhatChimp — Template creation walkthrough
- Getting Started with WhatChimp Developer API — API setup and authentication