Send Template Messages with Custom Variables via WhatChimp API
Send template messages with dynamic subscriber data via the API
Updated 10 February 2026
When you send WhatsApp template messages through WhatChimp, you often want to personalize them with subscriber-specific information like company names, locations, account details, or preferences. Custom fields (also called custom variables) let you store this data directly on each subscriber's profile. When your template references these fields, the API automatically pulls the values from the subscriber's stored data.
The key difference from template variables: you don't pass the values in each send request. Instead, you set the data on the subscriber once, and the system uses it every time you send a template that needs those fields.
Need to send different values with each message? If you're sending dynamic data that changes per message (like OTP codes, order numbers, or tracking IDs), use template variables instead. Custom fields are for data that stays with the subscriber profile.
Video: https://www.youtube.com/watch?v=yd1O0Sd_zDQ
How Custom Variables Work with Templates
Custom fields are stored on the subscriber's profile in WhatChimp. When you send a template that includes custom field placeholders, the system automatically retrieves the values from that subscriber's data and inserts them into the message.
Here's the typical flow:
Step A. You set company="Acme Corp" and country="United States" on a subscriber using the API or UI.
Step B. Your approved template message says: "Hi {{first_name}}, special offer for {{company}} customers in {{country}}!"
Step C. You call the send API with just the template name and subscriber phone number — no variable parameters needed.
Step D. The recipient receives: "Hi John, special offer for Acme Corp customers in United States!"
The system pulls "Acme Corp" and "United States" from the subscriber's stored custom fields automatically. You never pass these values in the send request.
Step 1: Create Custom Fields
Before you can use custom fields in templates or store them on subscribers, you need to create them in WhatChimp.
Step A. Log in to your WhatChimp account and navigate to Subscriber Manager > Manage Custom Fields, or go directly to /whatsapp/subscriber/manager/custom-field/list.
Step B. Click the Create button to add a new custom field.
Step C. Enter a field name (e.g., company, country, customer_email, membership_level). Use lowercase with underscores for consistency.
Step D. Select the reply type (text, email, phone, number, etc.) based on what kind of data the field will store.
Step E. Click Save to create the field.
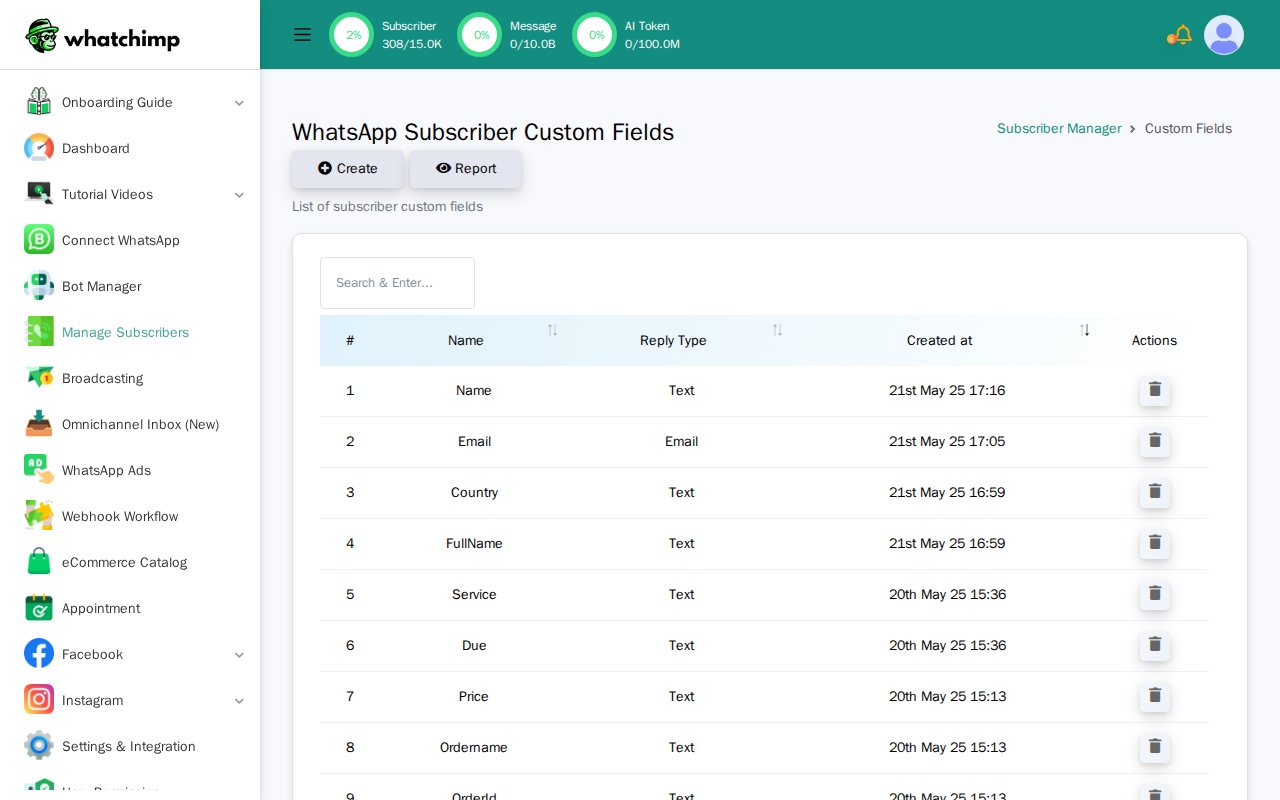
Repeat this process for all custom fields you need. Common fields include company name, location, account type, industry, or any subscriber-specific information your business uses.
Step 2: Set Up Subscriber and Custom Field Values via API
Before sending a template that uses custom fields, the subscriber must exist in your WhatChimp account AND have custom field values assigned to their profile.
Create the Subscriber (if they don't exist yet)
If the subscriber is not already in your WhatChimp account, you need to create them first using the Create Subscriber API.
Endpoint: POST /api/v1/whatsapp/subscriber/create
Parameters:
| Parameter | Type | Required | Description |
|---|---|---|---|
apiToken | String | Yes | Your WhatChimp API token |
phoneNumberID | String | Yes | Your WhatsApp phone number ID |
name | String | Yes | Name of the subscriber |
phoneNumber | String | Yes | Subscriber's phone number with country code (without + sign) |
Example Request:
curl -X POST https://app.whatchimp.com/api/v1/whatsapp/subscriber/create \
  -d "apiToken=YOUR_API_TOKEN" \
  -d "phoneNumberID=1234567890" \
  -d "name=John Doe" \
  -d "phoneNumber=15551234567"
Success Response:
{"status":"1","mesasge":"WhatsApp subscriber has been created."}If the subscriber already exists, the API returns "Something went wrong or subscriber already exist." — this is expected, and you can skip this step and go straight to assigning custom fields below.
Check Available Custom Fields
Retrieve the list of custom fields you've created to verify the exact field names.
Endpoint: POST /api/v1/whatsapp/subscriber/custom-fields/list
curl -X POST https://app.whatchimp.com/api/v1/whatsapp/subscriber/custom-fields/list \
  -d "apiToken=YOUR_API_TOKEN"
Response:
{
  "status": "1",
  "message": "Custom fields retrieved successfully",
  "data": [
    {
      "id": 1,
      "name": "company",
      "reply_type": "text"
    },
    {
      "id": 2,
      "name": "country",
      "reply_type": "text"
    },
    {
      "id": 3,
      "name": "customer_email",
      "reply_type": "email"
    }
  ]
}
Note the field names you'll use in the next step.
Assign Custom Fields to Subscriber
Now set the custom field values on the subscriber's profile. This works whether you just created the subscriber or they already existed.
Endpoint: POST /api/v1/whatsapp/subscriber/chat/assign-custom-fields
Parameters:
| Parameter | Type | Required | Description |
|---|---|---|---|
apiToken | String | Yes | Your WhatChimp API token |
phone_number_id | String | Yes | Your WhatsApp phone number ID |
phone_number | String | Yes | Subscriber's phone number (with country code, no + sign) |
custom_fields | JSON | Yes | JSON object with field names and values |
Example Request:
curl -X POST https://app.whatchimp.com/api/v1/whatsapp/subscriber/chat/assign-custom-fields \
  -d "apiToken=YOUR_API_TOKEN" \
  -d "phone_number_id=1234567890" \
  -d "phone_number=15551234567" \
  -d 'custom_fields={"company":"Acme Corp","country":"United States","customer_email":"john@acme.com"}'
Success Response:
{
  "status": "1",
  "message": "Subscriber changes have been saved successfully."
}
The custom field values are now stored on this subscriber's profile. You can update them anytime by calling this endpoint again with new values.
You can also set custom fields by:
- Manually editing subscribers in the Subscriber Manager UI
- Importing contacts via CSV with custom field columns
- Using chatbot flows that capture user input and save it to custom fields
- Bulk operations through the subscriber API
Step 3: Create a Template with Custom Fields
Now create a WhatsApp message template that uses your custom fields.
Step A. Navigate to Bot Manager > Message Template in your WhatChimp dashboard.
Step B. Click Create to start a new template.
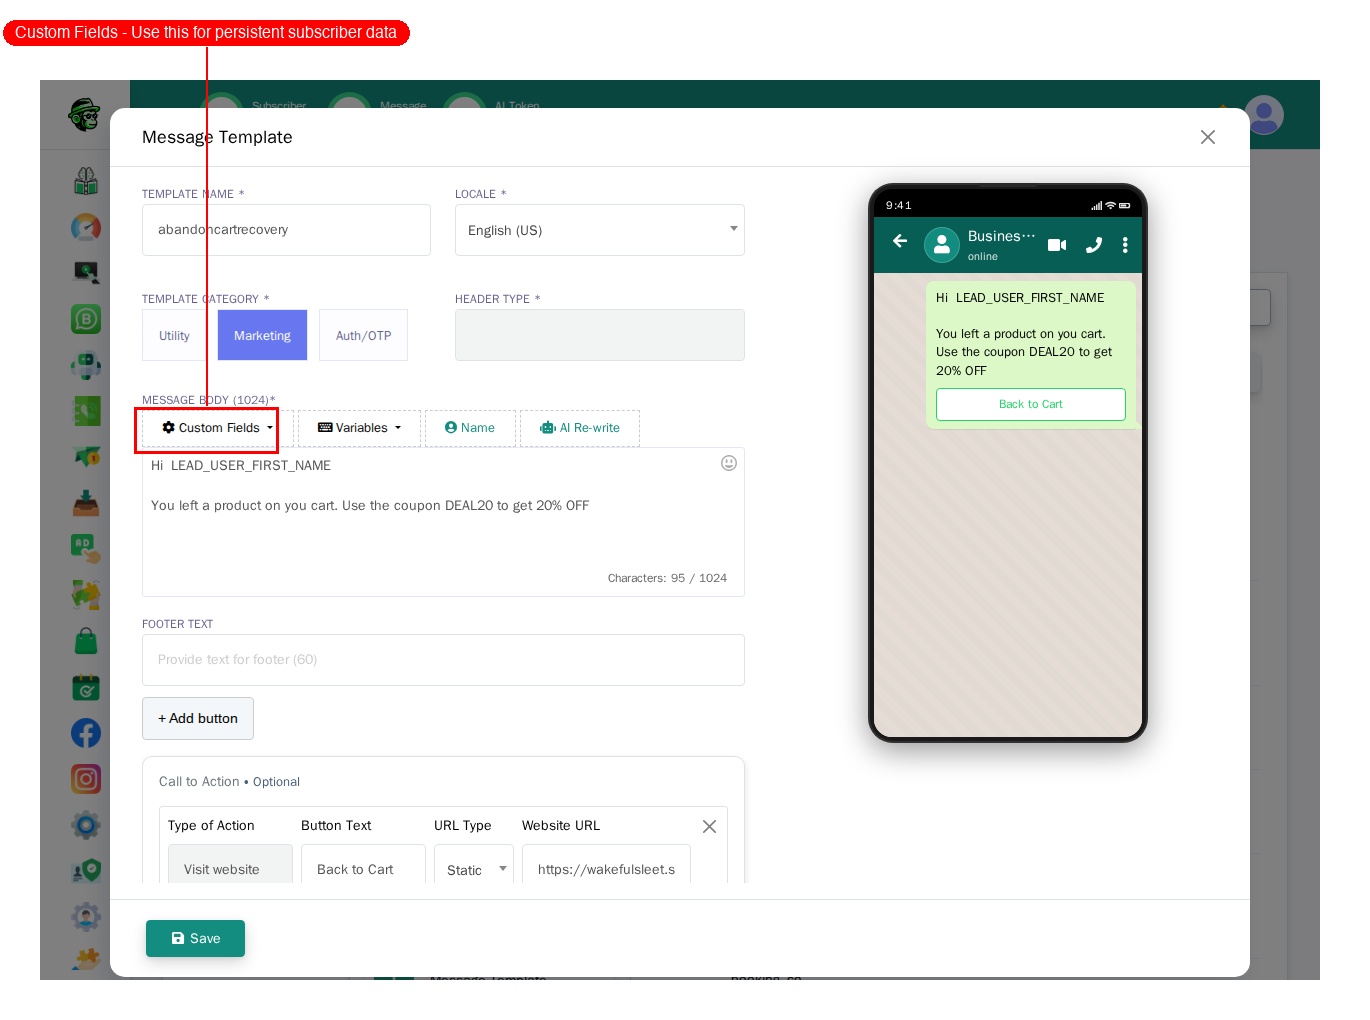
Step C. Write your message body. When you want to insert a custom field, click the Custom Fields dropdown button (with the gear icon) above the message body text area. Do NOT click "Variables" — that inserts template variables, which work differently.
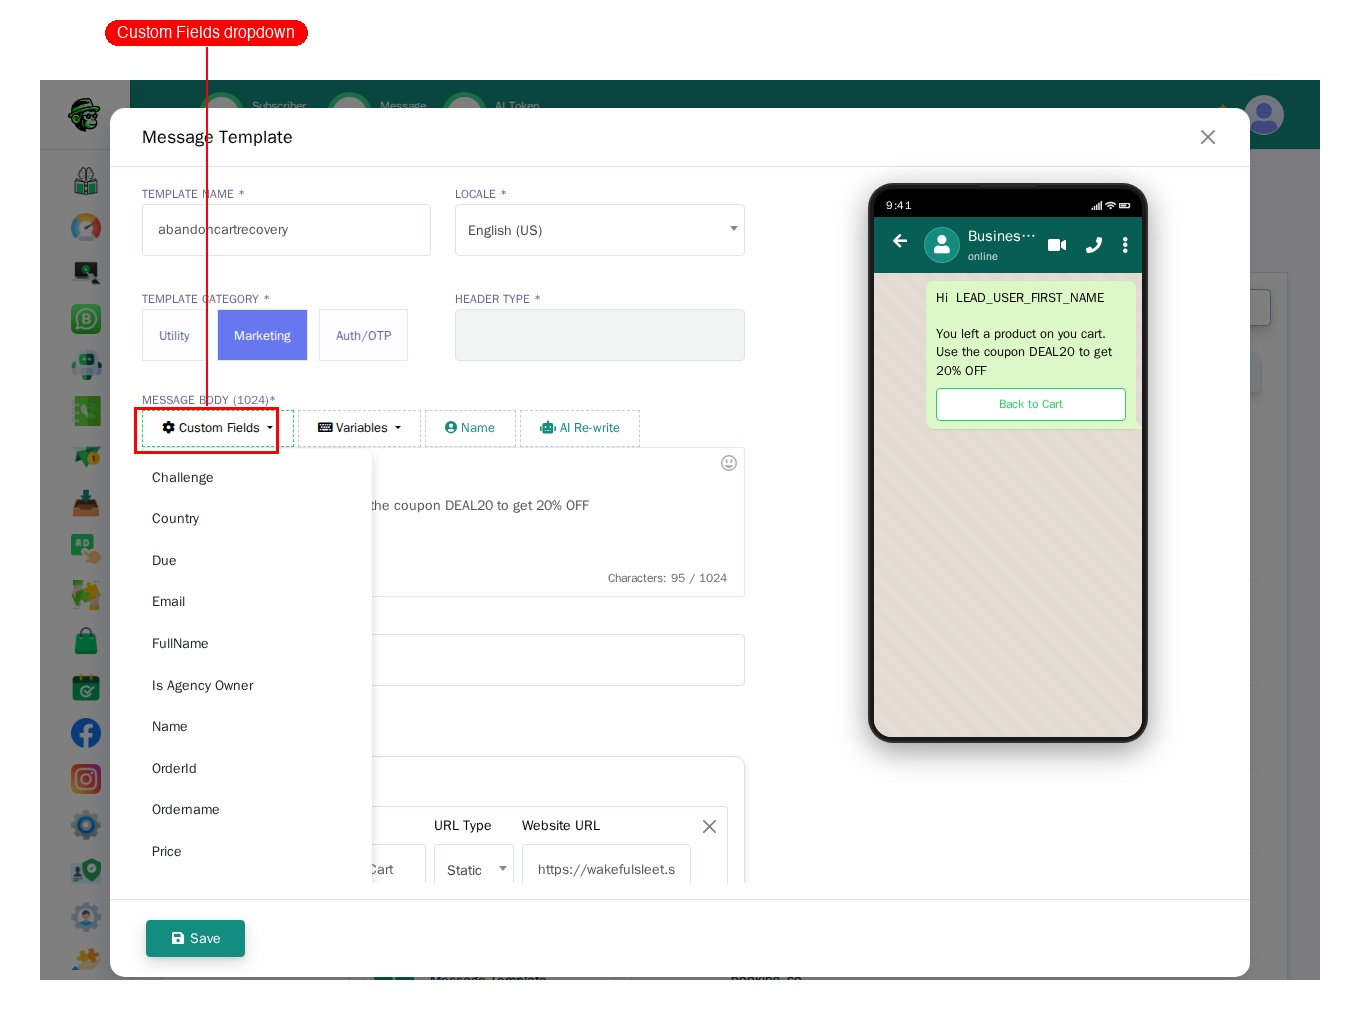
The Custom Fields dropdown shows all the custom fields you created in Step 1 (like Country, Email, FullName, etc.). Click any field name to insert it into your template message body.
Example template body:
Hi {{first_name}}, we have a special offer for {{company}}!

As a valued customer in {{country}}, you're eligible for exclusive benefits. Click below to learn more.
Step D. Add any buttons, headers, or footers your template needs.
Step E. Click Save and submit for Meta approval.
Wait for Meta to approve your template. This typically takes a few hours to a day. Once approved, you can send it via API.
Step 4: Send the Template via API
Now you're ready to send the template. Notice that the send request does NOT include any variable parameters. The custom field values are automatically pulled from the subscriber's stored data.
Endpoint: GET/POST /api/v1/whatsapp/send
Parameters:
| Parameter | Type | Required | Description |
|---|---|---|---|
apiToken | String | Yes | Your WhatChimp API token |
phone_number_id | String | Yes | Your WhatsApp phone number ID |
phone_number | String | Yes | Recipient's phone number |
template_name | String | Yes | Name of your approved template |
language_code | String | Yes | Template language (e.g., en, en_US) |
Example Request (GET):
https://app.whatchimp.com/api/v1/whatsapp/send?apiToken=YOUR_API_TOKEN&phone_number_id=1234567890&phone_number=15551234567&template_name=special_offer&language_code=en_USExample Request (POST):
curl -X POST https://app.whatchimp.com/api/v1/whatsapp/send \
  -d "apiToken=YOUR_API_TOKEN" \
  -d "phone_number_id=1234567890" \
  -d "phone_number=15551234567" \
  -d "template_name=special_offer" \
  -d "language_code=en_US"
Success Response:
{
  "status": "1",
  "message": "Message sent successfully",
  "data": {
    "message_id": "wamid.HBgNMTU1NTEyMzQ1NjcVAgARGBI5QTNDQTA3RjU4Q0M1MTBGMkEA"
  }
}
The system automatically pulls the custom field values (company, country, customer_email) from the subscriber's profile and inserts them into the template. The recipient sees a fully personalized message without you having to pass those values in each send request.
Complete Workflow Example
Here's the full end-to-end process for sending template messages with custom variables:
One-Time Setup:
Step A. Create custom fields in WhatChimp UI (e.g., company, country, membership_level).
Step B. Create and get approval for a template that uses those custom fields.
For Each Subscriber:
Step C. Create the subscriber if they don't already exist in WhatChimp:
curl -X POST https://app.whatchimp.com/api/v1/whatsapp/subscriber/create \
  -d "apiToken=YOUR_API_TOKEN" \
  -d "phoneNumberID=1234567890" \
  -d "name=John Doe" \
  -d "phoneNumber=15551234567"
Skip this step if the subscriber already exists in your account.
Step D. Set custom field values on the subscriber:
curl -X POST https://app.whatchimp.com/api/v1/whatsapp/subscriber/chat/assign-custom-fields \
  -d "apiToken=YOUR_API_TOKEN" \
  -d "phone_number_id=1234567890" \
  -d "phone_number=15551234567" \
  -d 'custom_fields={"company":"Acme Corp","country":"United States","membership_level":"Gold"}'
Step E. Send the template (no variable parameters needed):
curl -X POST https://app.whatchimp.com/api/v1/whatsapp/send \
  -d "apiToken=YOUR_API_TOKEN" \
  -d "phone_number_id=1234567890" \
  -d "phone_number=15551234567" \
  -d "template_name=membership_update" \
  -d "language_code=en_US"
The subscriber receives a personalized message like: "Hi John, your Gold membership at Acme Corp is active. As a customer in United States, you have access to exclusive benefits."
Troubleshooting
| Problem | Fix |
|---|---|
| Custom field shows blank or missing in message | The field value is not set on the subscriber. Use the assign-custom-fields API to set it first, or edit the subscriber manually in the UI. |
Trying to pass variable1=VALUE in send request | Custom fields don't use variable parameters. They're pulled automatically from subscriber data. If you need to pass different values with each message, use template variables instead. |
| "Custom field not found" error | The field name in your template doesn't match an existing custom field. Check the exact name using the custom-fields/list API. |
| Template rejected by Meta | Meta may reject templates with too many variables or unclear messaging. Review Meta's template guidelines and simplify if needed. |
| Subscriber not found | Make sure the phone number is in the correct format (country code, no + sign) and the subscriber exists in your WhatChimp account. |
Related Articles
- Template Variables vs Custom Variables
- Send Template Messages with Variables via WhatChimp API — For dynamic per-message data like OTPs and order numbers
- WhatChimp Subscriber Management API
- How to Manage Custom Fields and Labels
- Send Template Messages via WhatChimp API
- Getting Started with WhatChimp Developer API