Send Template Messages via WhatChimp API
How to create templates, use the API Console generator, send template messages with variables, and troubleshoot errors.
Updated 5 February 2026
Template messages let you send WhatsApp messages to customers anytime — even if they haven't messaged you in days, weeks, or months. Unlike text messages (which only work within a 24-hour window), template messages use pre-approved templates and have no time restriction.
This is what you should use for sending notifications, order updates, appointment reminders, OTPs, and any outbound message where the customer hasn't recently contacted you.
Before you begin: Make sure you have your API key and phone number ID. See Getting Started with WhatChimp Developer API for setup instructions.
Need personalized messages? If your template includes dynamic content like customer names, order numbers, or dates, see Send Template Messages with Variables via WhatChimp API for a detailed guide on how {{1}}, {{2}} placeholders work.
Video: https://www.youtube.com/watch?v=czd3S5cBHvY
Why Template Messages?
WhatsApp enforces a 24-hour session window for text messages. You can only send a free-text reply within 24 hours of the customer's last message. After that, the API returns an error.
Template messages bypass this restriction. They can be sent anytime because they use content that has been reviewed and approved by Meta.
If you're building any of the following, you need template messages:
- Order confirmations and shipping updates
- Appointment or booking reminders
- Payment receipts and invoices
- Lead follow-up messages
- OTP and verification codes
- Promotional offers and broadcasts
- Re-engagement messages for inactive customers
Template Message Types
Templates are categorized into three types. The type affects approval speed and pricing:
- Utility — Order confirmations, shipping updates, appointment reminders, payment receipts. These get approved fastest.
- Marketing — Promotional messages, offers, product updates, re-engagement campaigns. May take longer for approval.
- Authentication — OTP and verification codes. Specific format requirements.
Step 1: Create a Template in WhatChimp
Before sending a template message via the API, you need to create and get a template approved. Here's how:
Step A. Go to Bot Manager > Message Template

Step B. Click Create under Message Template Settings
Step C. Fill in the form:
- Template Name — Give it a clear name (e.g.,
welcome_message,promo_offer) - Message Body — Write your message content
- Footer Text (optional) — Small text at the bottom of the message
- Quick Reply / Buttons (optional) — Add interactive buttons
Want to personalize your message? If you need to include dynamic content like customer names, order numbers, or dates, you'll need to set up template variables before creating your template. See Send Template Messages with Variables via WhatChimp API for the complete step-by-step guide on using {{1}}, {{2}} placeholders.
Step D. Click Save. The template is submitted to Meta for review.

Step E. Wait for Meta to approve the template. Check the status in Bot Manager > Message Template — it will show as Approved, Pending, or Rejected.
For a detailed template creation walkthrough, see Creating a WhatsApp Message Template in WhatChimp.
Tip: Utility templates (order updates, booking confirmations) typically get approved faster than marketing templates.
Step 2: Generate the API Call Using the Console
The easiest way to get the correct API call for your template is to use the Template Message Generator built into the API Developer Console.
Step A. Go to Settings > API Developer Console (or navigate to app.whatchimp.com/api/developer/console)
Step B. Scroll down to the Send Message section
Step C. Under Generate API End-point: Send Template Message, select your WhatsApp Account from the dropdown
Step D. Select your Message Template from the dropdown — templates are listed with their type (Marketing, Utility, etc.)
Step E. The console automatically generates the complete API endpoint URL with all required parameters pre-filled
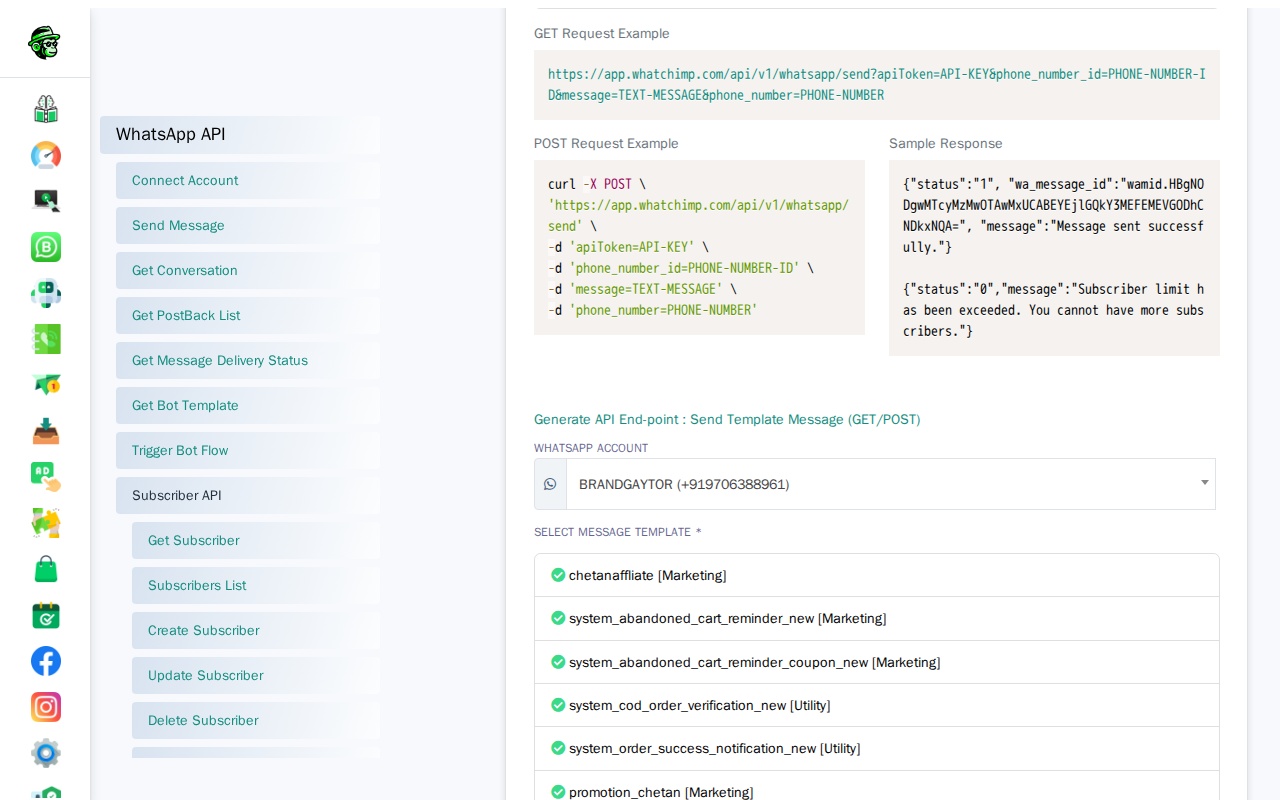
Copy the generated URL — this is your ready-to-use API call.
Step 3: Send the Template Message via API
Endpoint: GET/POST /api/v1/whatsapp/send
Full URL: https://app.whatchimp.com/api/v1/whatsapp/send
Use the URL generated by the console and replace the placeholder values with your actual data.
Example — GET request:
https://app.whatchimp.com/api/v1/whatsapp/send?apiToken=API-KEY&phone_number_id=PHONE-NUMBER-ID&phone_number=919999999999&template_name=TEMPLATE-NAME&language_code=en_USThe exact parameters depend on your template. The API Console generator creates the correct structure — just swap in your real values.
Sending personalized data? If your template uses variables like {{1}}, {{2}}, you'll need to add variable1=VALUE&variable2=VALUE parameters to this URL. See Send Template Messages with Variables for the full guide.
Success Response:
{
  "status": "1",
  "wa_message_id": "wamid.HBgNODgwMTcyMzMwOTAwMxUCABEYEjlGQkY3MEFEMEVGODhCNDkxNQA=",
  "message": "Message sent successfully."
}
Common Errors and Fixes
| Error | Cause | Fix |
|---|---|---|
| Template message rejected by API | Template not yet approved by Meta | Check status in Bot Manager > Message Template. Wait for approval or edit and resubmit. |
| "Subscriber limit exceeded" | Your plan's subscriber limit reached | Upgrade your WhatChimp plan or remove inactive subscribers |
| Template shows as "Rejected" | Meta rejected the template content | Review Meta's rejection reason, update the content, and resubmit |
Related Articles
- Send Template Messages with Variables via WhatChimp API — Personalize template messages with dynamic data
- Send 24-Hour Text Messages via WhatChimp API — Send text replies within the session window
- Creating a WhatsApp Message Template in WhatChimp — Detailed template creation guide with video
- Sending WhatsApp Messages — Text vs Template — Comparison overview
- Getting Started with WhatChimp Developer API — API setup and authentication