How to Create a Keyword-Based WhatsApp Chatbot
Build a chatbot that replies on its own when a customer sends a word you choose, in five steps.
Updated 23 September 2026
A keyword-based chatbot replies on its own when a customer sends a word you choose. Someone types "price" and gets your pricing message back in a second, at any hour, without anyone on your team touching the phone.
This guide builds a simple one: the customer sends a word, and the chatbot sends one reply. When it works, you can move on to a full menu chatbot (see the end of this guide).
Before You Start
You need:
- Your WhatsApp number connected to WhatChimp. If you have not done this yet, follow How to Connect Your Phone Number with WhatChimp first.
- A short list of the words your customers actually type. Look at your recent chats for these.
Words You Will See
- Chatbot: automatic replies that WhatChimp sends for you, so nobody has to type them.
- Keyword: a word that starts the chatbot, such as "price". When a customer sends it, the chatbot answers.
- Flow Builder: the screen where you build a chatbot. It works like a drawing board, which the app calls the canvas.
- Block: one box on the drawing board. Each block is one step, such as "send this message" or "send this picture". You join blocks with lines to set the order.
- Label: a tag you put on a customer, such as "Interested in prices", so you can find or message that group later.
- Custom field: a piece of saved information about a customer, such as their city or order number.
- Sequence: a series of follow-up messages that go out over the next hours or days.
- Template: a message that Meta (the company behind WhatsApp) has approved in advance. You need one to message people who have not written to you recently.
Step 1: Open Keyword Replies
Log in at app.whatchimp.com. The numbers in the picture below match these steps:
- The menu on the left may show only small icons. Click the menu button (three lines) at the top left to show the names next to them.
- Click Bot Manager.
- In the Bots / Accounts list, click the WhatsApp number you want the chatbot to run on.
- Make sure the Automation tab is open, then click Keyword Replies.
- Click Create.
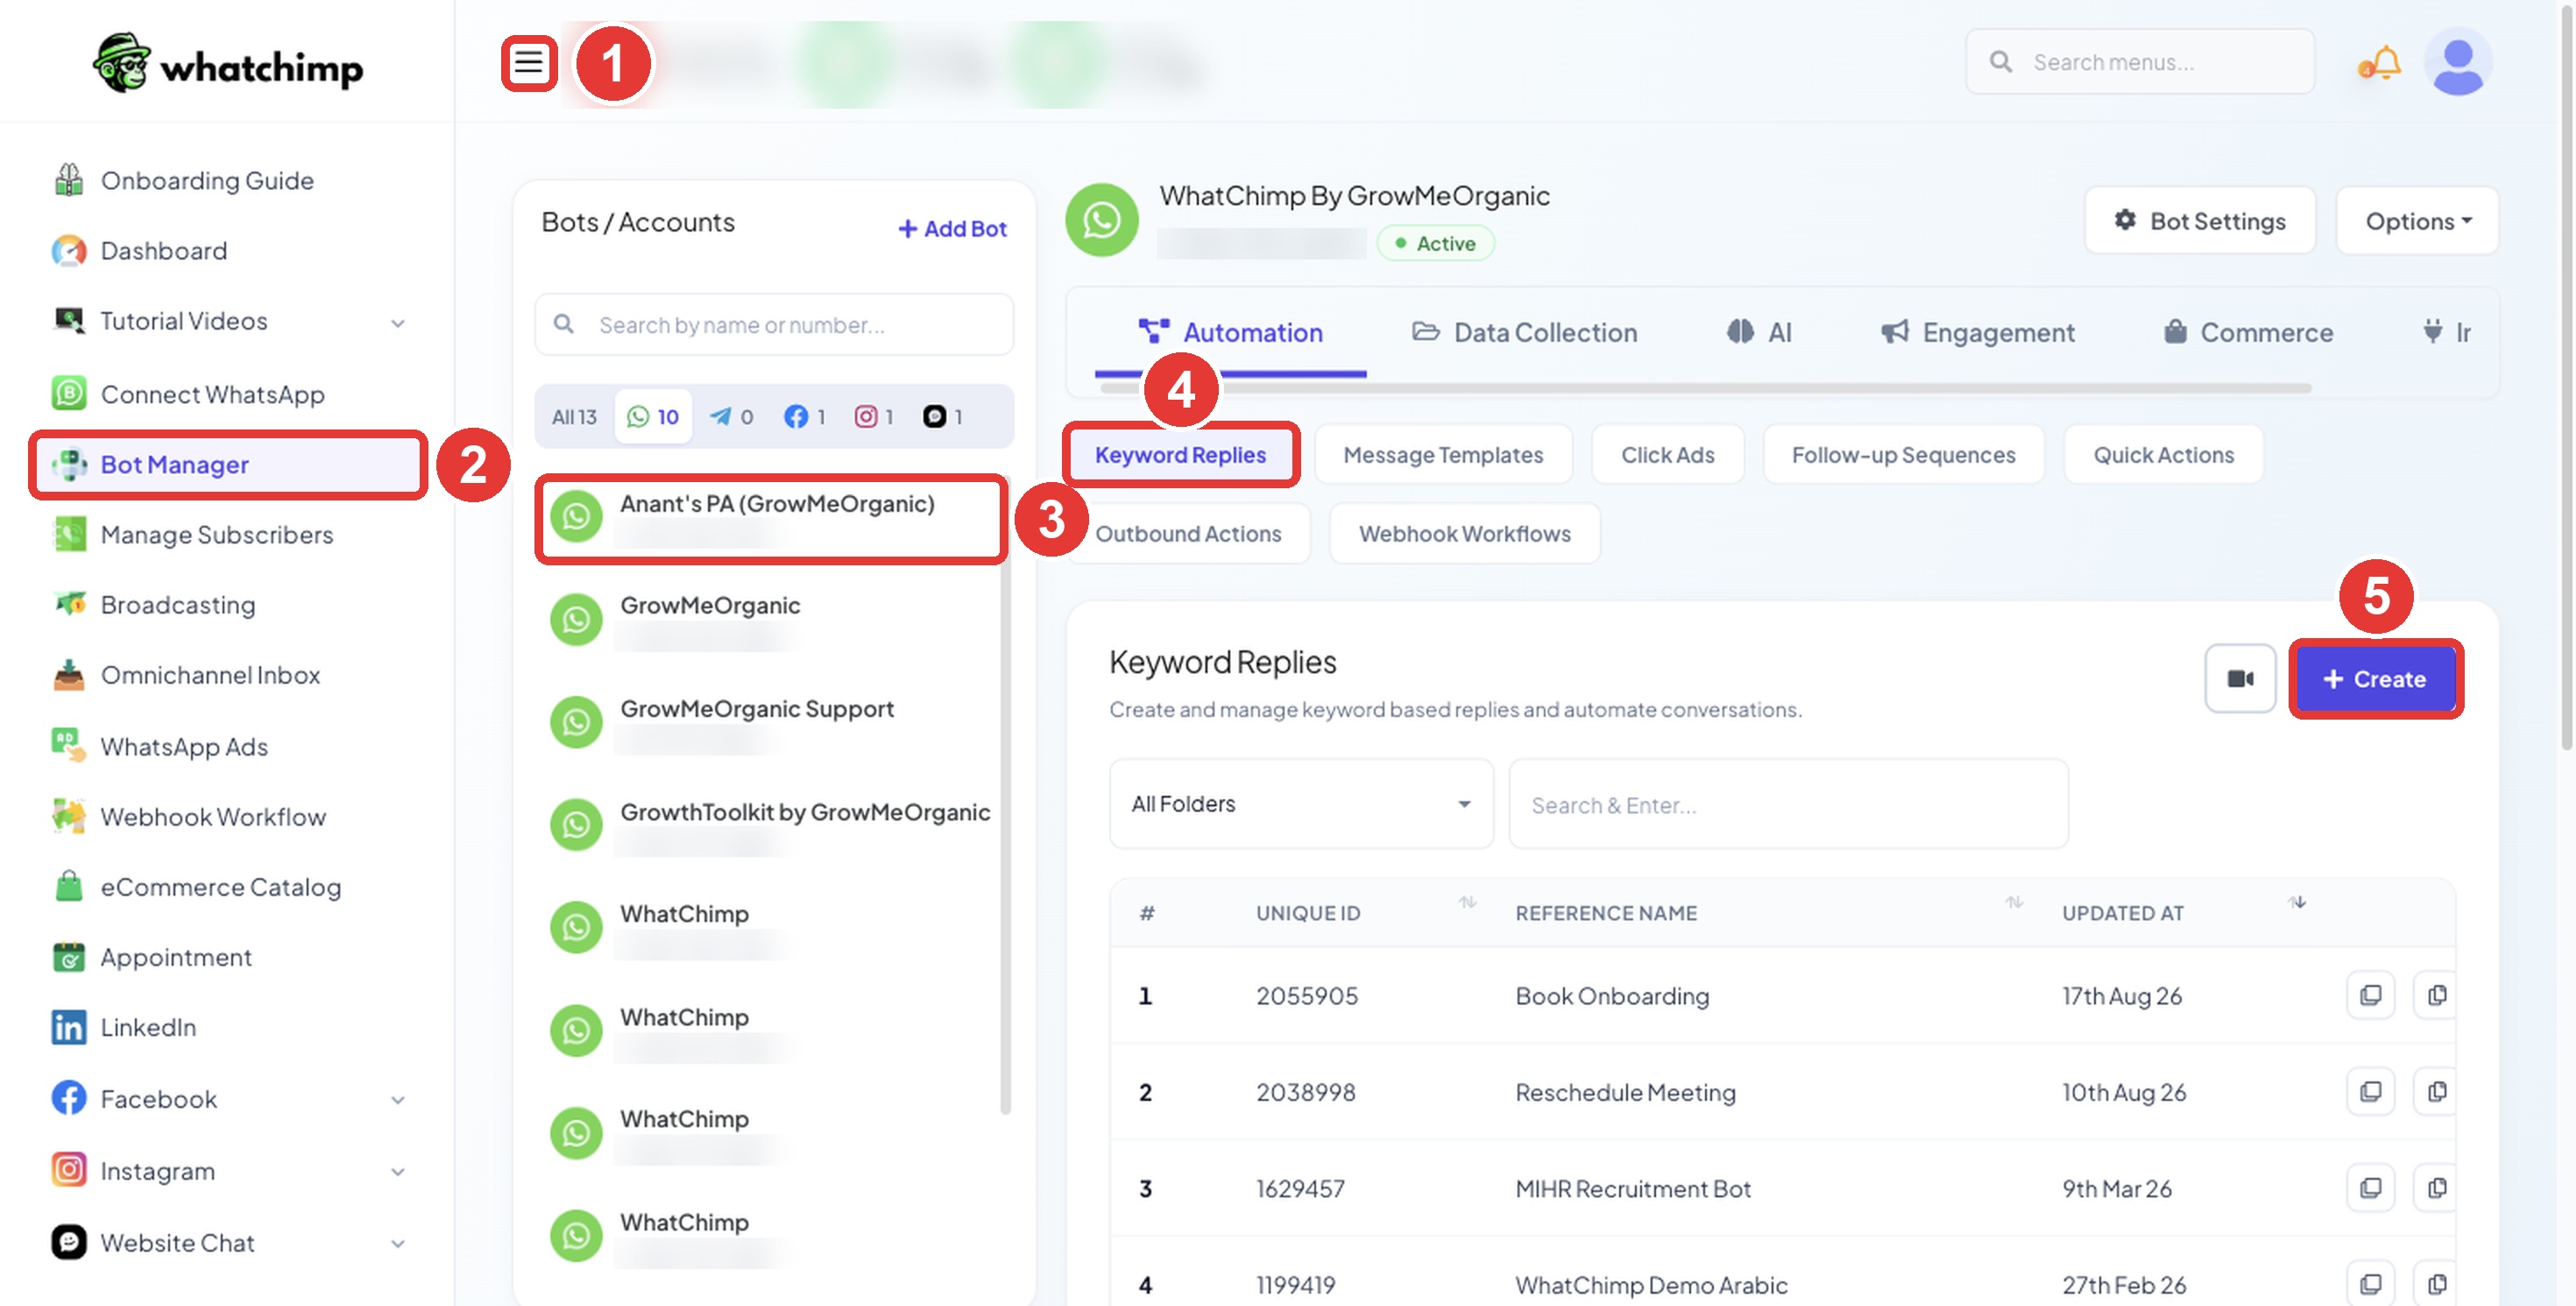 Follow the numbers 1 to 5
The Flow Builder opens. It starts with one block, called Start Bot Flow. The list of other blocks you can add is on the left.
Step 2: Set Your Keyword
Double-click the Start Bot Flow block.
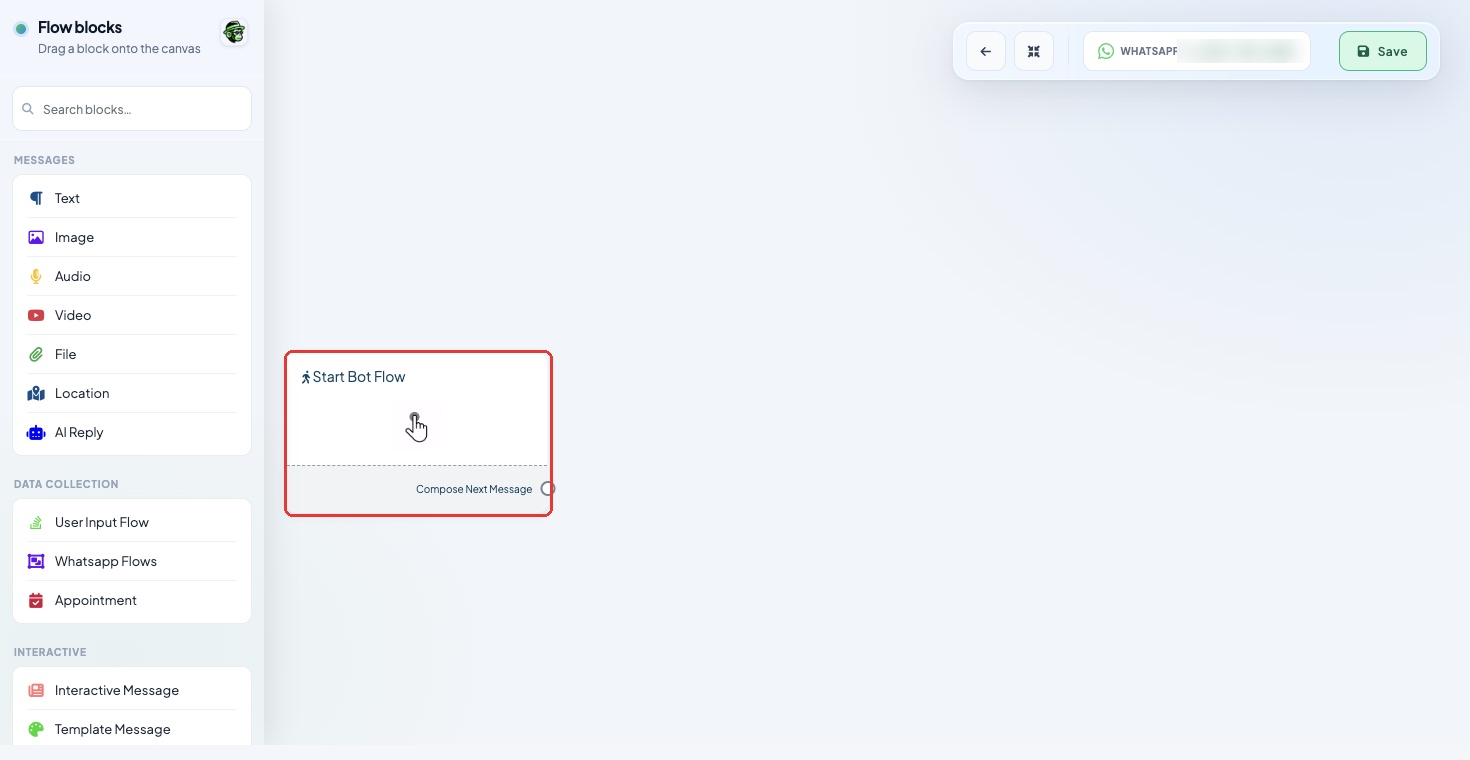 Double-click the block to open its settings
The Configure Reference panel opens. Fill in two things:
- Trigger Keywords: the words that start this chatbot. Separate them with commas, for example
price, pricing, plans. - Title: a name for your own use, such as "Pricing Enquiry". It never shows to the customer, but it is what you see in the Keyword Replies list later.
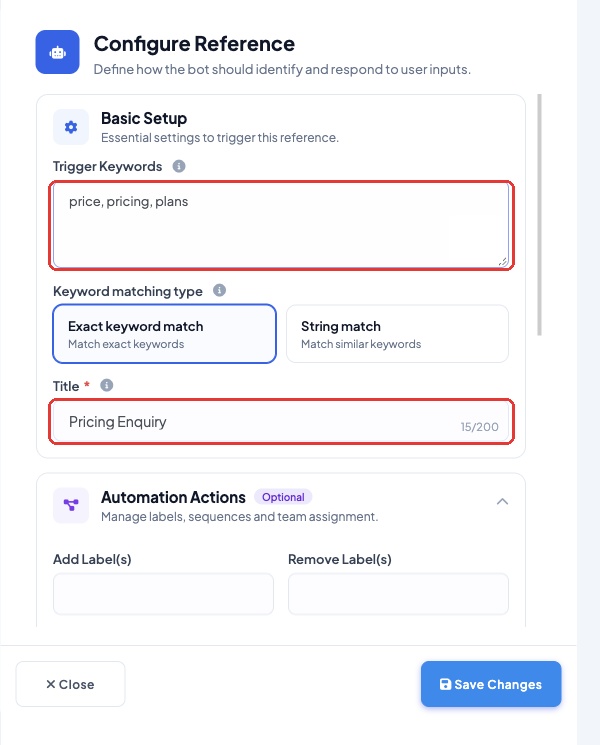 Trigger Keywords and Title are the two fields you need
Exact match or string match
Keyword matching type decides how strict the chatbot is.
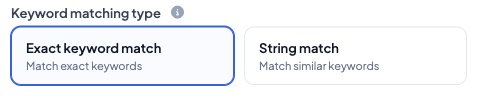 Pick one before you save
- Exact keyword match: the chatbot replies only when the whole message is your keyword. "price" starts it. "what is the price" does not.
- String match: the chatbot replies when your keyword appears anywhere in the message. "what is the price please" starts it.
String match catches far more real messages, so start there. Click the card you want, even if it already looks selected. On a new chatbot a card can look chosen when it is not.
Keep string match keywords at three letters or longer. String match looks for your keyword anywhere in the message, including inside a longer word. A keyword of "yo" starts the chatbot on "Thank you" and on "Youtube", because the letters sit inside those words. Short keywords will make your chatbot answer ordinary sentences at random. If you need a two-letter keyword, use exact match for it.
Optional settings
Scroll down the same panel and you can also add or remove a label, subscribe the person to a follow-up sequence, assign the chat to a team member, save the reply to a custom field, or send the details to a Google Sheet or another tool you use. All of it is optional. Skip it for your first chatbot.
When you are done, click Save Changes at the bottom of the panel.
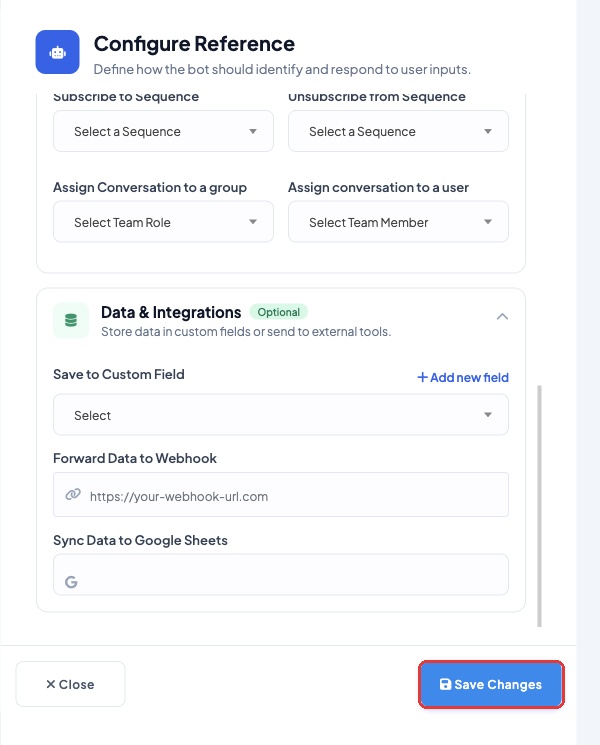 Save Changes closes the panel and keeps your keyword
Step 3: Add Your Reply
Drag a Text block from the left panel onto the canvas: click it, hold the mouse button down, move it onto the canvas, and let go.
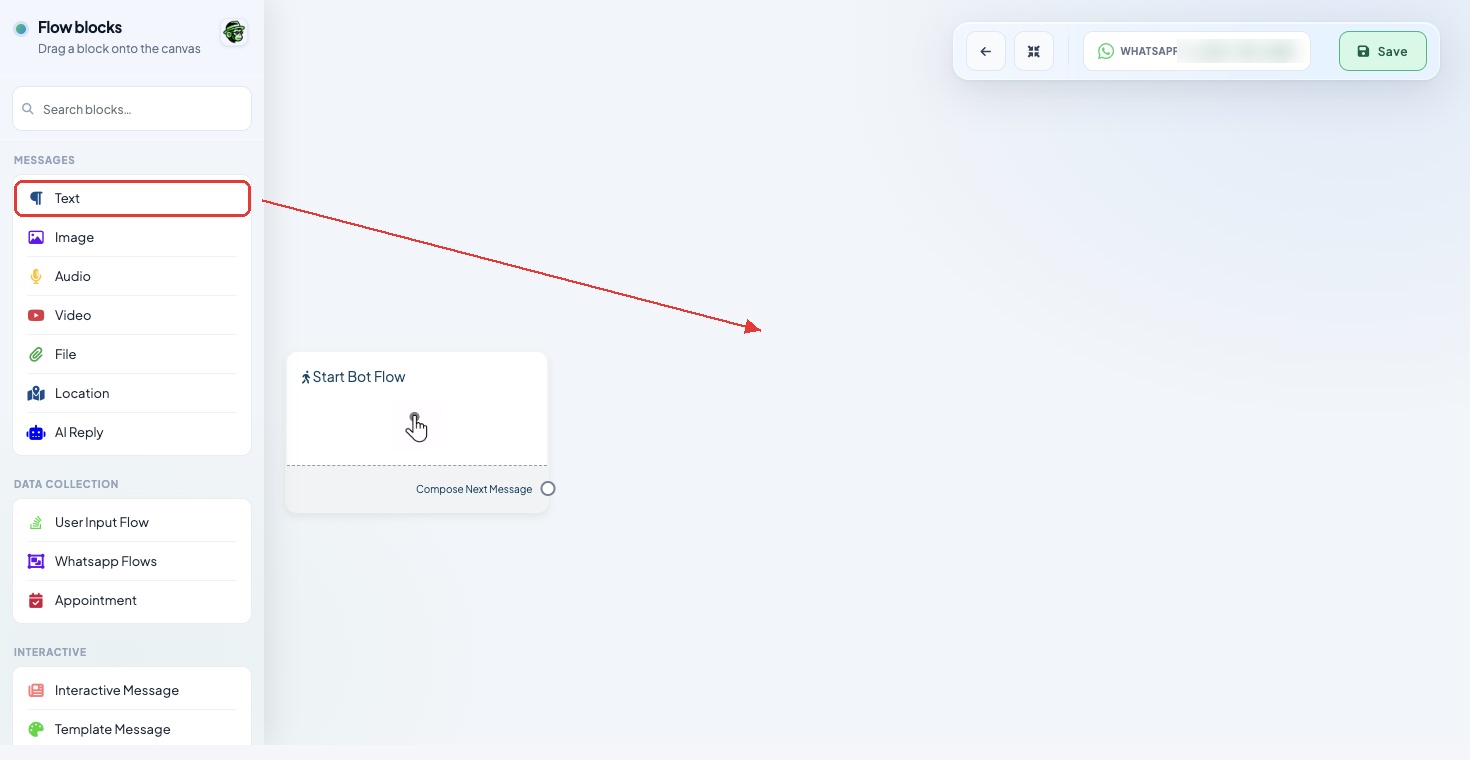 Drag any block from the left panel onto the canvas
Now join the two blocks. Put your mouse on the Compose Next Message dot on the right edge of Start Bot Flow, hold the mouse button down, drag to the Message dot on the left edge of your Text block, and let go.
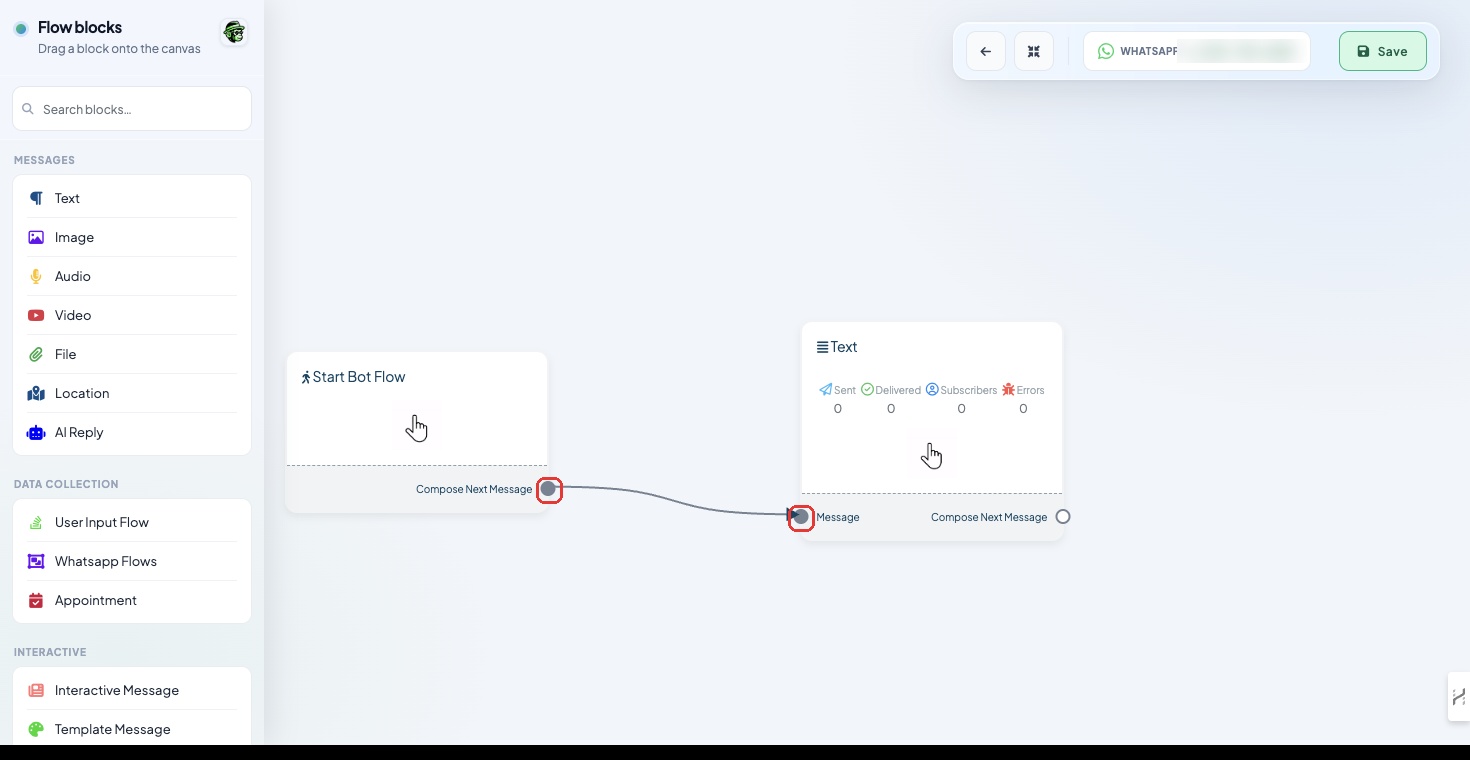 Drag from the right dot of one block to the left dot of the next
A line appears between them and the Configure Text Message panel opens.
Type your reply in Reply message. To greet each customer by name, click Name. It adds #LEAD_USER_FIRST_NAME# to your message, and WhatChimp swaps it for the name on the customer's WhatsApp profile when it sends. Type it through the button, because a hand-typed #name is sent as plain text. Custom does the same with any custom field you have saved. Delivery Options lets you show the "typing..." dots and wait a few seconds before the reply is sent, so it feels less robotic.
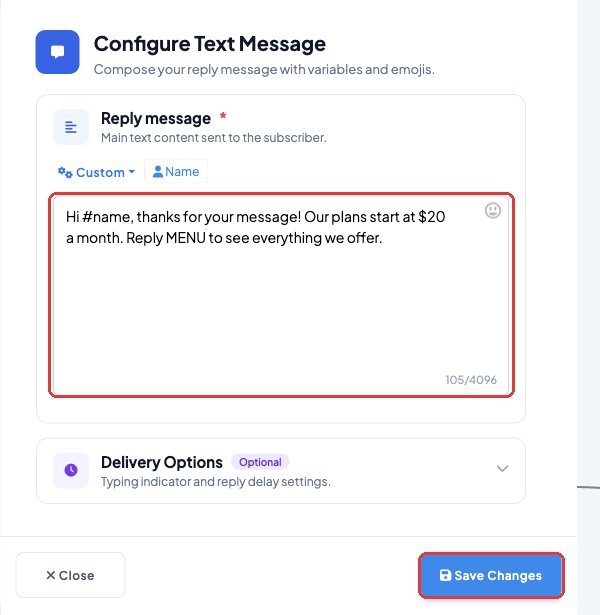 Personalize the reply, then save the panel
Click Save Changes.
Step 4: Save the Chatbot
Click Save at the top right of the Flow Builder. Nothing you built is live until you do. If you close the page or go back before clicking Save, everything you built on the canvas is lost.
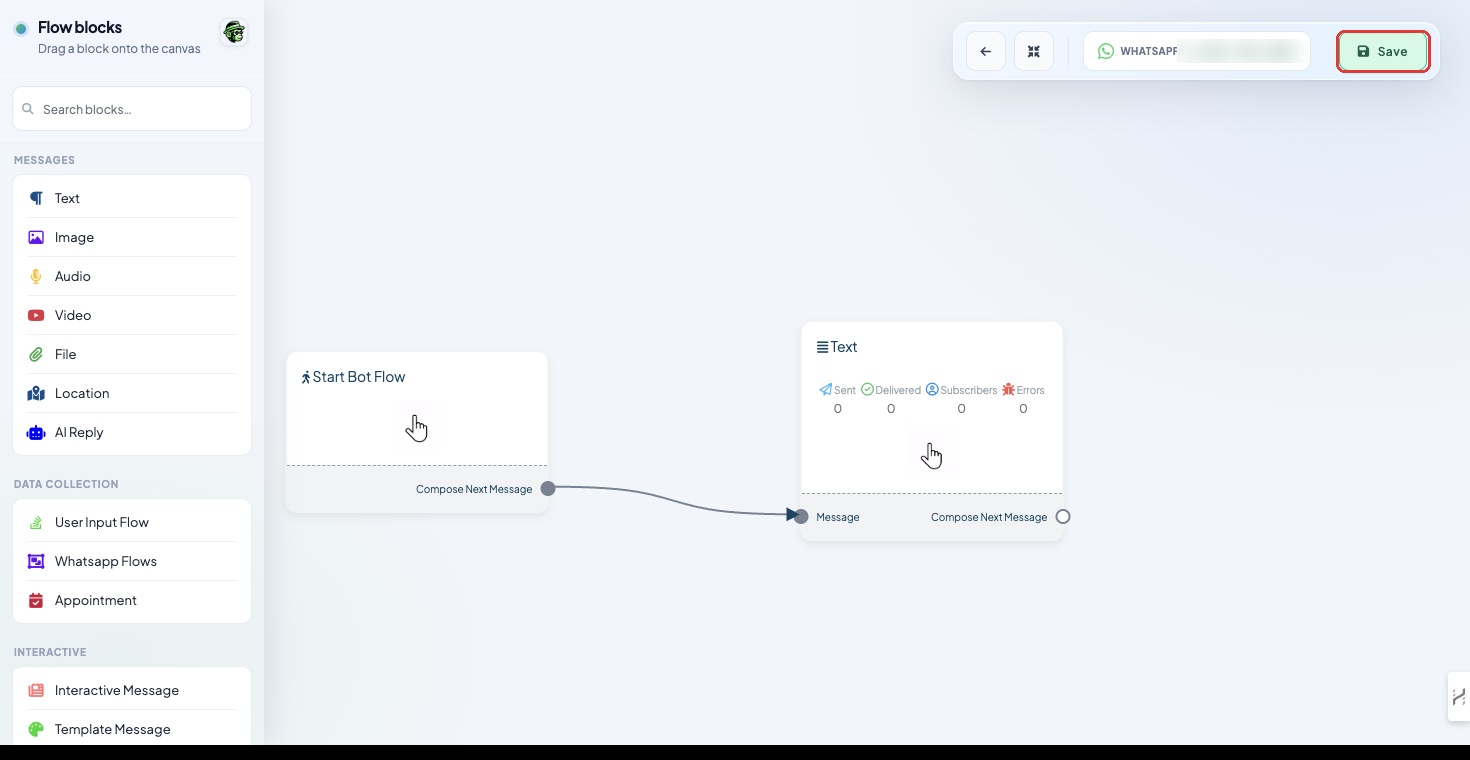 Save sits above the canvas, at the top right
Your chatbot now appears in the Keyword Replies list, and it is live from that moment.
Step 5: Test It
Pick up your personal phone, open WhatsApp, and send your keyword to your business number. Use a different WhatsApp number from the one you connected, because a number cannot message itself. The reply should arrive in a few seconds.
Test with the messy version too. If you set string match, try "hey what is the price" and check that the chatbot still answers.
Next: Build a Full Menu Chatbot
A single reply answers one question. Most businesses want a menu instead: the customer sends a keyword, gets a list of options, and each option sends something useful, such as a price list, a PDF, a link, a discount code, a booking form or an AI answer.
How to Build a Complete WhatsApp Chatbot, Step by Step builds one from start to finish, click by click, with a picture of every setting and of what the customer sees on their phone.
Tips
Write down the words your customers already use. Open your inbox and read the last fifty messages. The real keywords are in there, and they are rarely the ones you would have guessed.
Cover the spelling mistakes. Add "pricing", "prices" and "cost" alongside "price". Keywords cost you nothing.
Give people a way out. When you build a menu, always include an option like Talk to us, so a customer who needs help is not stuck with the bot.
Frequently Asked Questions
My chatbot does not answer when I send the keyword. Why? Check two things. First, that the chatbot is saved: open it and look for your keyword in the Start Bot Flow block. Second, that the matching type suits the message you are testing. On exact match, only the keyword on its own starts the chatbot.
Can one chatbot answer any message, not just my keywords? Yes. See How to Make a Chatbot Reply to Any Keyword.
What happens when someone sends a word I have not set up? Nothing, unless you set a No Match Reply. See No Match Reply & Frequency Setup.
Can I send more than one message in a reply? Yes. Add another block and join it to the Compose Next Message dot on your Text block. The messages go out in the order you join them.
Can I start a booking or a follow-up series from a keyword? Yes. See How to Trigger Appointment Booking from a Chatbot and How to Set Up Sales Sequence Chatbots.
Related Articles
- How to Build a Complete WhatsApp Chatbot, Step by Step: a full menu chatbot, click by click
- Flow Builder Blocks Explained: what every block in the Flow Builder does
- How to Add Clickable CTA Buttons: replace typed replies with tappable buttons
- How to Make a Chatbot Reply to Any Keyword: a catch-all chatbot for messages you did not plan for
- No Match Reply & Frequency Setup: what to say when nothing matches
- How to Set Up Sales Sequence Chatbots: follow up automatically after the first reply
- Webhook on Keyword Trigger: send the details to another tool you use when a customer sends a keyword