How to Build a Complete WhatsApp Chatbot, Step by Step
Build your own menu chatbot one click at a time and learn every main Flow Builder block, with a picture for every step.
Updated 24 September 2026
In this guide you build your own WhatsApp chatbot, one click at a time. By the end, you will know how to use every main block in the WhatChimp Flow Builder.
To make it easy to follow, we use one example the whole way through: a flower shop called Bloom Florist. Wherever you see our flower shop text, type your own business details instead.
New to the Flow Builder? Read Flow Builder Blocks Explained first. It shows what each block does, so the steps below make more sense.
Here is what your customers will see when you finish:
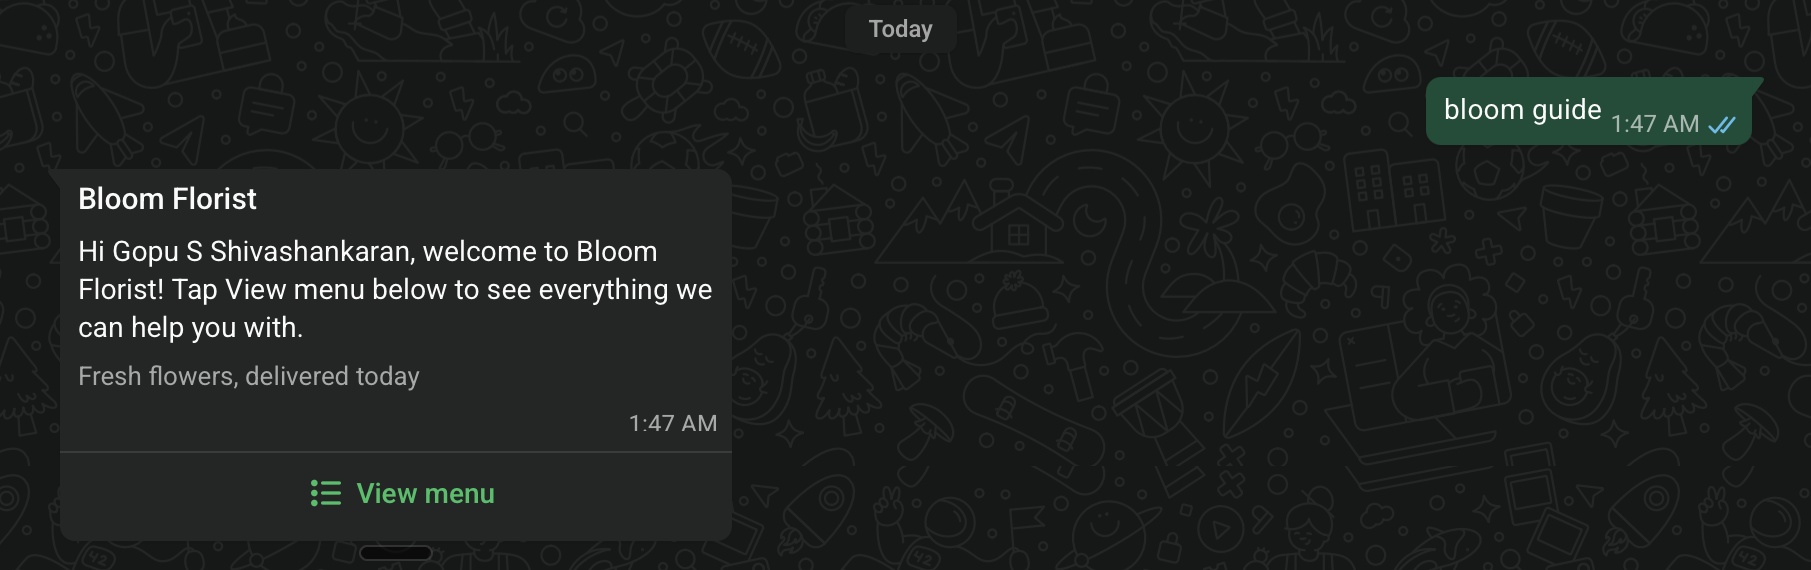 The customer sends your keyword, and your welcome message arrives with a View menu button
When they tap View menu, your menu opens:
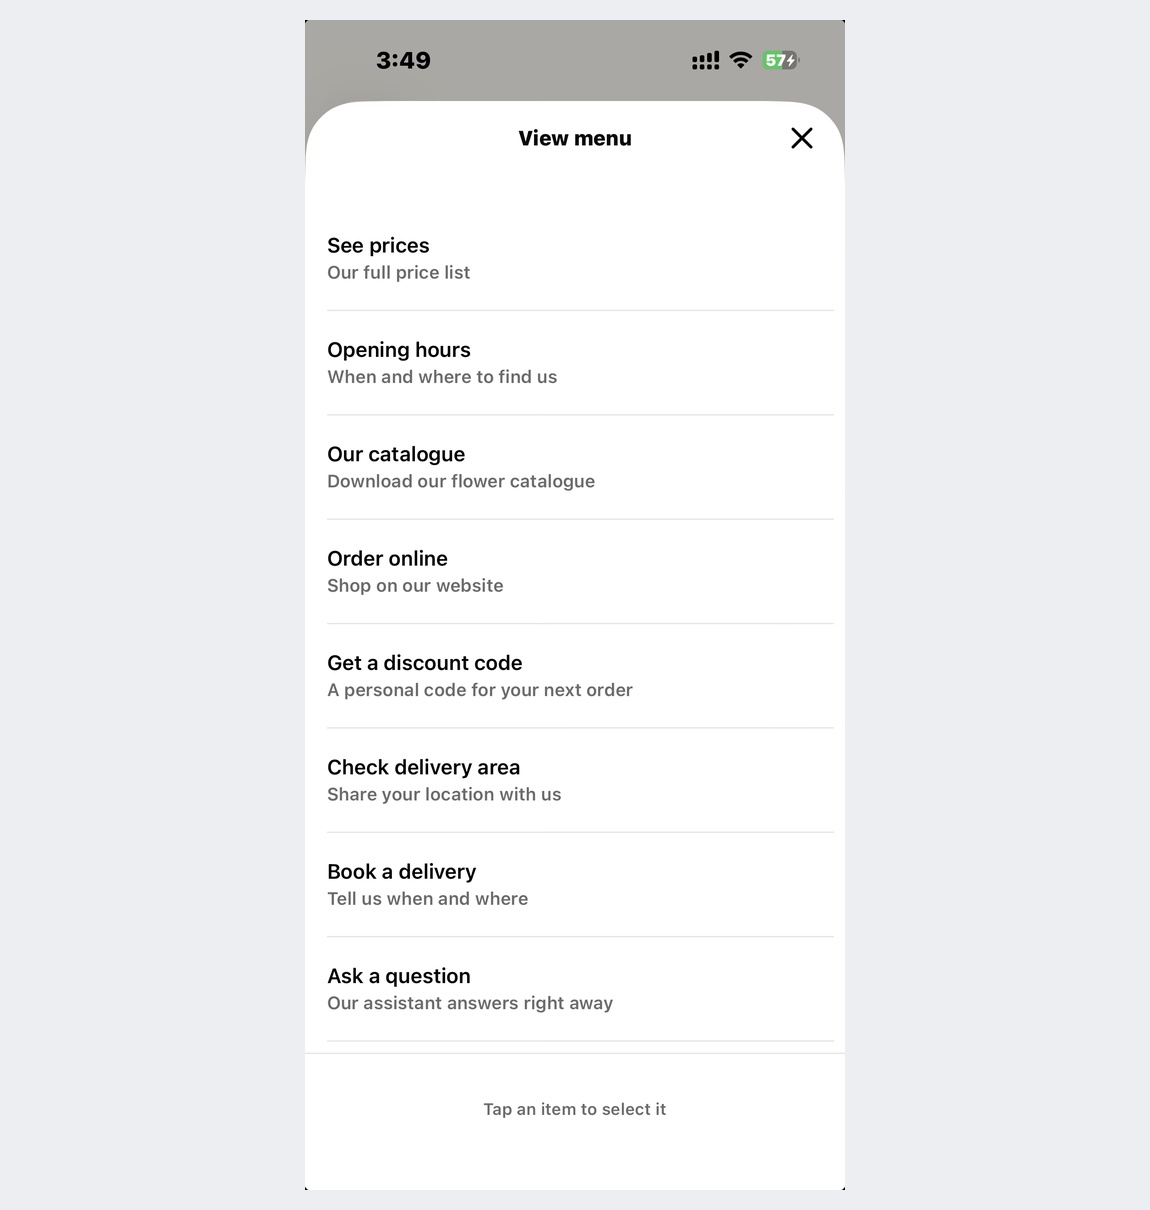 Each line is one menu option
Step 0: Plan Your Menu (2 minutes)
Before you click anything, decide what goes in your menu. Think about the questions customers ask you most. Each one becomes a menu option.
Use this table as your guide. The middle column shows our example. Write your own option next to each row you want, and skip the rest.
| If customers ask for... | Our example option | Part |
|---|---|---|
| Your prices | See prices | 4 |
| Your hours or address | Opening hours | 5 |
| A catalogue or brochure | Our catalogue | 6 |
| A way to order online | Order online | 7 |
| A discount | Get a discount code | 8 |
| Whether you serve their area | Check delivery area | 9 |
| Any other question | Ask a question | 10 |
| A booking | Book a delivery | 11 |
| A real person | Talk to us | 12 |
A menu can hold up to 10 options. You can change them any time.
Before You Start
- Your WhatsApp number is connected to WhatChimp. If not, see How to Connect Your Phone Number with WhatChimp.
- You are on a computer, not a phone. You build by dragging with the mouse.
- You have what your options send ready, such as a price list picture, a PDF or your website link.
The Three Moves You Will Use
You only need three moves to build a chatbot.
1. Add a block. A block is one step, such as "send a picture". Drag it from the list on the left onto the empty space on the right.
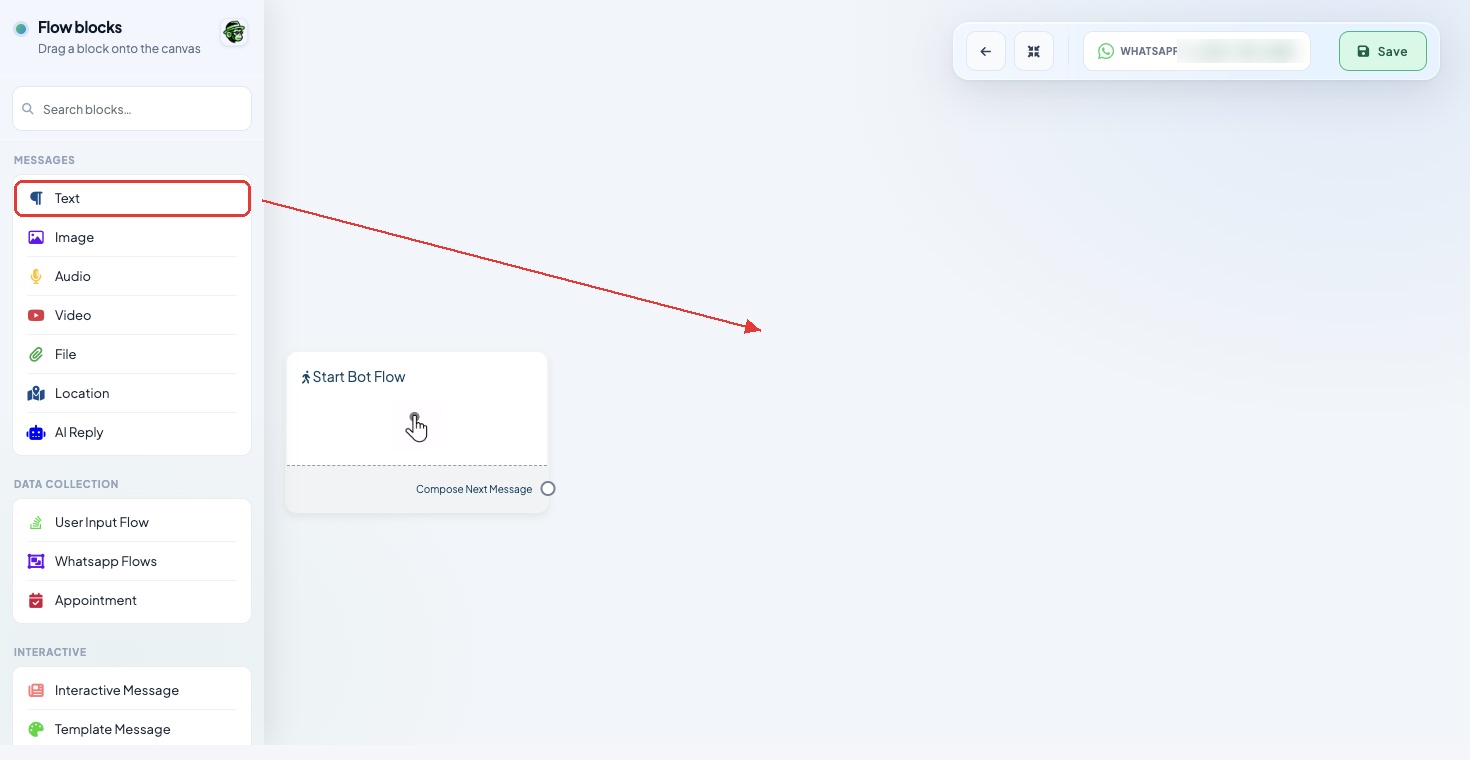 Drag a block from the left list onto the empty space
2. Join two blocks. Each block has small dots. Drag from a dot on the right of one block to the dot on the left of the next. A line appears, and the chatbot follows the line.
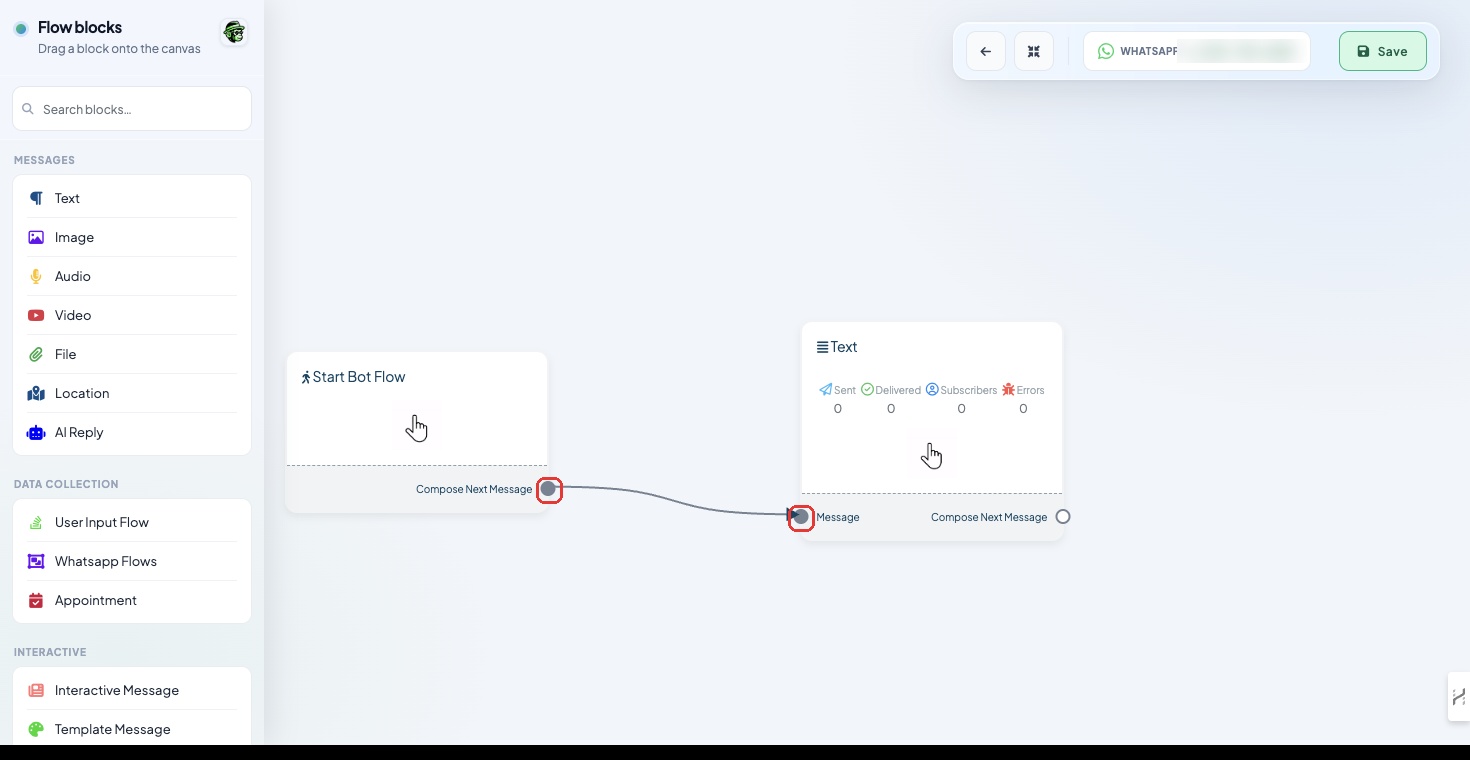 Right dot of one block, to the left dot of the next
3. Save. Each block's settings have a Save Changes button. The whole chatbot saves with the green Save button at the top right. Click it at the end of every part.
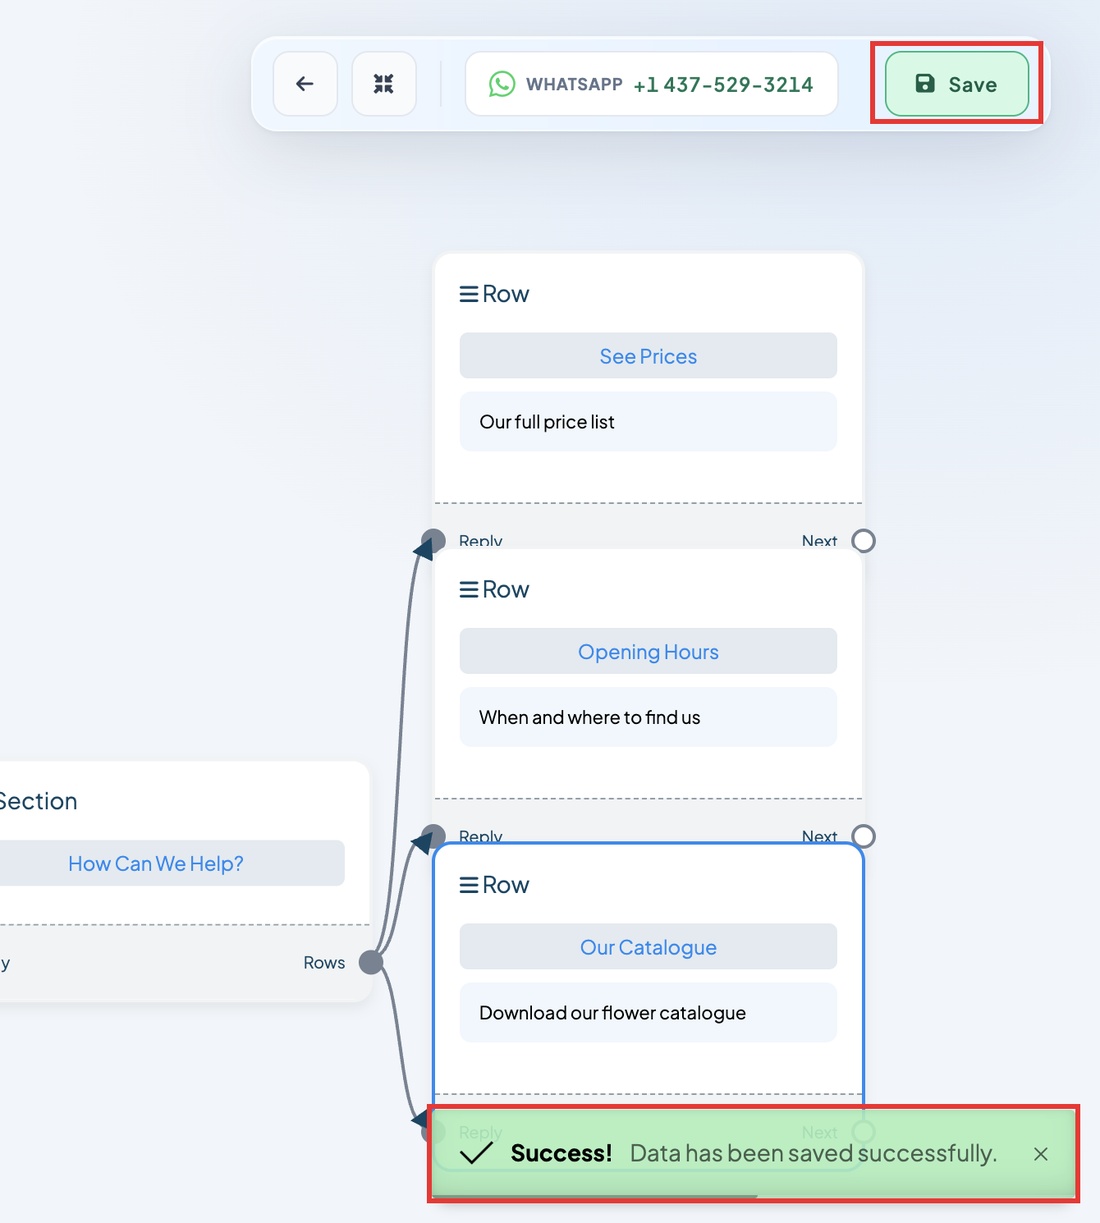 Top right: Save. Bottom right: your work is saved
Part 1: Choose Your Keyword (about 3 minutes)
Your keyword is the word customers send to start your chatbot, for example your shop name plus "menu".
Step 1. Follow the numbers in this picture to open Keyword Replies, then click Create.
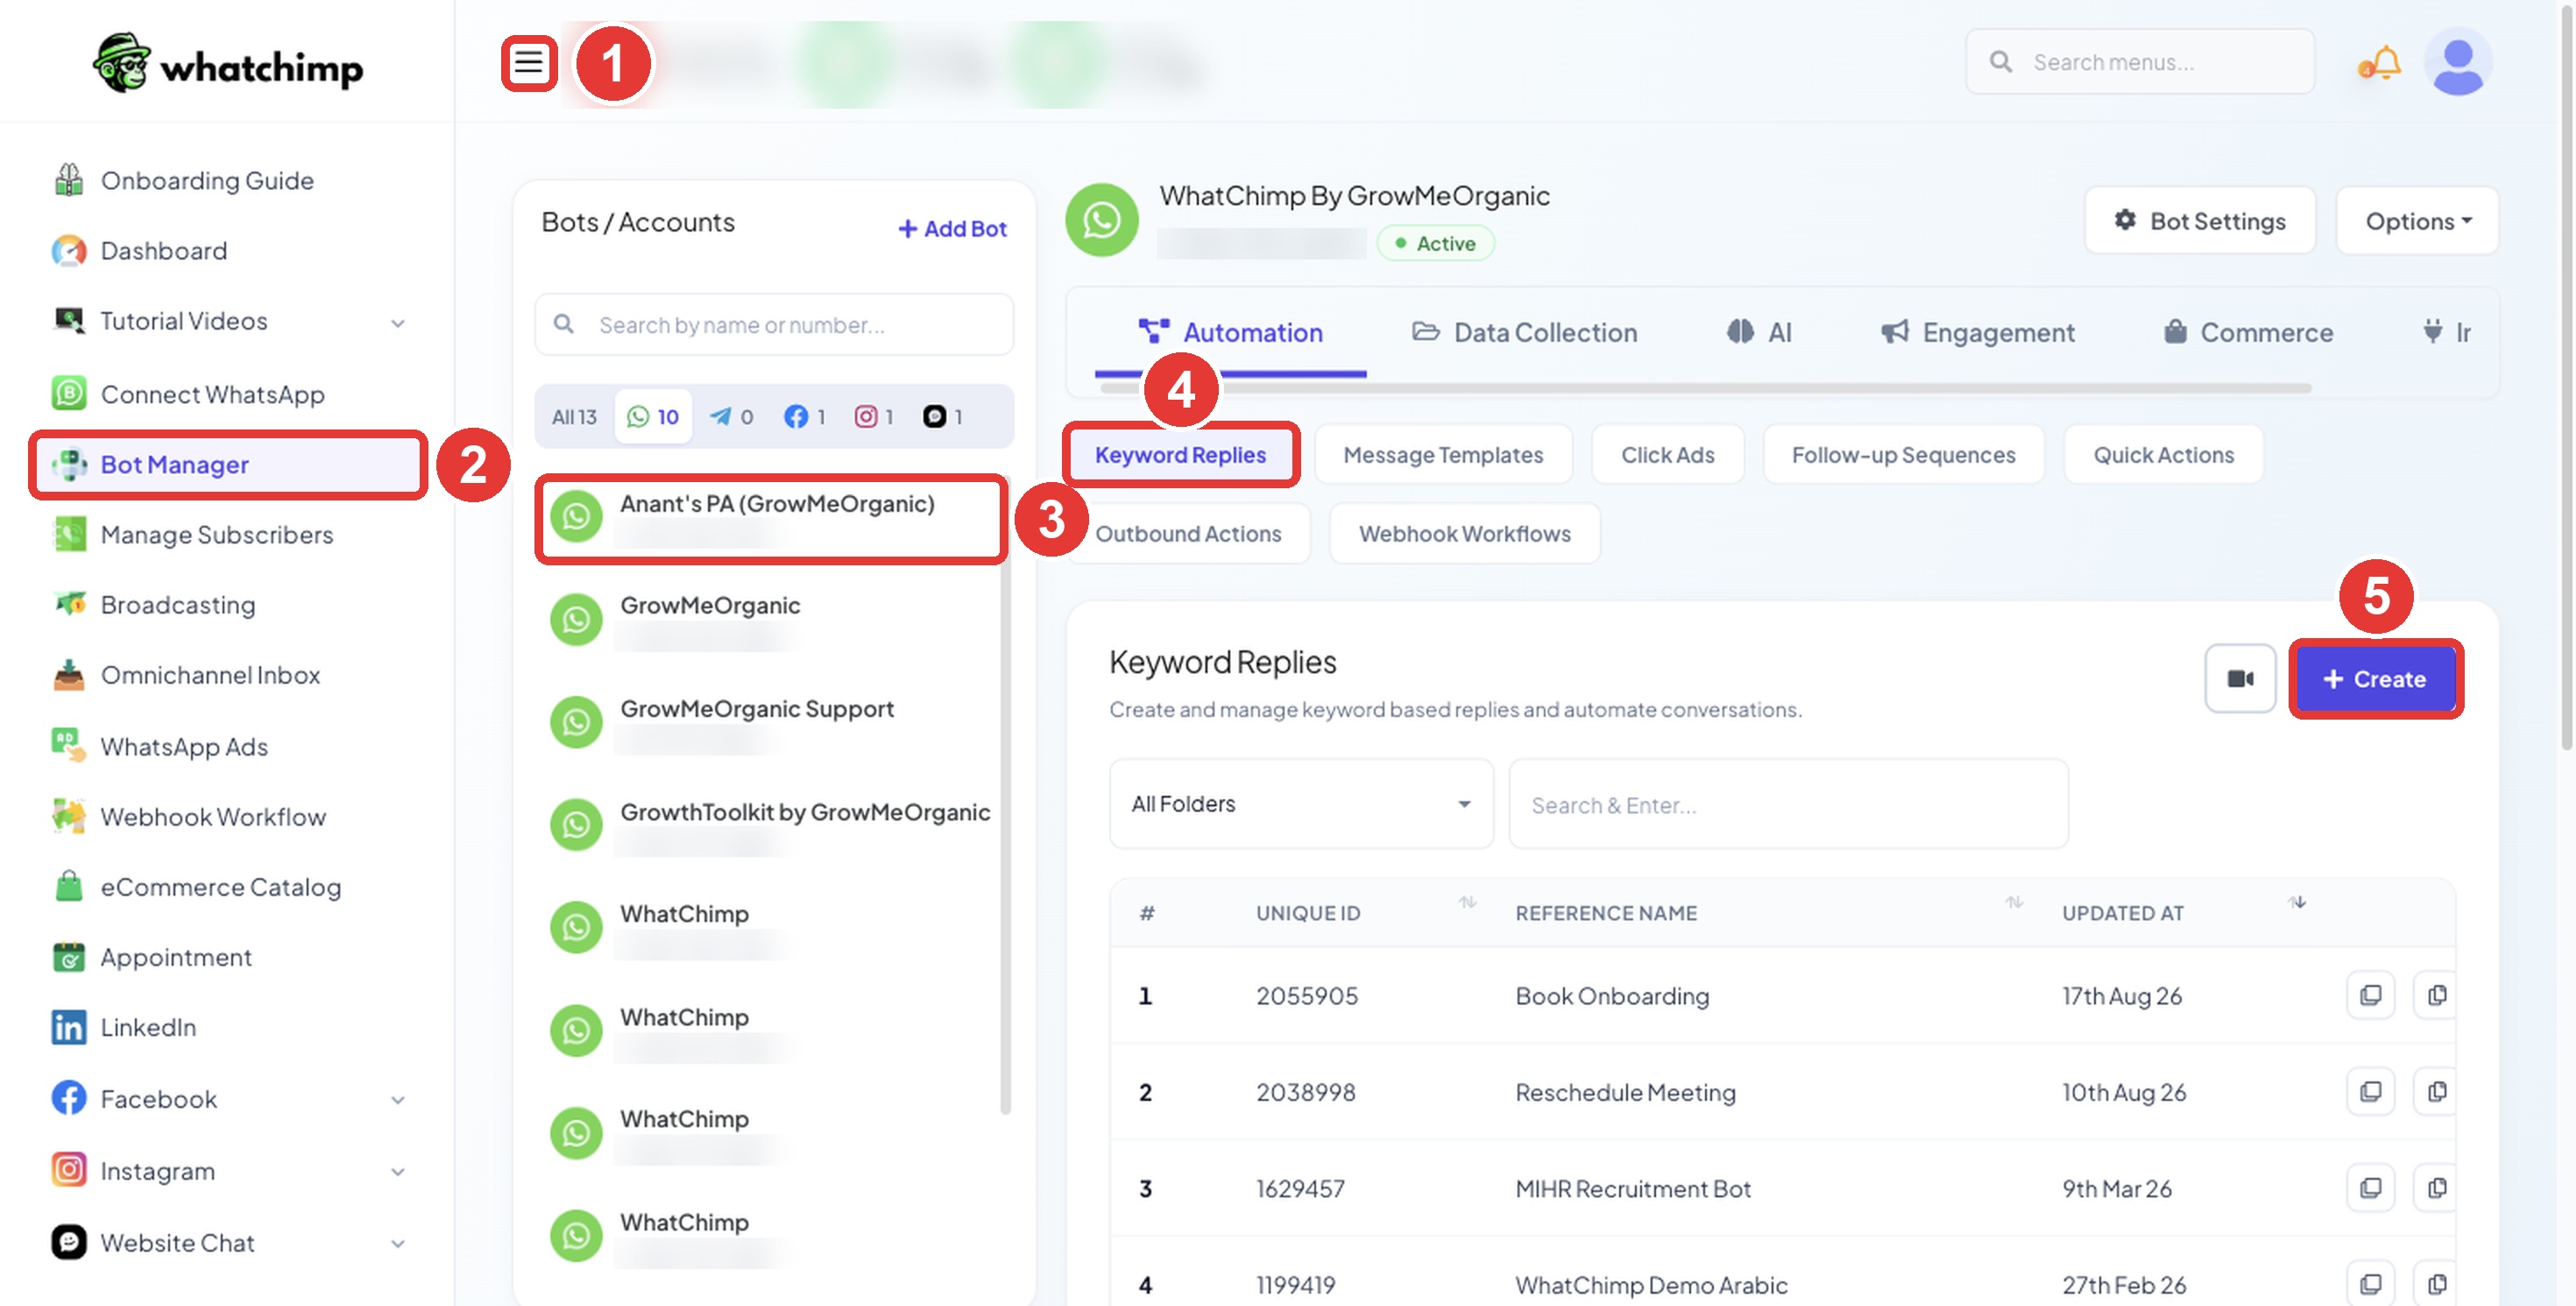 Follow the numbers 1 to 5
Step 2. The chatbot builder opens in a new tab. Double-click the Start Bot Flow block.
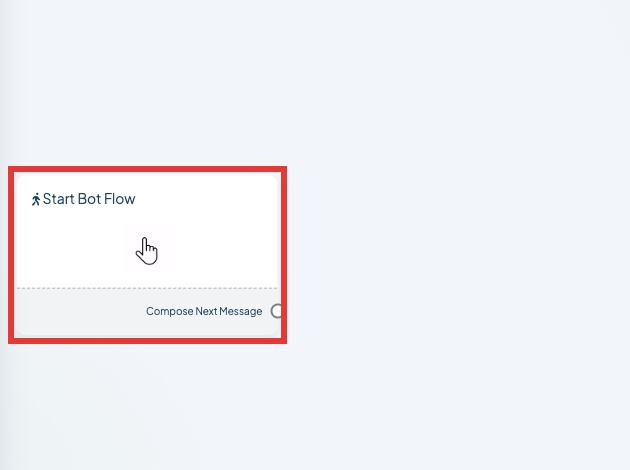 Double-click this block
Step 3. In Trigger Keywords, type your keyword. (Our example: bloom guide)
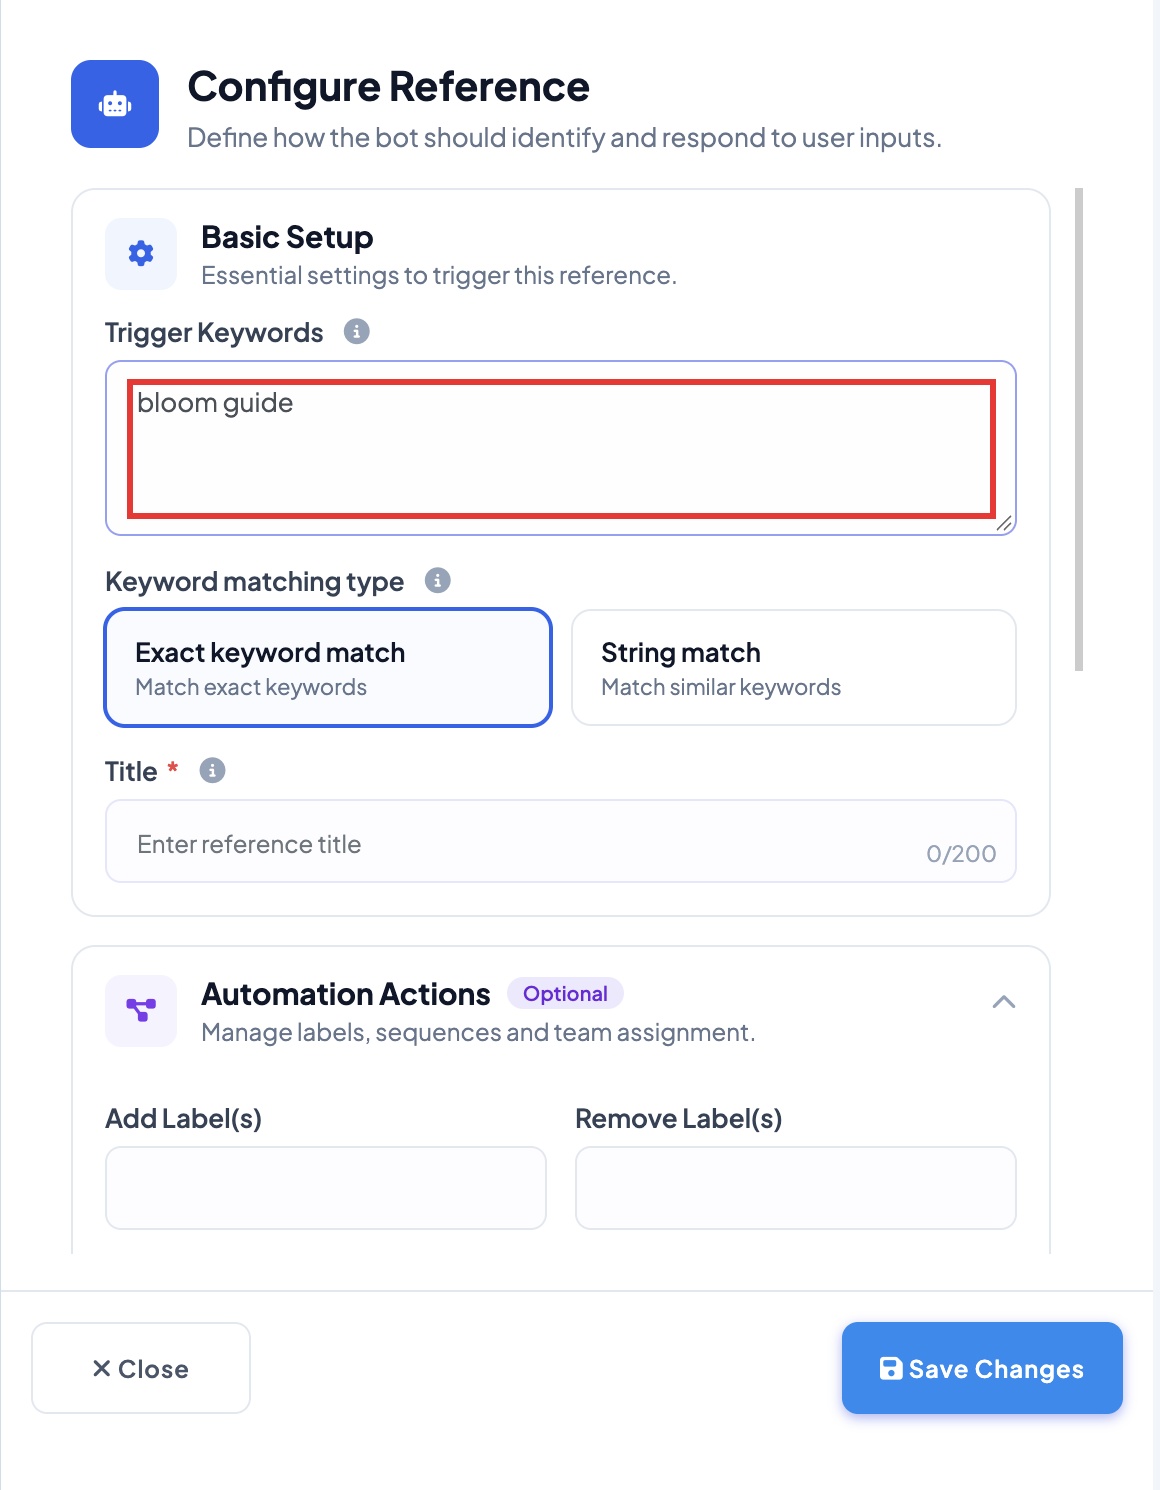 Type your keyword here
Step 4. Click Exact keyword match, even if it already looks selected.
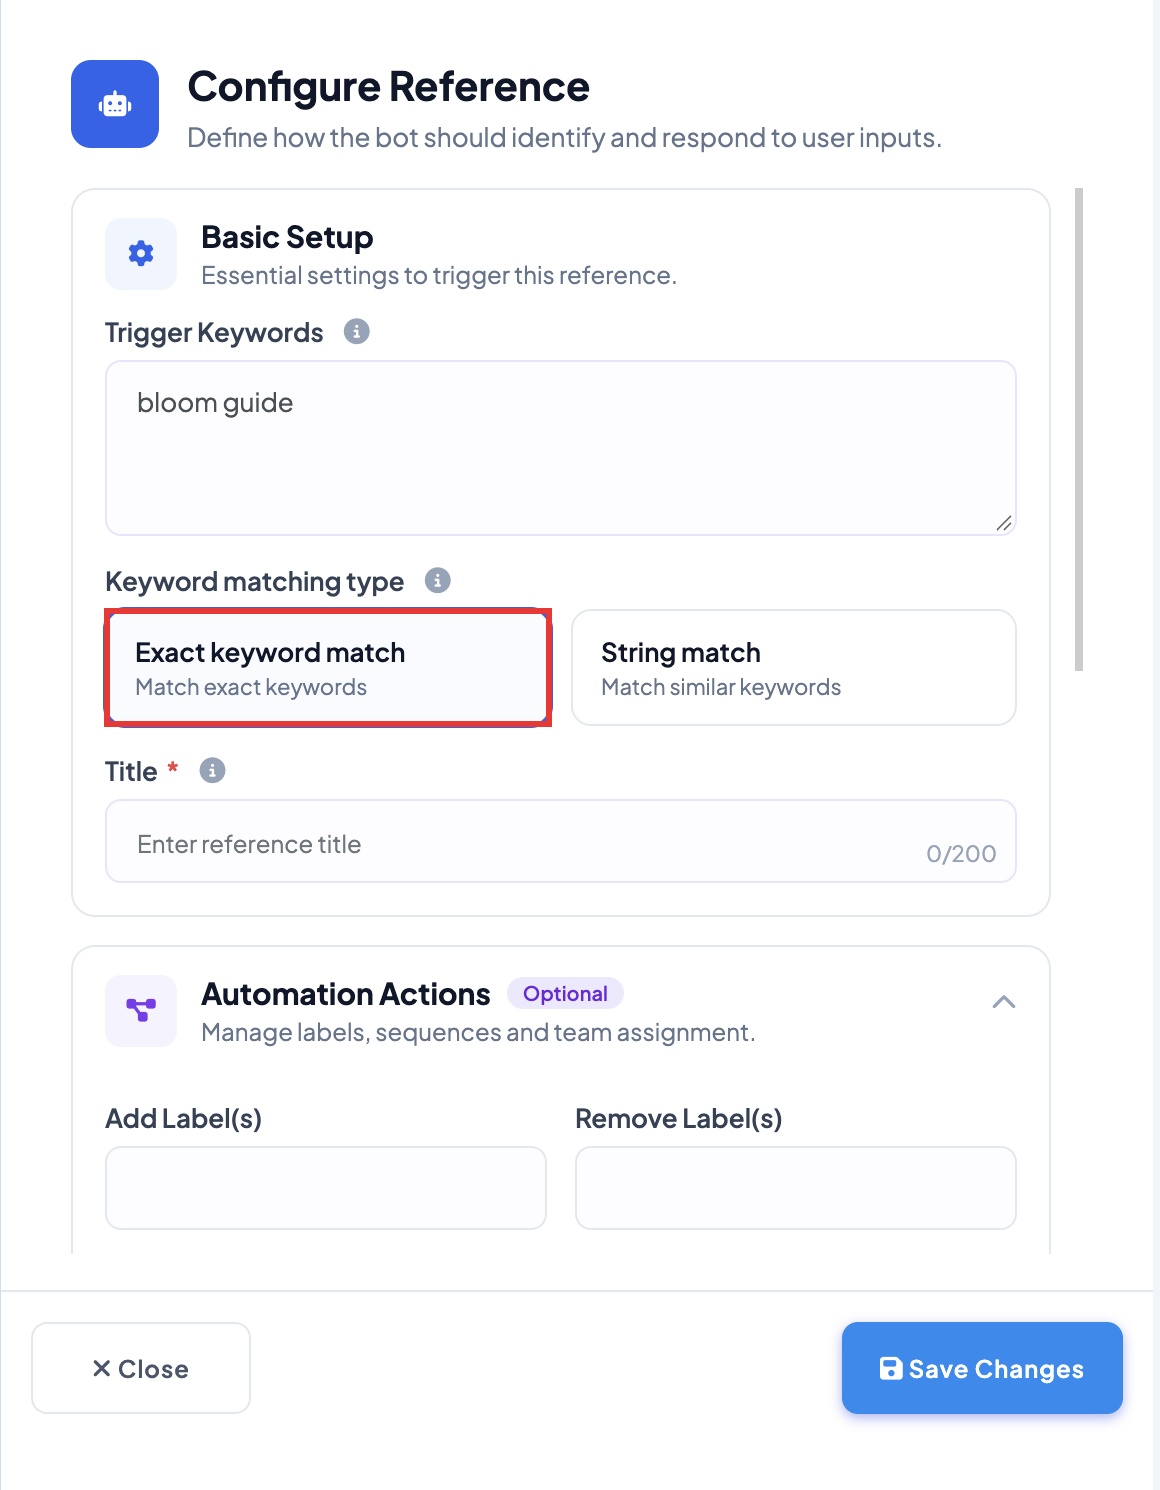 The chatbot starts only when the customer sends exactly your keyword
Step 5. In Title, type a name only you will see. (Our example: Bloom Florist Guide) Then click Save Changes.
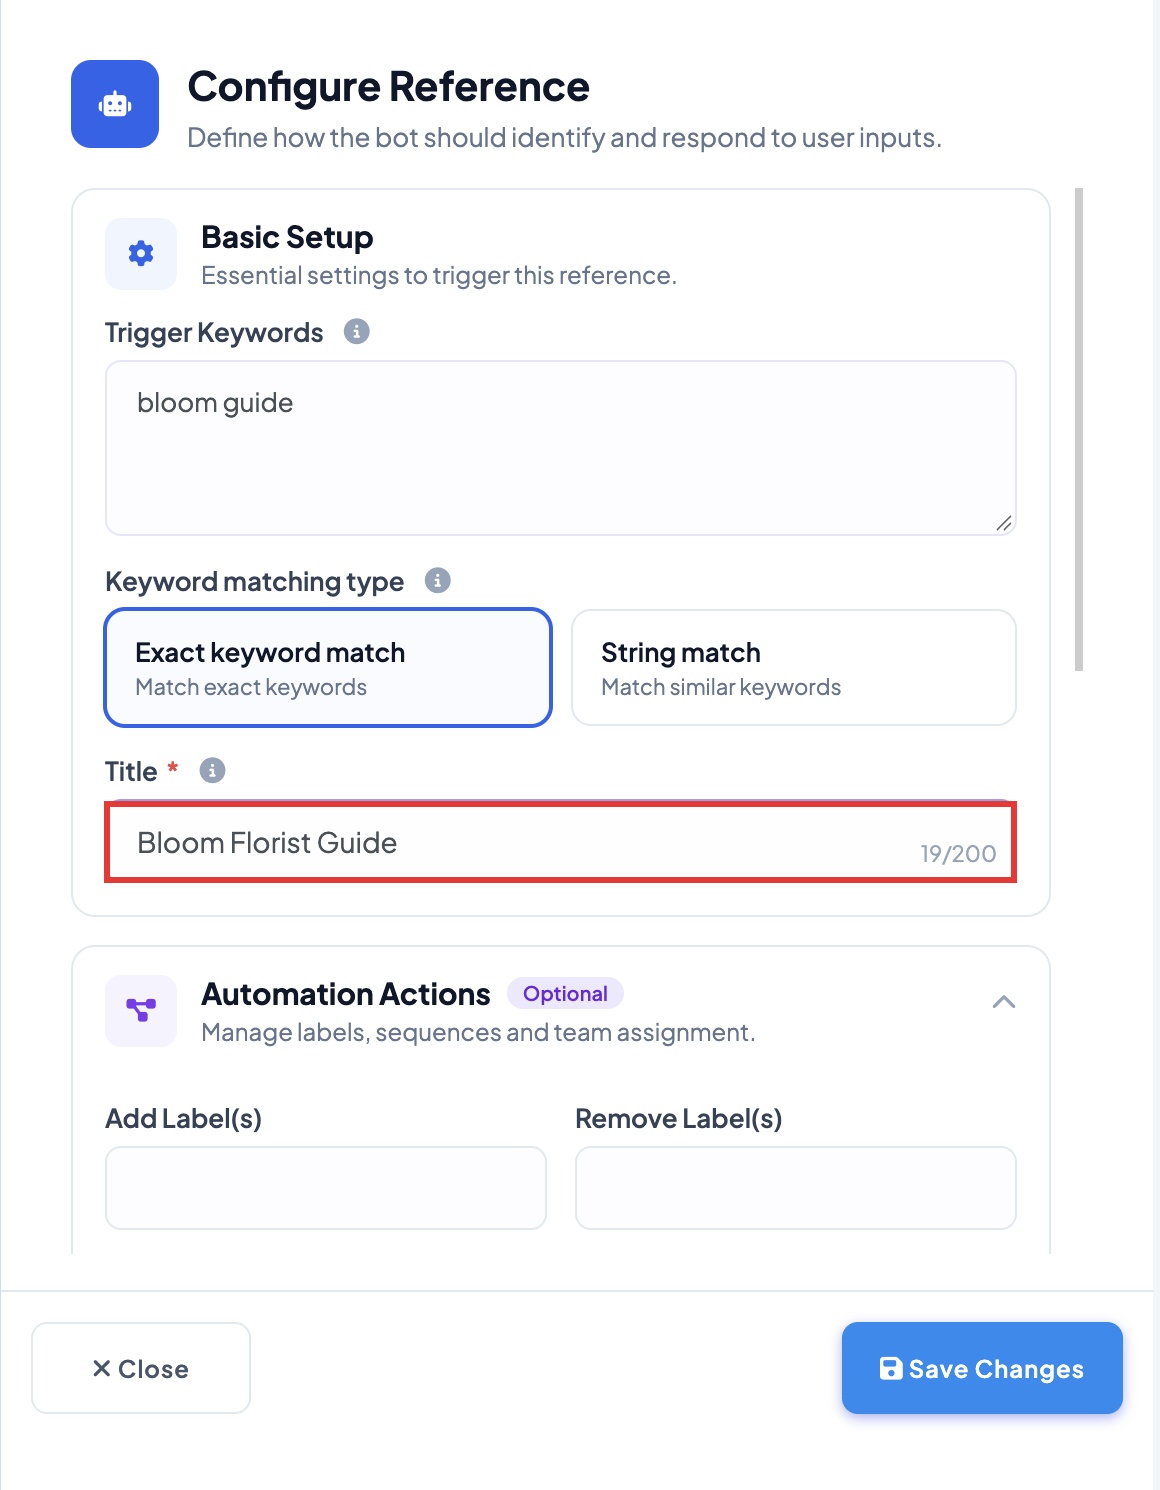 Customers never see the title
Step 6. Your keyword now shows on the block.
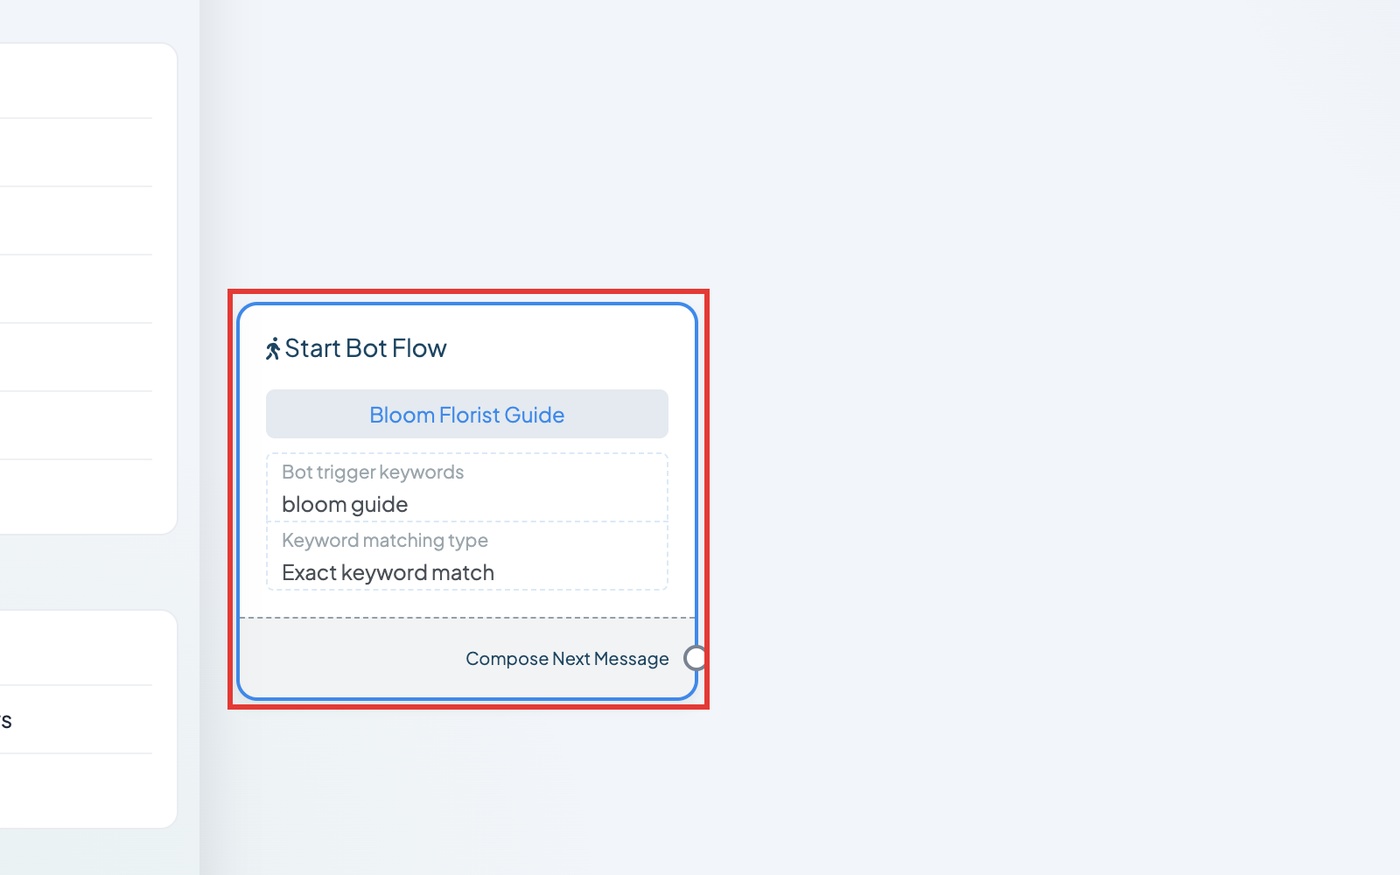 Your keyword is set
Watch out: if you click the green Save button now, you see "Please add some more components." That is normal. Go on to Part 2.
Part 2: Write Your Welcome Message (about 5 minutes)
This is the first message your customers get. It greets them by name and holds the menu button.
Step 1. Find Interactive Message in the list on the left. Drag it onto the empty space, to the right of Start Bot Flow.
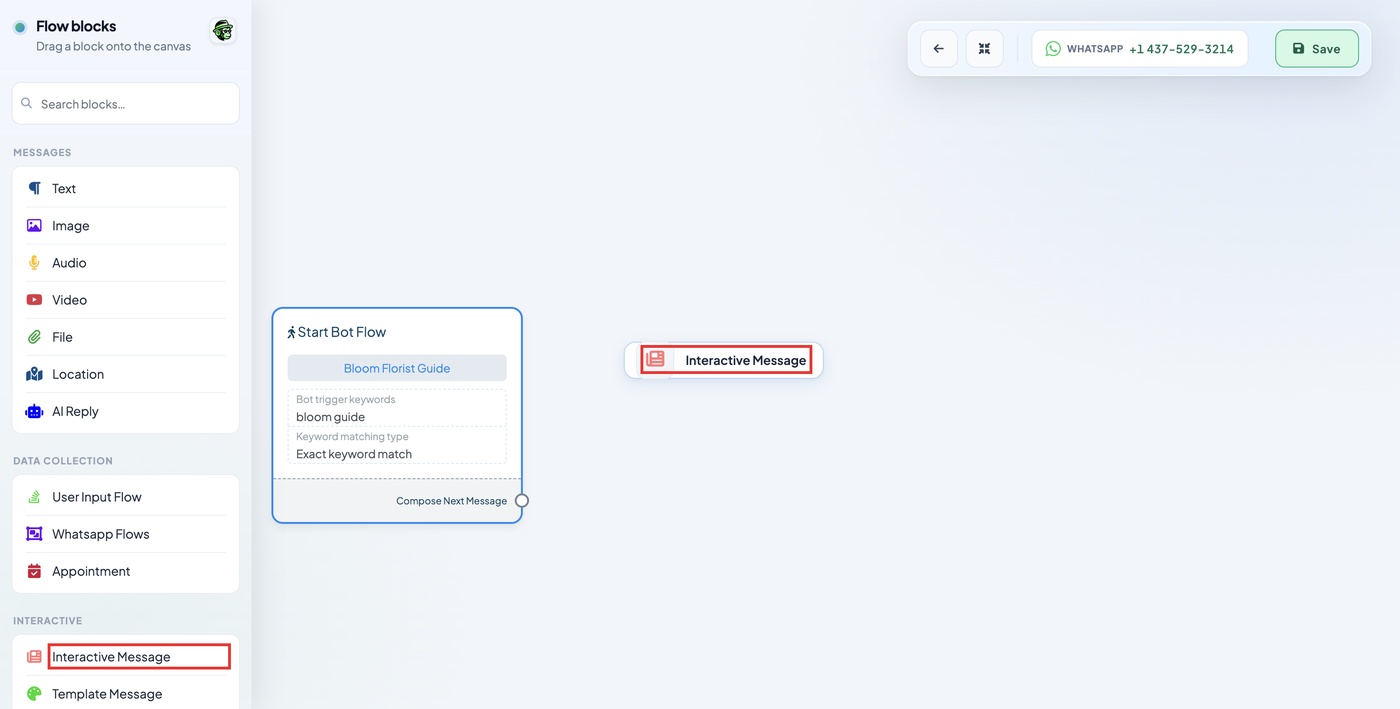 Left box: the block in the list. Right box: the block as you drag it
Step 2. Let go. The block appears.
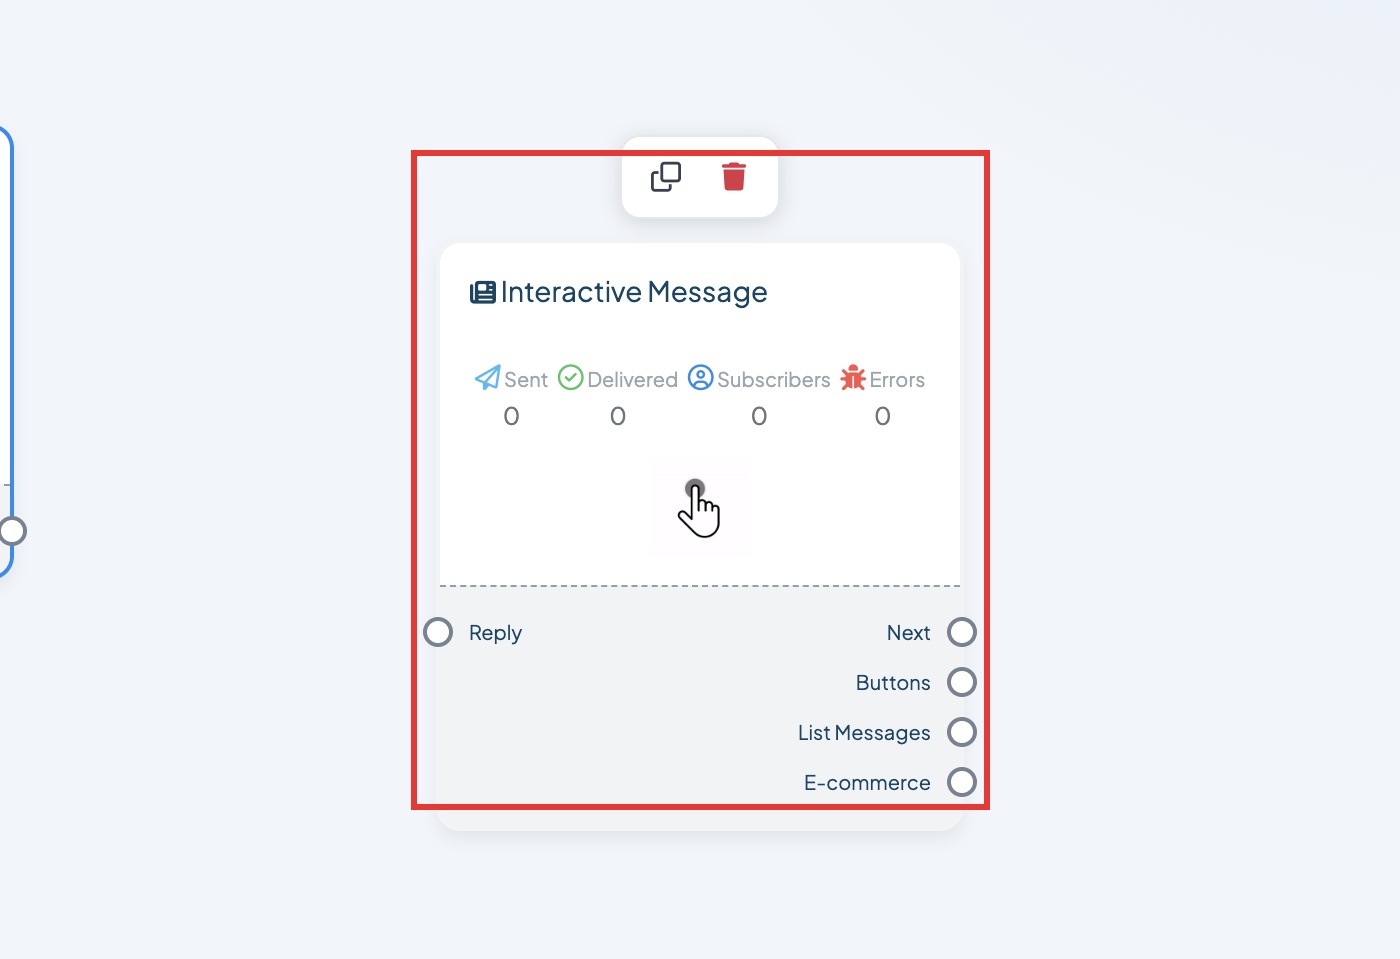 The new block, not joined yet
Step 3. Drag from the Compose Next Message dot on Start Bot Flow towards the Reply dot on the new block.
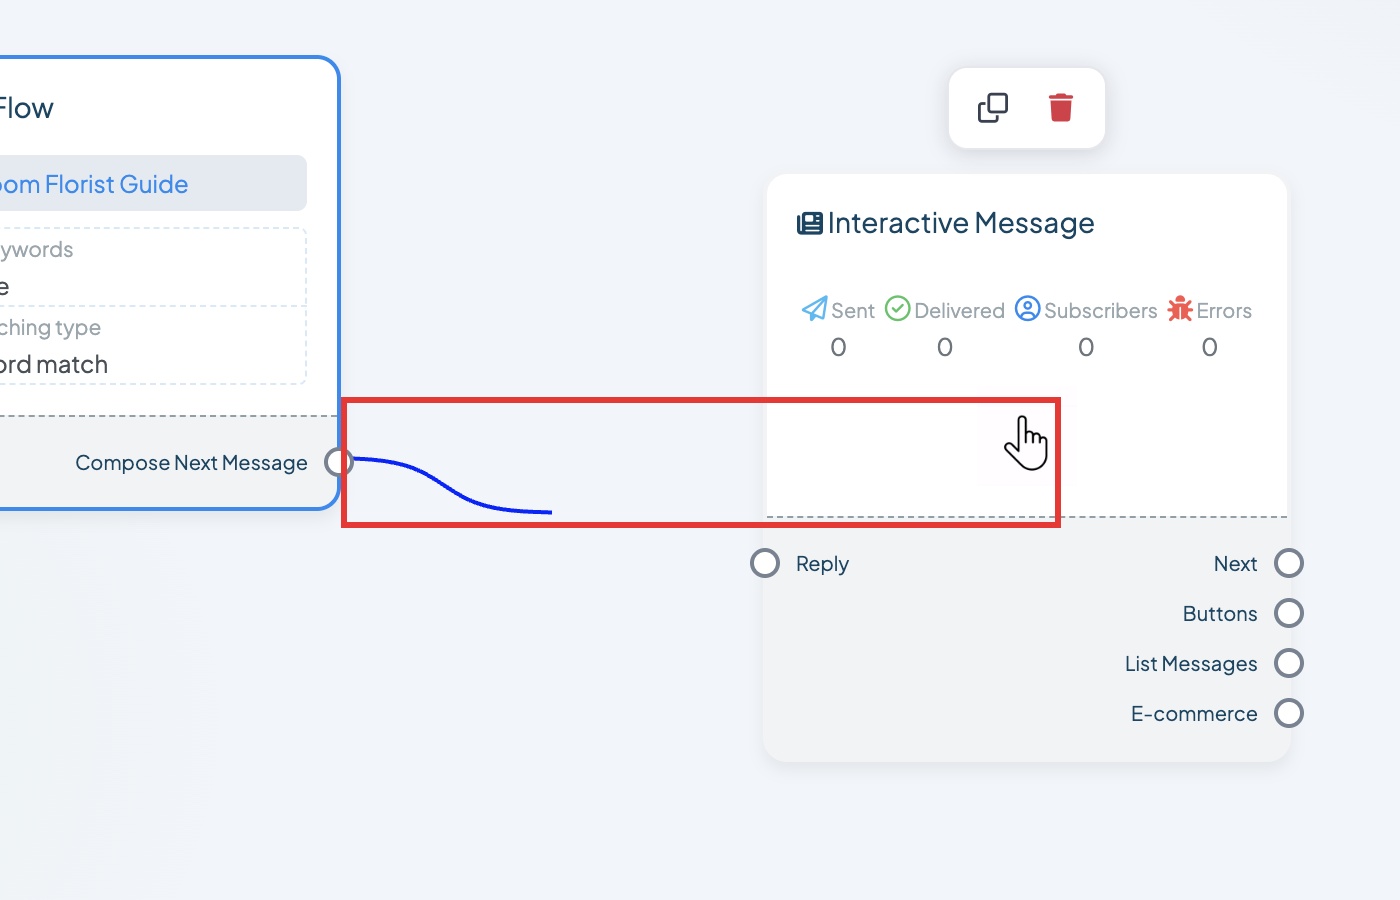 A line follows your mouse
Step 4. Let go on the Reply dot. The blocks are joined, and the settings open on the left.
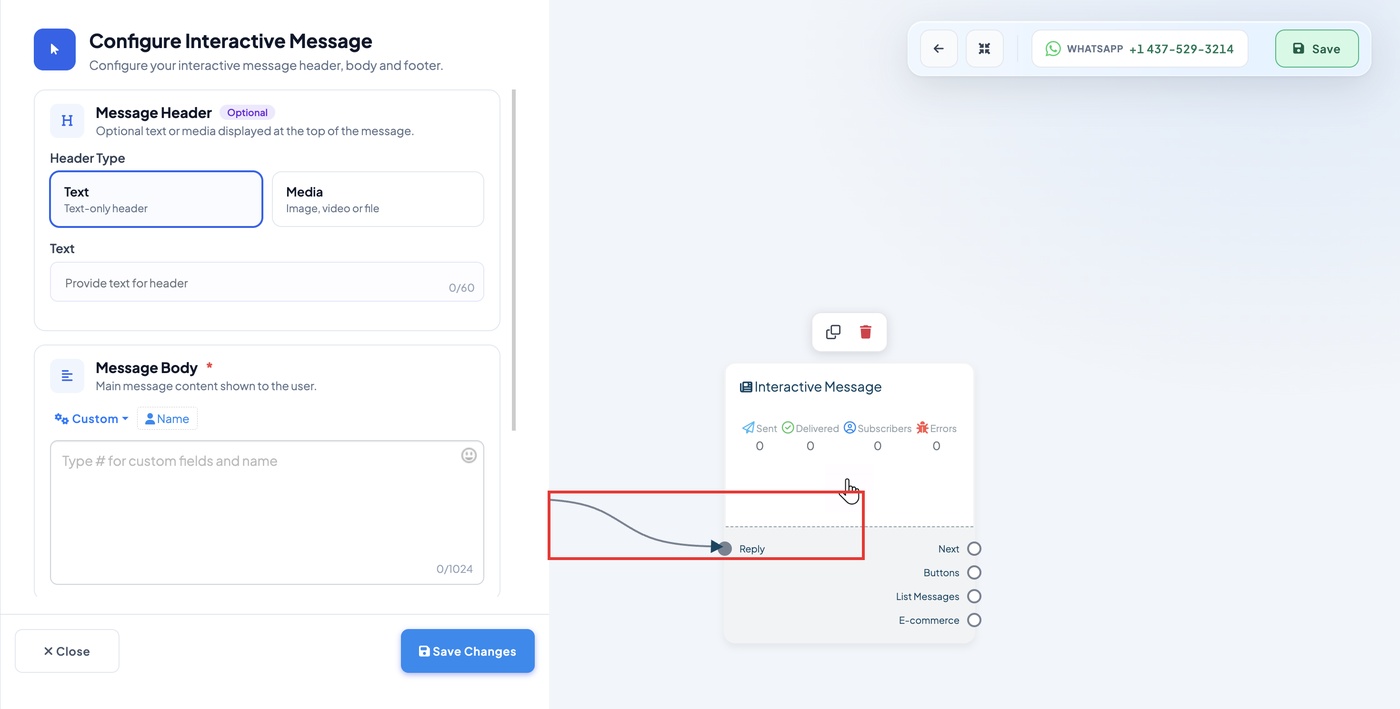 Your keyword now leads to this message
Step 5. In Message Header, type your business name. (Our example: Bloom Florist)
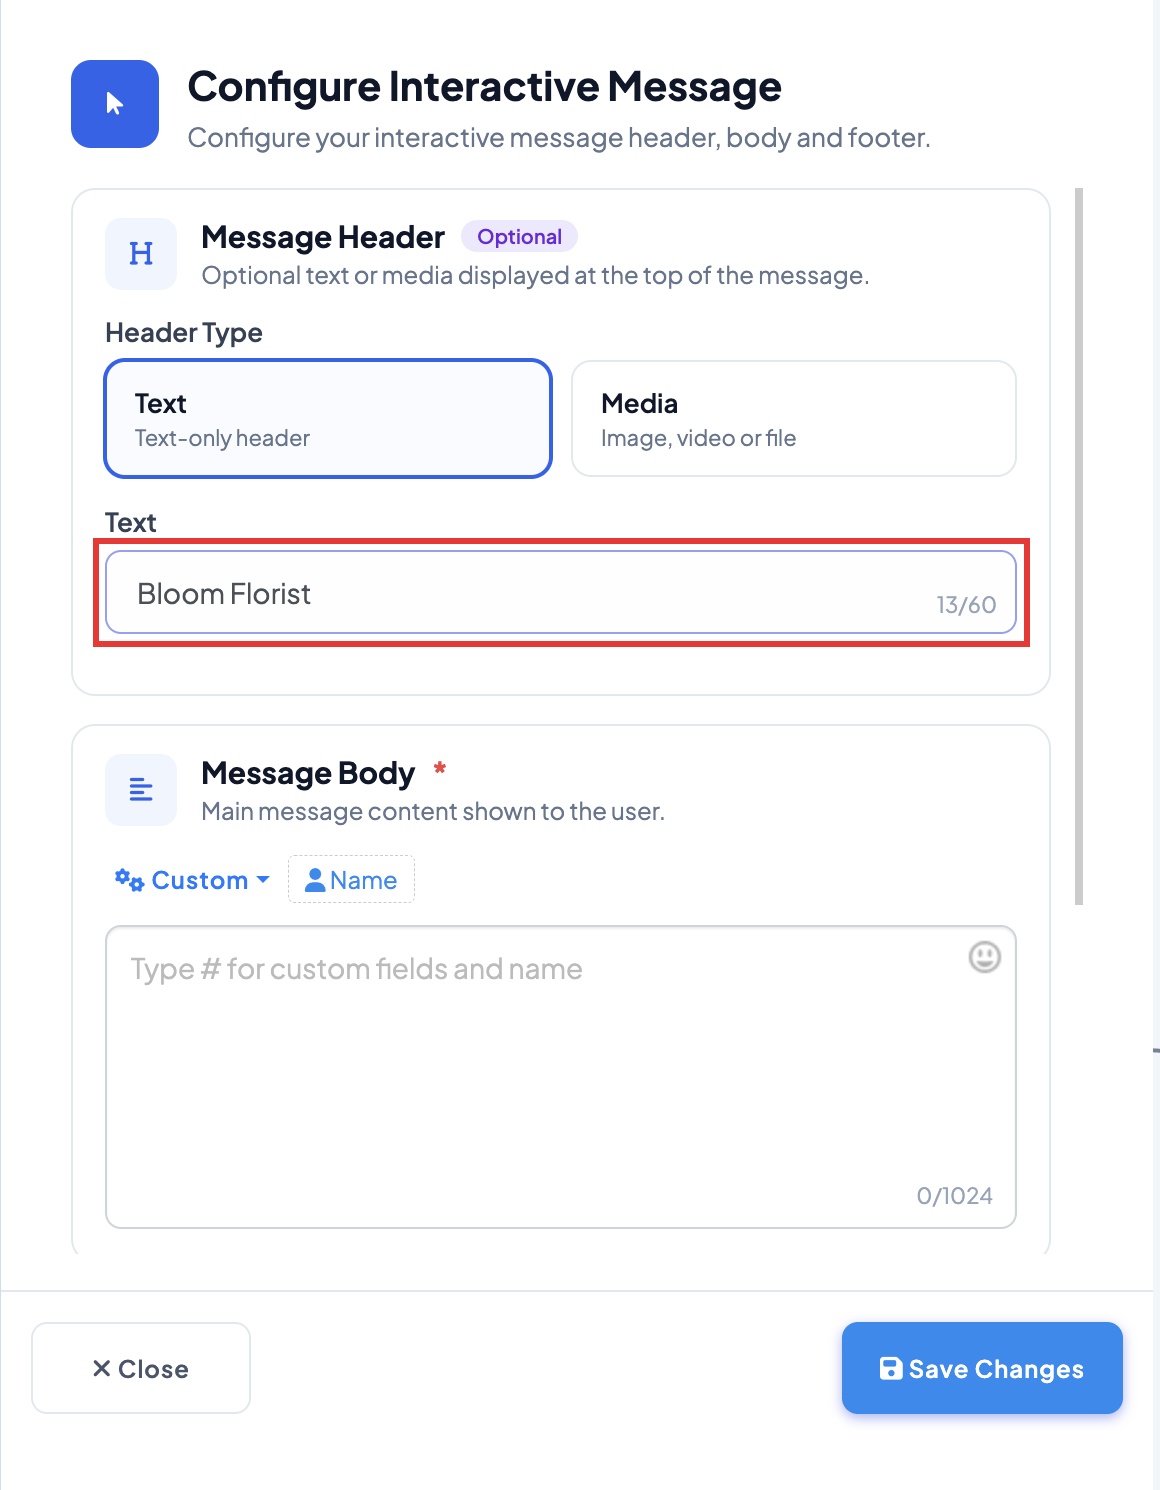 Shows in bold at the top of the message
Step 6. Click in Message Body and type Hi. Then click the Name button. It adds the customer's WhatsApp name to your message.

Watch out: always use the Name button. If you type #name yourself, customers see "#name" instead of their name.
Step 7. Finish your welcome message. Tell customers to tap View menu.
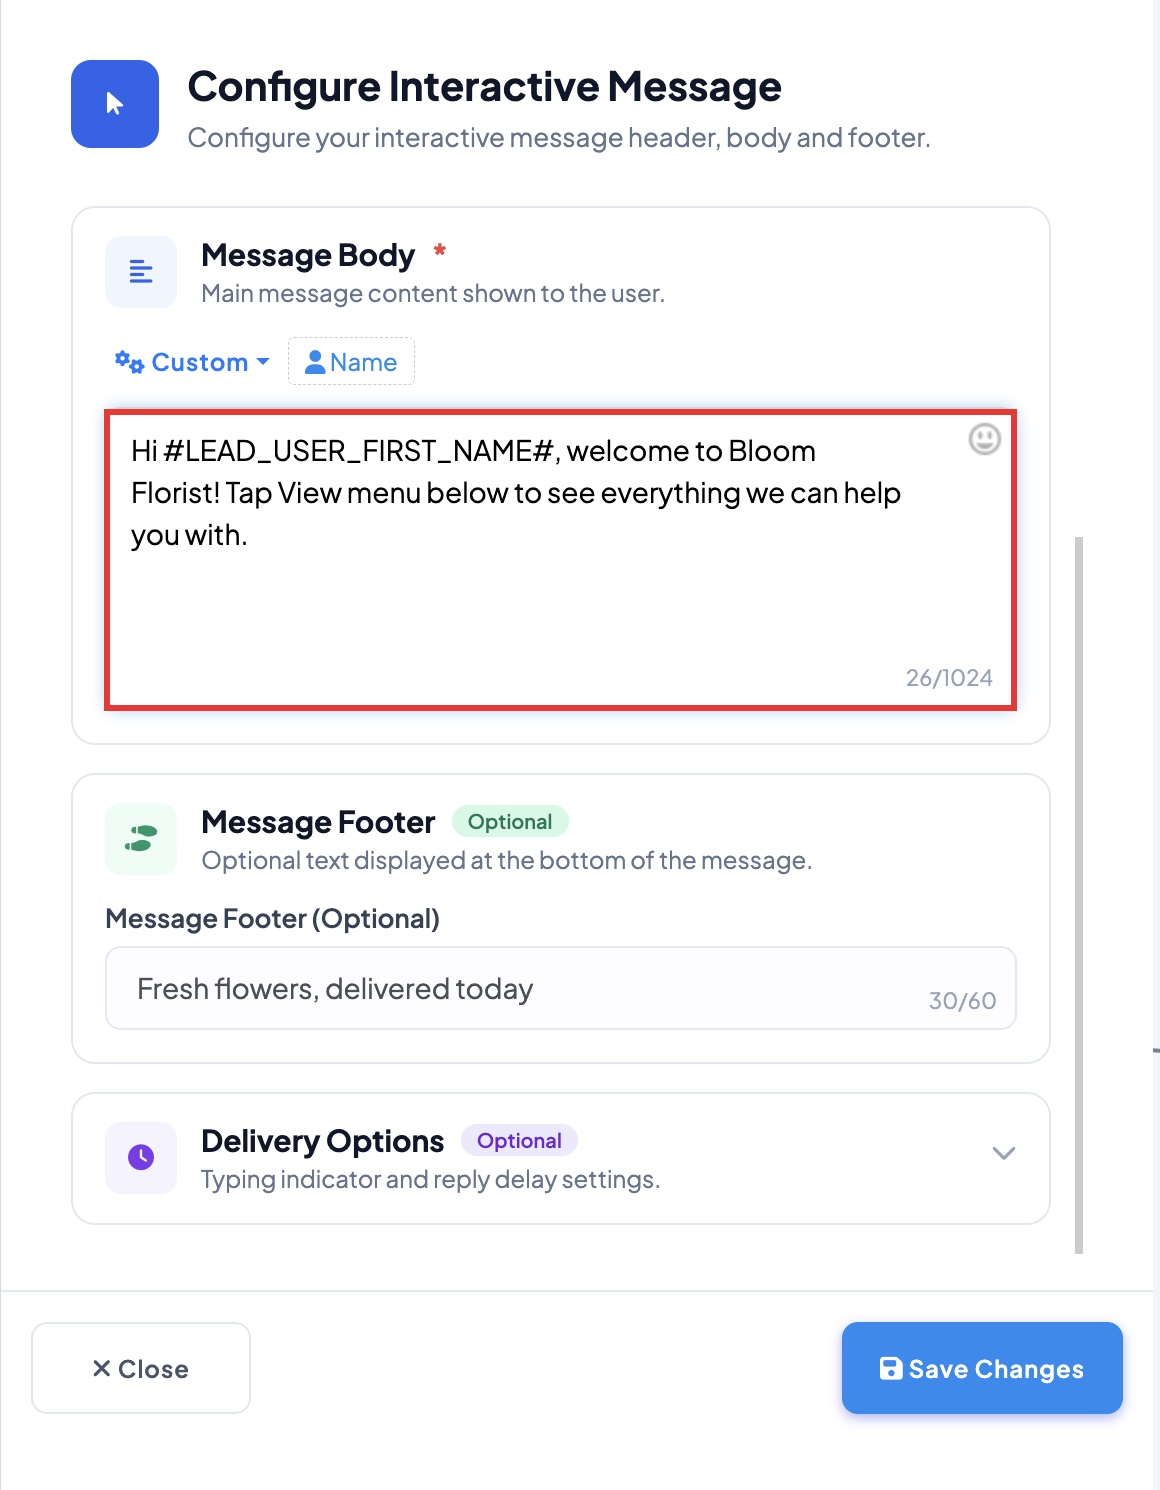 Tell the customer what to do next
Step 8. In Message Footer, type a short line if you want one. (Our example: Fresh flowers, delivered today)
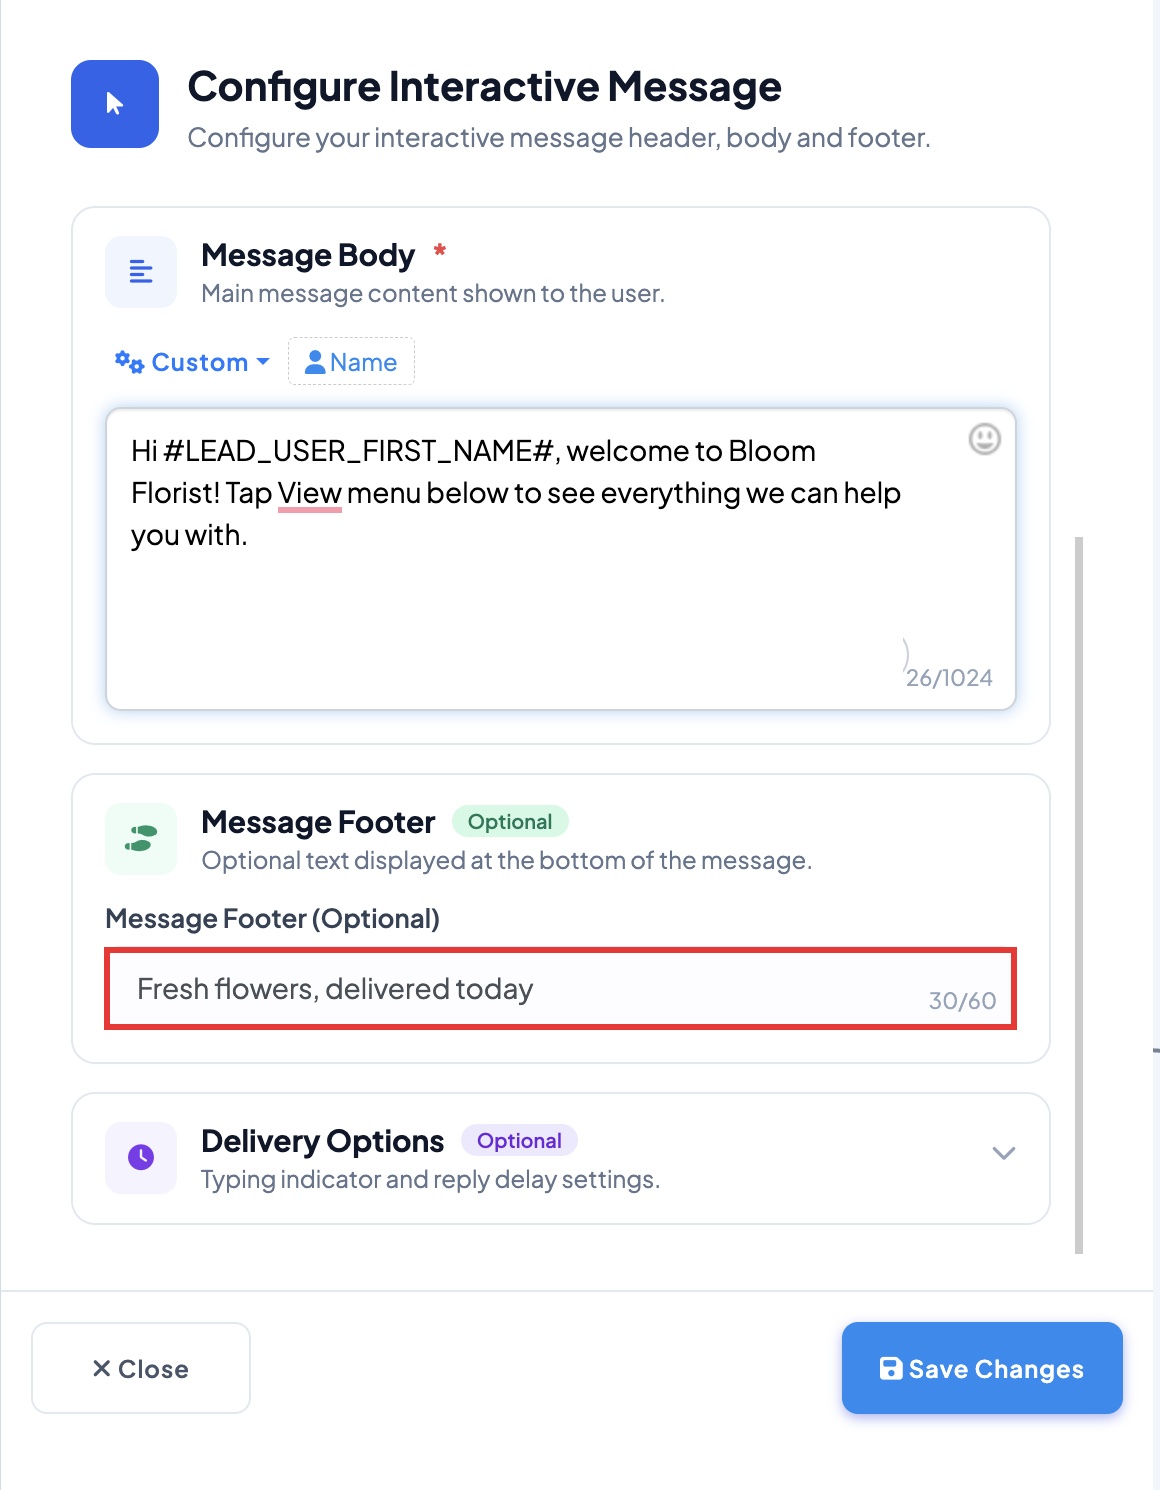 Optional small grey text at the bottom
Step 9. Scroll down and click Delivery Options.
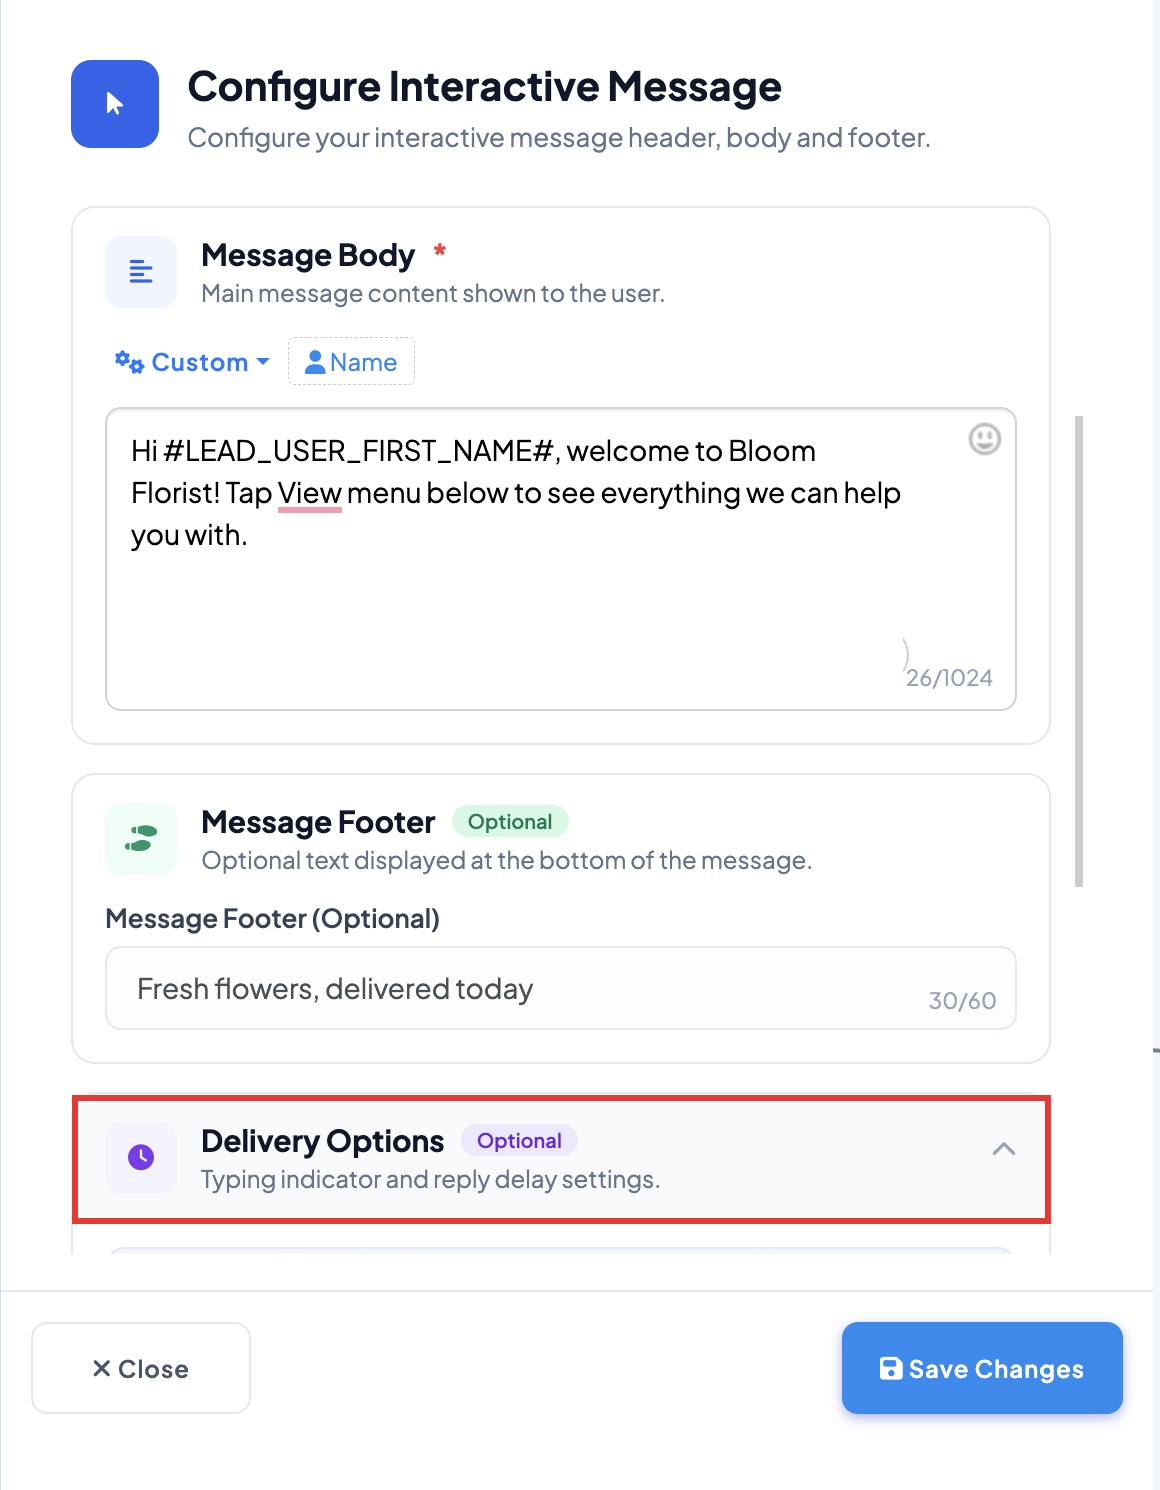 Click to open it
Step 10. Turn on Typing on display and set Seconds to 2. Customers see "typing..." first, so the reply feels more personal.
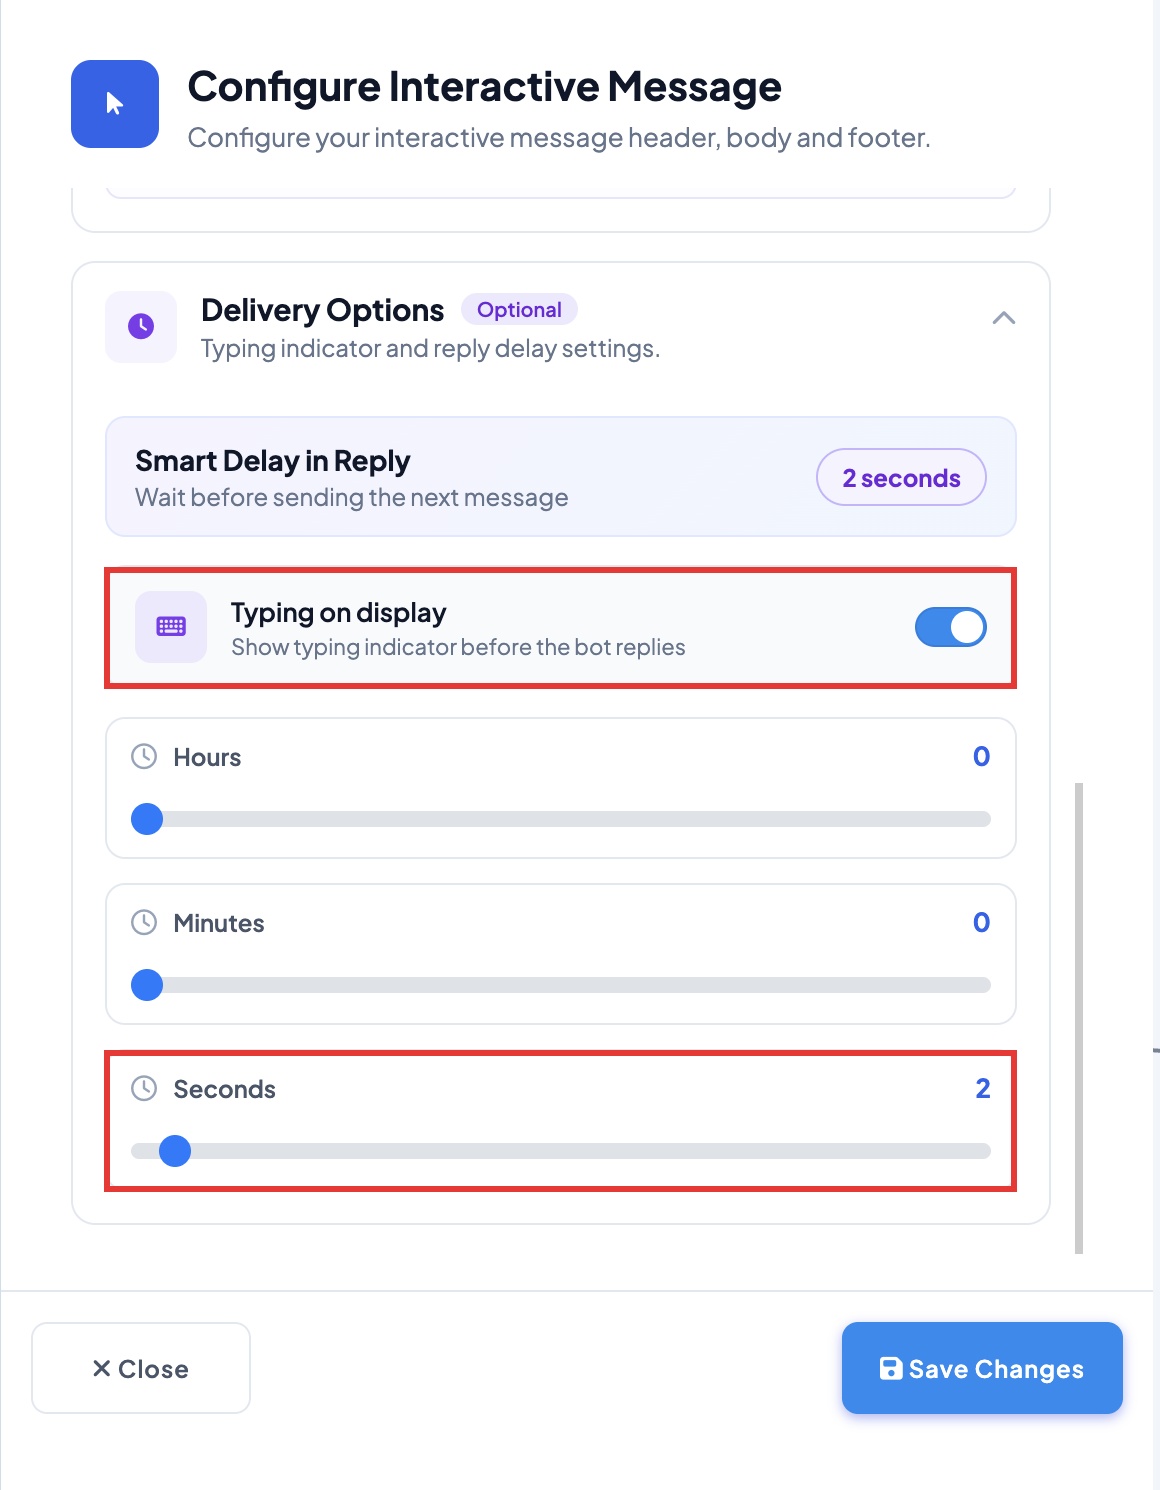 Typing on display, with a 2 second wait
Step 11. Click Save Changes.
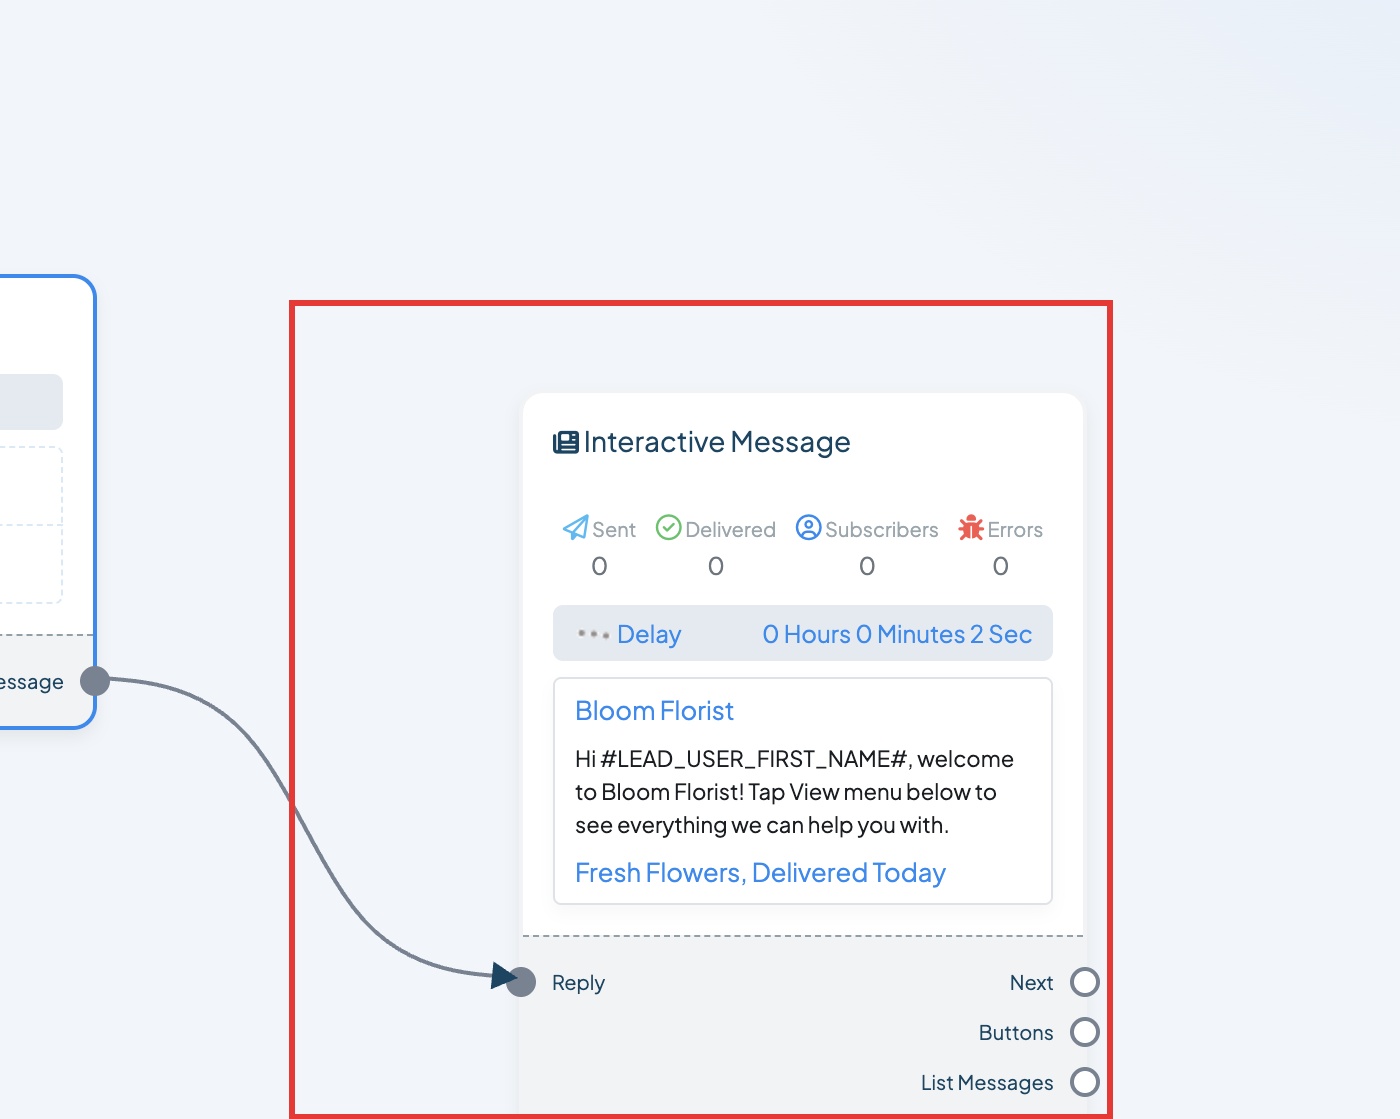 Your welcome message is ready
Watch out: if you click the green Save button now, you see this warning. That is normal. It goes away in Part 3.
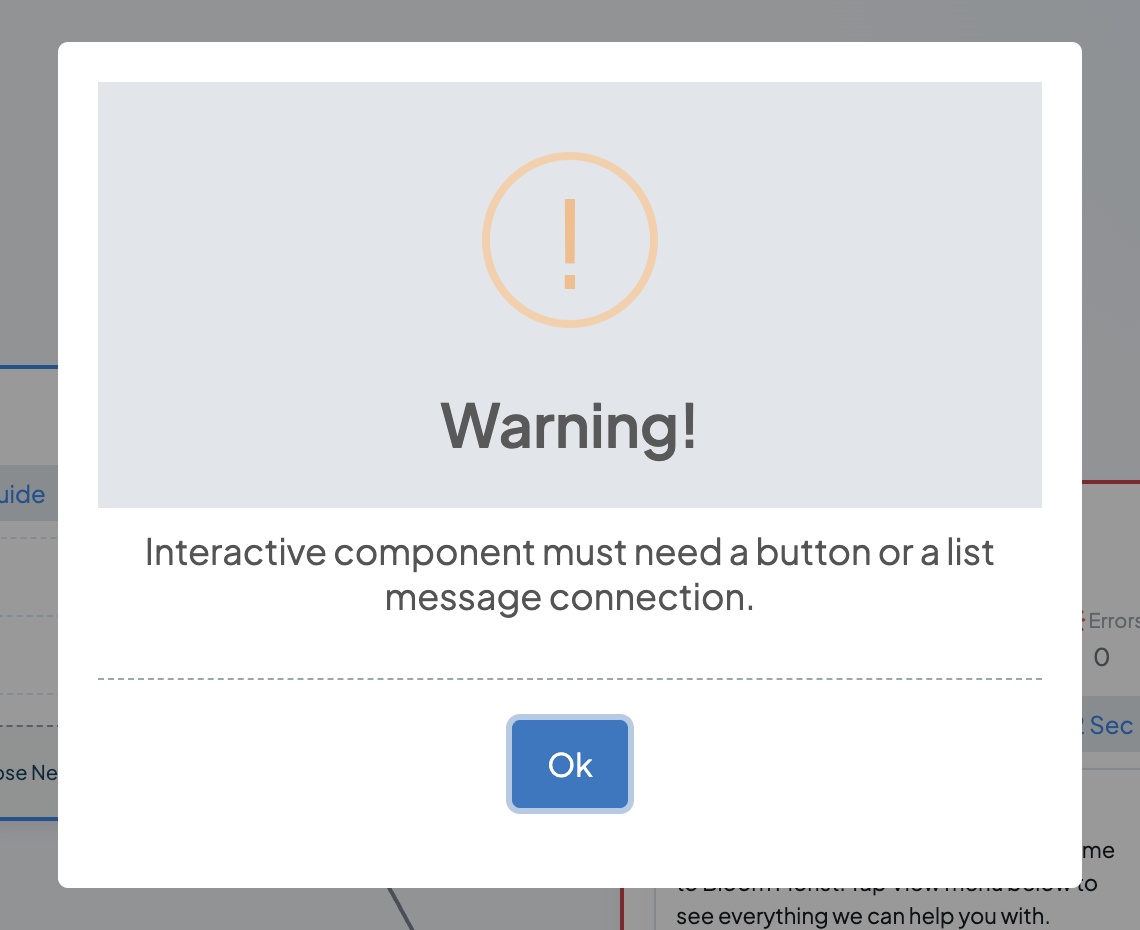 Normal at this point
Part 3: Build Your Menu (about 10 minutes)
Now you add the View menu button and the options from your plan in Step 0.
Step 1. On the welcome message block, find the List Messages dot. Drag from it to empty space on the right, and let go.
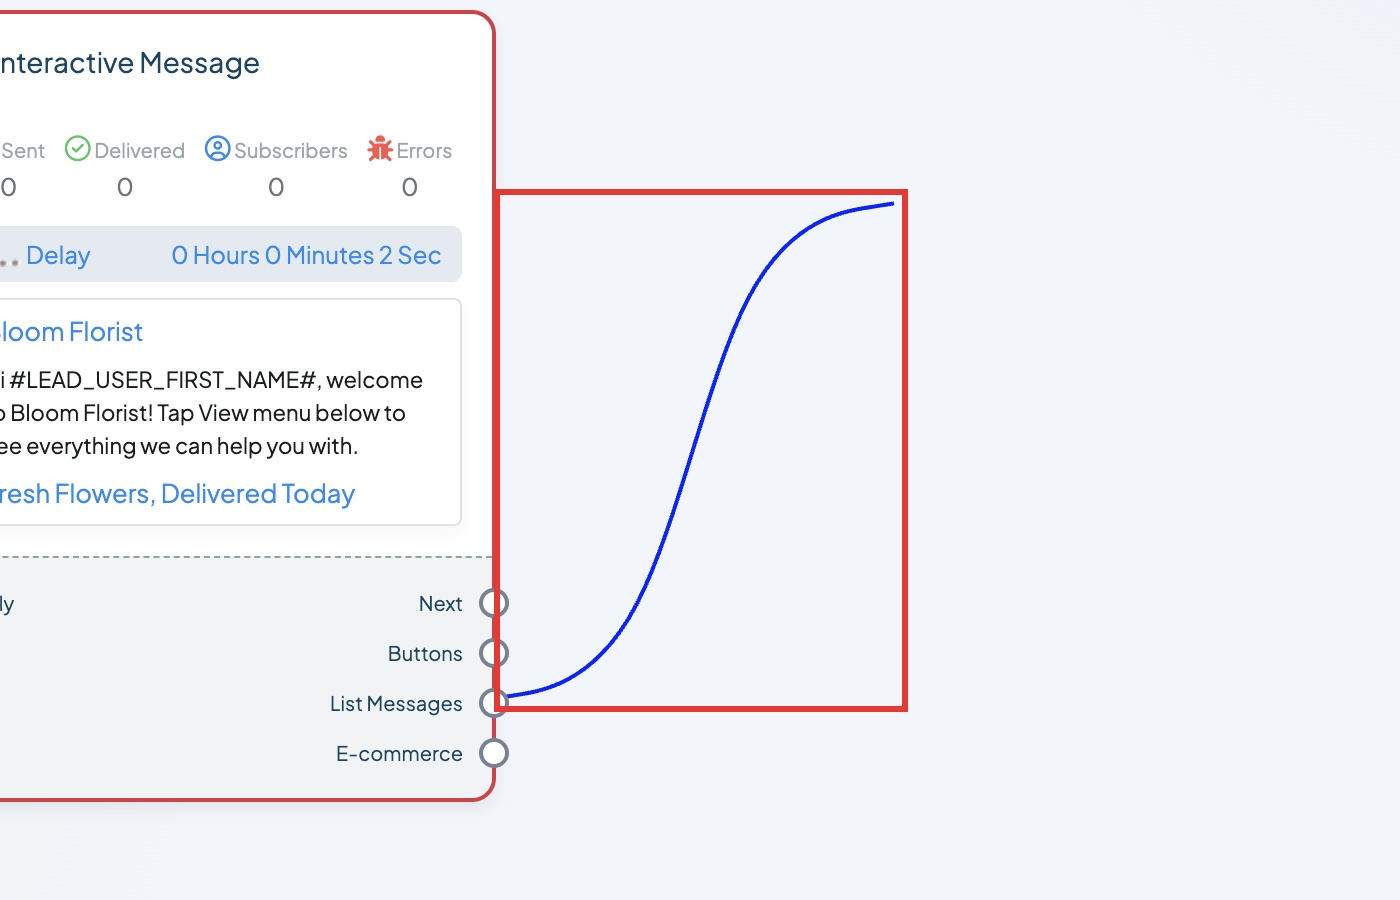 Drag from List Messages into empty space
Step 2. WhatChimp adds your menu blocks and opens the settings of one option. Click Close for now.
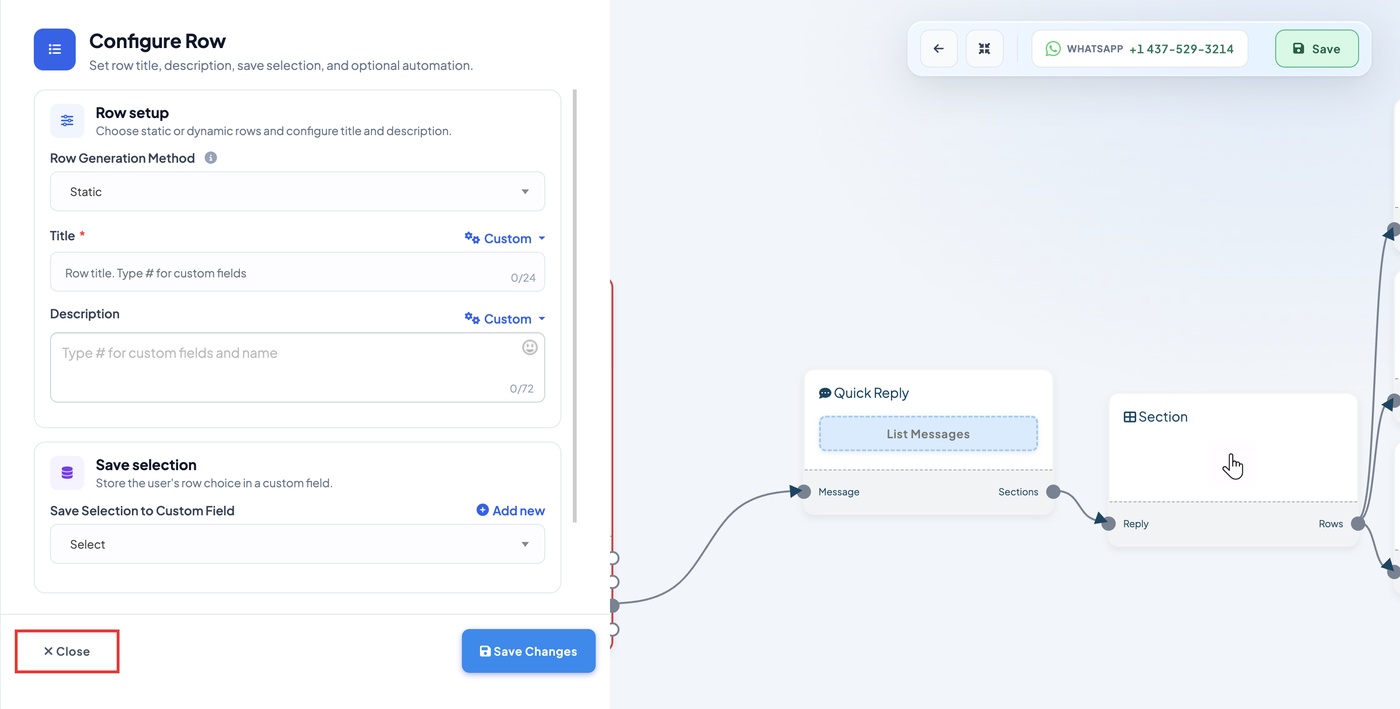 Click Close for now
Step 3. You now have three new kinds of blocks:
- Quick Reply: the View menu button.
- Section: the heading at the top of your menu.
- Row: one menu option. You start with three.
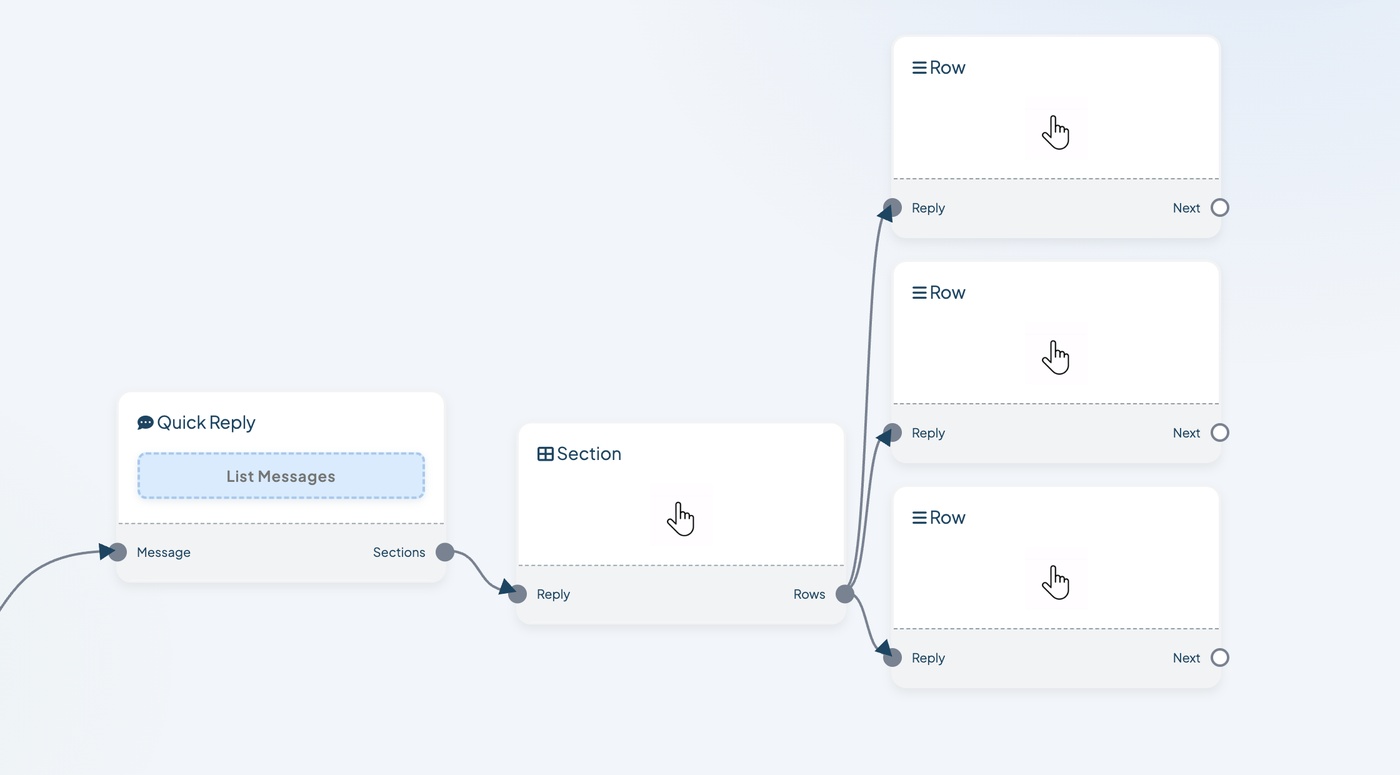 Quick Reply, Section, then three Rows
Step 4. Double-click Quick Reply. In Button Name, type View menu. Click Save Changes.
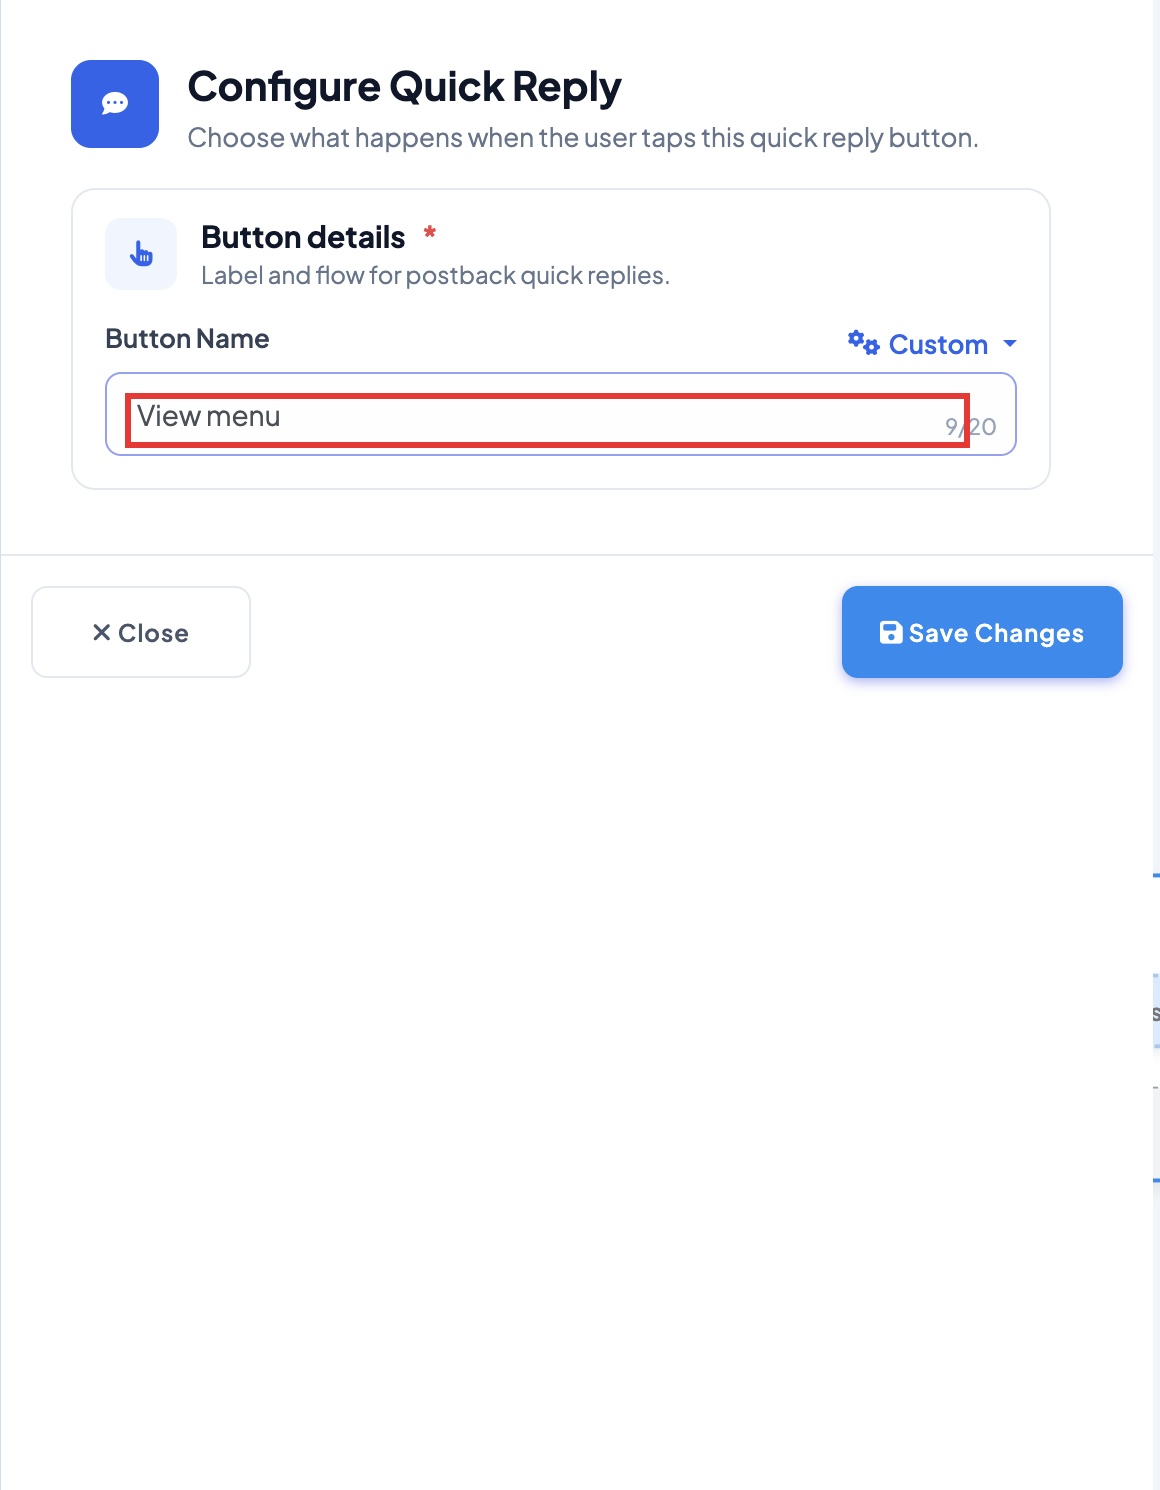 The button customers tap
Step 5. Double-click Section. In Title, type a heading. (Our example: How can we help?) Click Save Changes.
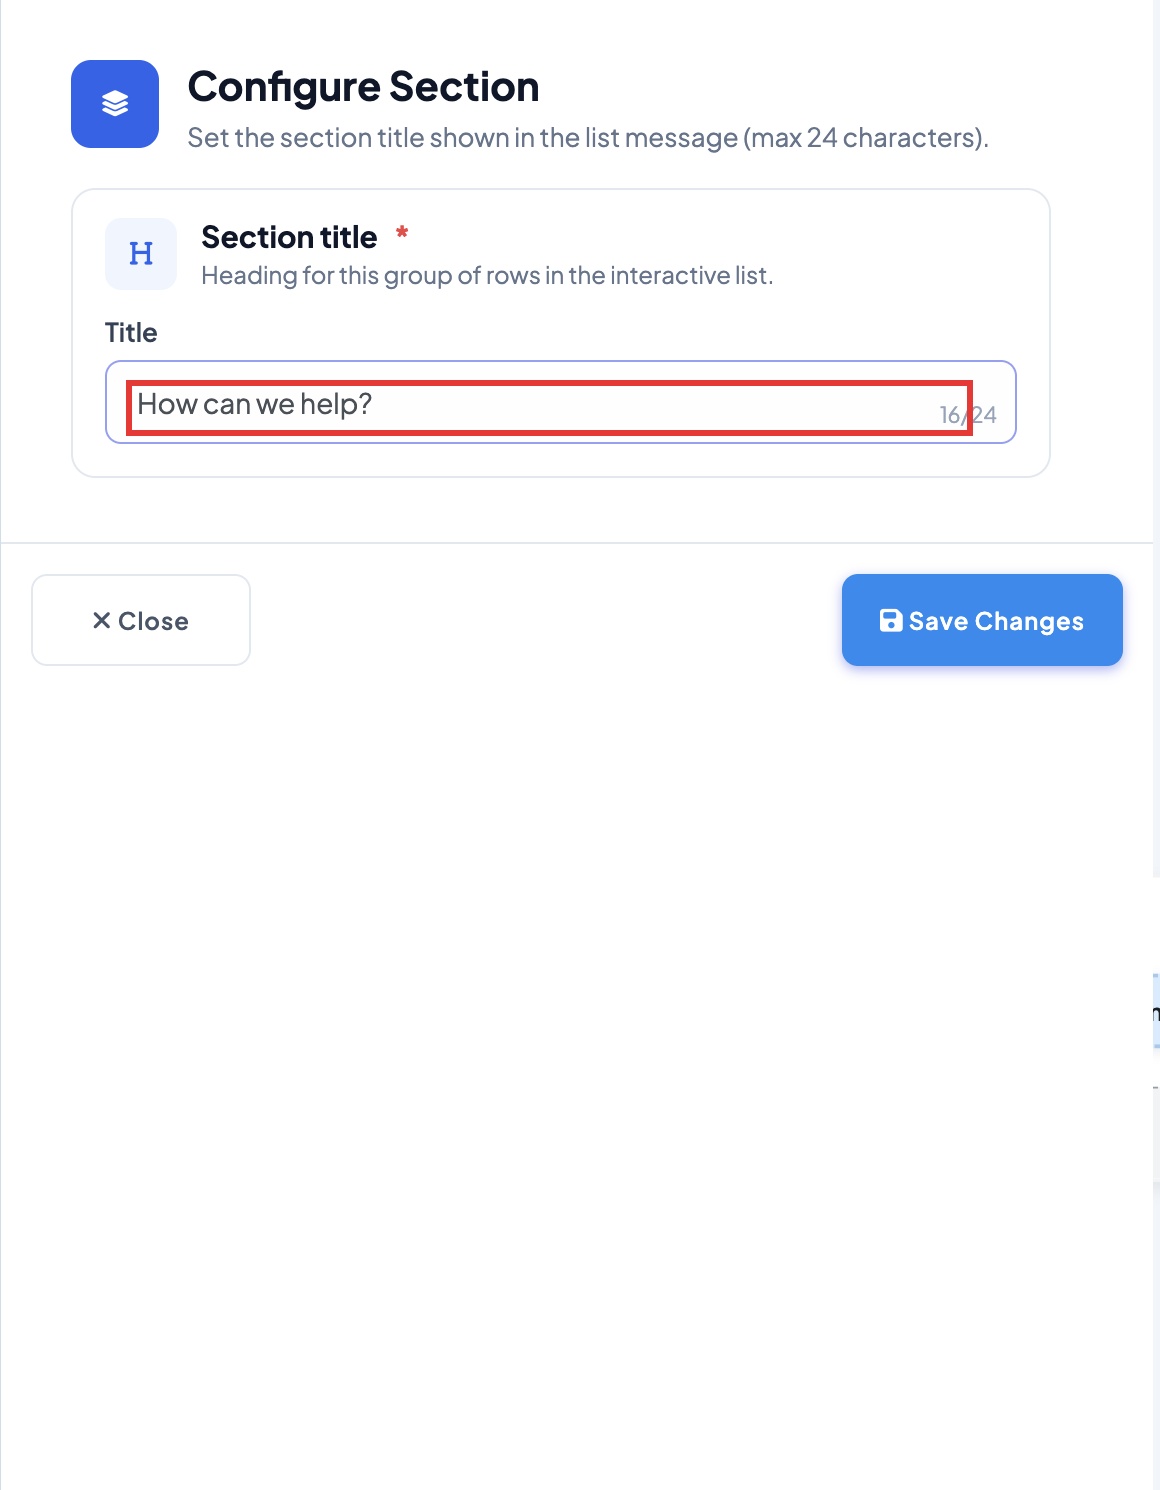 Shows at the top of your menu
Step 6. Double-click the first Row. Type your first option in Title and a short line in Description. Click Save Changes.
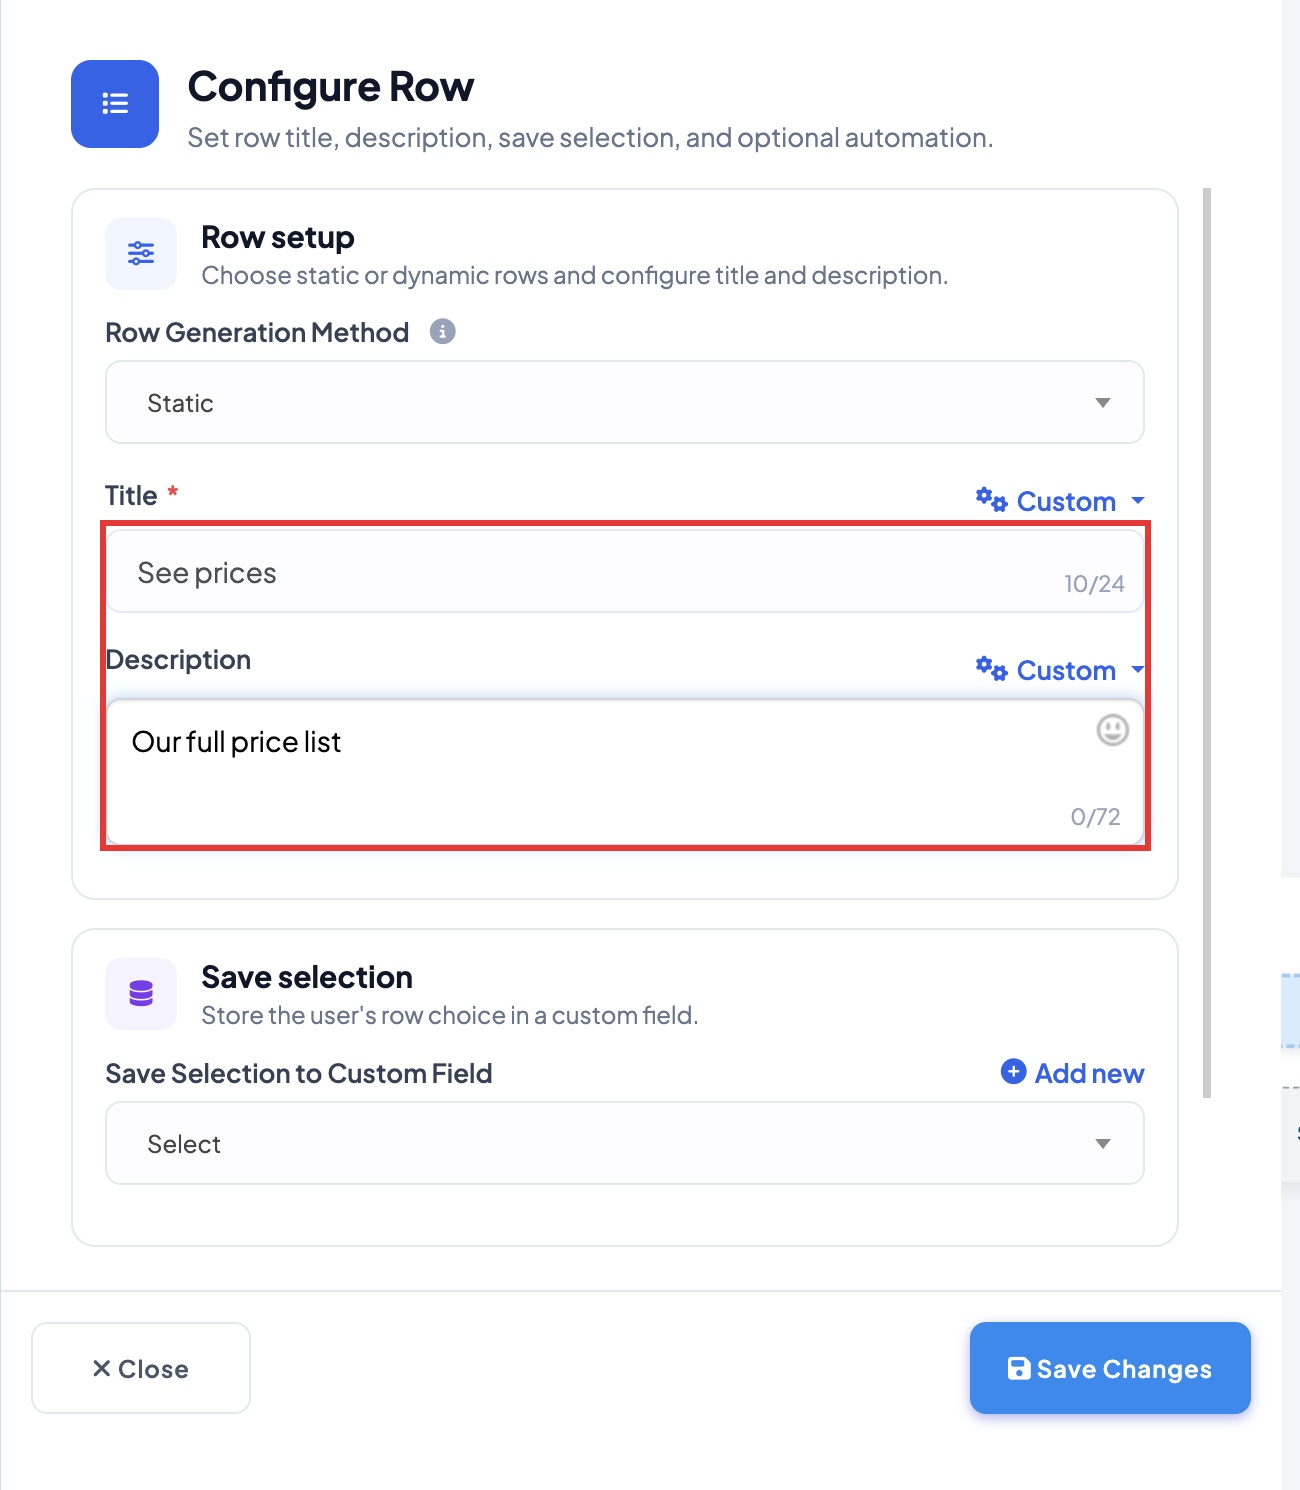 Title: up to 24 characters. Description: up to 72
Step 7. Name the other two Rows the same way.
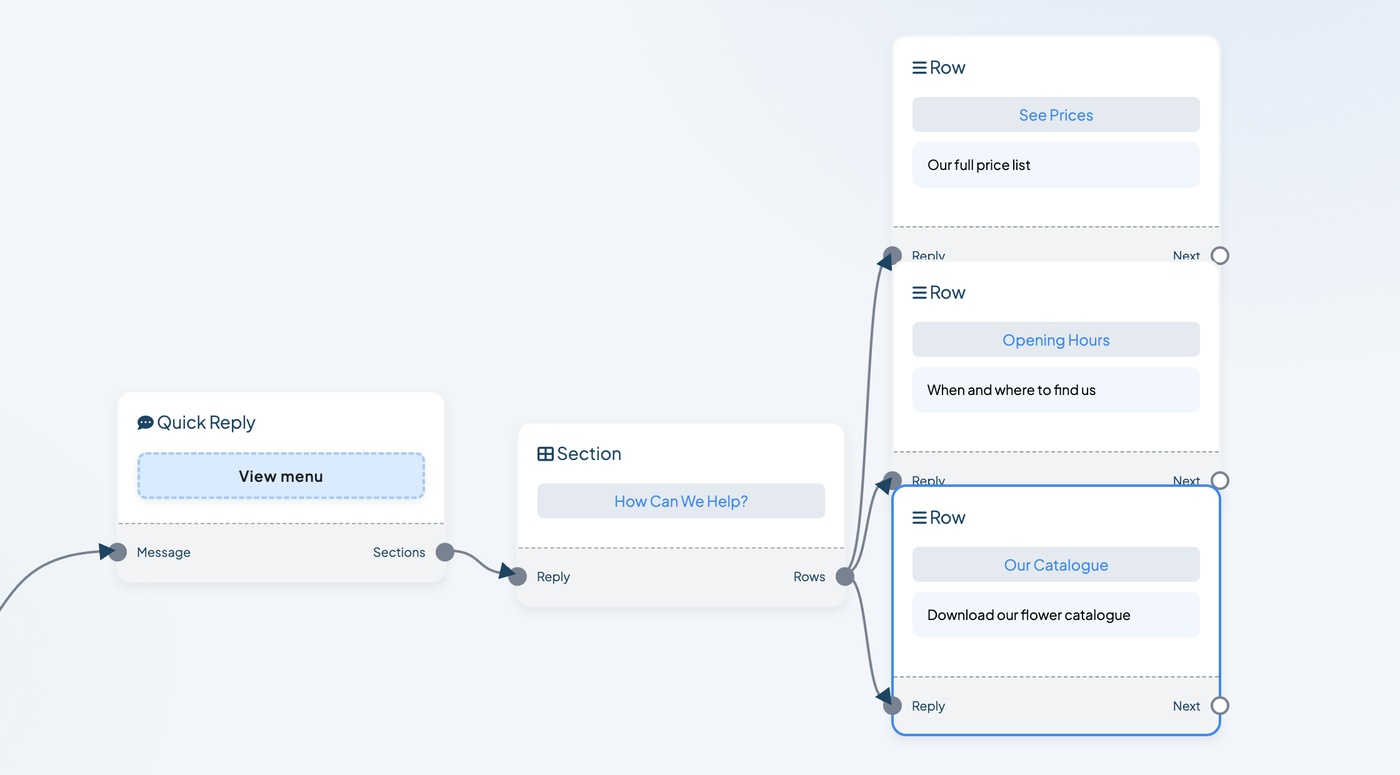 Three options done
Step 8. Need more options? Right-click a Row and click Clone.
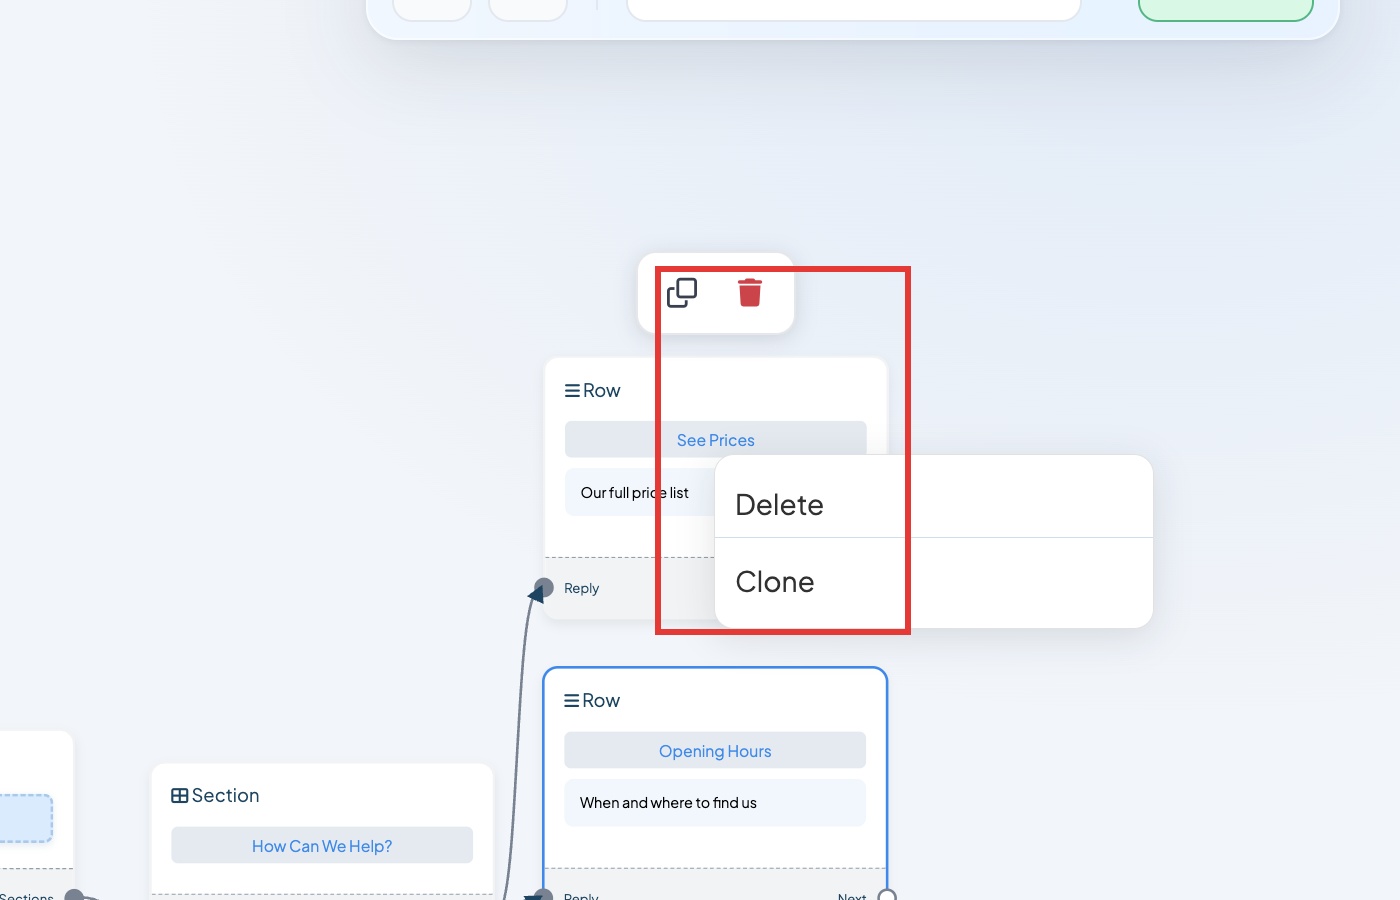 Clone makes a copy
Step 9. The copy appears on top of the original.
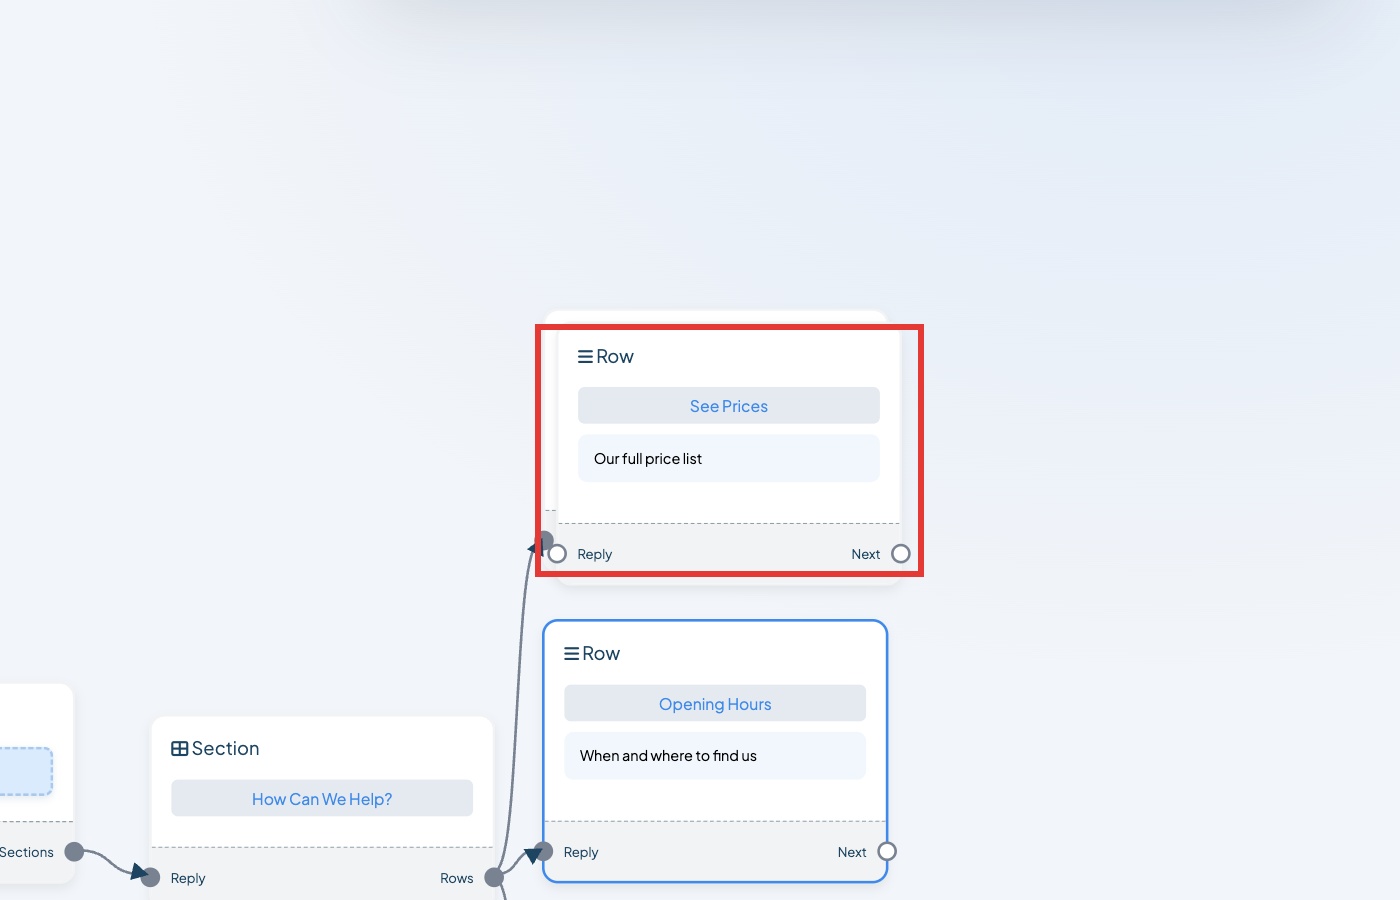 The copy sits on top
Step 10. Drag the copy by its title to an empty space below.
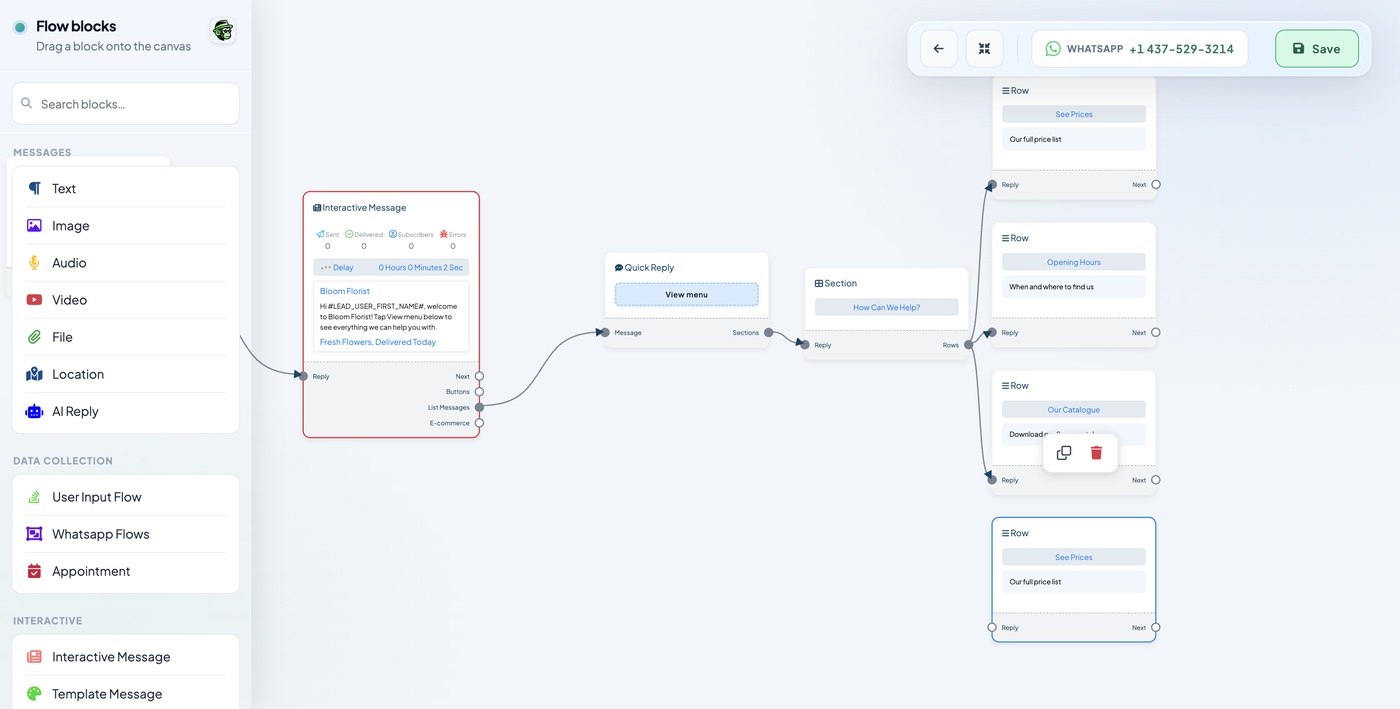 Move it where you can see it
Step 11. Add the copy to your menu: drag from the Rows dot on the Section block to the Reply dot on the copy.
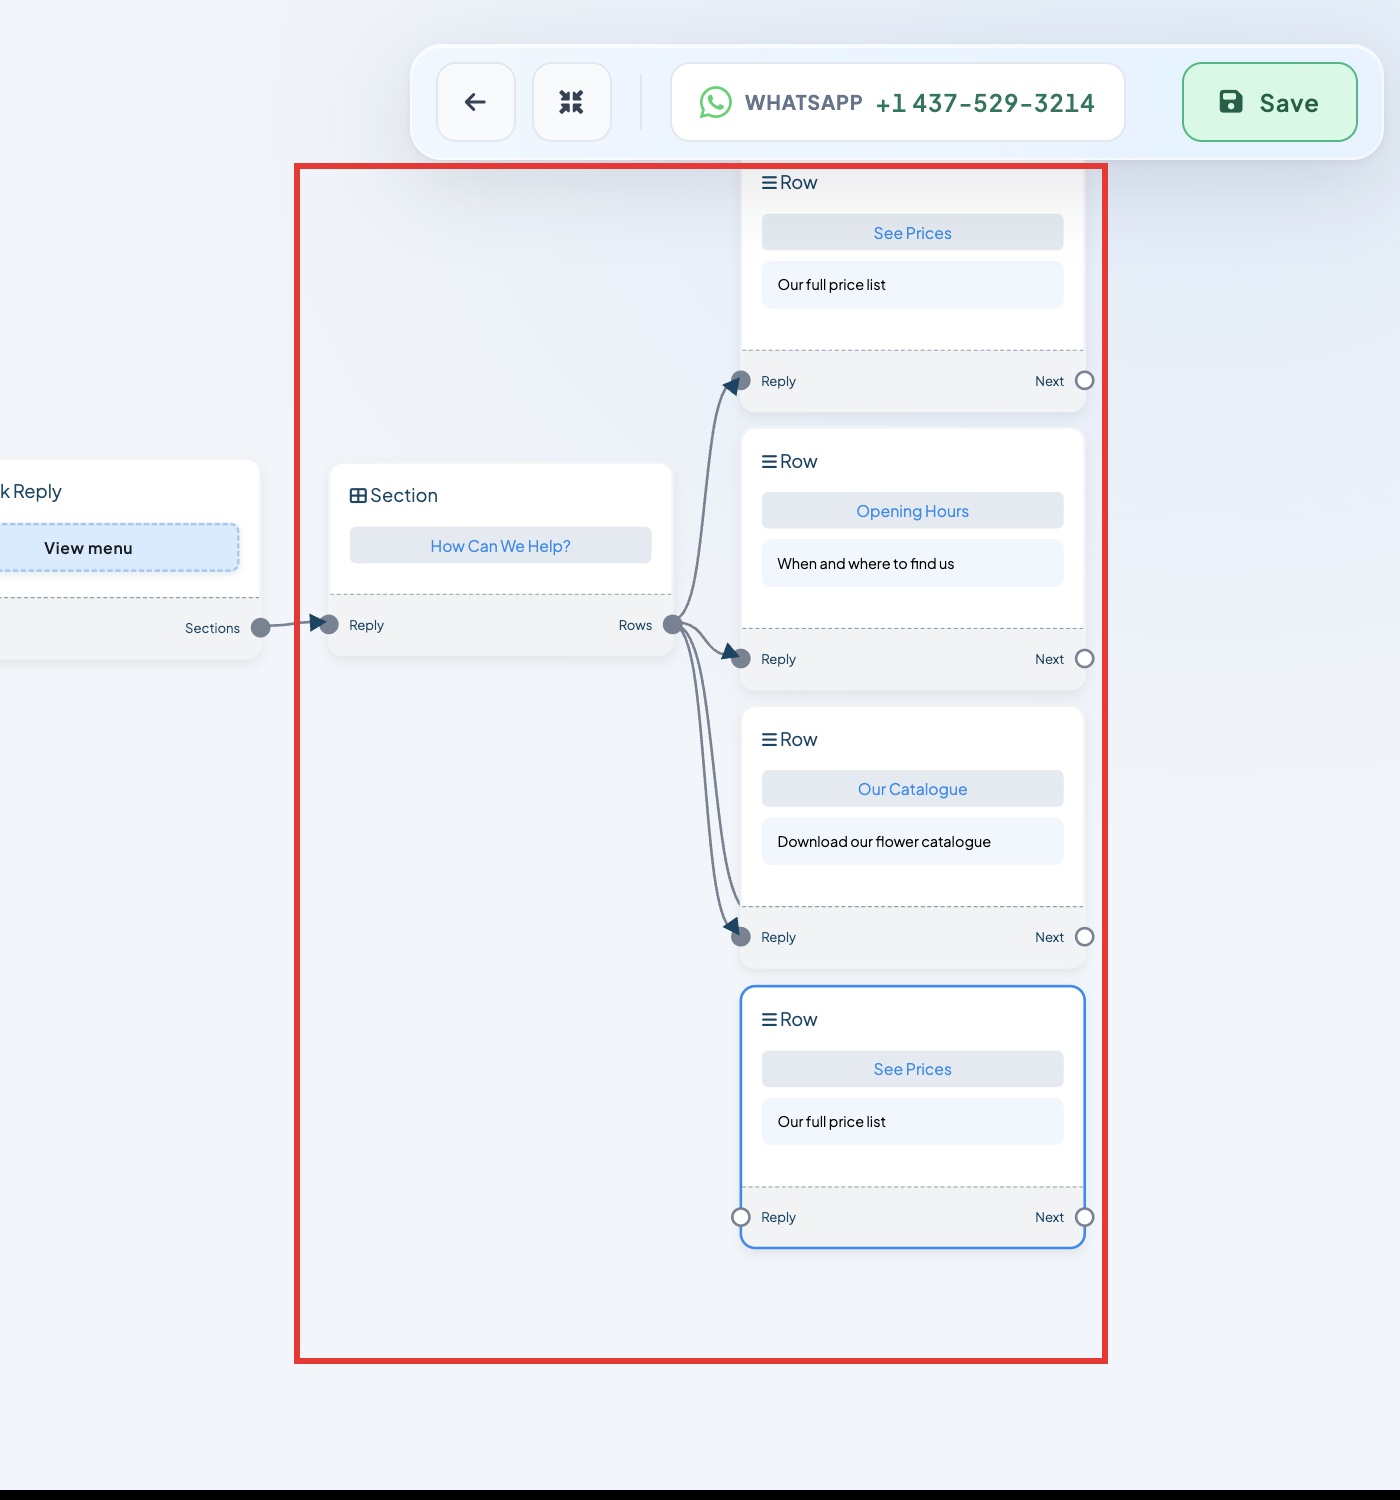 From Rows to Reply
Step 12. Let go. The copy's settings open, still showing the old name.
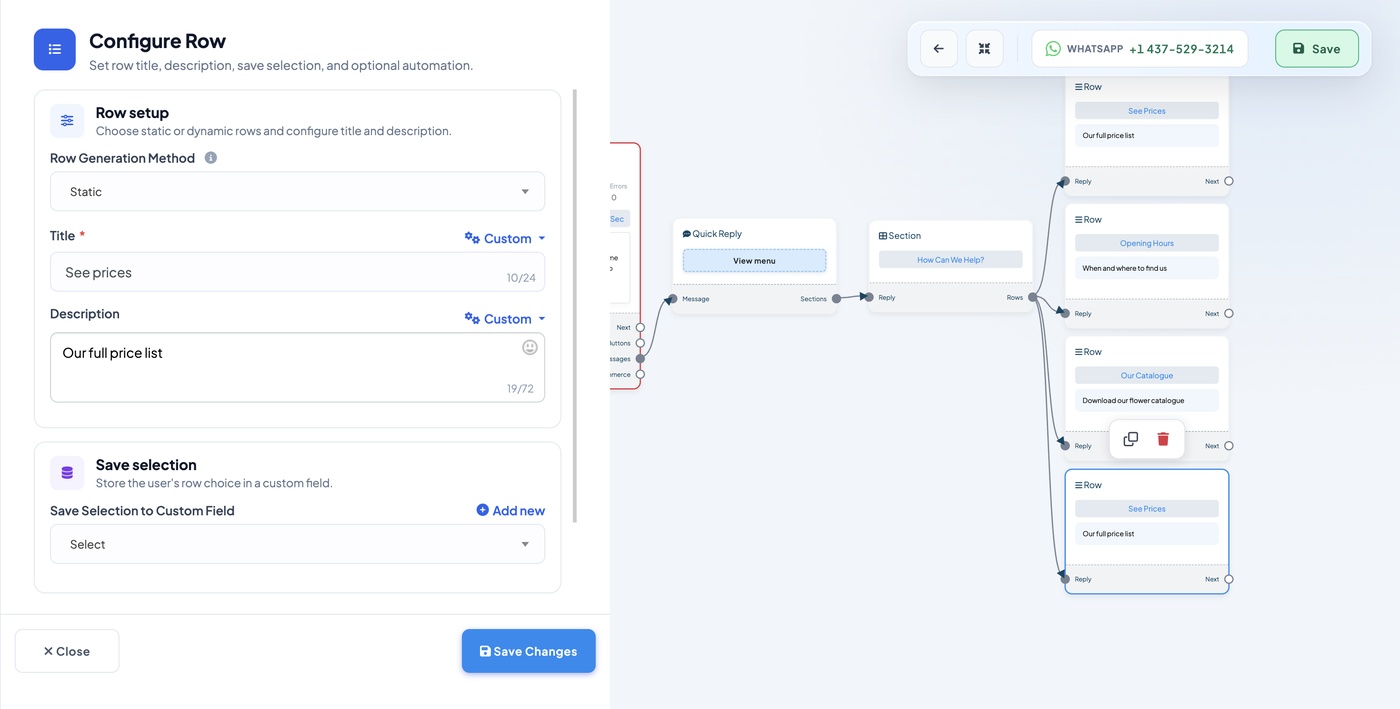 Still the old name
Step 13. Type the new option name and description. Click Save Changes.
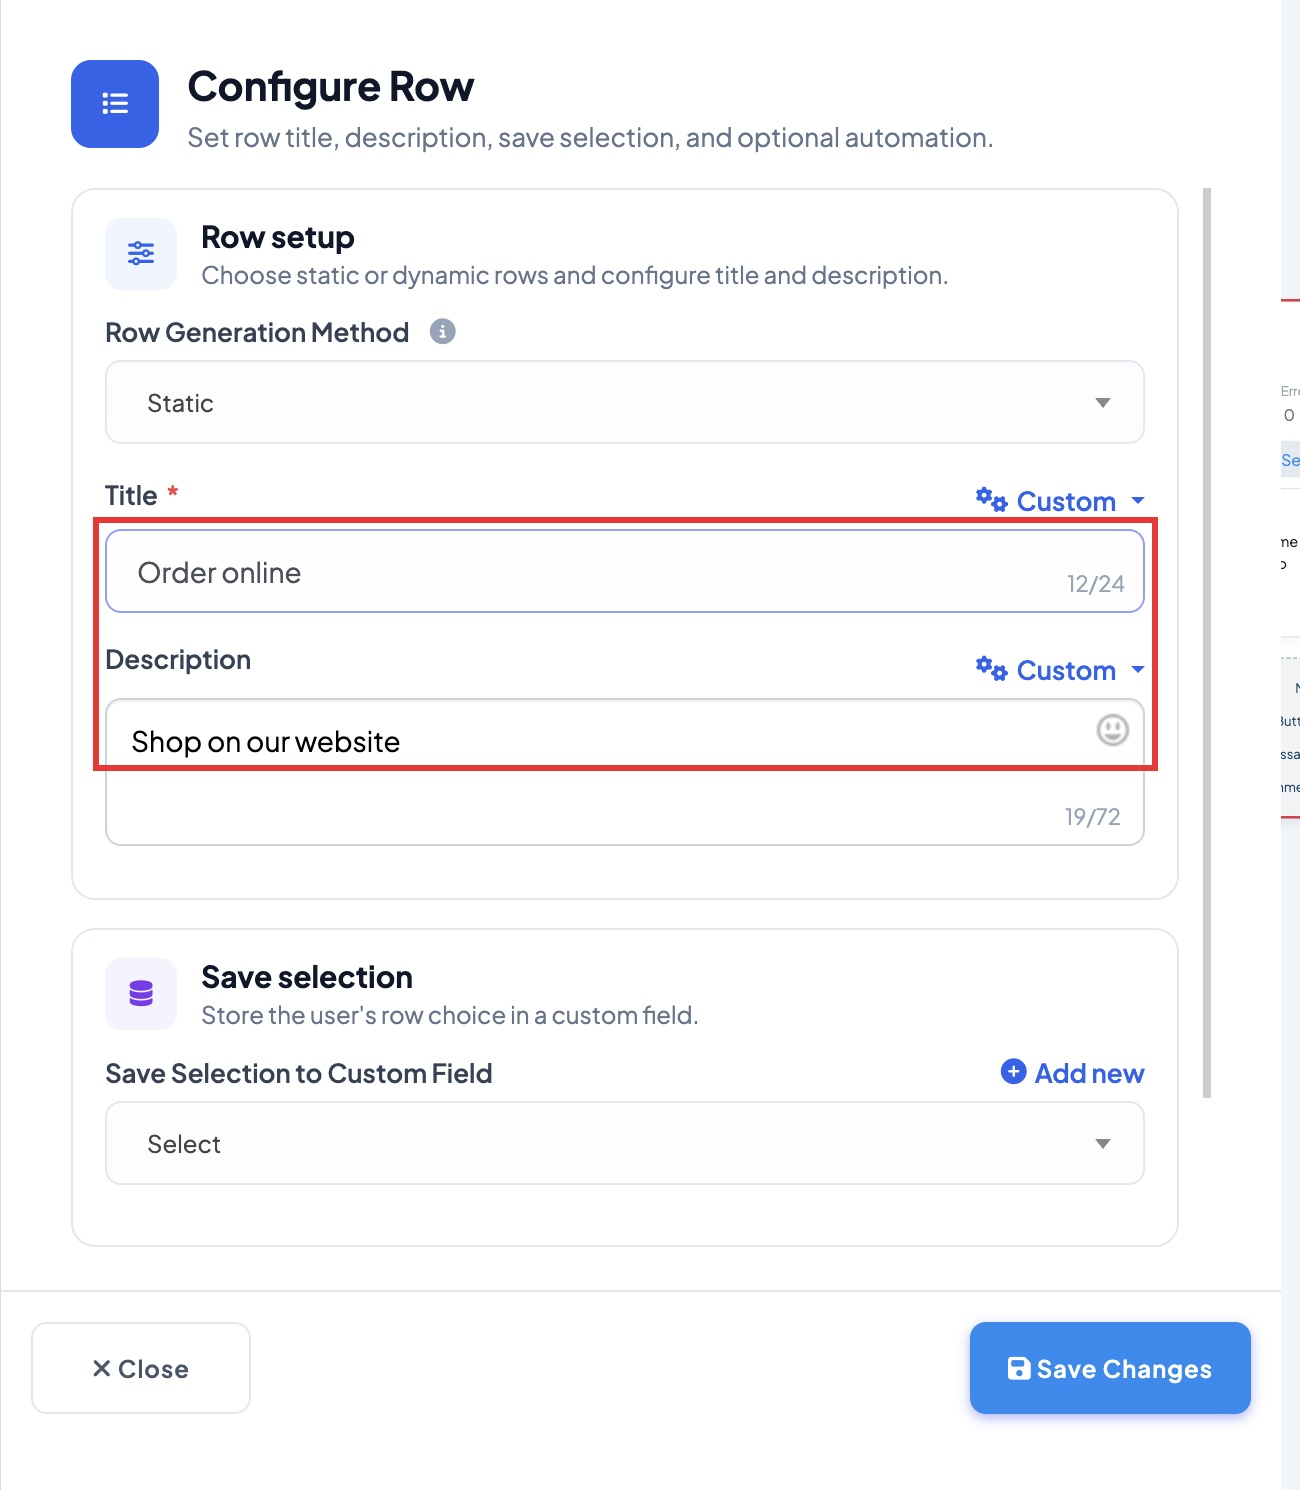 Your fourth option is ready
Step 14. Repeat Steps 8 to 13 until every option from your plan is there. Then click the green Save button.
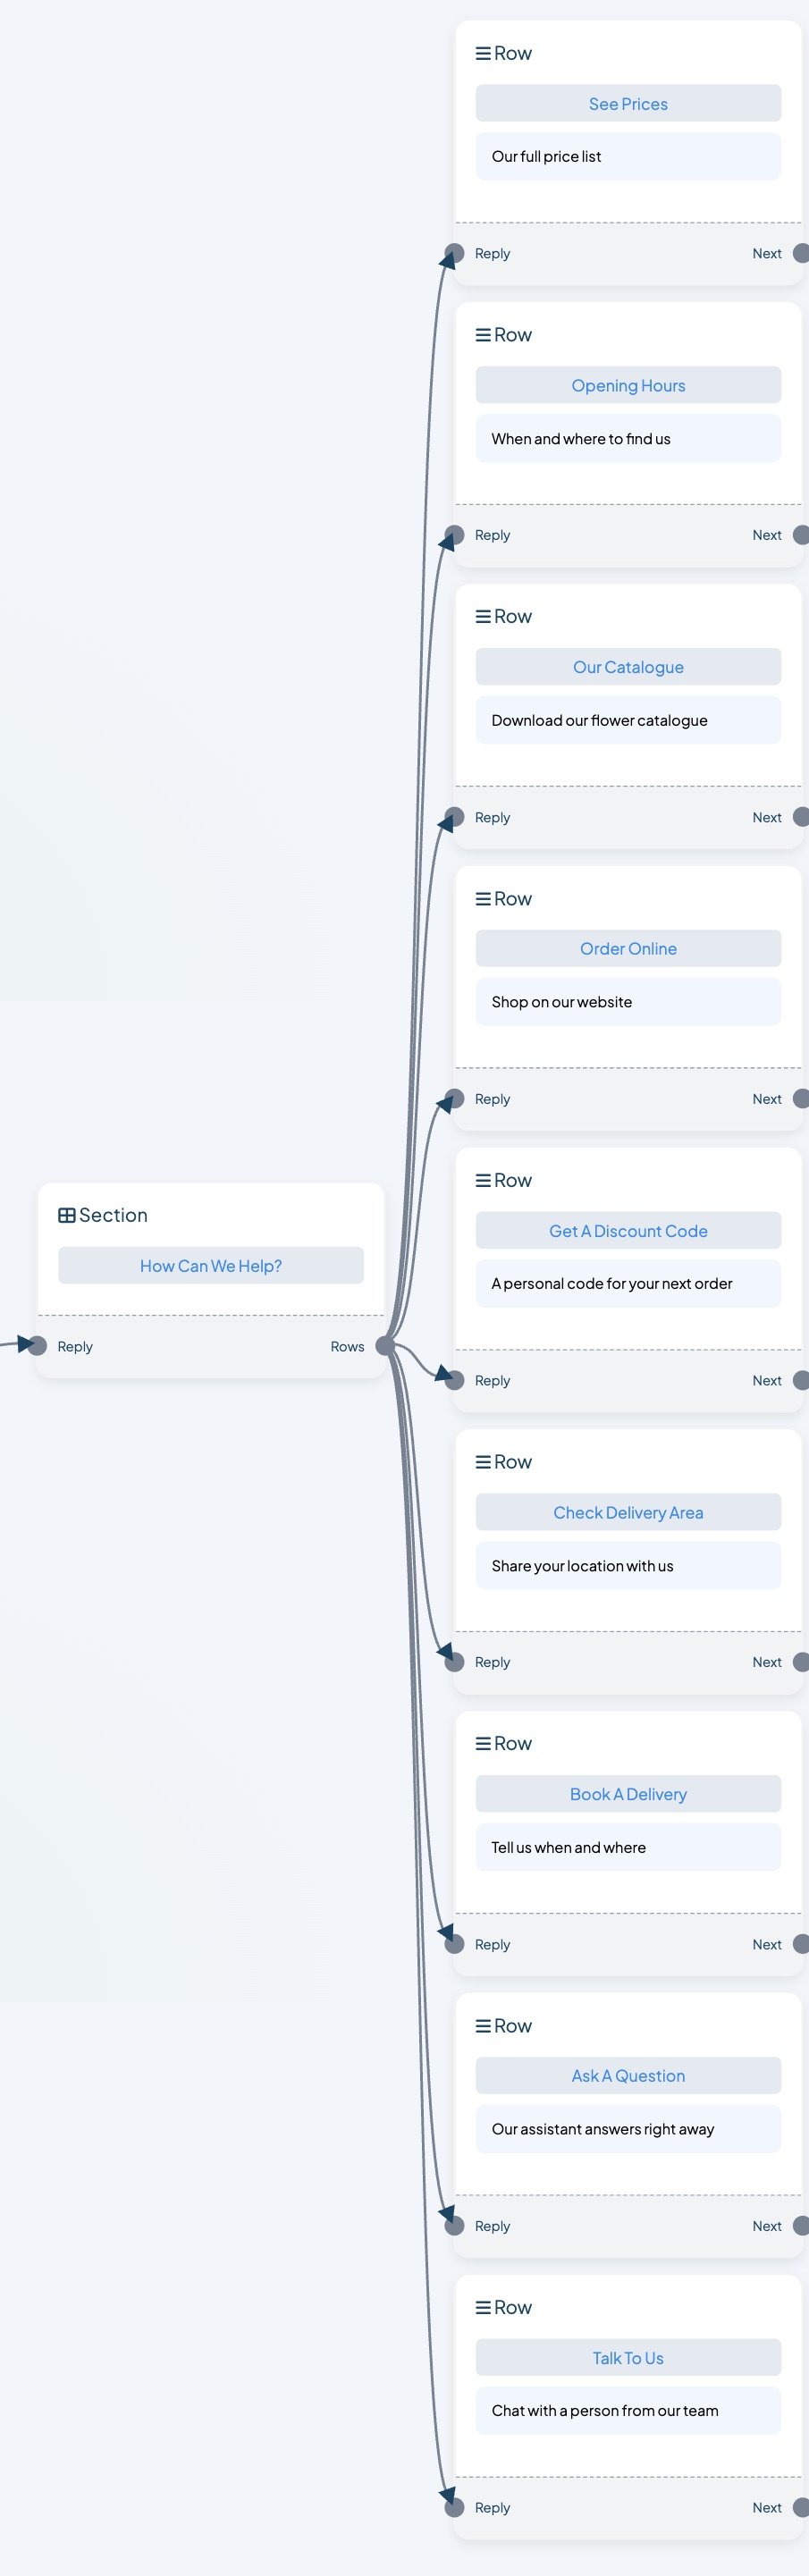 Our nine options, all joined to the Section
Tip: if your screen gets messy, click Rearrange at the top.
Try it now
From your personal phone, send your keyword to your business number. You get your welcome message:
Your keyword, then your welcome message
Tap View menu to see your menu. The options don't send anything yet. That is what Parts 4 to 12 do.
Parts 4 to 12: Make Each Option Work
Each part below makes one option work. Follow only the parts for the options you chose. Every part works the same way:
- Add the block that sends what you want.
- Drag from the Next dot on your option to the left dot on that block.
- Fill in the settings and click Save Changes.
Part 4: Send a Picture (about 3 minutes)
Do customers ask for your prices? This option sends your price list as a picture.
Step 1. Drag an Image block onto the empty space, next to the option that should send the picture.
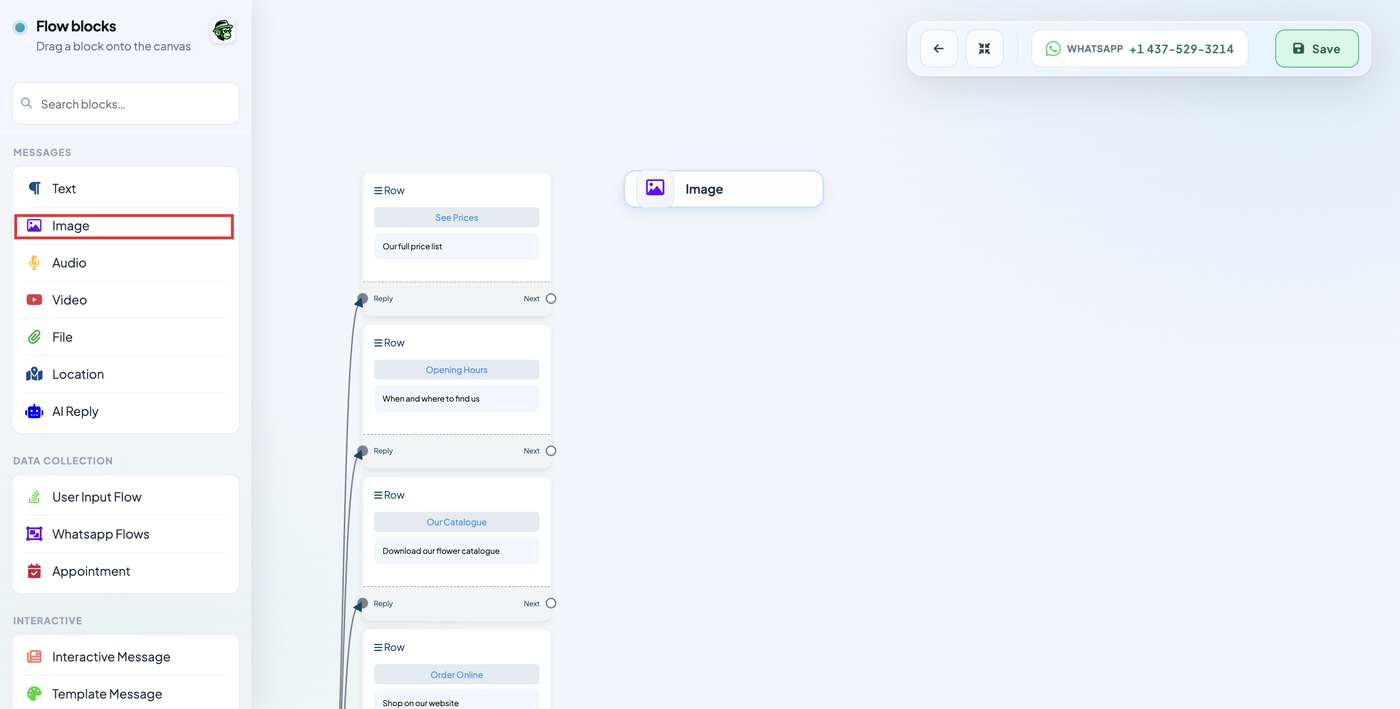 Image is in the list on the left
Step 2. Let go.
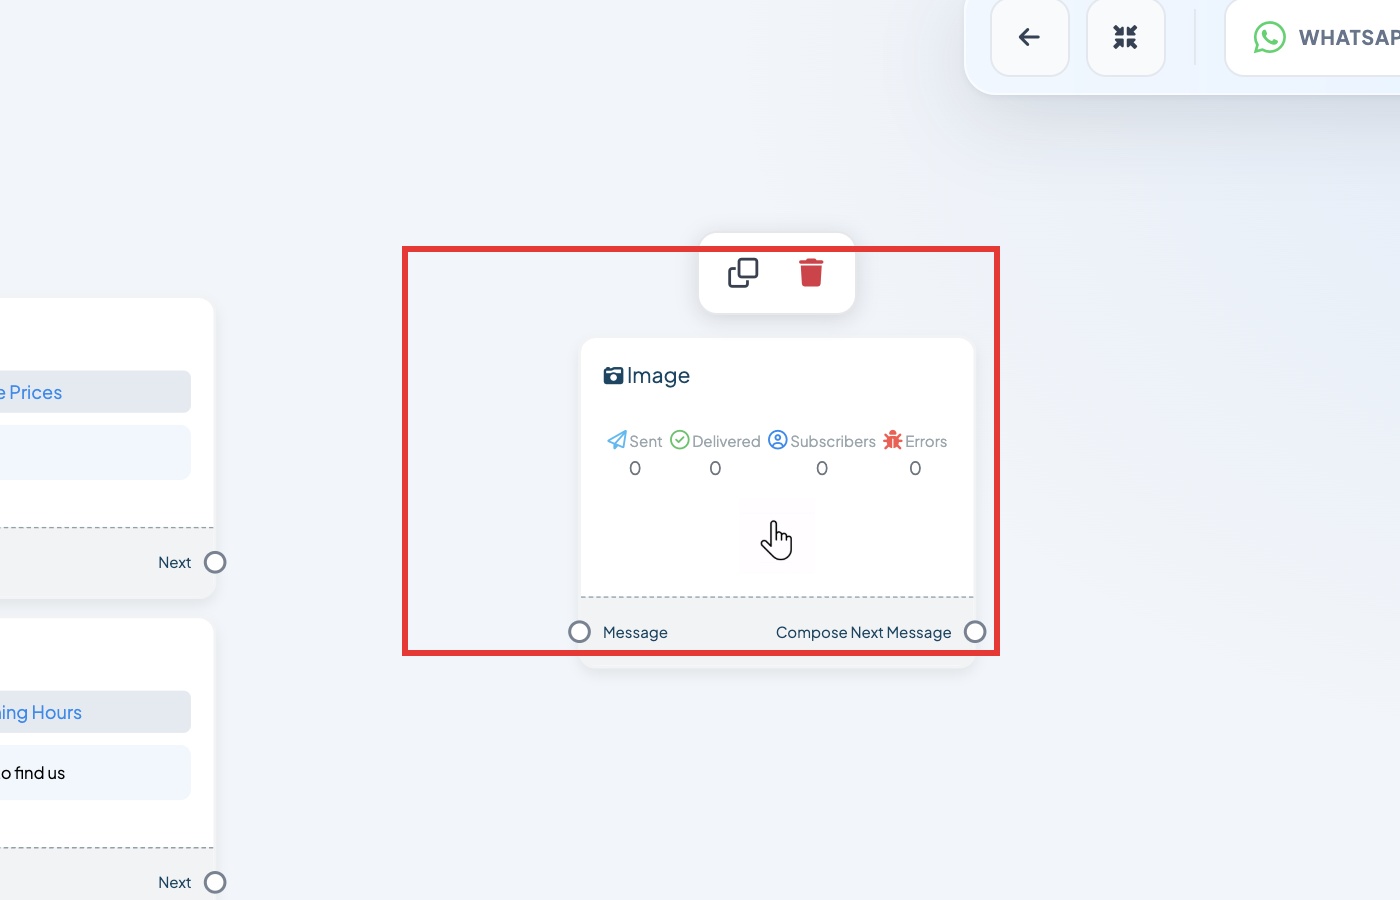 Not joined yet
Step 3. Drag from your option's Next dot to the Message dot on the Image block.
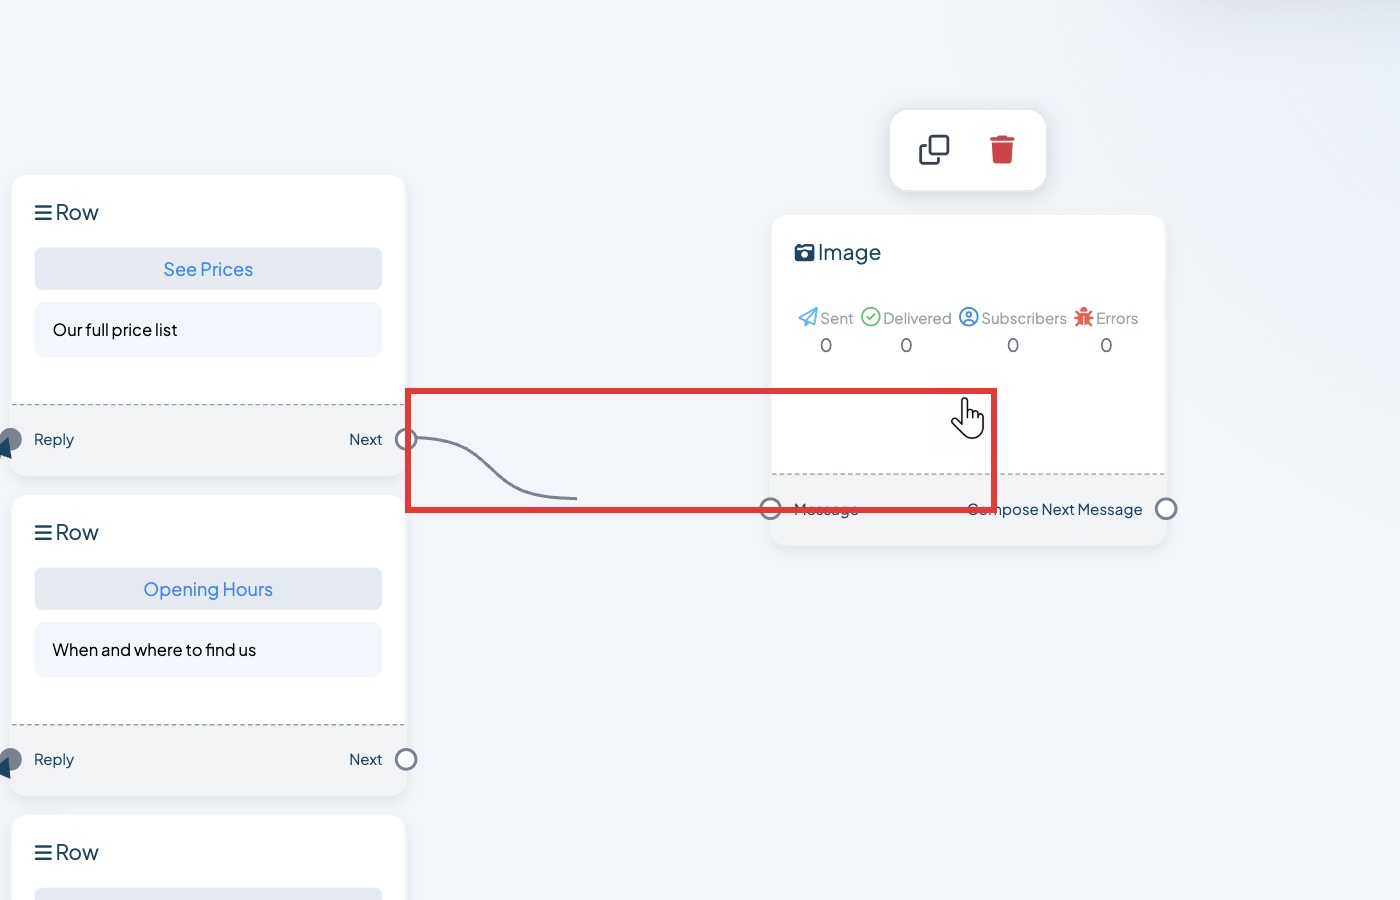 From Next to Message
Step 4. The Image settings open.
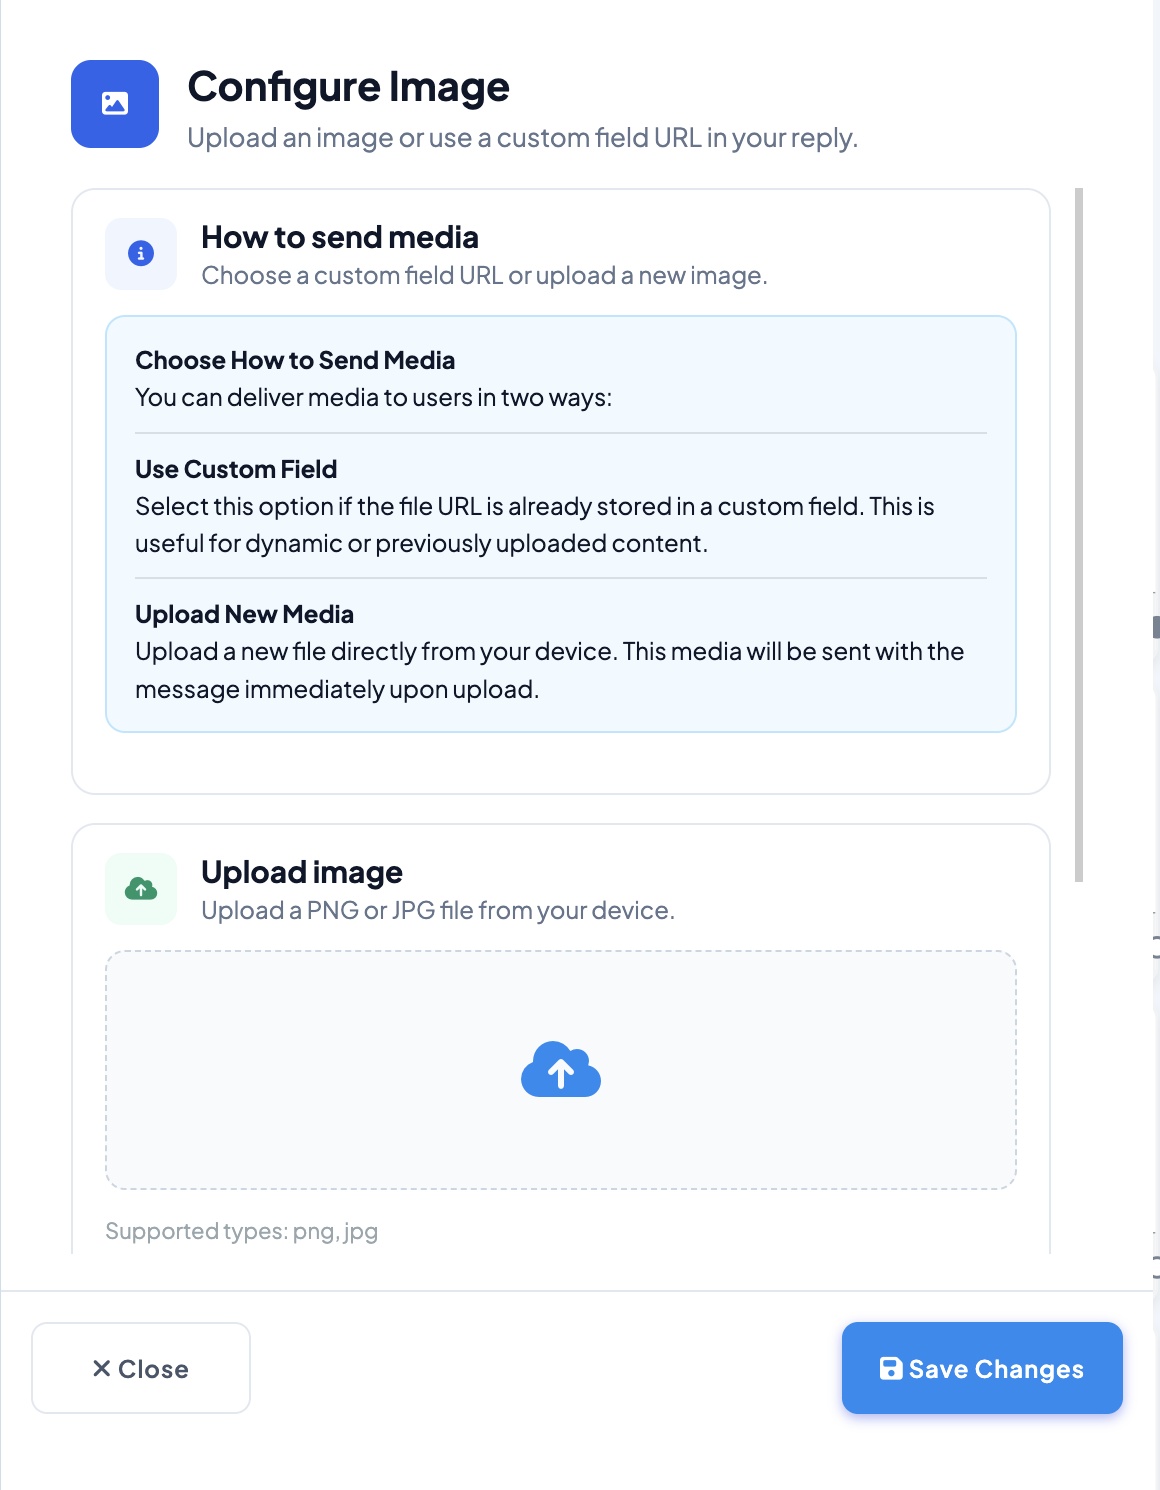 Scroll to Upload image
Step 5. Drag your picture onto Upload image, or click the box to choose it.
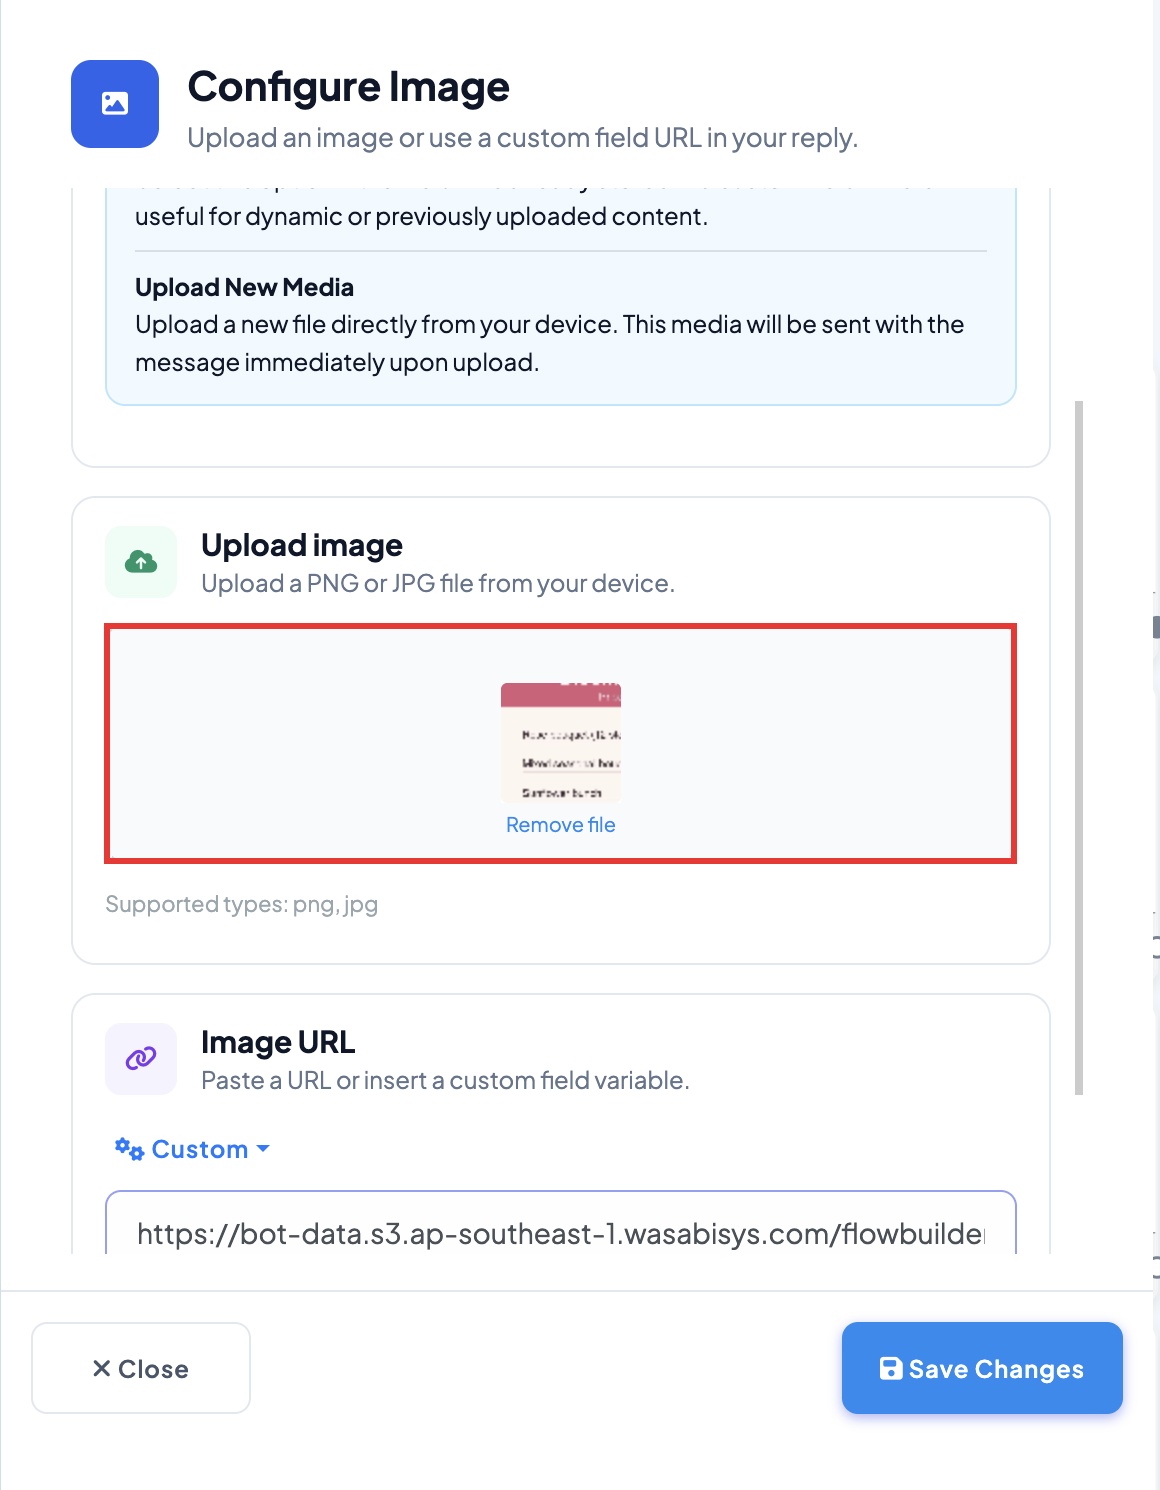 Your picture is uploaded
Step 6. Click Save Changes.
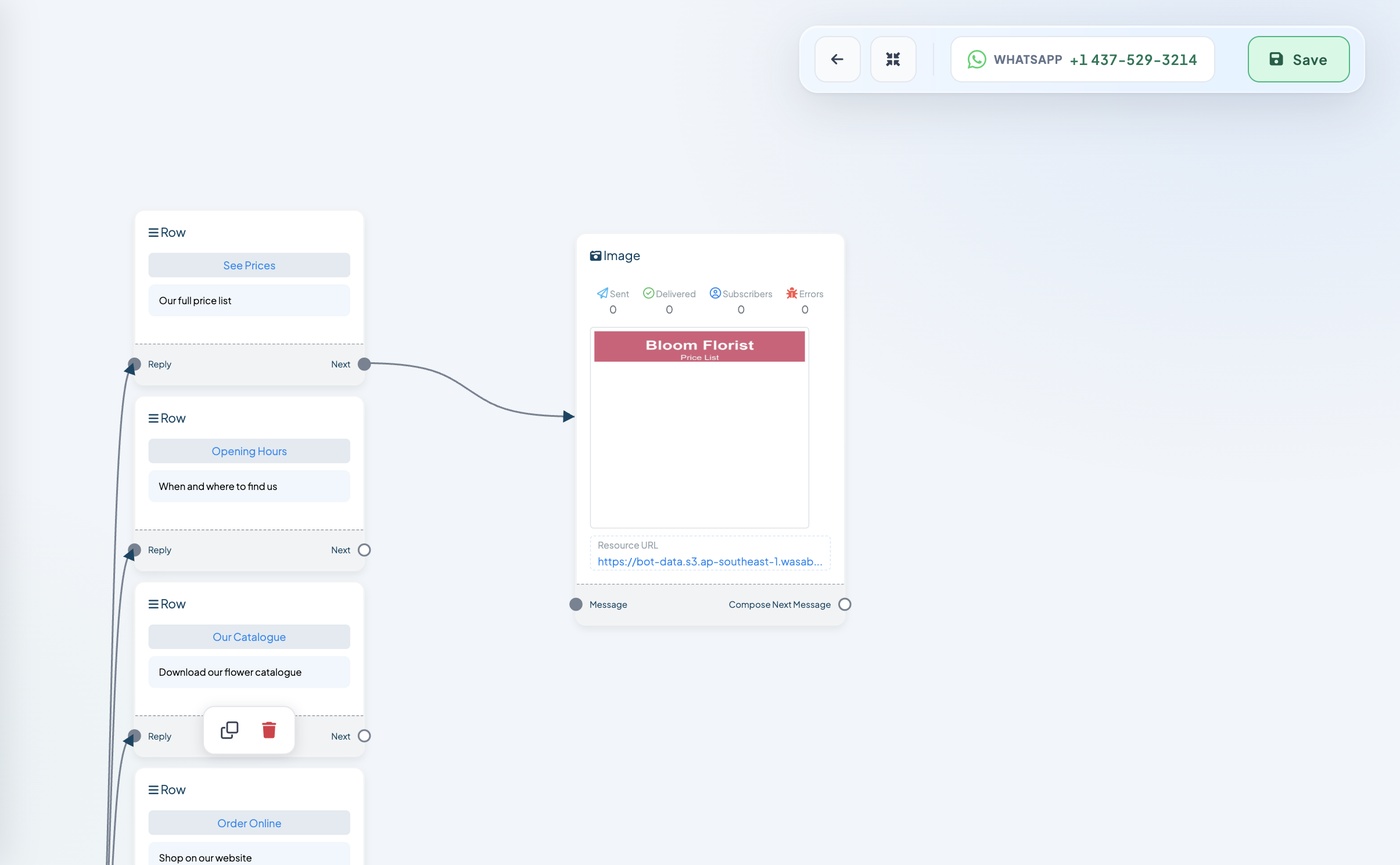 This option now sends your picture
What your customer sees (left side):
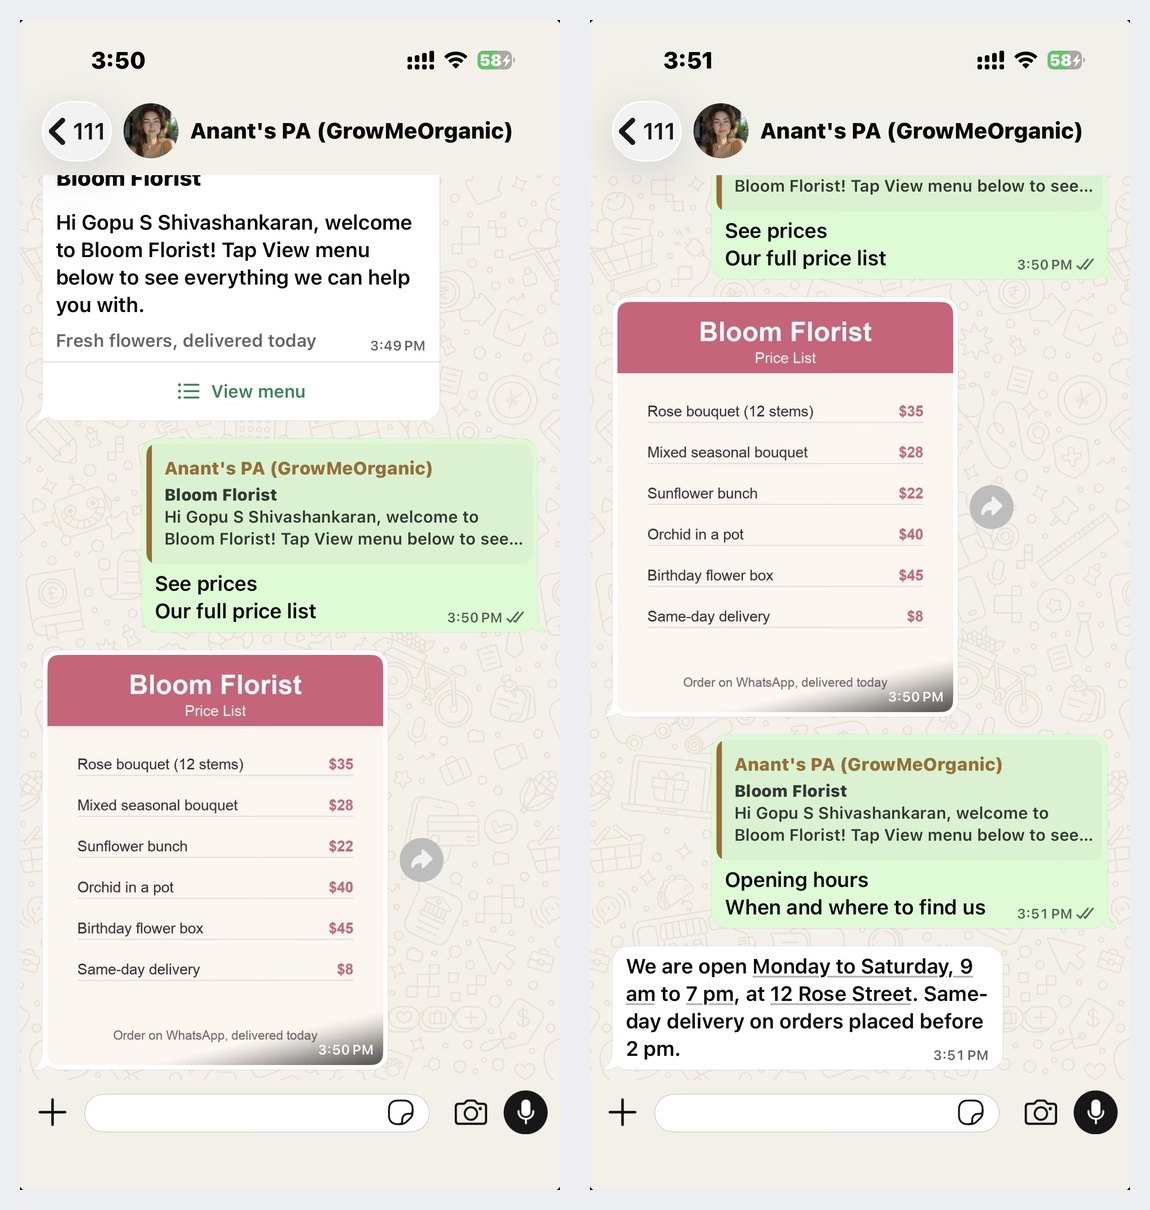 Left: the picture. Right: the text message from Part 5
Part 5: Send a Text (about 2 minutes)
Do customers ask for your hours or address? This option sends a text message.
Step 1. Drag a Text block onto the empty space.
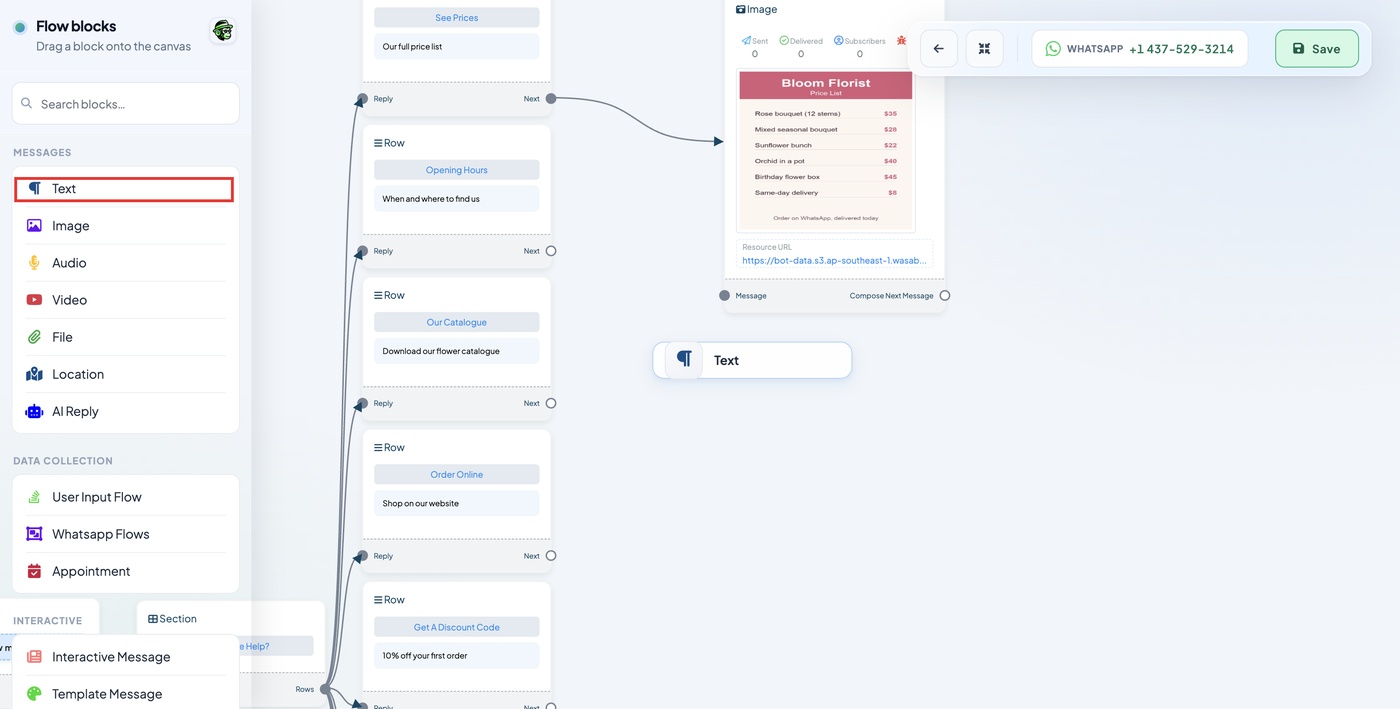 Text is first in the list
Step 2. Drag from your option's Next dot to the Message dot on the Text block.
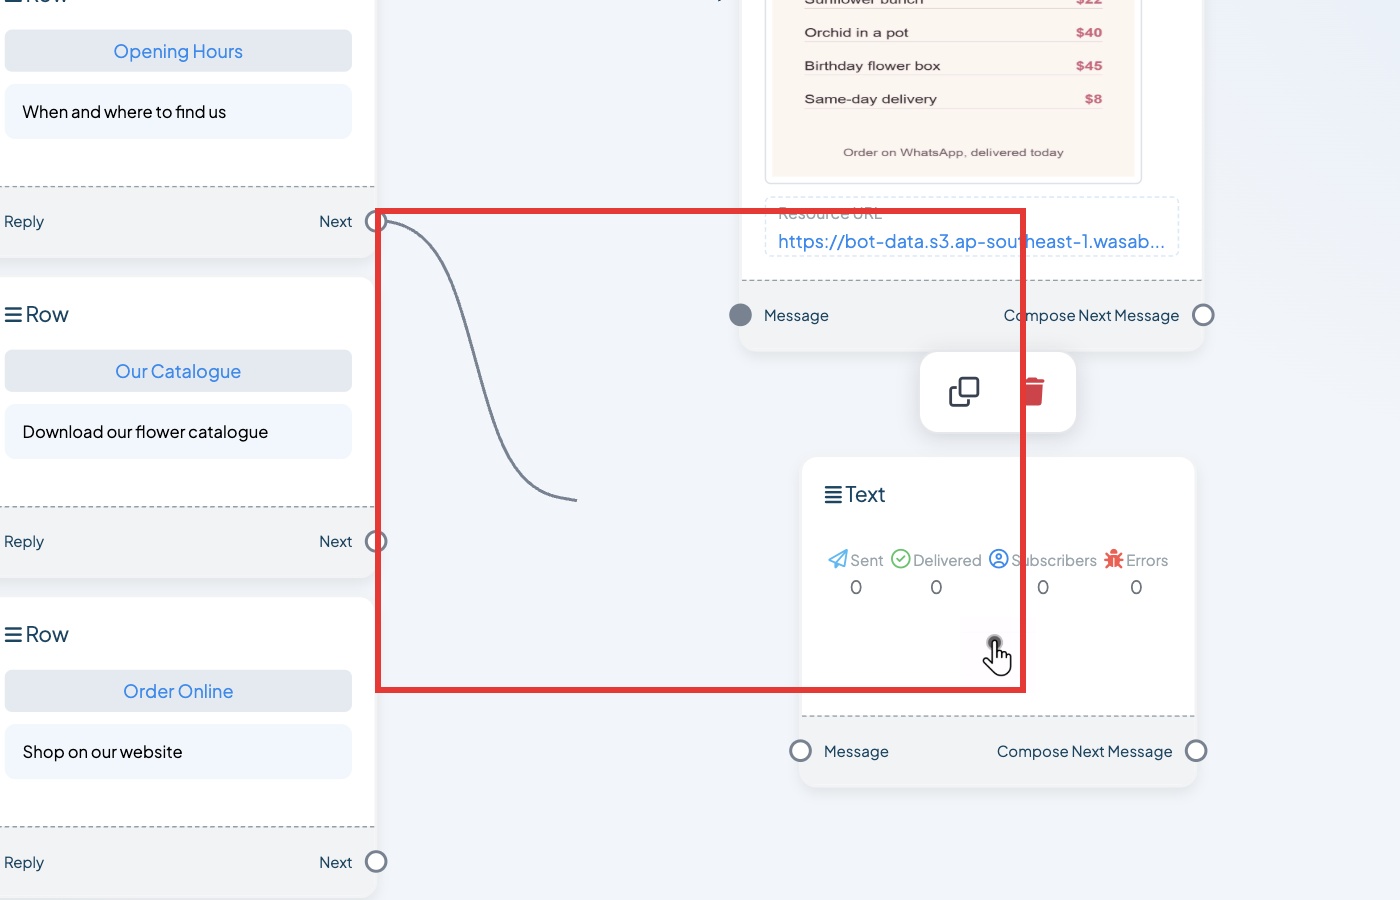 From Next to Message
Step 3. Type your message.
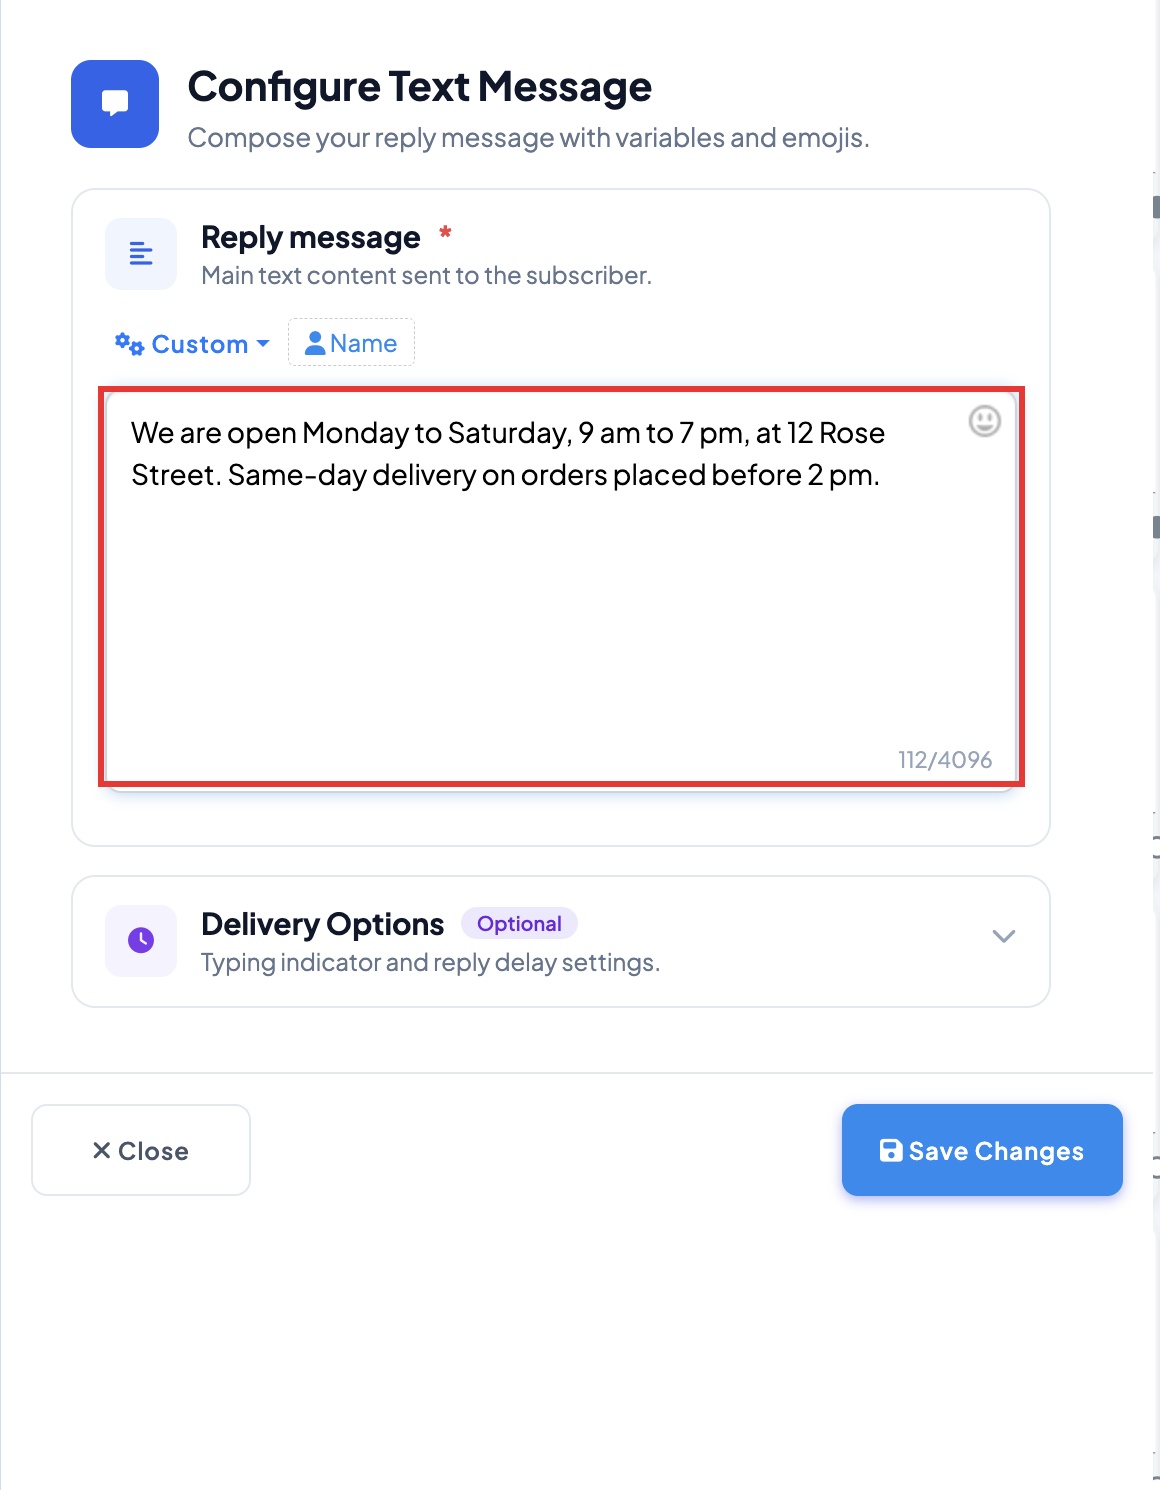 Our example: hours and address
Step 4. Click Save Changes.
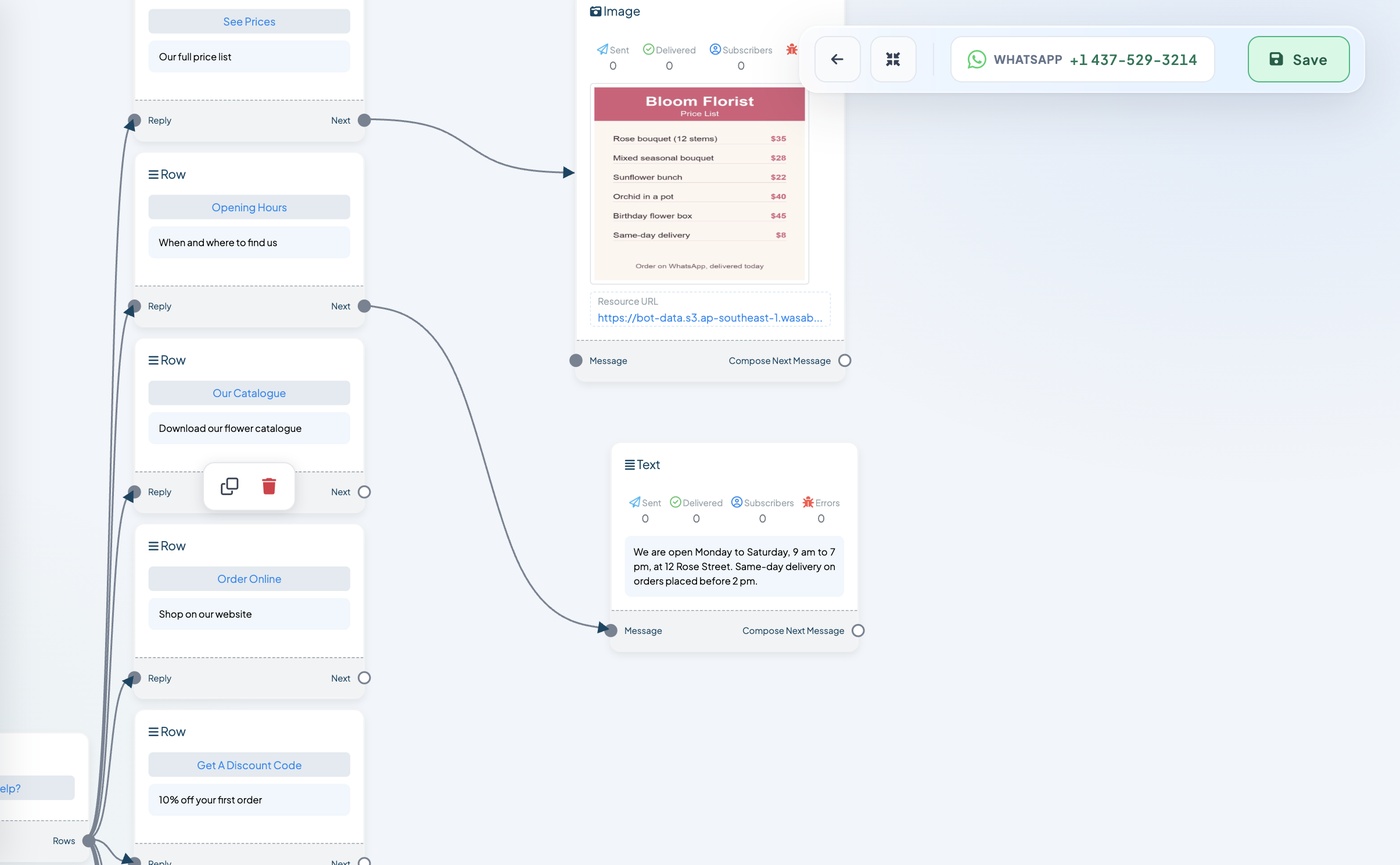 This option now sends your text
The phone picture at the end of Part 4 (right side) shows what customers see.
Part 6: Send a PDF (about 3 minutes)
Do customers ask for a catalogue, menu or brochure? This option sends it as a file.
Step 1. Drag a File block onto the empty space.
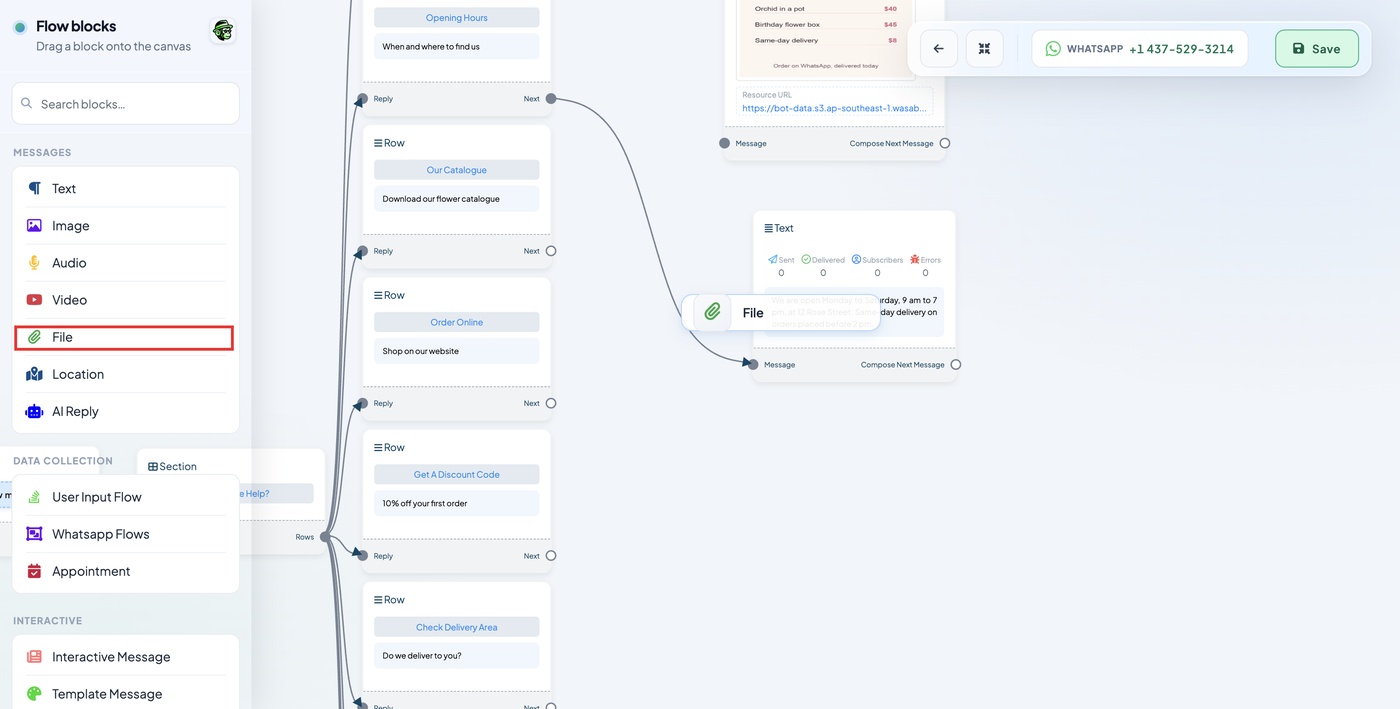 File is in the list on the left
Step 2. Drag from your option's Next dot to the Message dot on the File block.
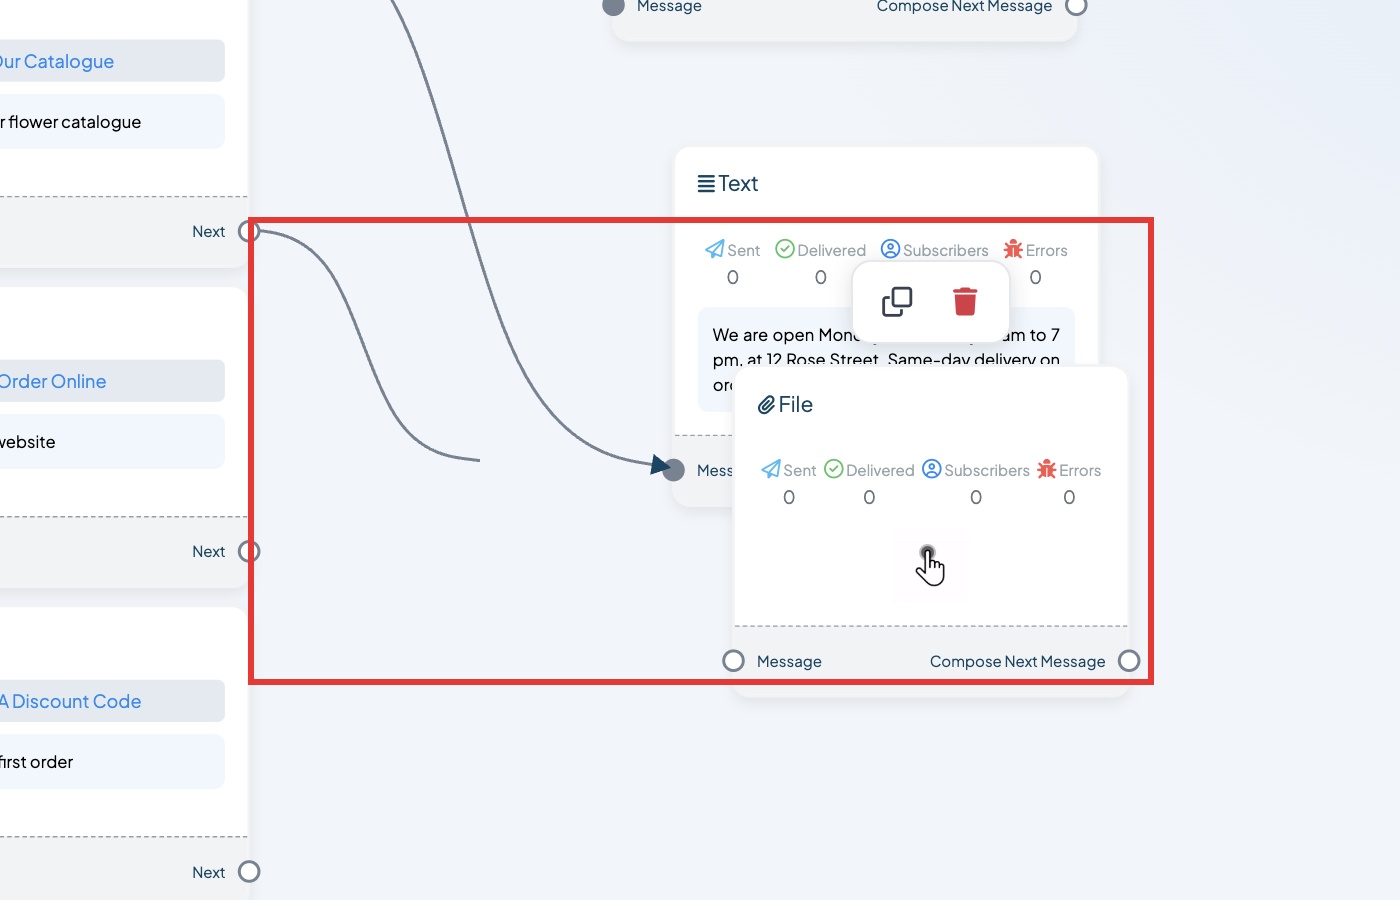 From Next to Message
Step 3. The File settings open.
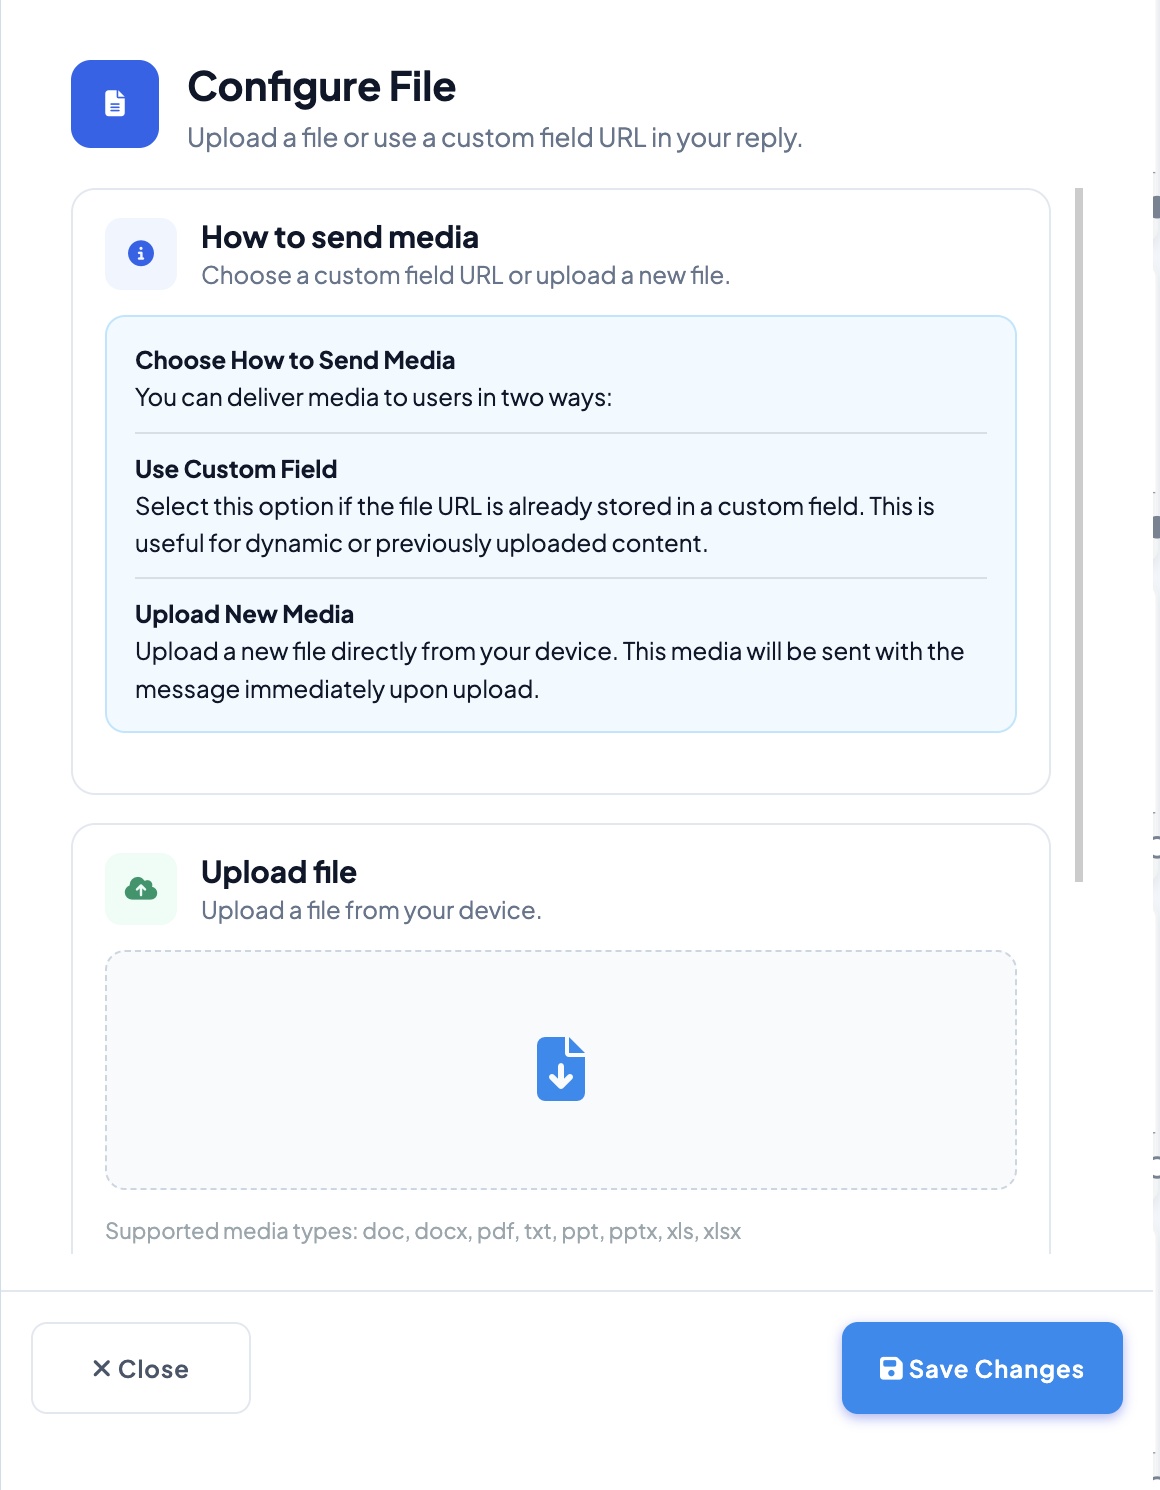 Scroll to Upload file
Step 4. Drag your file onto Upload file. PDF, Word, Excel and PowerPoint all work.
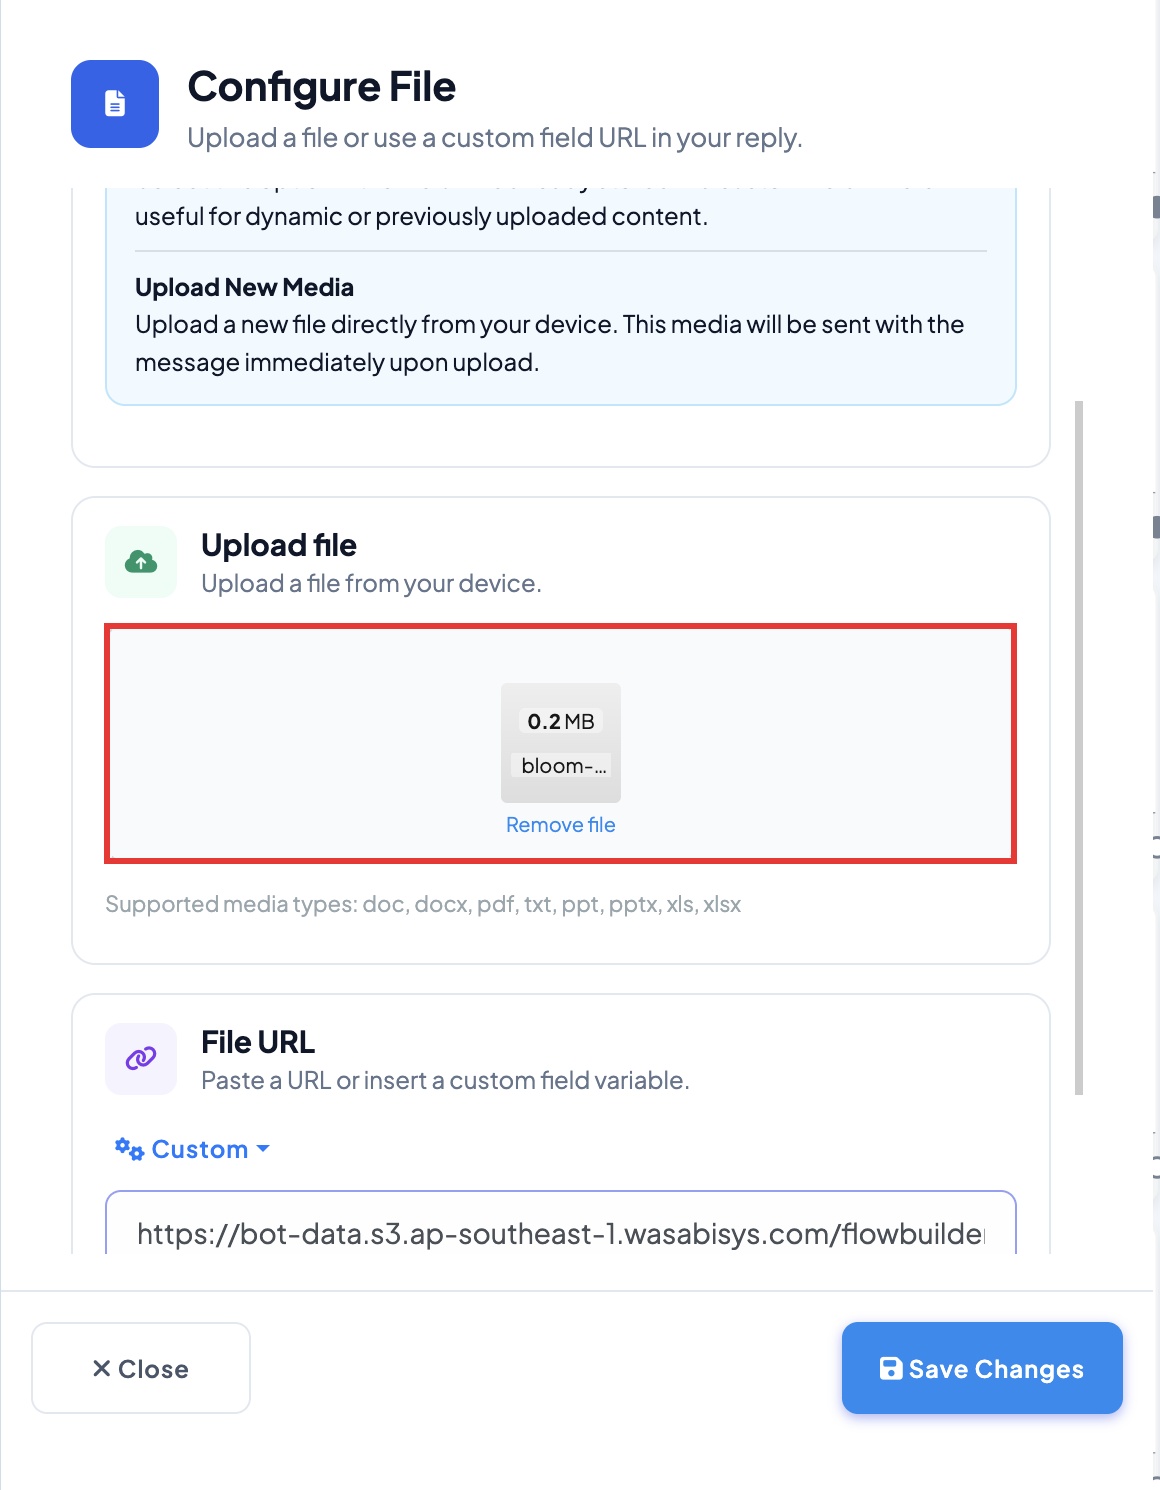 Your file is uploaded
Watch out: customers see the file name, so give your file a clear name before you upload it.
Step 5. Click Save Changes.
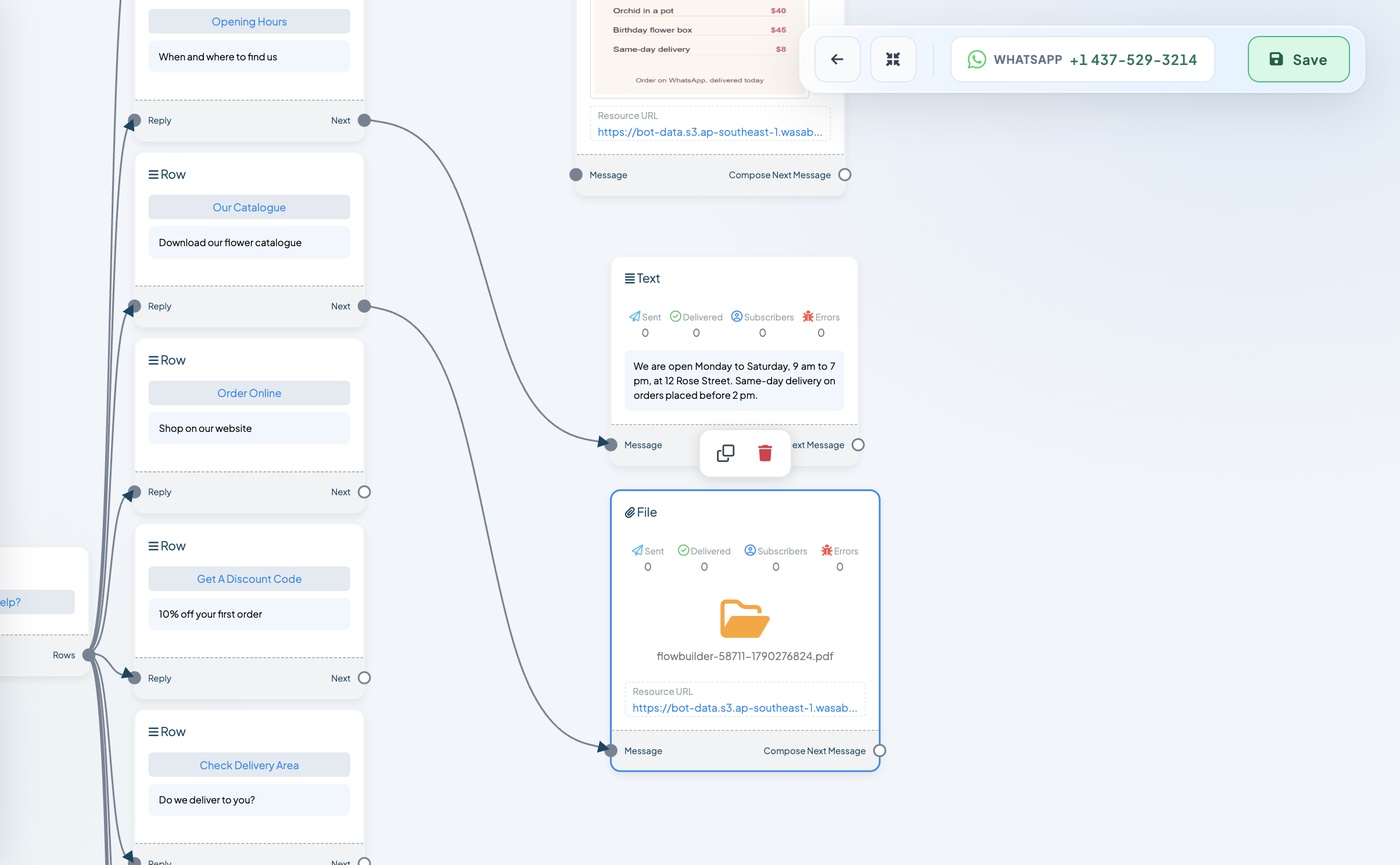 This option now sends your file
What your customer sees:
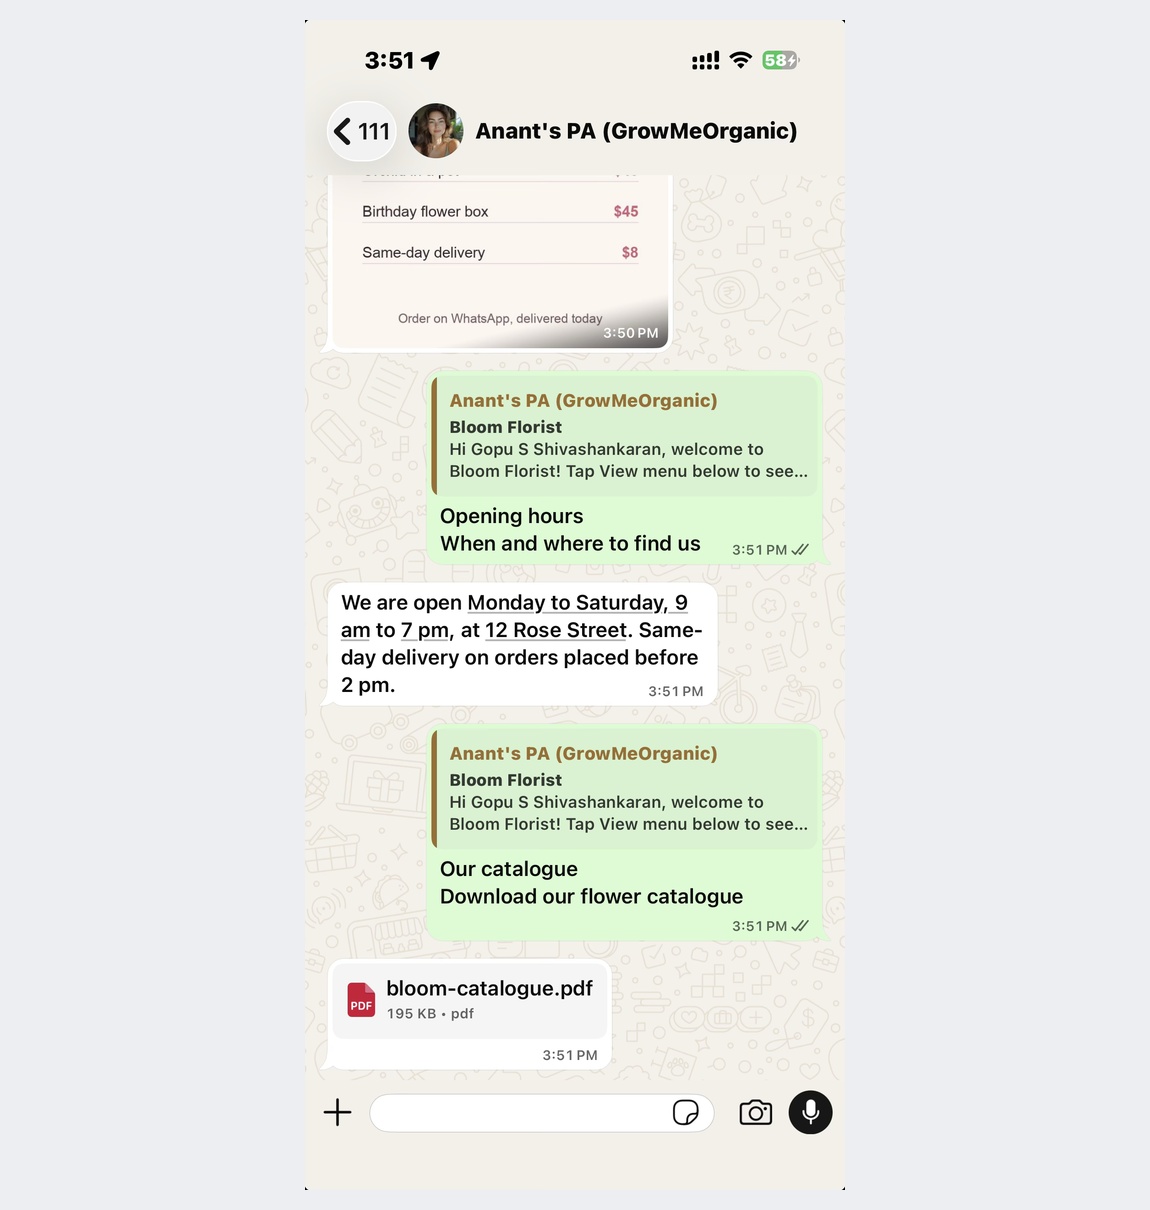 The customer taps the file to open it
Part 7: Send a Website Button (about 3 minutes)
Do you sell online? This option sends a button that opens your website.
Step 1. Type CTA in Search blocks at the top of the list. CTA URL Button appears.
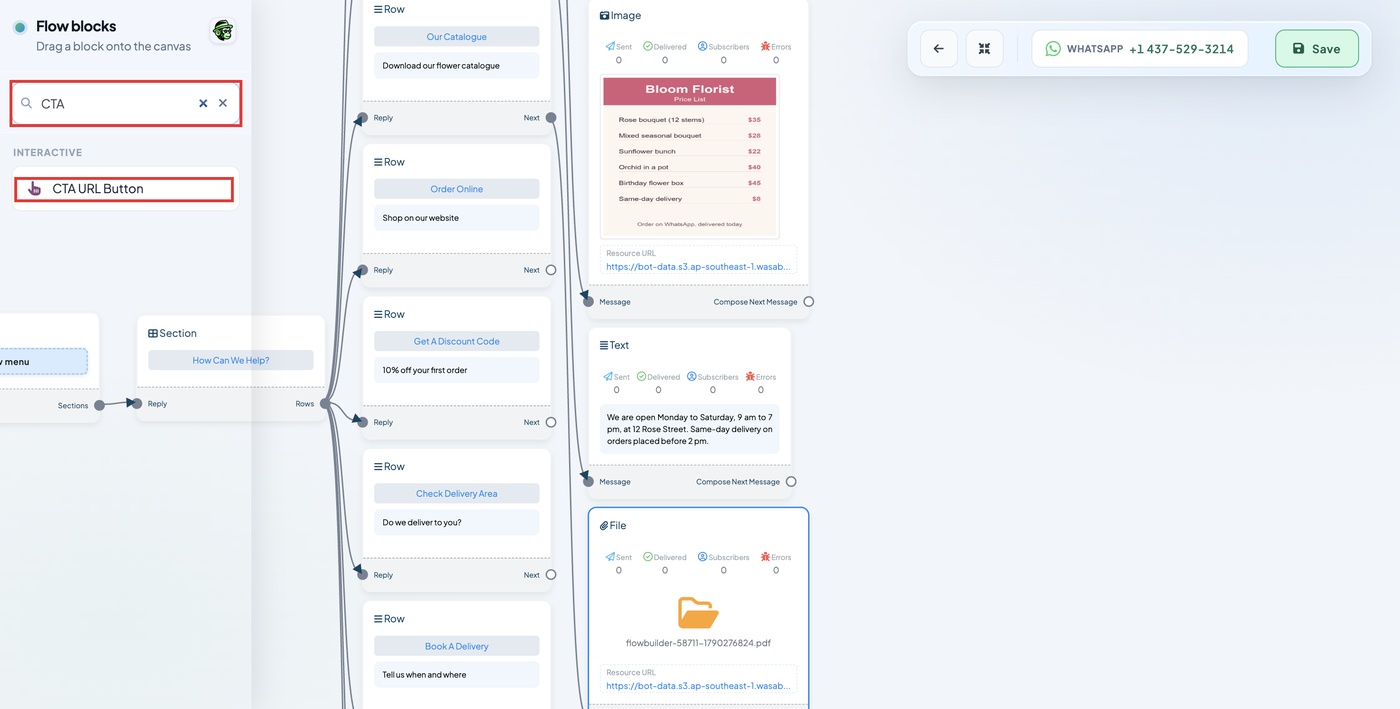 Search finds any block fast
Step 2. Drag CTA URL Button onto the empty space.
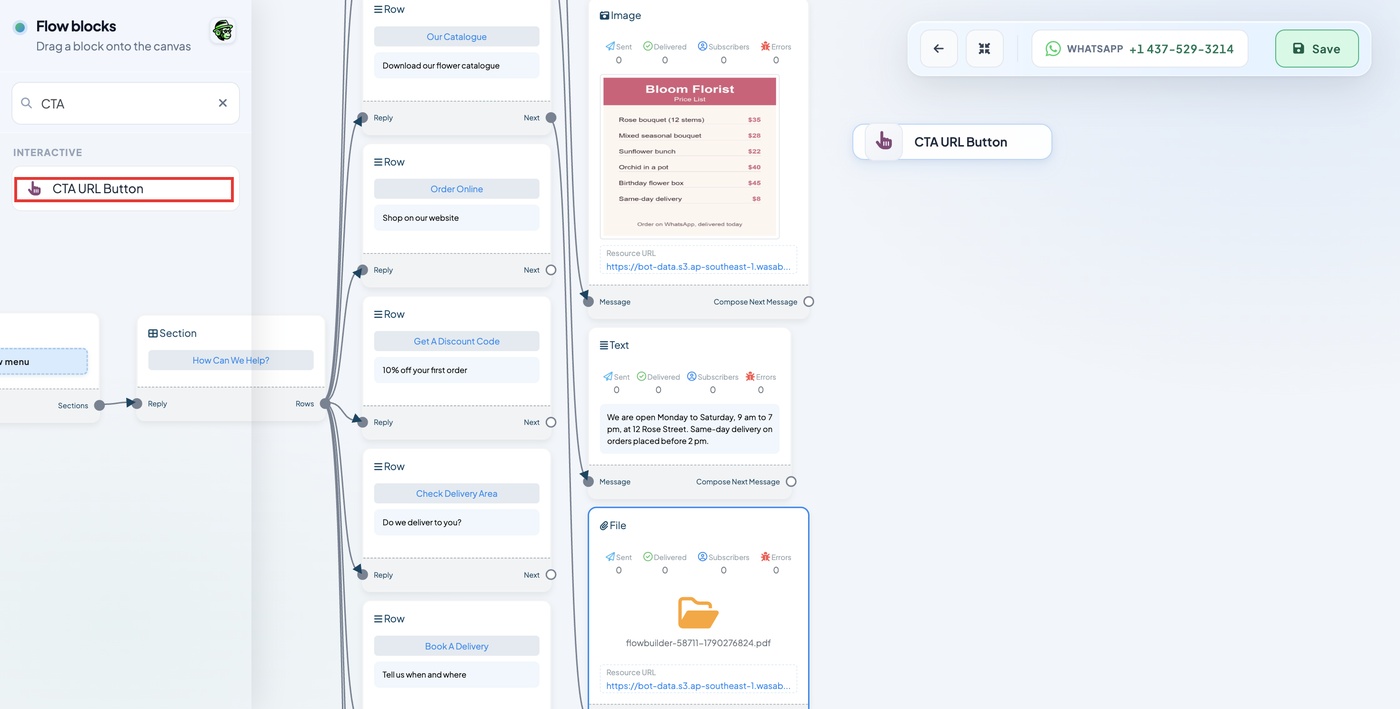 Drag it from the search result
Step 3. Drag from your option's Next dot to the Message dot on the new block.
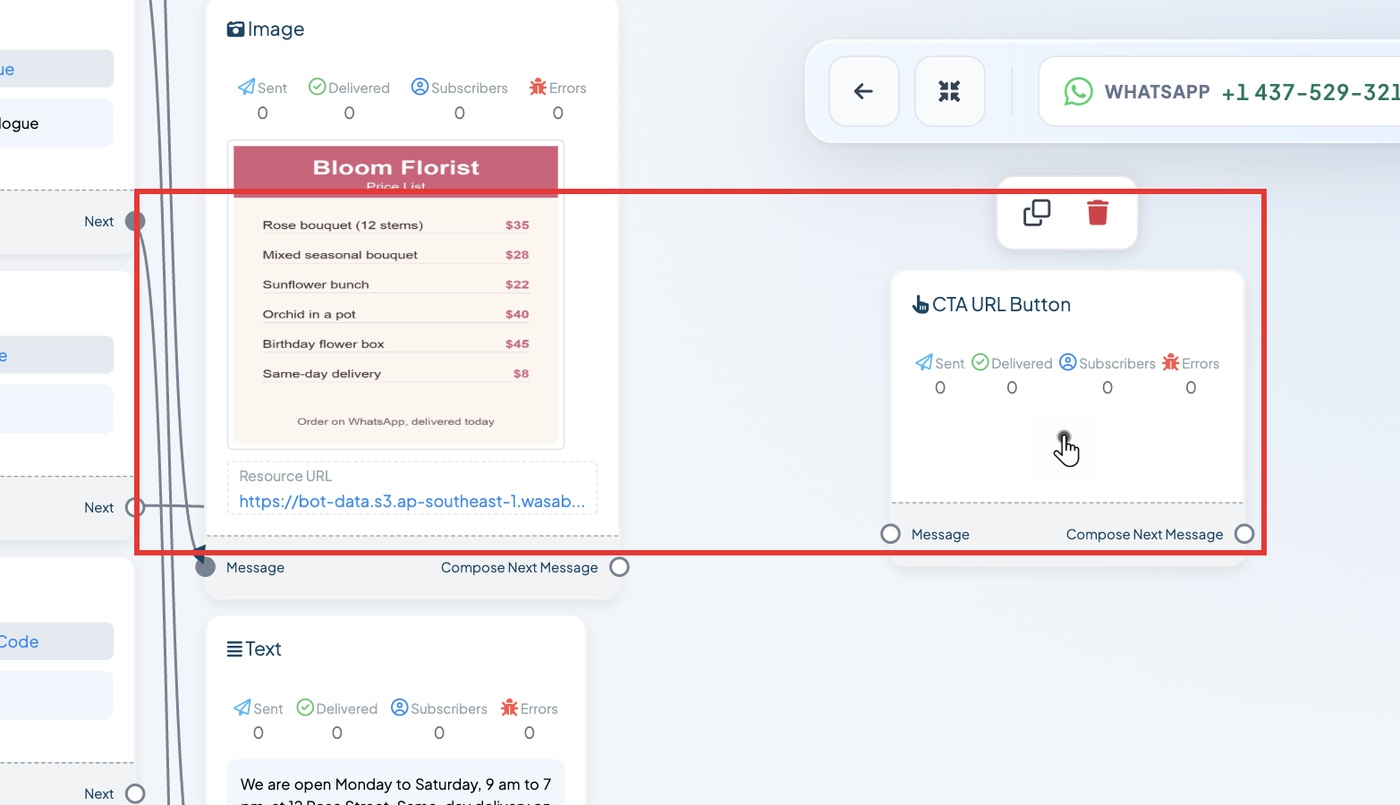 From Next to Message
Step 4. In Body Message, type a short line.
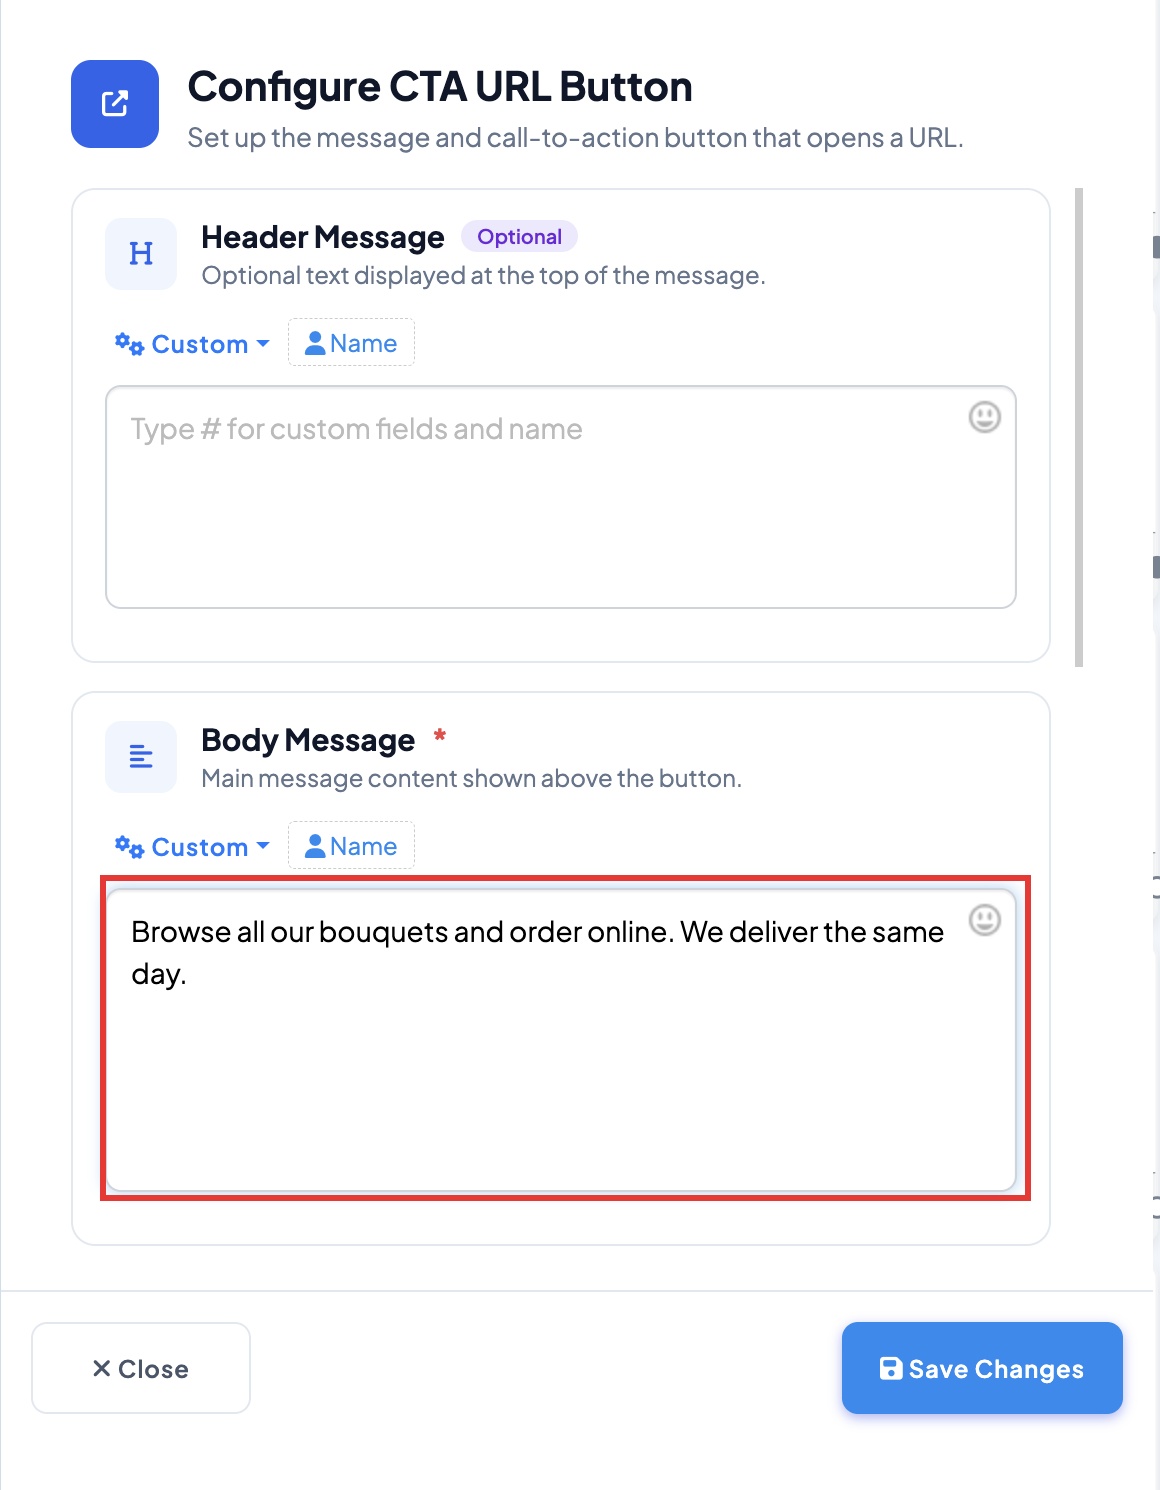 The text above your button
Step 5. Type your Button Text and paste your website address in Button URL. Click Save Changes.
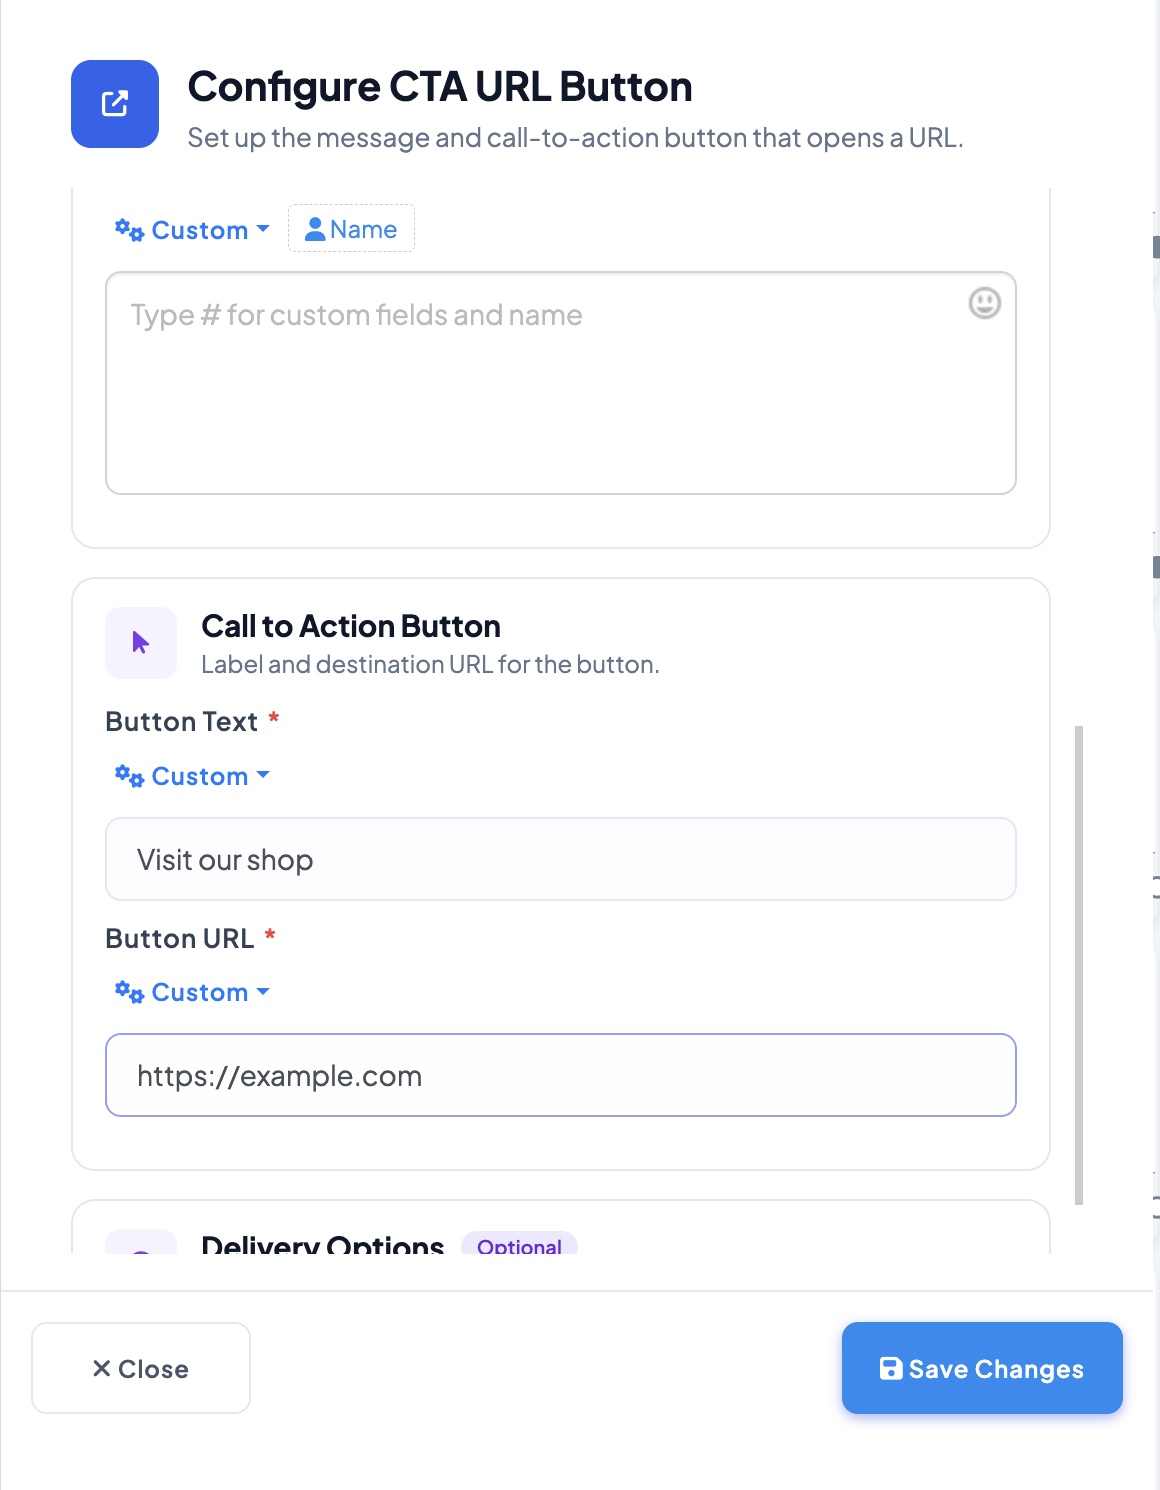 Our example: Visit our shop
Step 6. Your button block is ready. Clear the search box to see all blocks again.
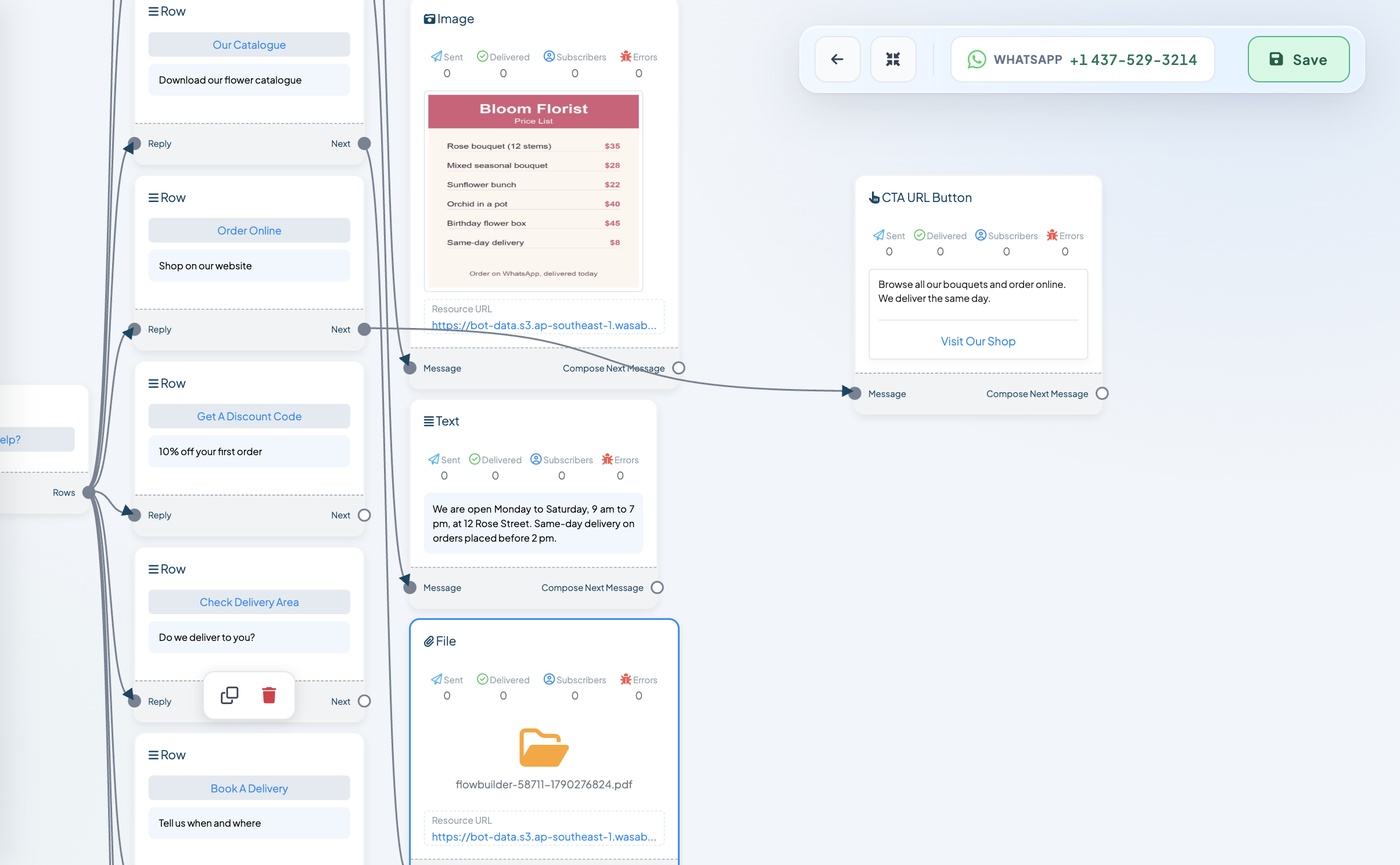 This option now sends your button
What your customer sees:
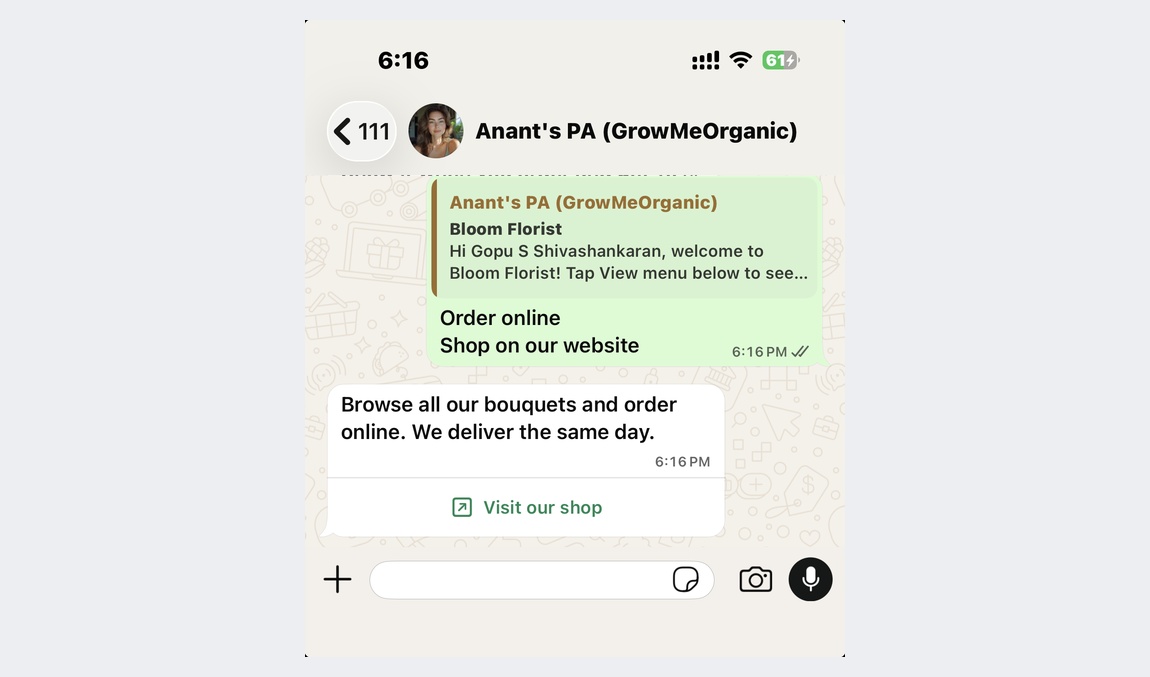 Tapping the button opens your website
Part 8: Send a Discount Code and Tag the Customer (about 5 minutes)
Want to reward customers? This option sends a discount code. It also adds a label (a tag) to the customer, so you can see who asked for a code. Part 13 uses this label.
Step 1. Drag a Text block onto the empty space.
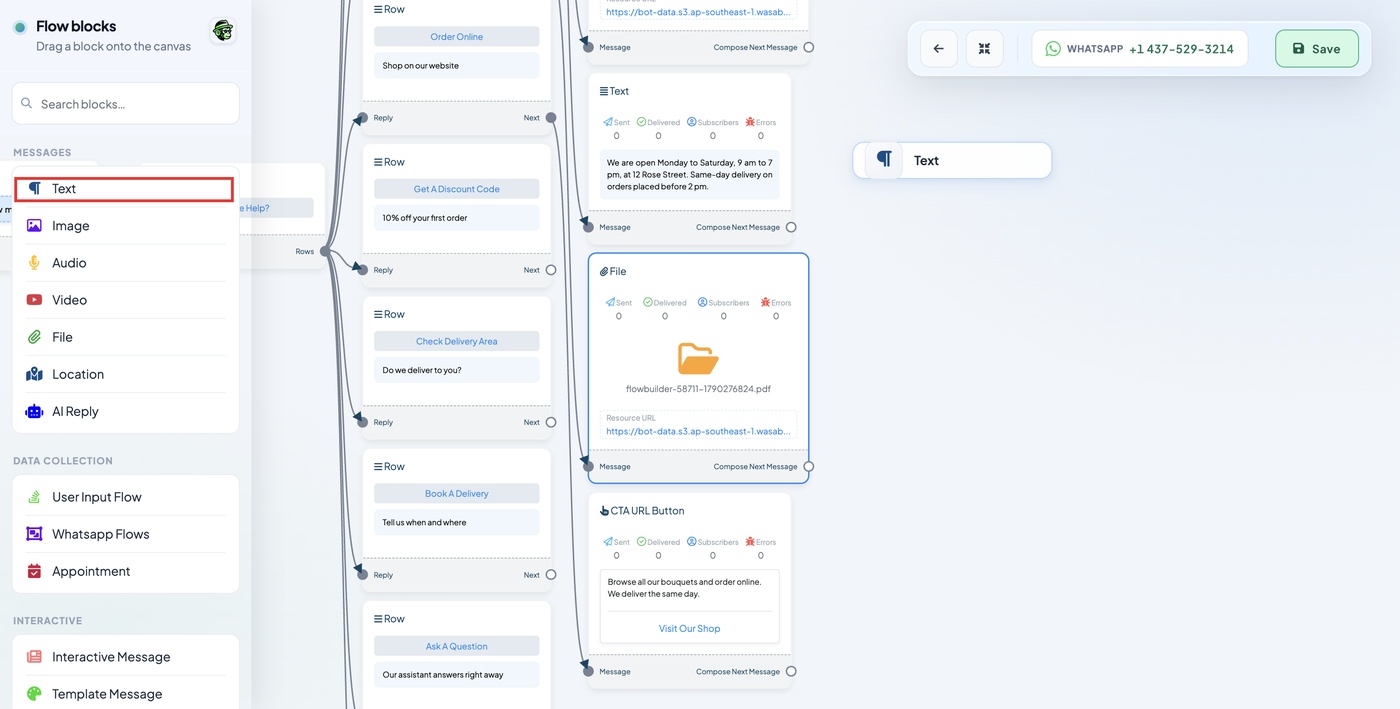 Text is first in the list
Step 2. Drag from your option's Next dot to the Message dot on the Text block.
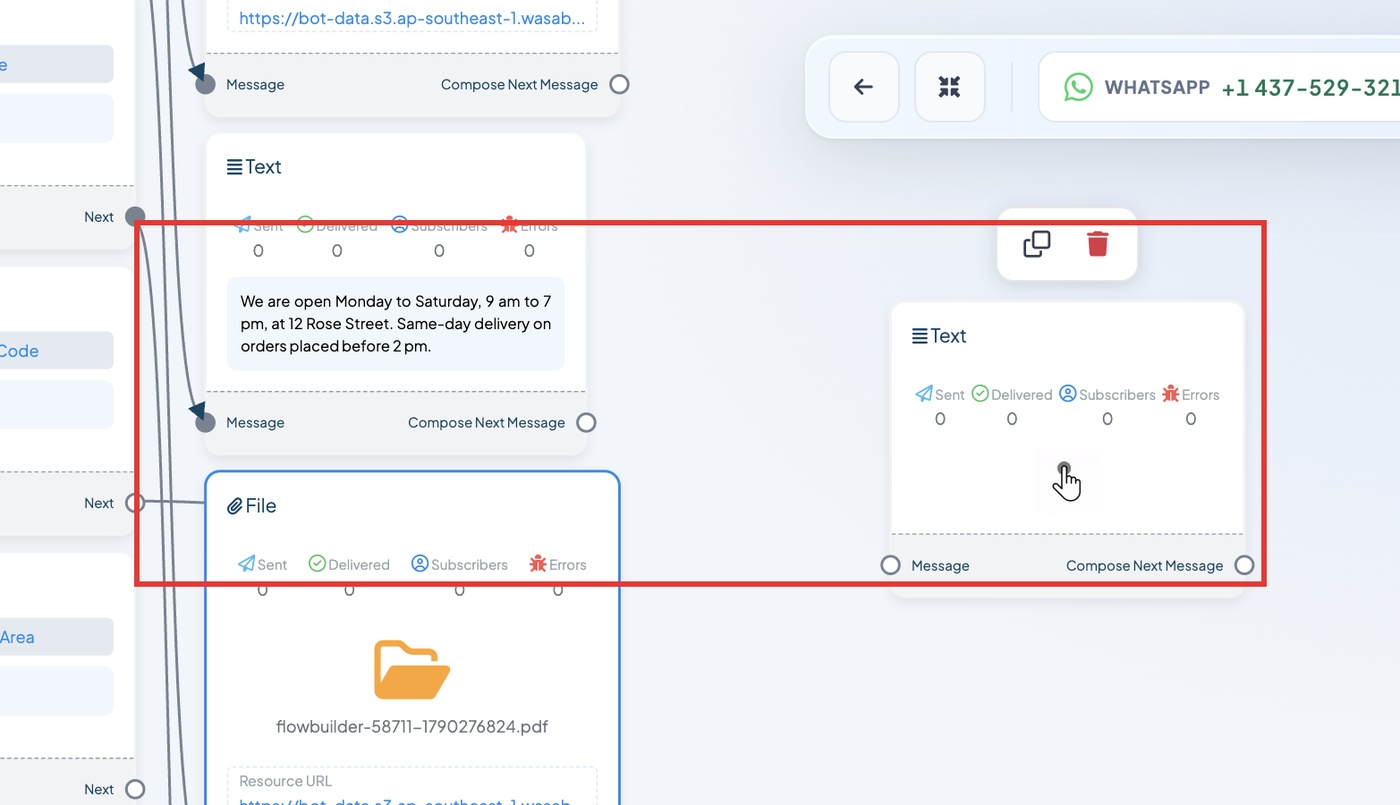 From Next to Message
Step 3. Type your code and how to use it. Click Save Changes.
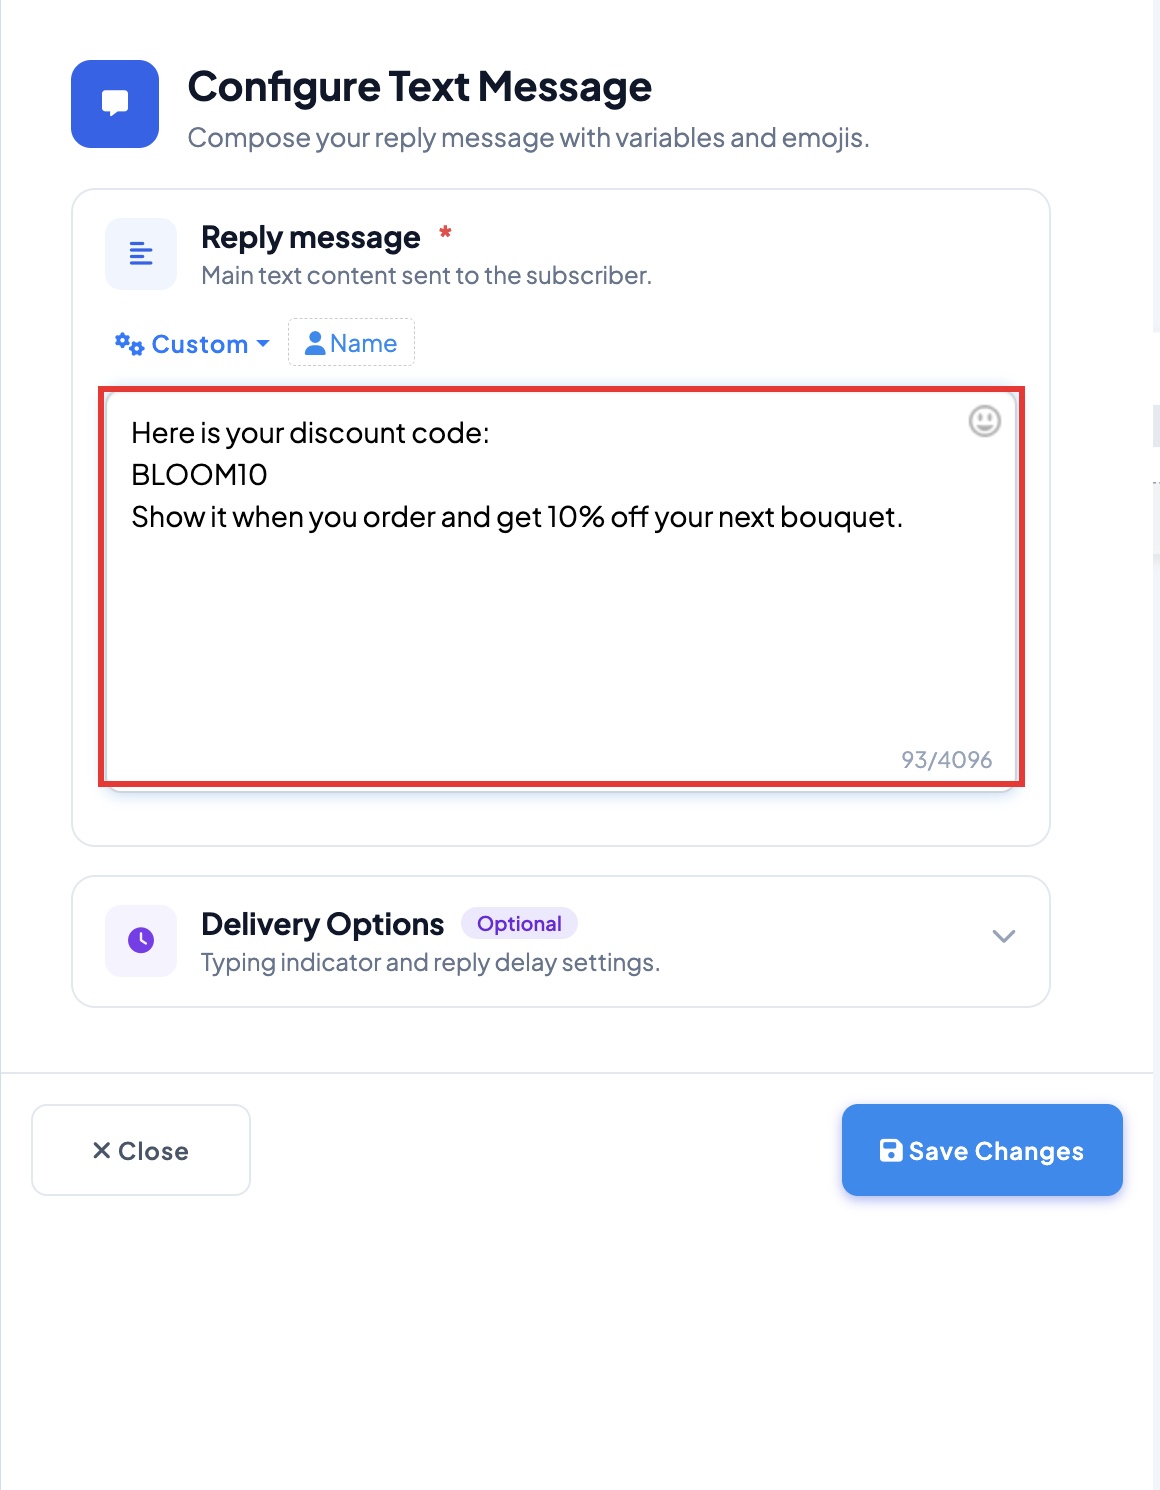 Our example: BLOOM10
Step 4. Your code message is ready.
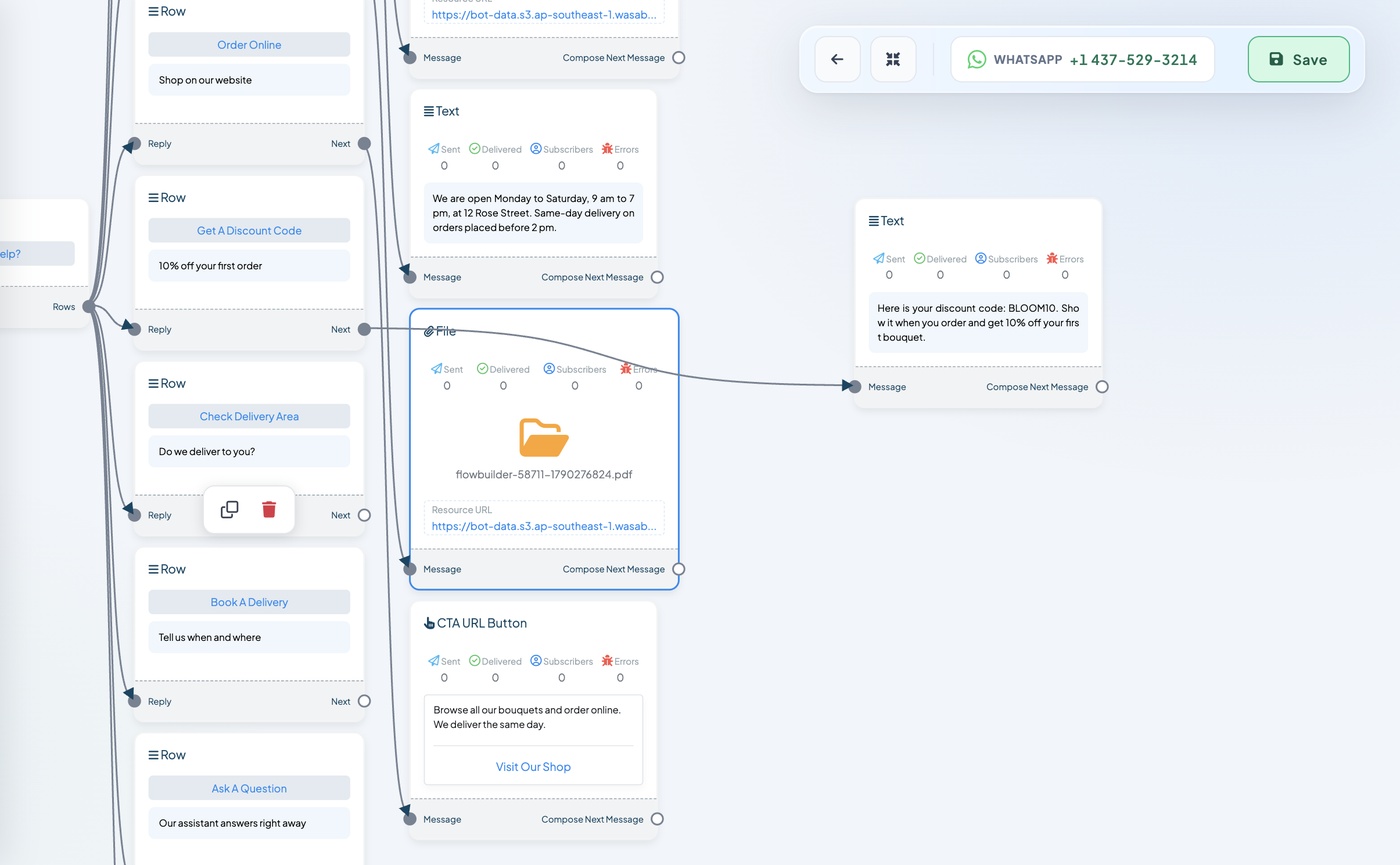 The code is ready
Step 5. Now the label. Type Label in Search blocks.
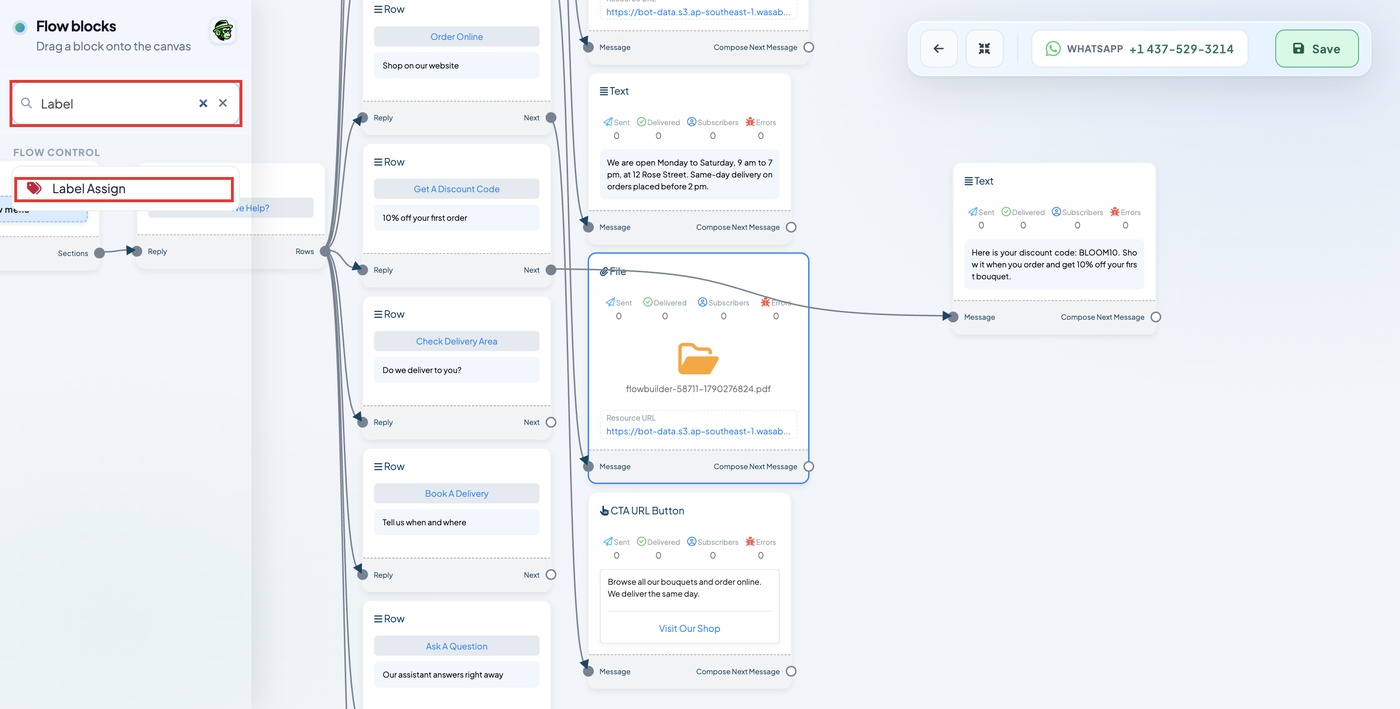 Label Assign adds a tag
Step 6. Drag Label Assign onto the empty space, below your code message.
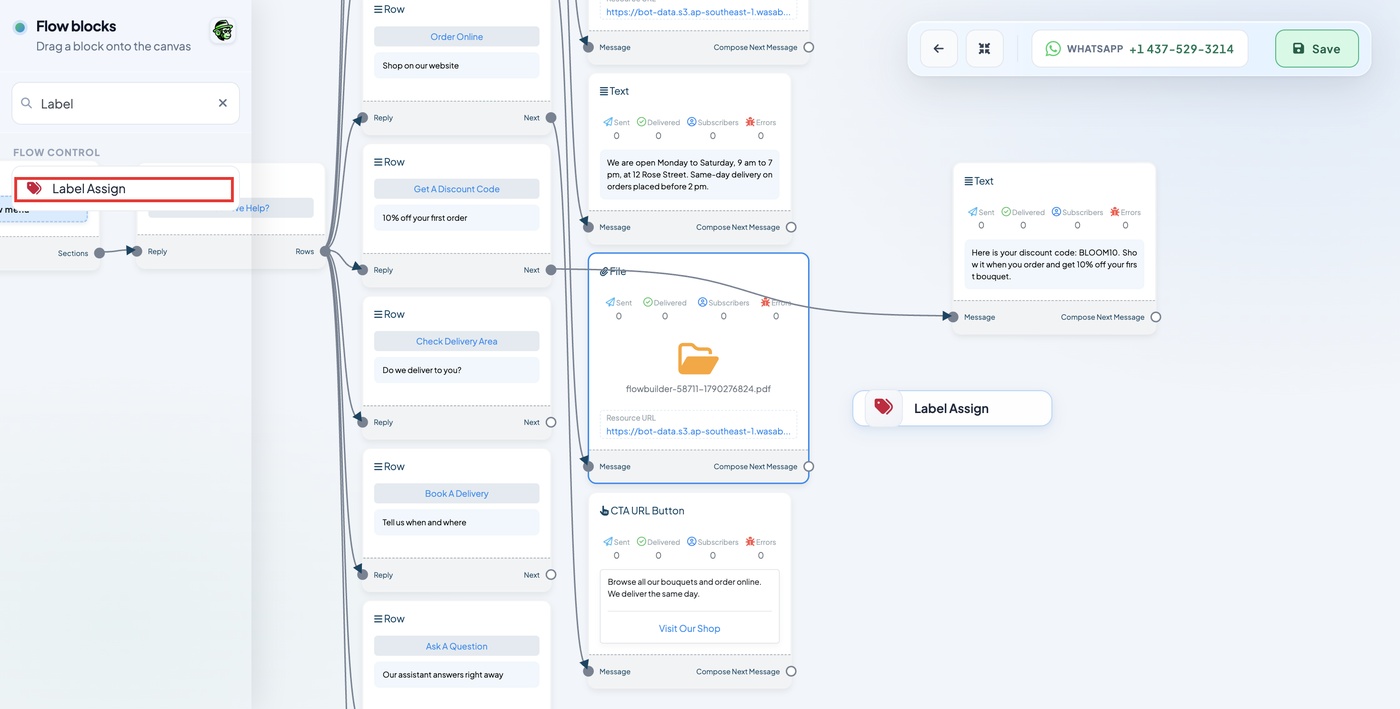 Drag it from the search result
Step 7. Drag from the Compose Next Message dot on your code message to the Message dot on Label Assign.
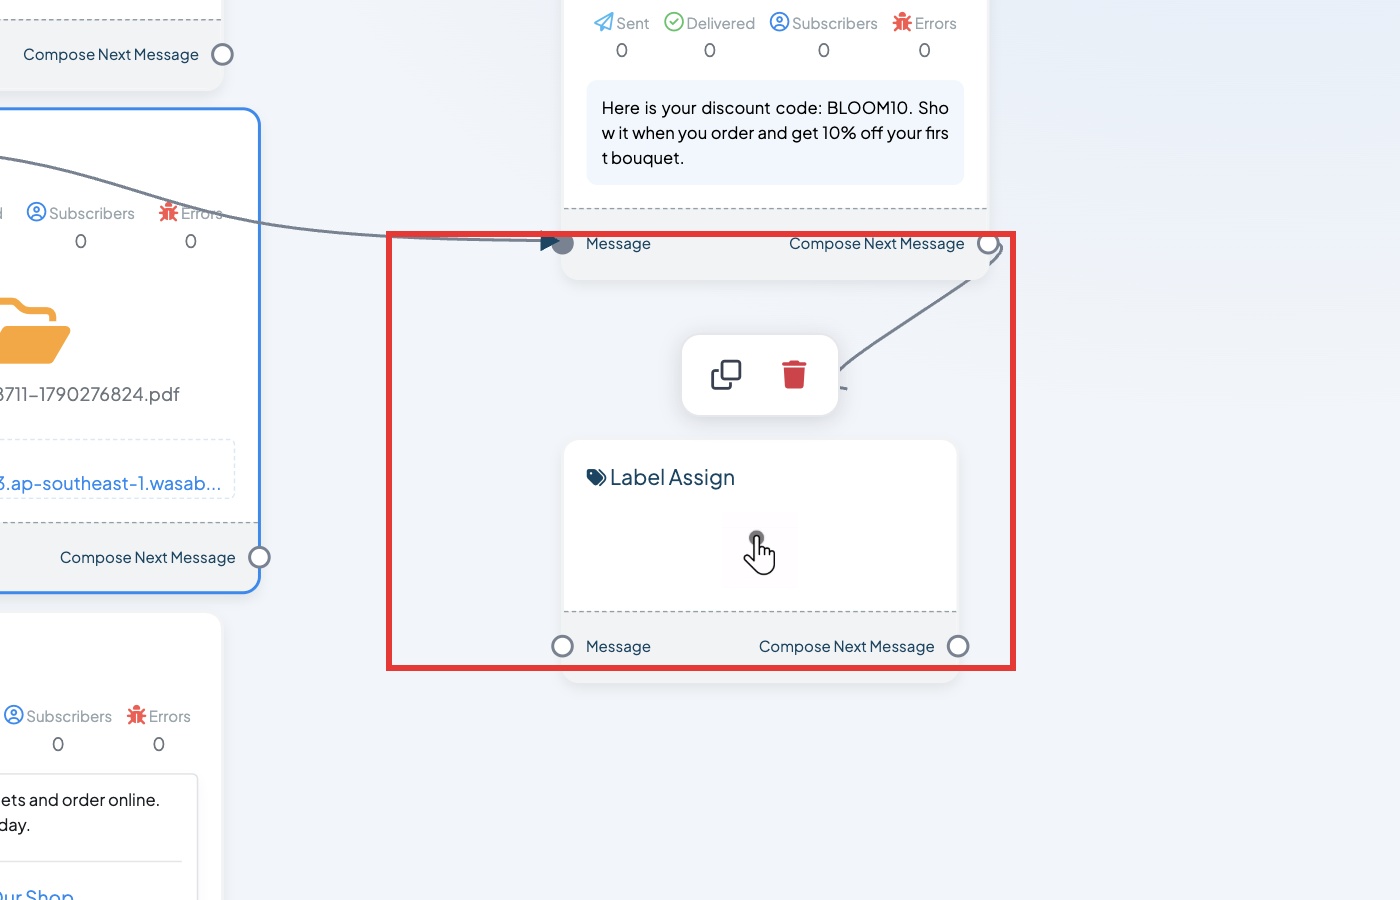 The label is added right after the code is sent
Step 8. Click the box under Add Label(s) and type a label name. (Our example: Bloom discount)
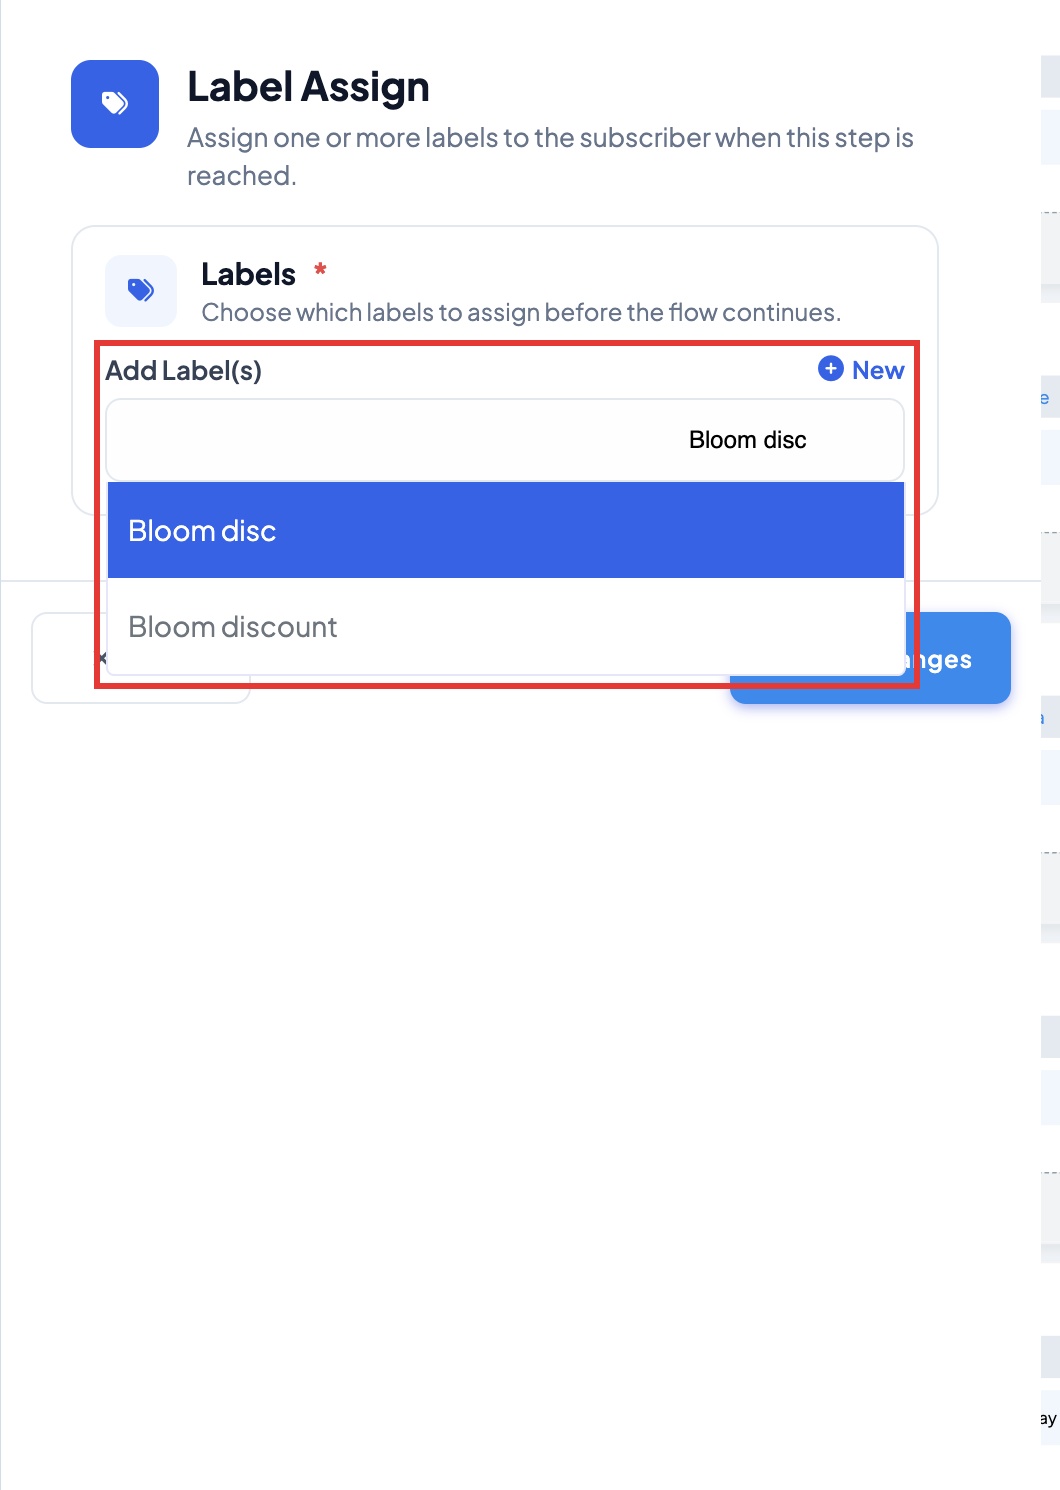 Type your label name
Step 9. Click your label in the list. For a new label, click the line that shows exactly what you typed. Click Save Changes.
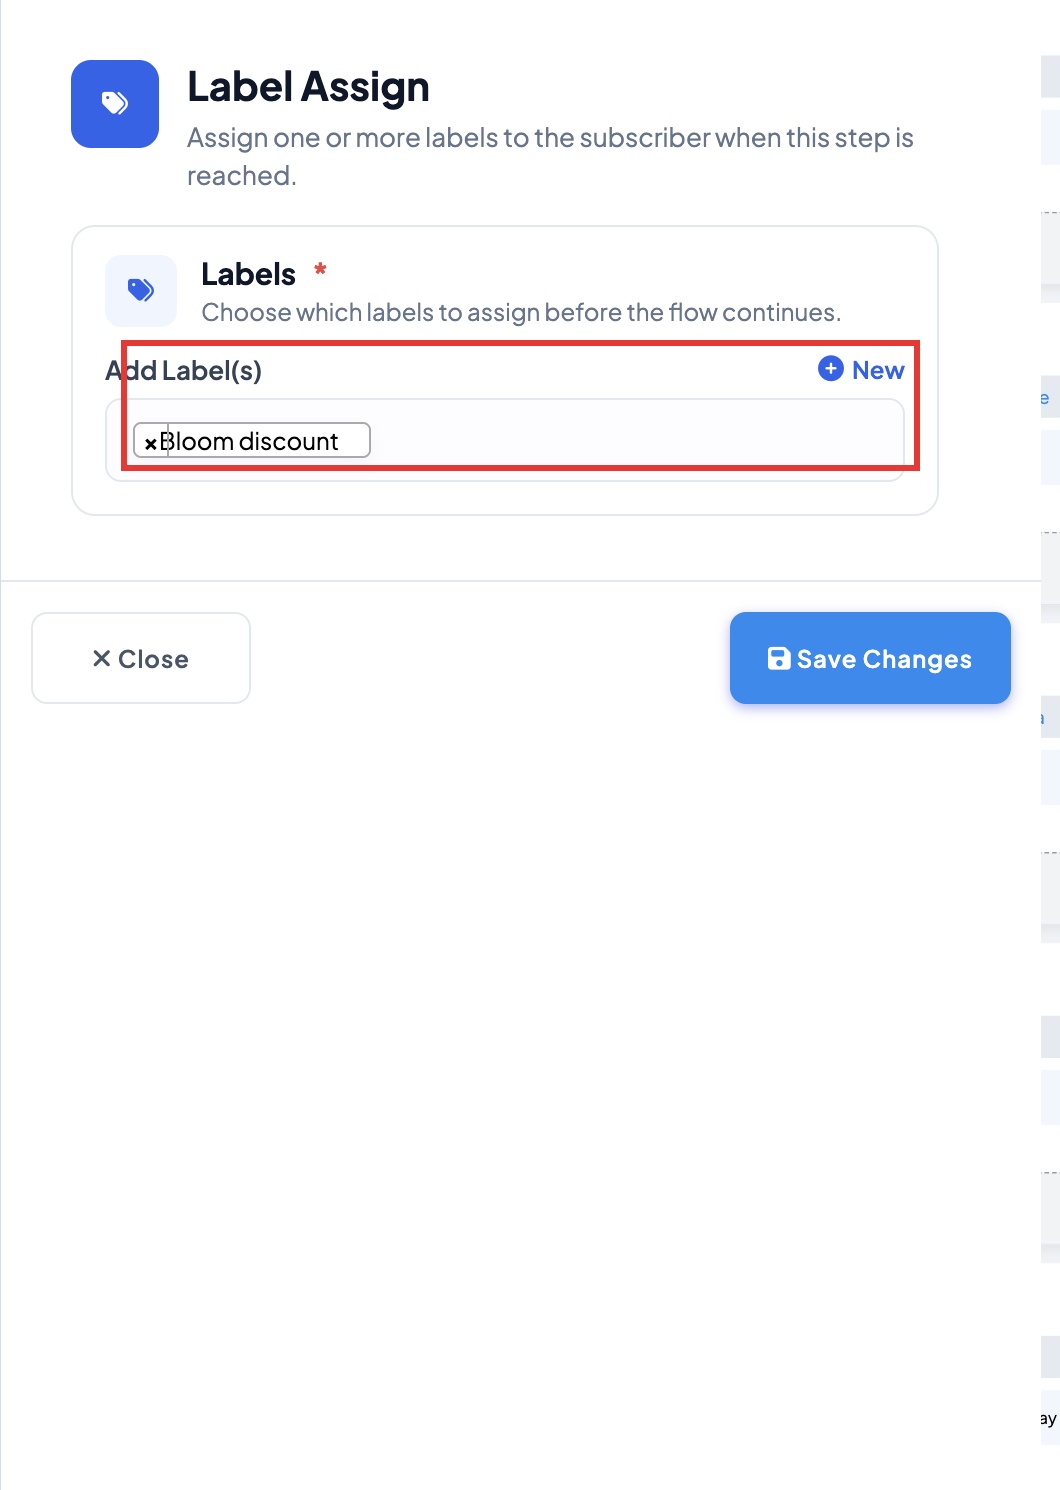 Your label is chosen
Step 10. Everyone who taps this option now gets your label.
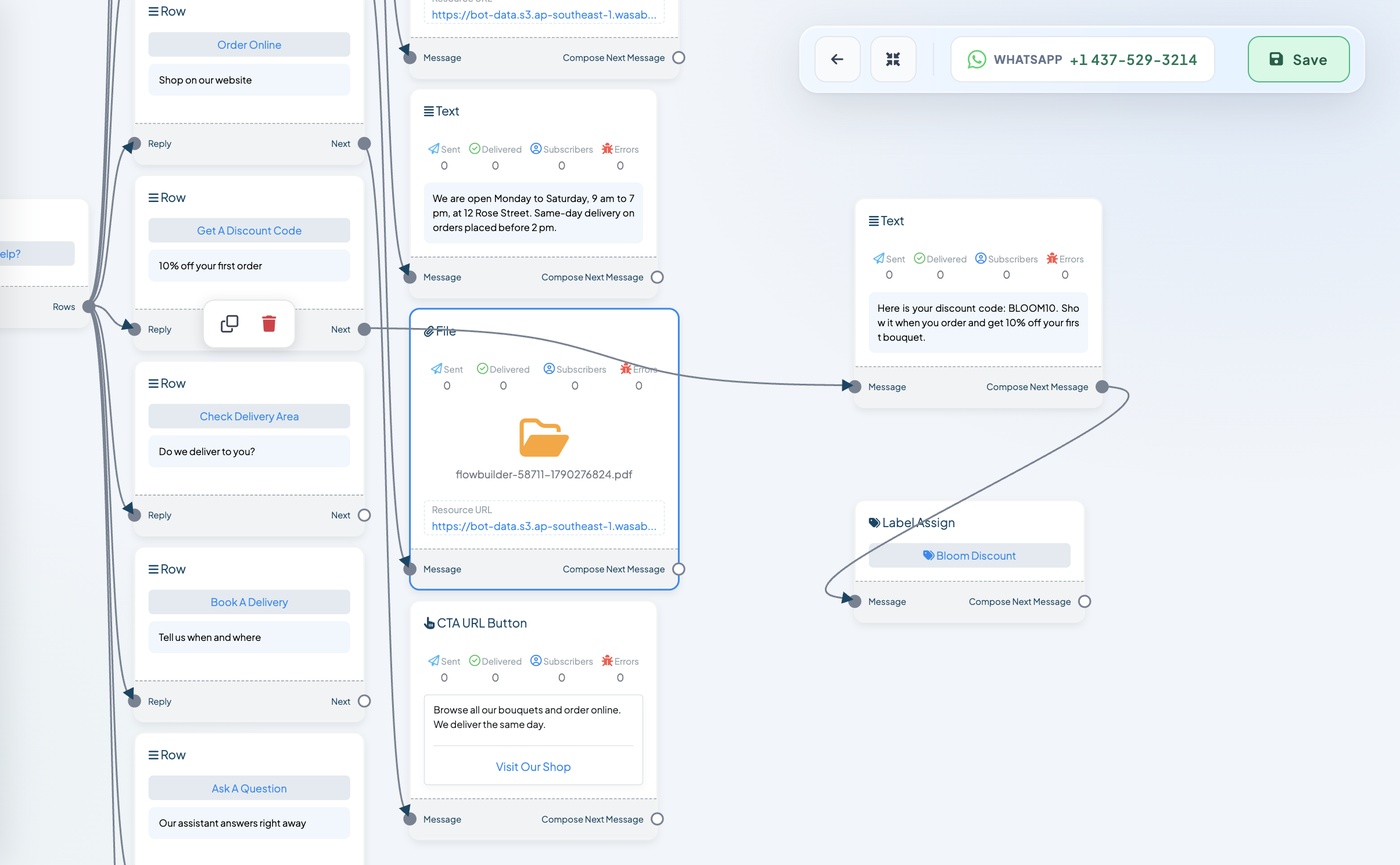 The label is set
What your customer sees: the code. The label is only visible to you.
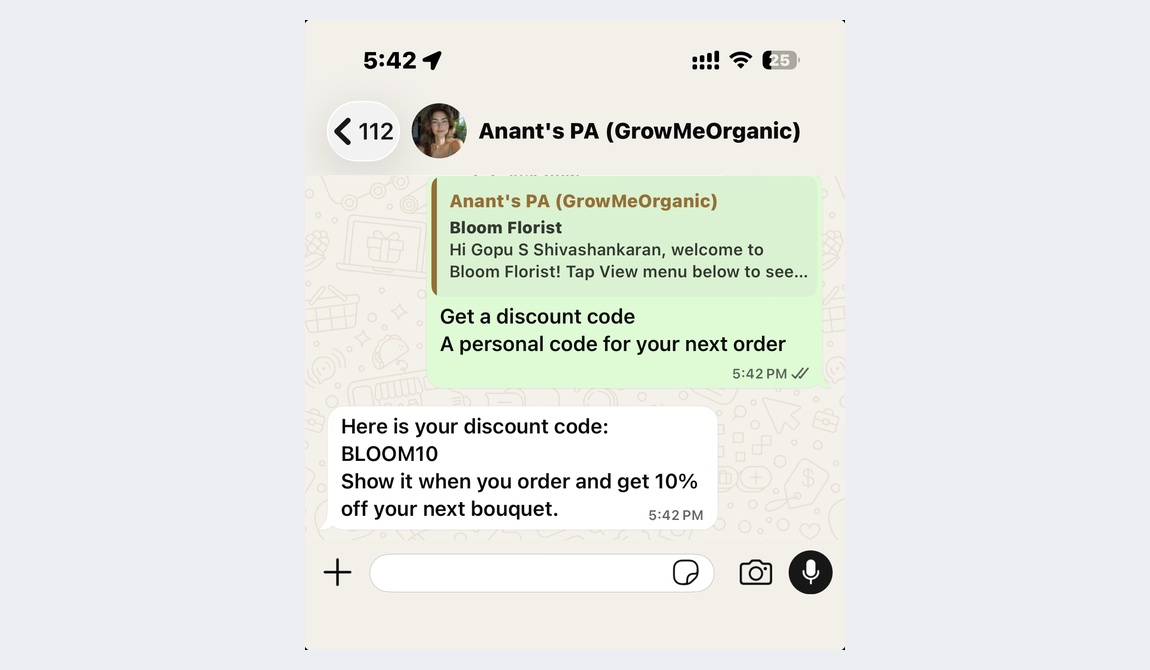 The code arrives right away
Part 9: Ask for the Customer's Location (about 2 minutes)
Do you deliver or visit customers? This option asks them to share their location in one tap.
Step 1. Drag a Location block onto the empty space.
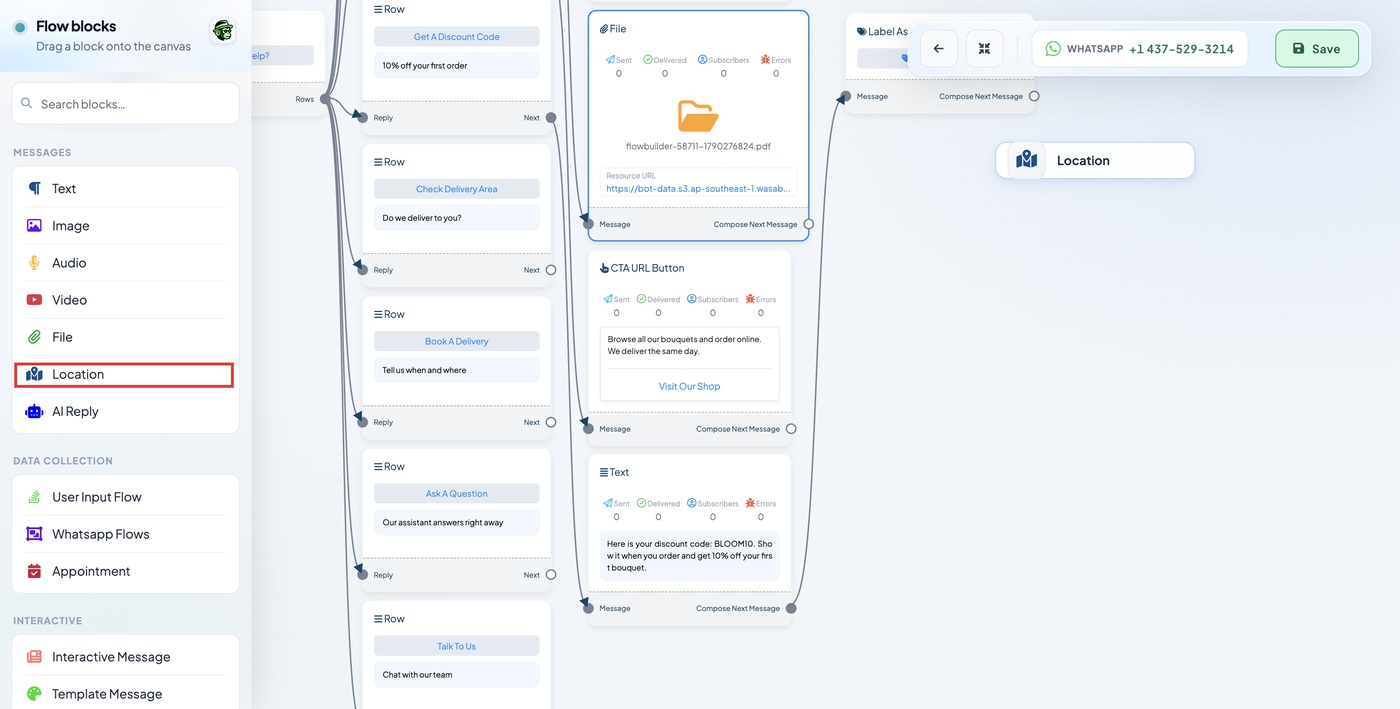 Location is in the list on the left
Step 2. Drag from your option's Next dot to the Message dot on the Location block.
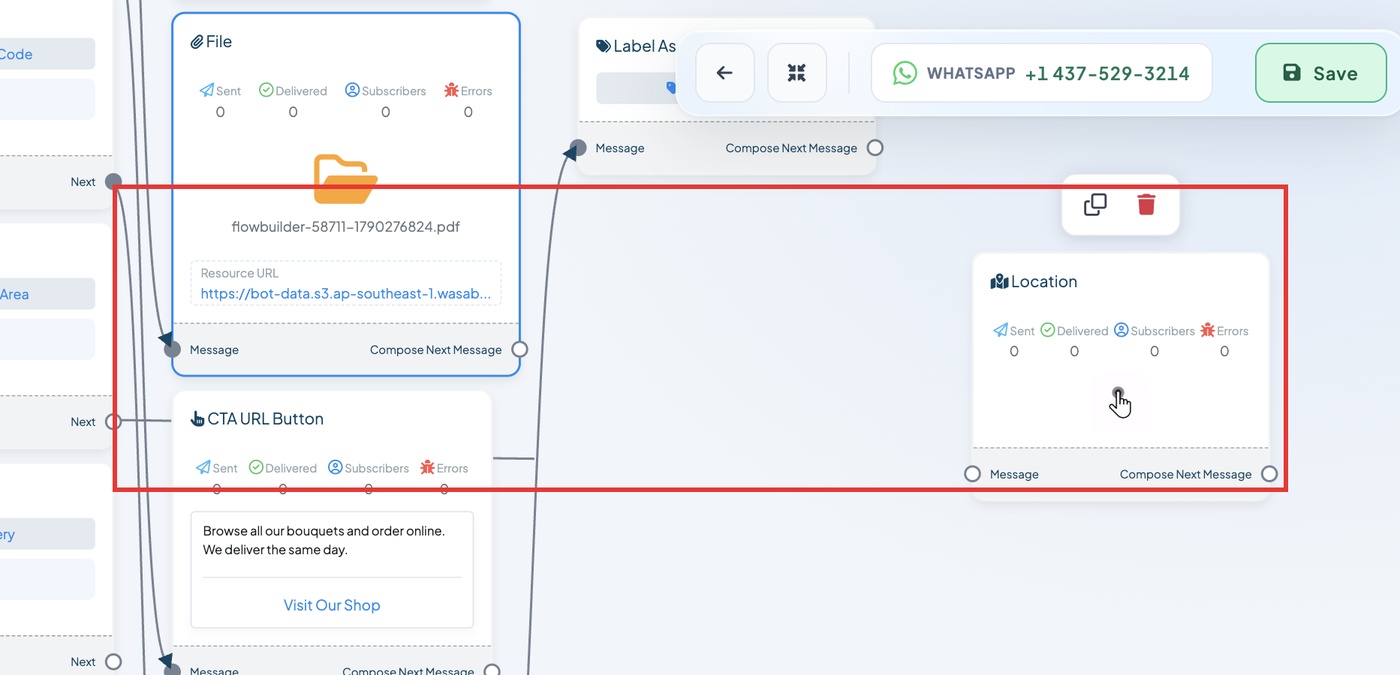 From Next to Message
Step 3. In Body text, tell the customer what to do. Click Save Changes.
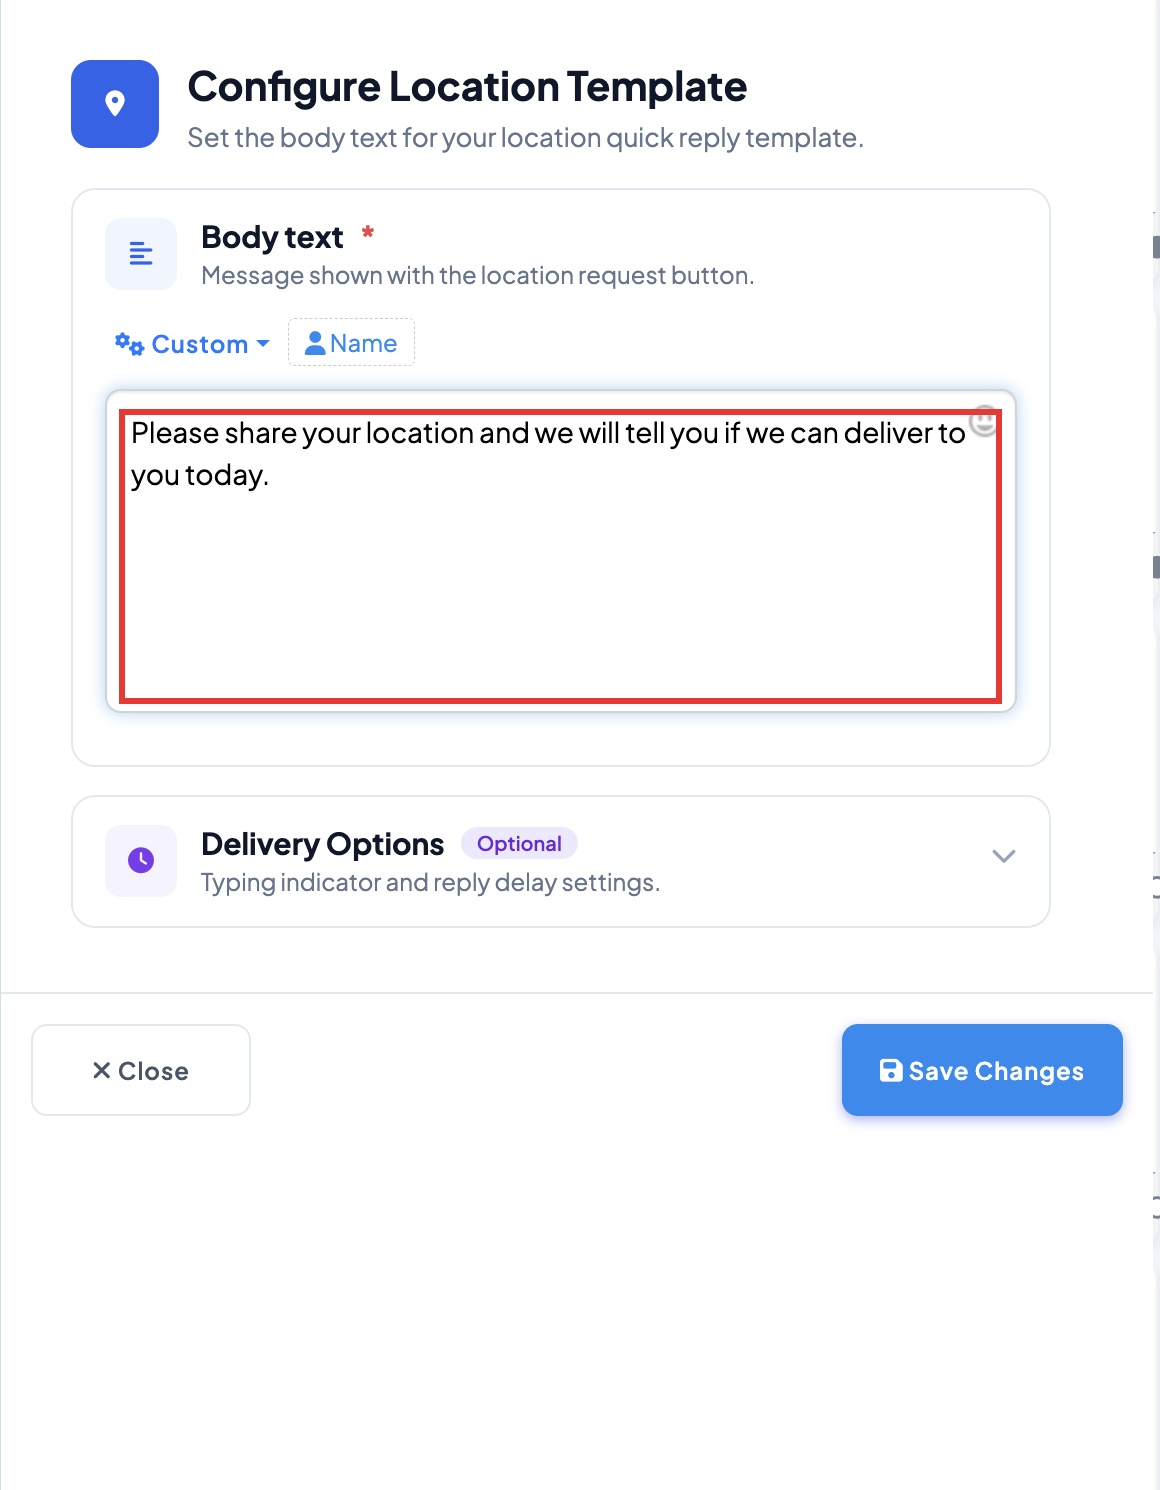 The text above the Send location button
Step 4. Your location block is ready.
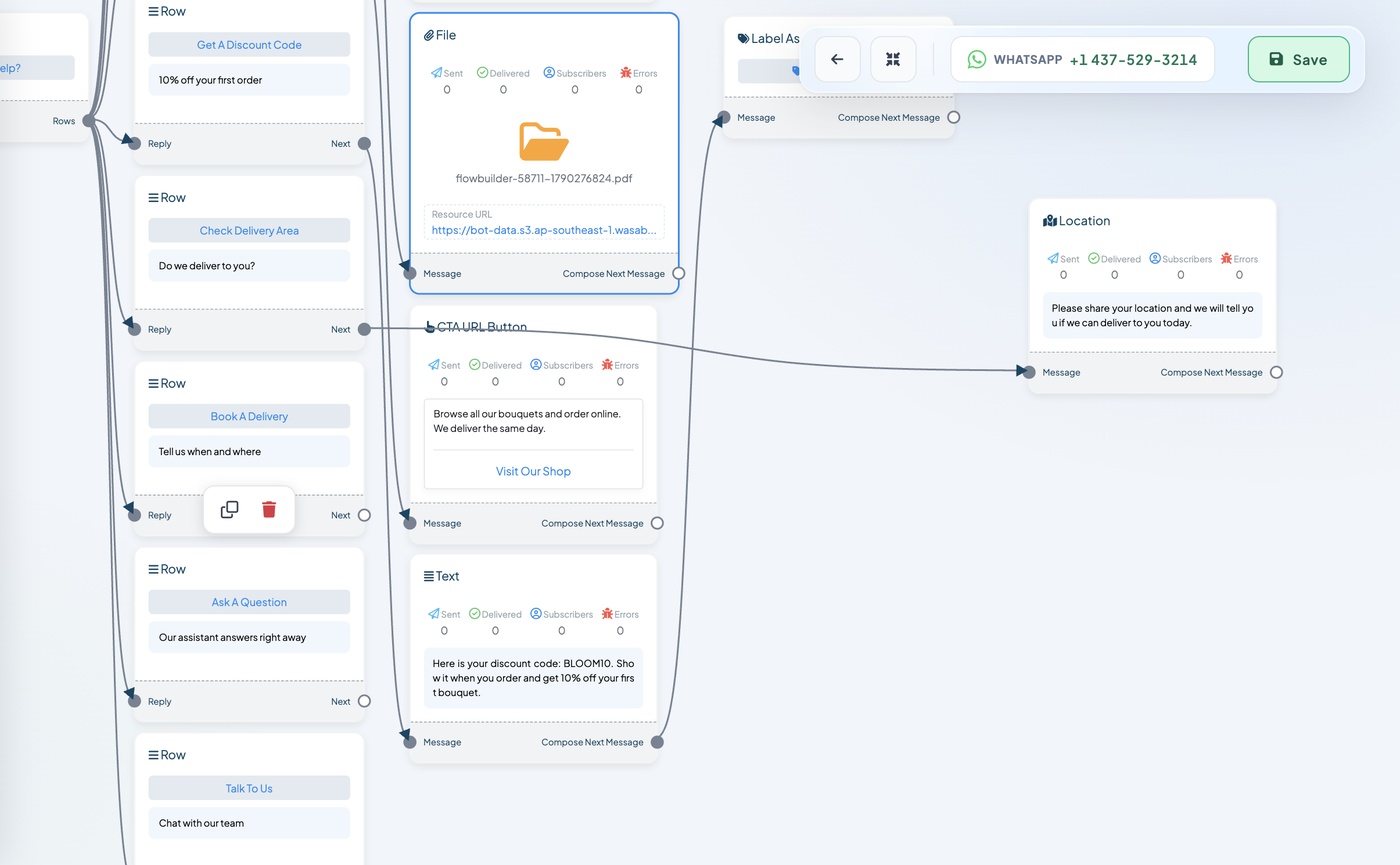 This option now asks for location
What your customer sees:
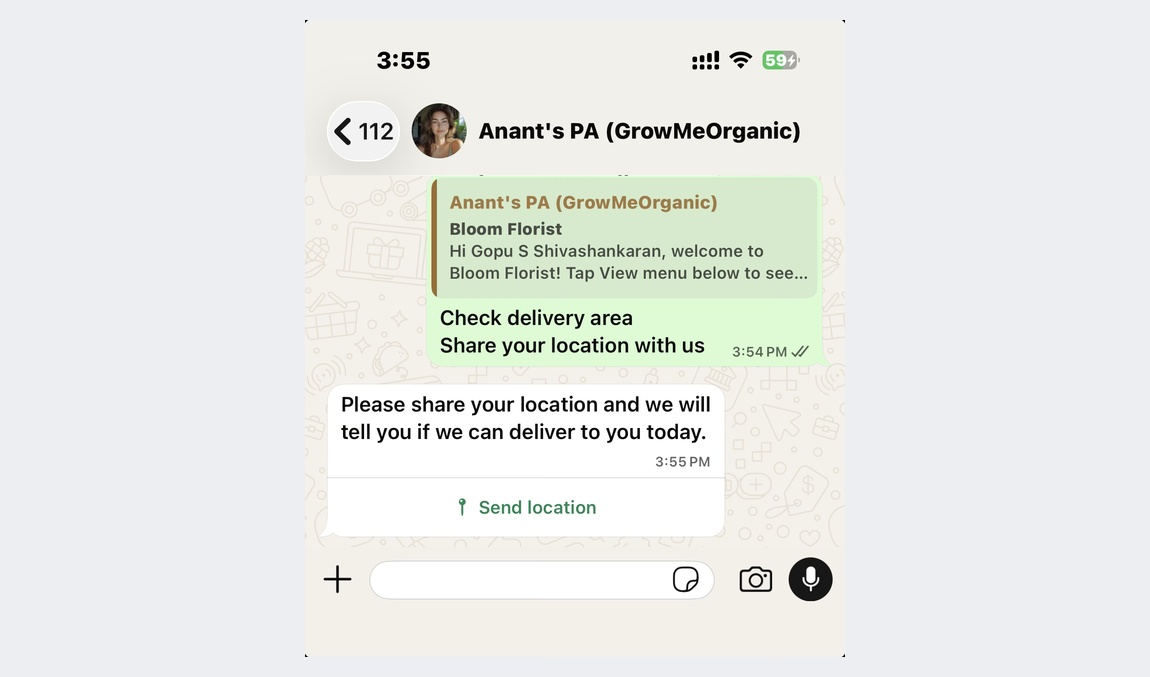 The customer taps Send location
Part 10: Let AI Answer Questions (about 6 minutes)
Tired of answering the same questions? This option lets AI answer them, using information you give it.
The AI needs a button in front of it, so this part uses three blocks: a message, an Ask now button, and the AI.
Step 1. Drag an Interactive Message block onto the empty space.
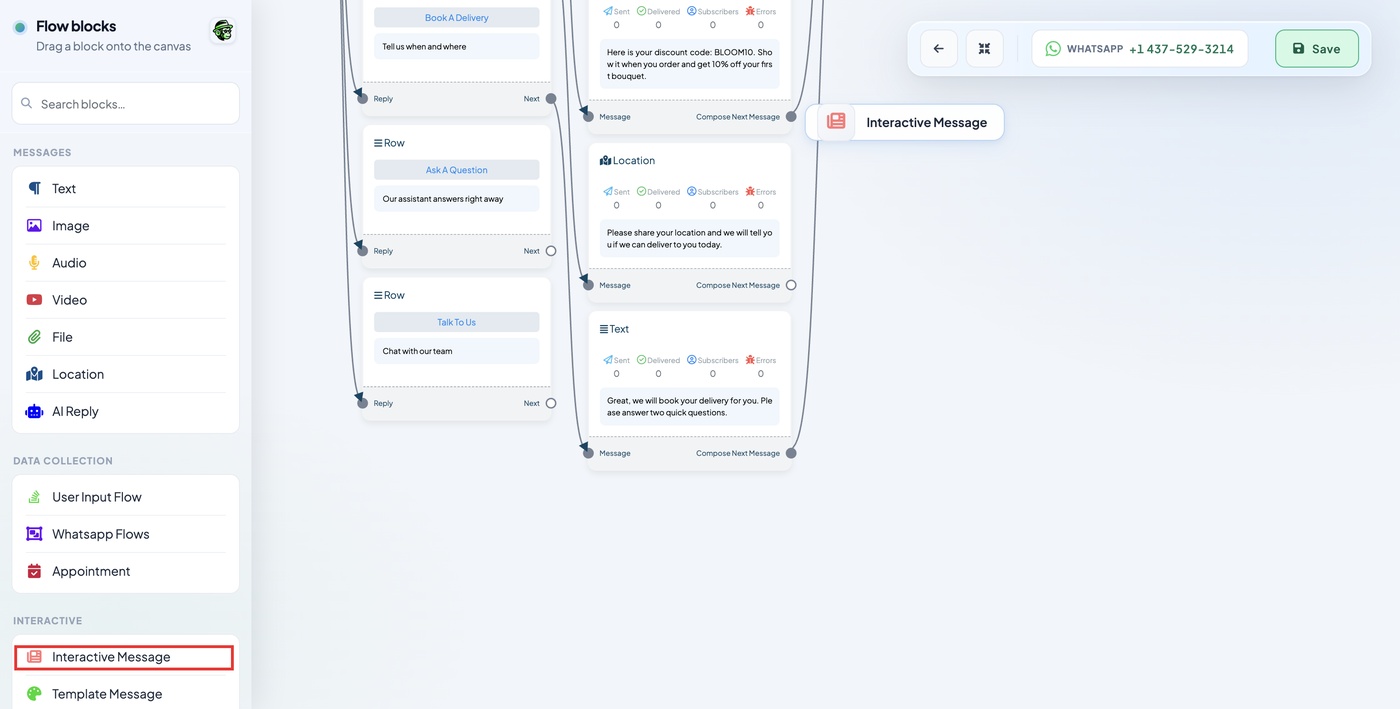 Interactive Message is in the list on the left
Step 2. Drag from your option's Next dot to the Reply dot on the new block.
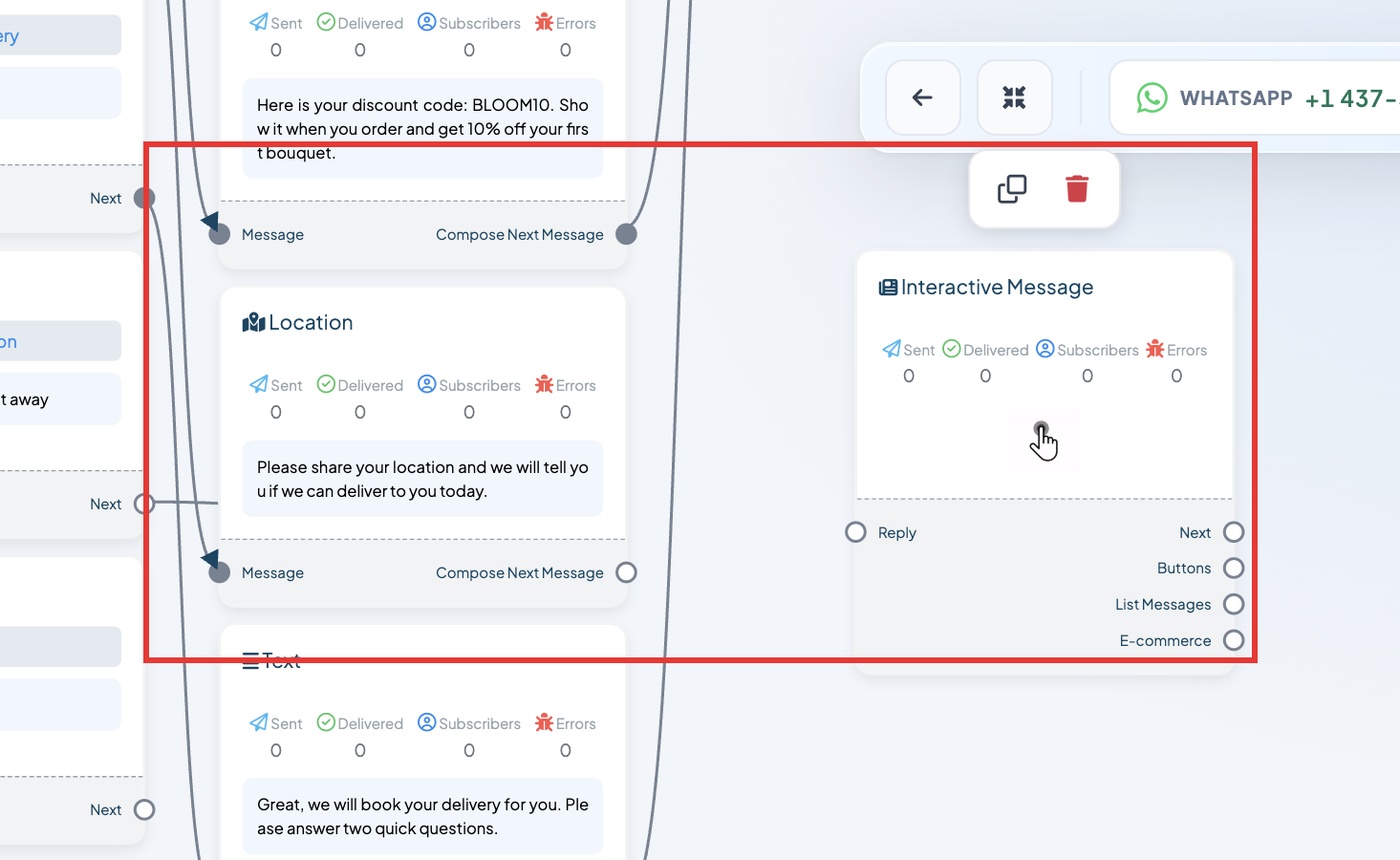 From Next to Reply
Step 3. In Message Body, tell customers to tap Ask now and type their question. Click Save Changes.
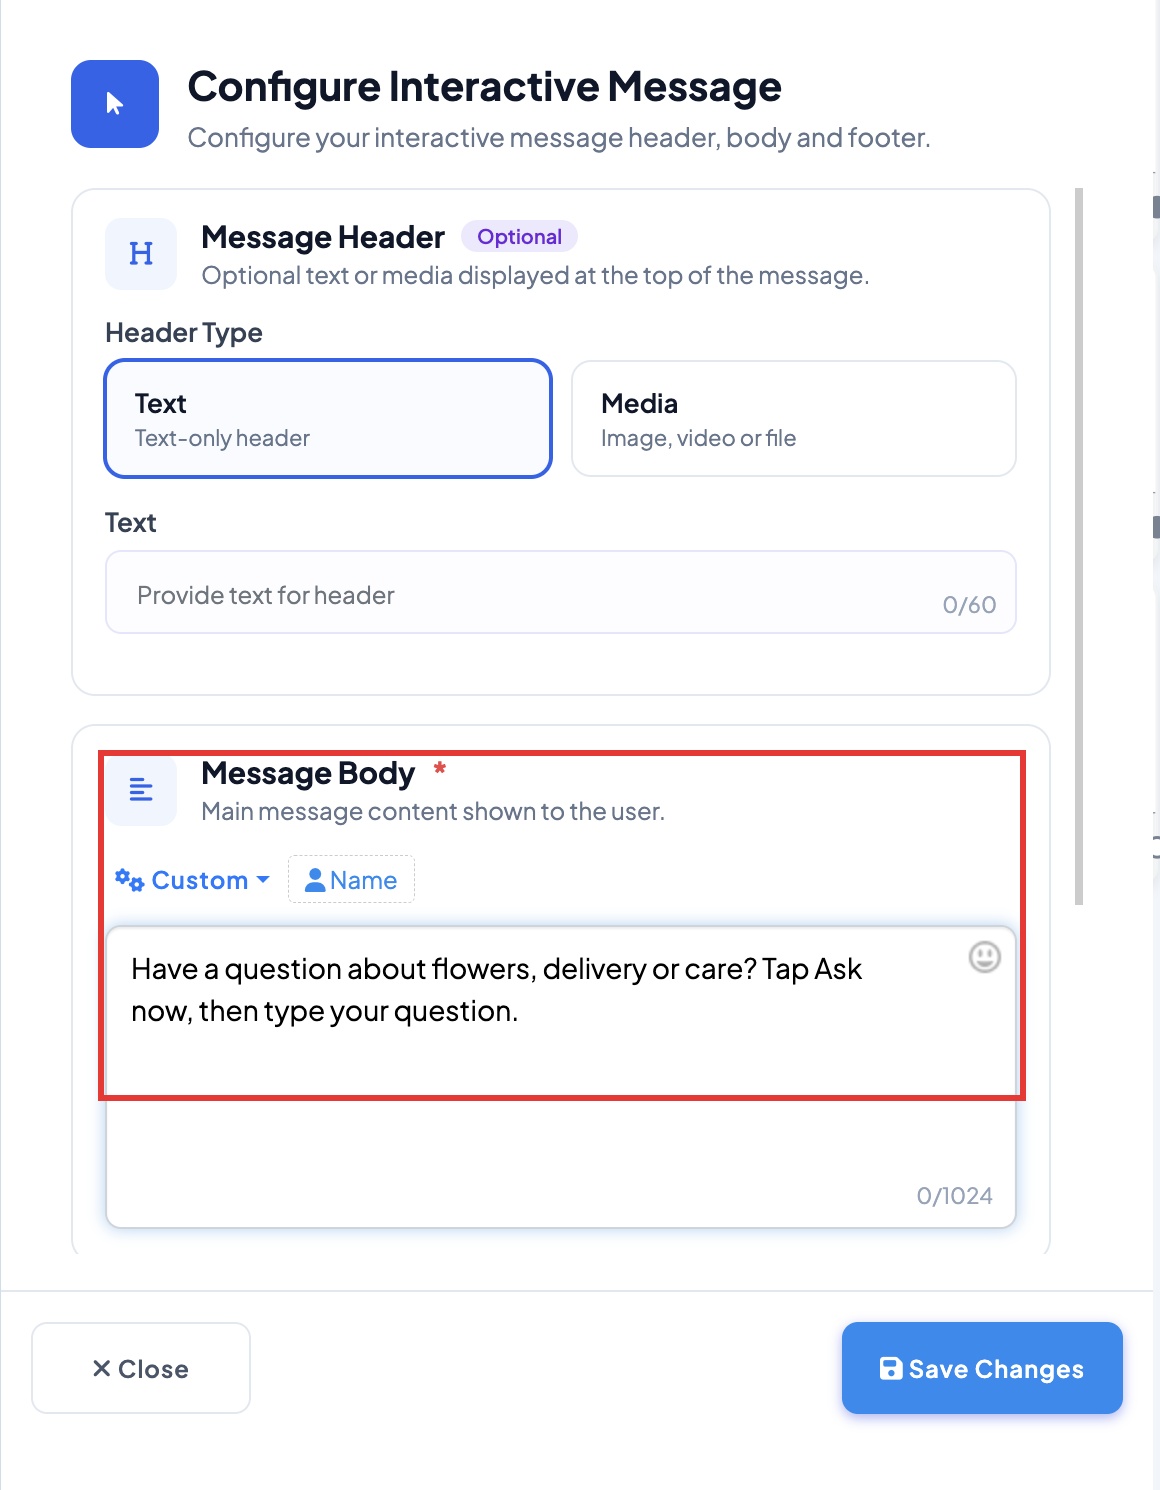 Tell them what to do
Step 4. Drag from the Buttons dot on this block to empty space, and let go. A Button block appears.
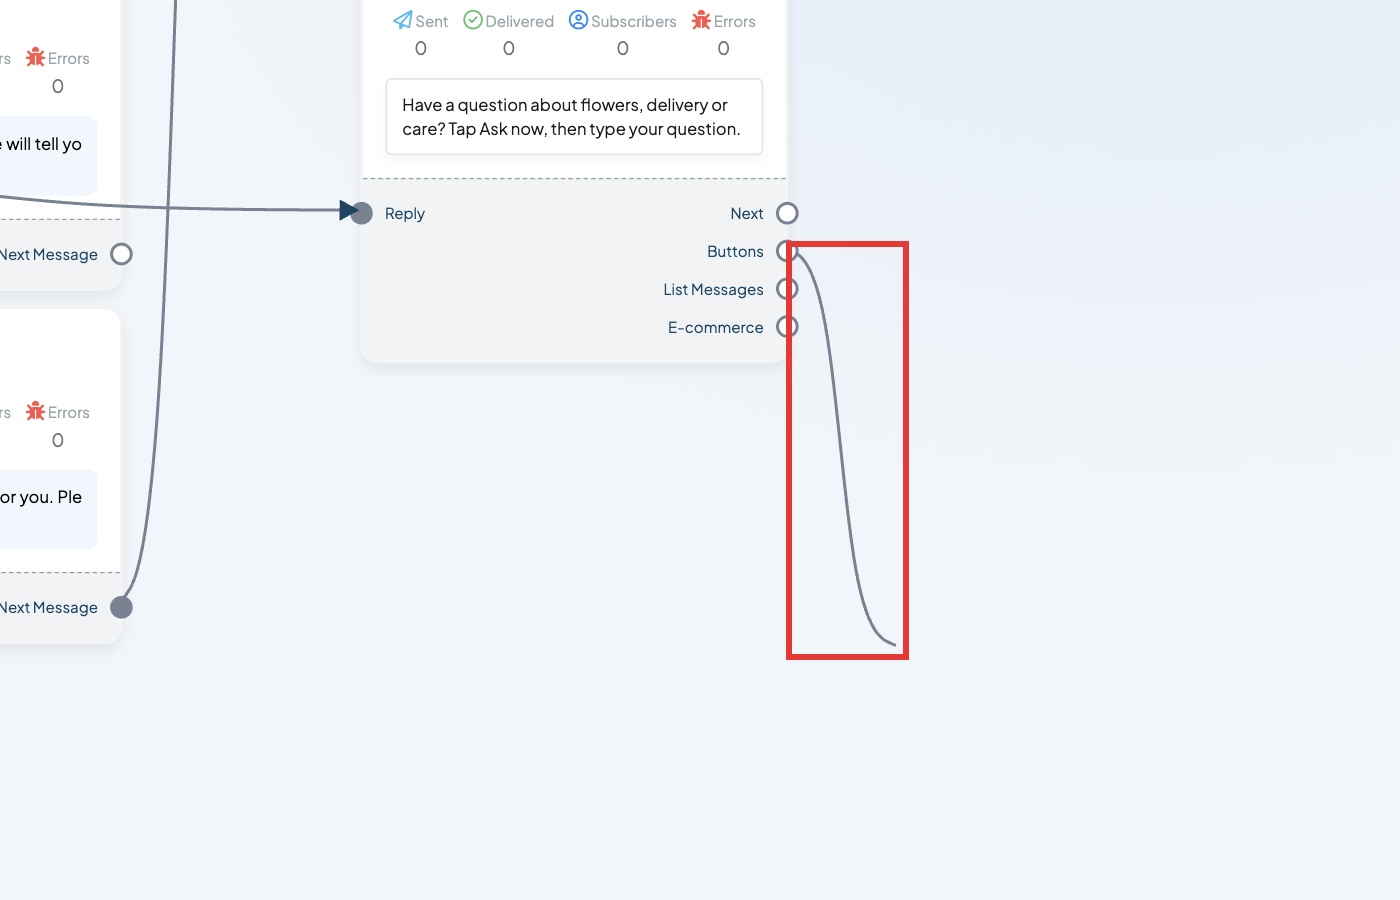 Drag from Buttons into empty space
Step 5. In Button Title, type Ask now. Under When user press the button, choose Send Message. Click Save Changes.
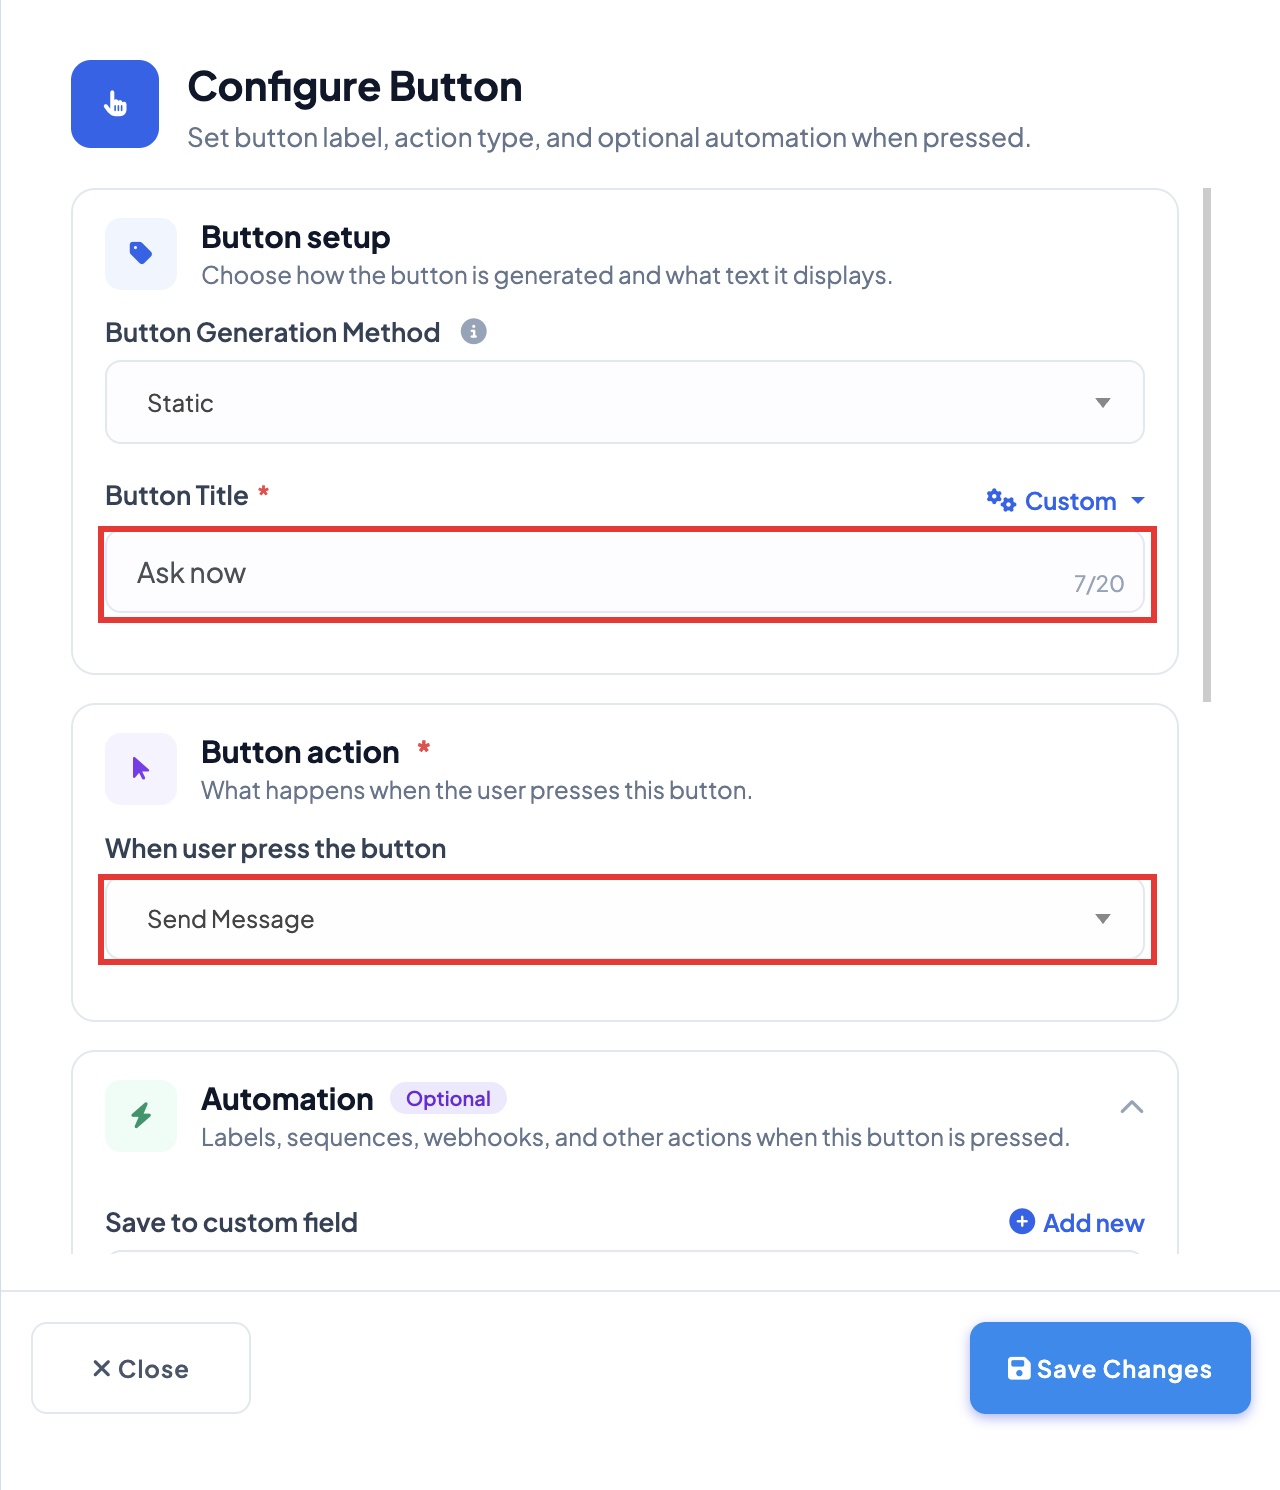 Button title and what it does
Step 6. Your Ask now button is ready.
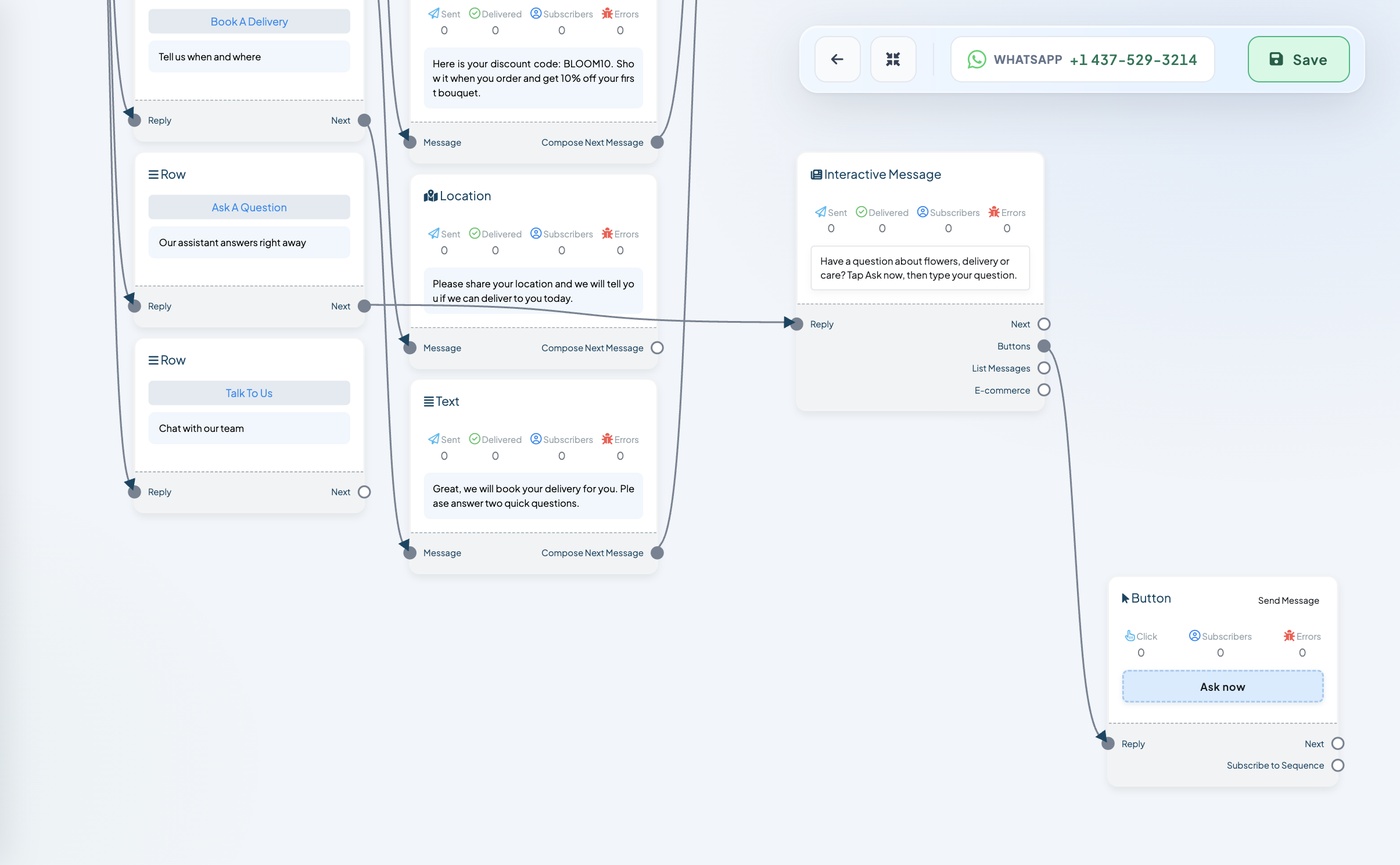 The button is ready
Step 7. Drag an AI Reply block onto the empty space, next to the button.
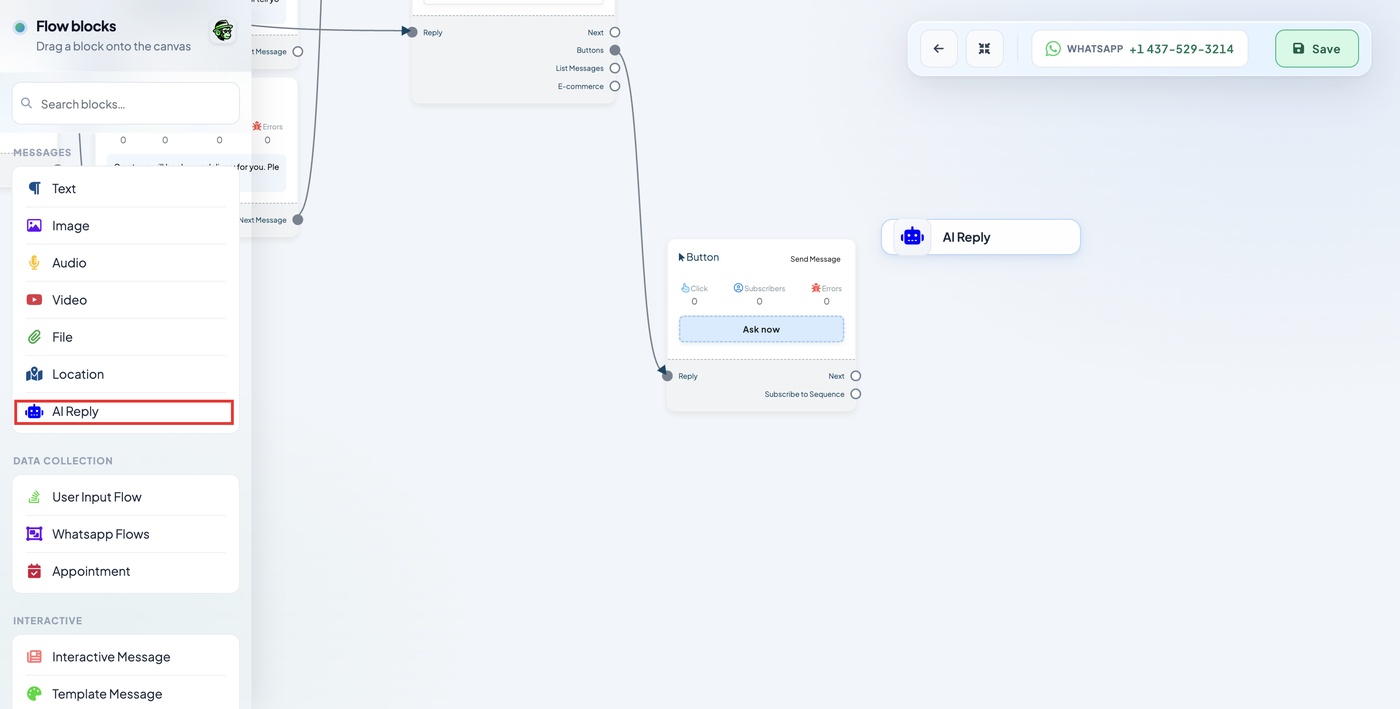 AI Reply is in the list on the left
Step 8. Drag from the button's Next dot to the Message dot on AI Reply.
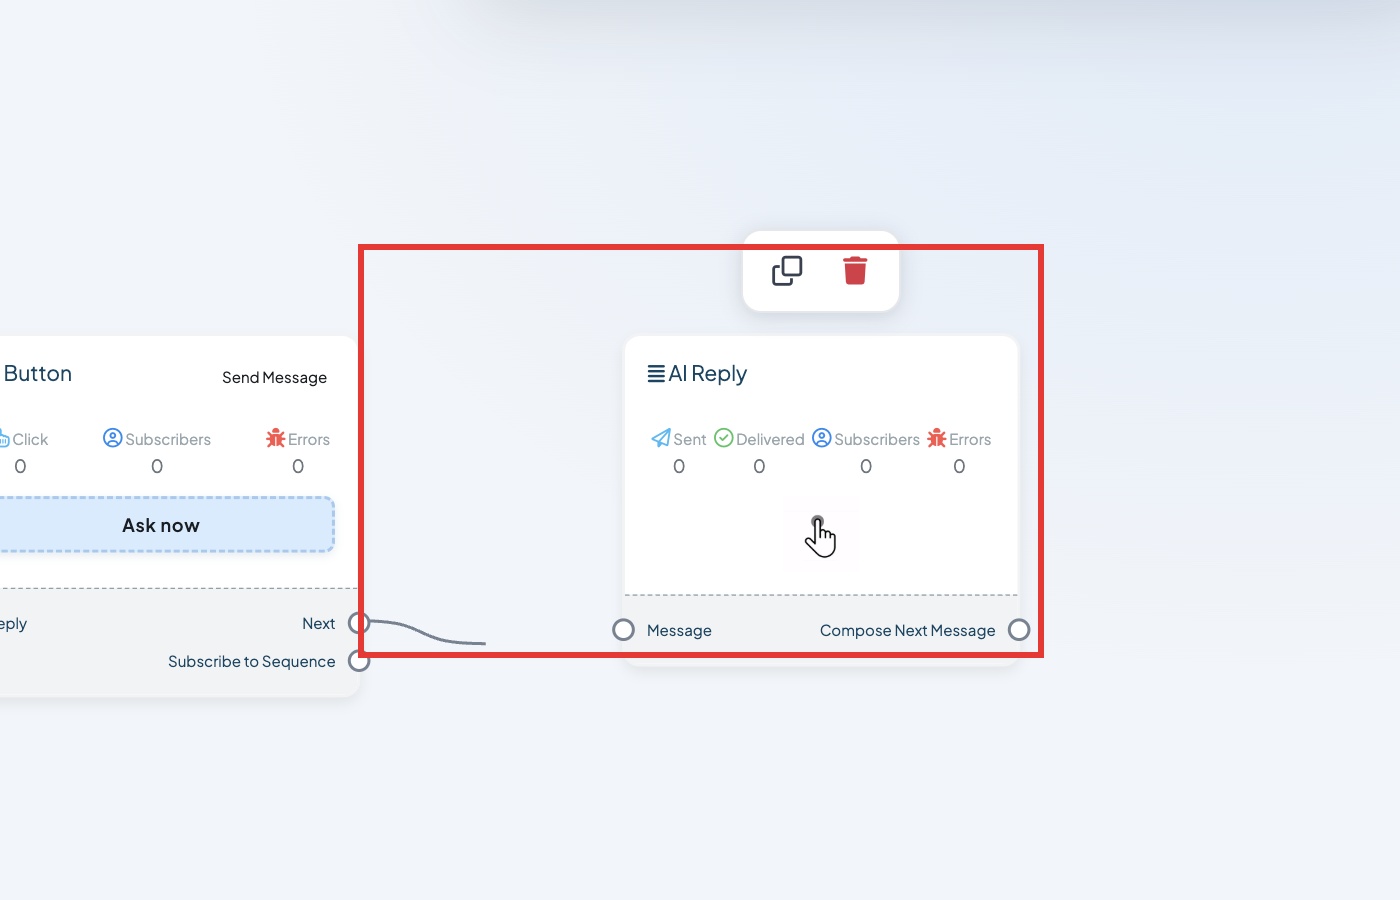 From Next to Message
Step 9. In Message to learn, write what the AI should know: what you sell, prices, hours, address and how to answer. Click Save Changes.
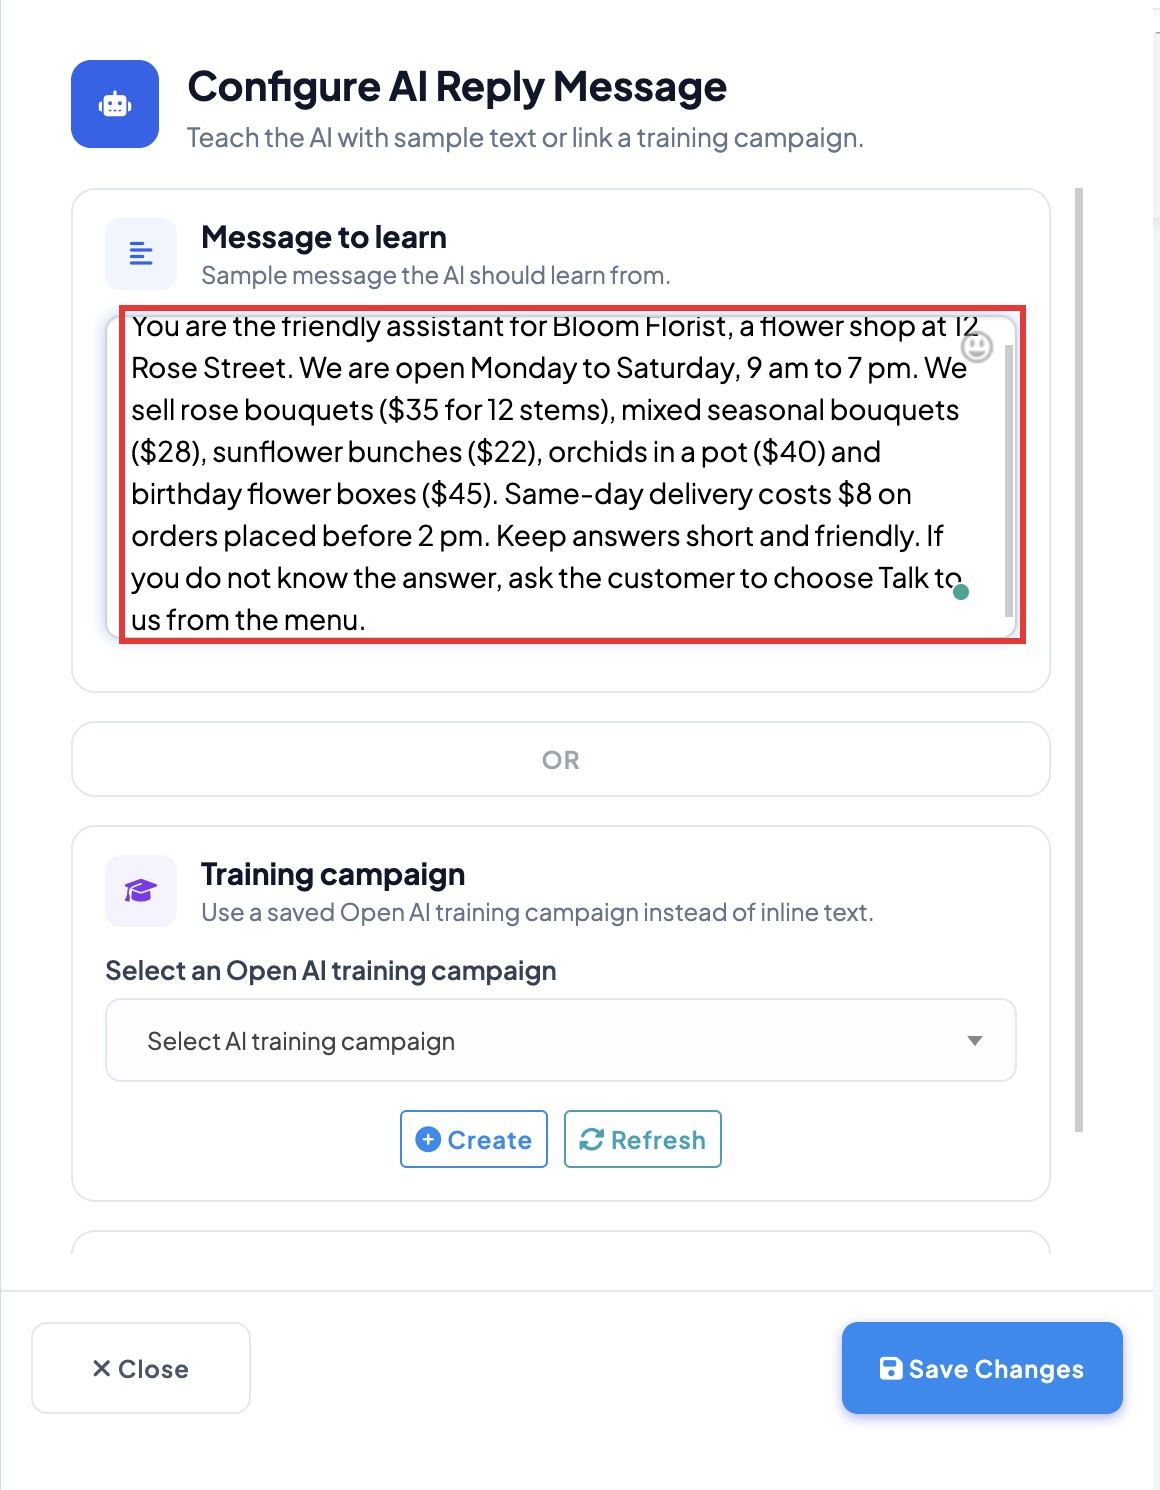 Write it as if you were training a new employee
Step 10. Your AI is ready.
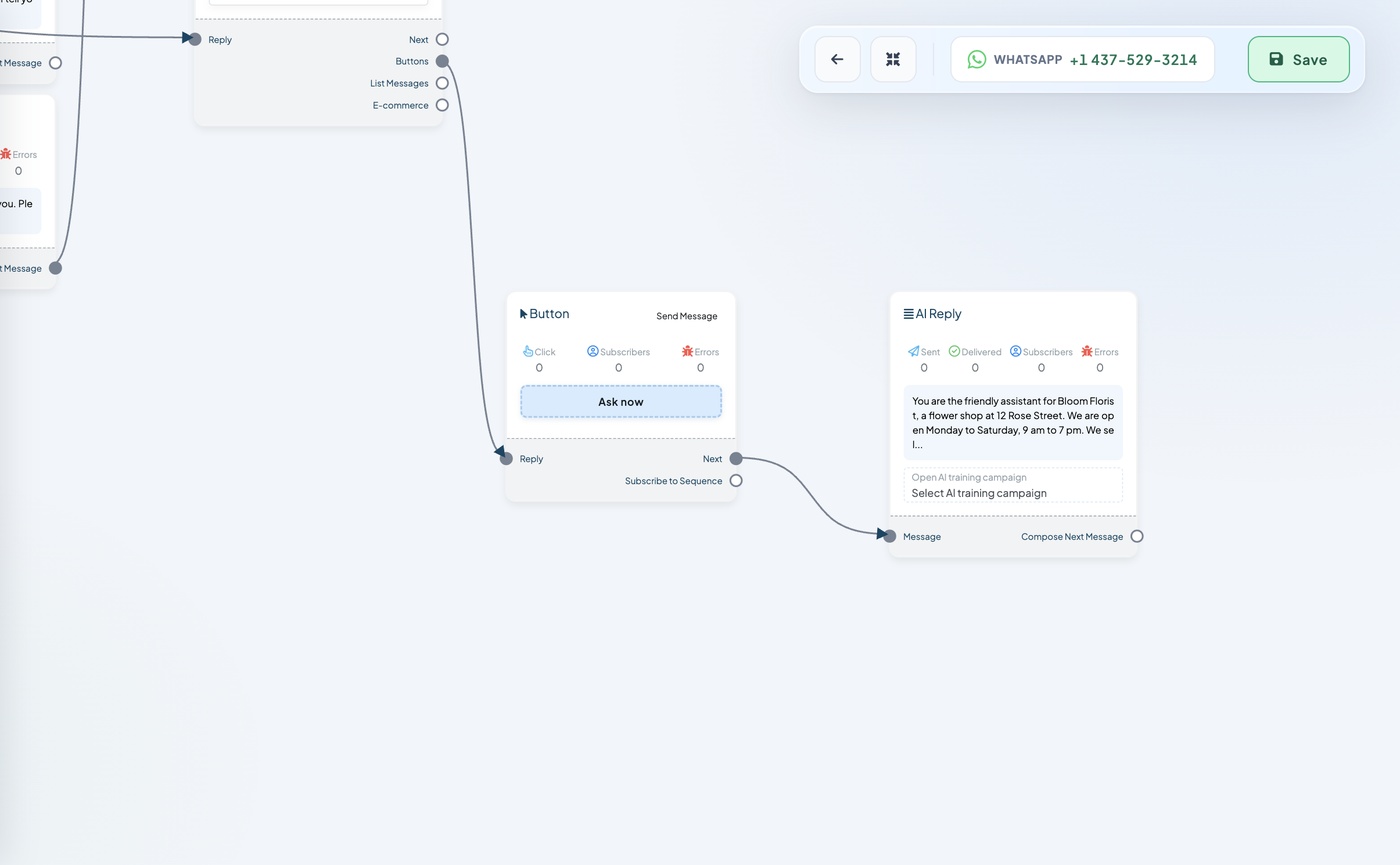 This option now answers with AI
Watch out: AI Reply needs AI connected to your account first. See Add Your OpenAI API Key.
What your customer sees:
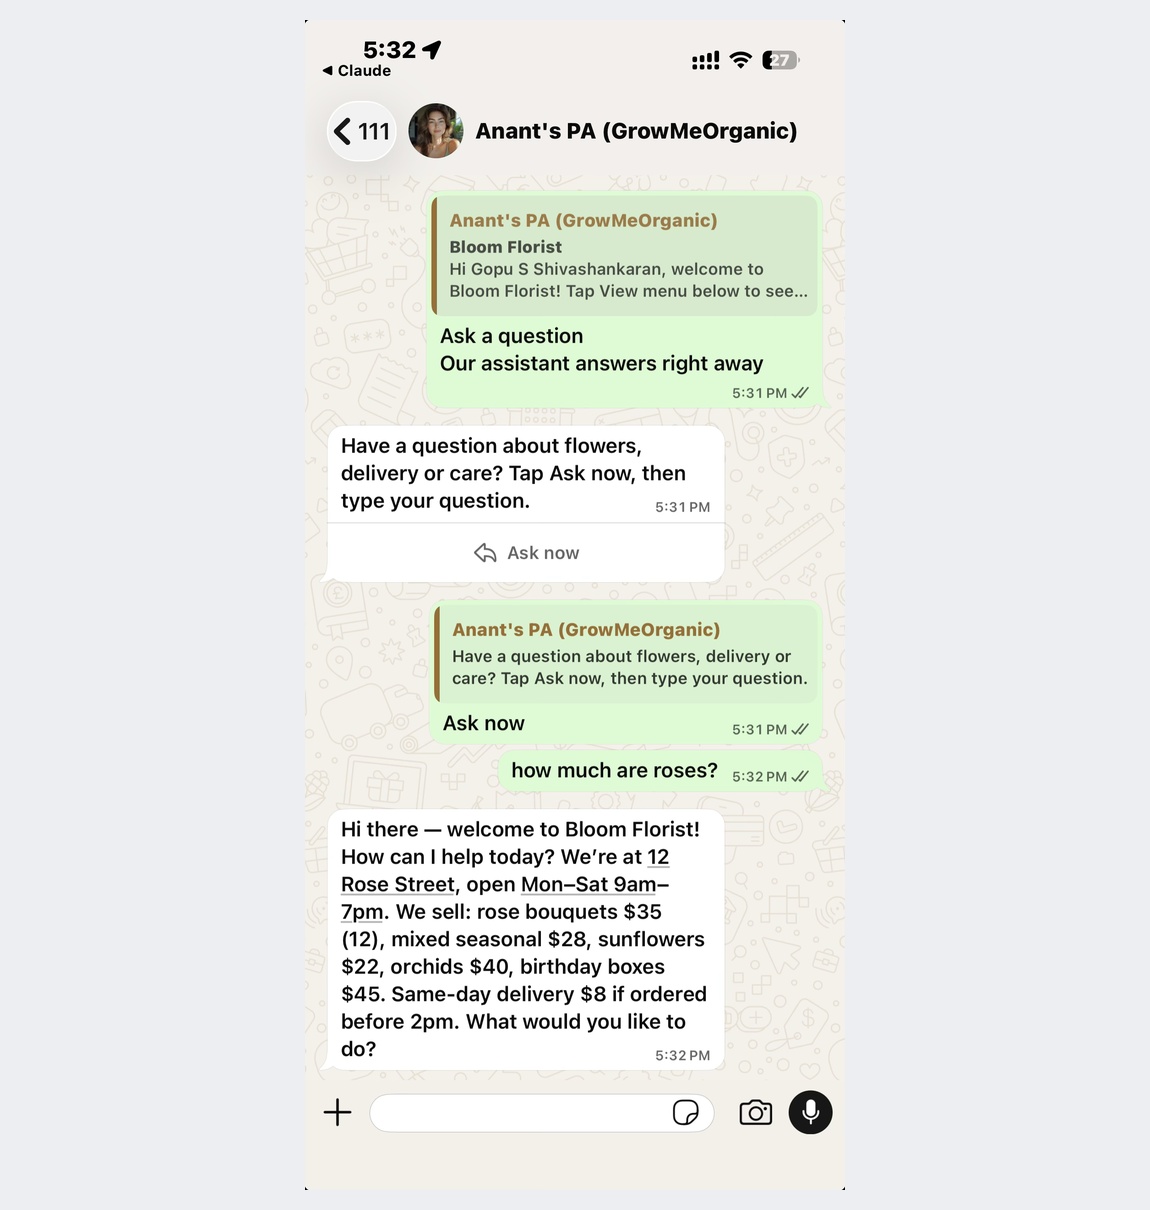 The customer taps Ask now, types a question, and the AI answers
Part 11: Take Bookings (about 5 minutes)
Do customers book with you? This option asks their details one question at a time and saves the answers.
Before you start: this uses a question form called a User Input Flow. Make your form first with How to Collect User Details Without Forms. Our example form asks for a delivery address and a date.
Step 1. Drag a Text block onto the empty space. The form needs a message in front of it.
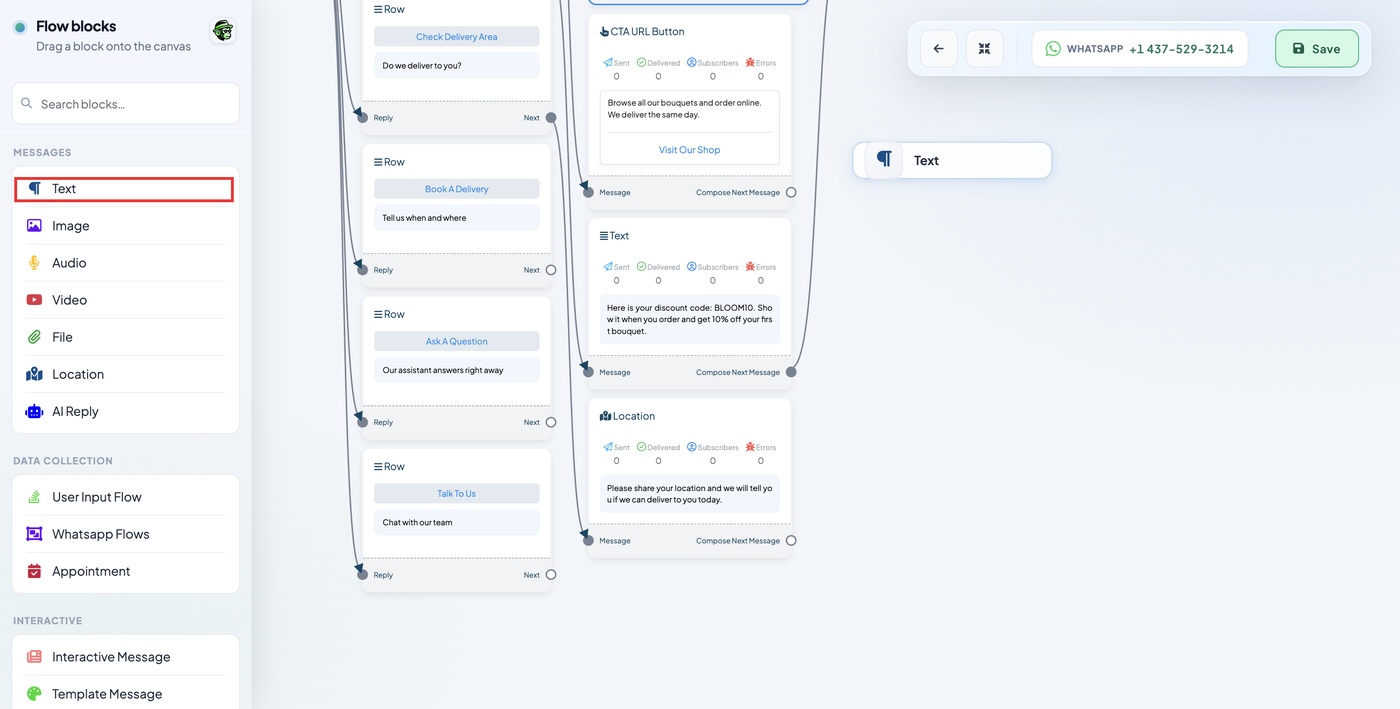 Text is first in the list
Step 2. Drag from your option's Next dot to the Message dot on the Text block.
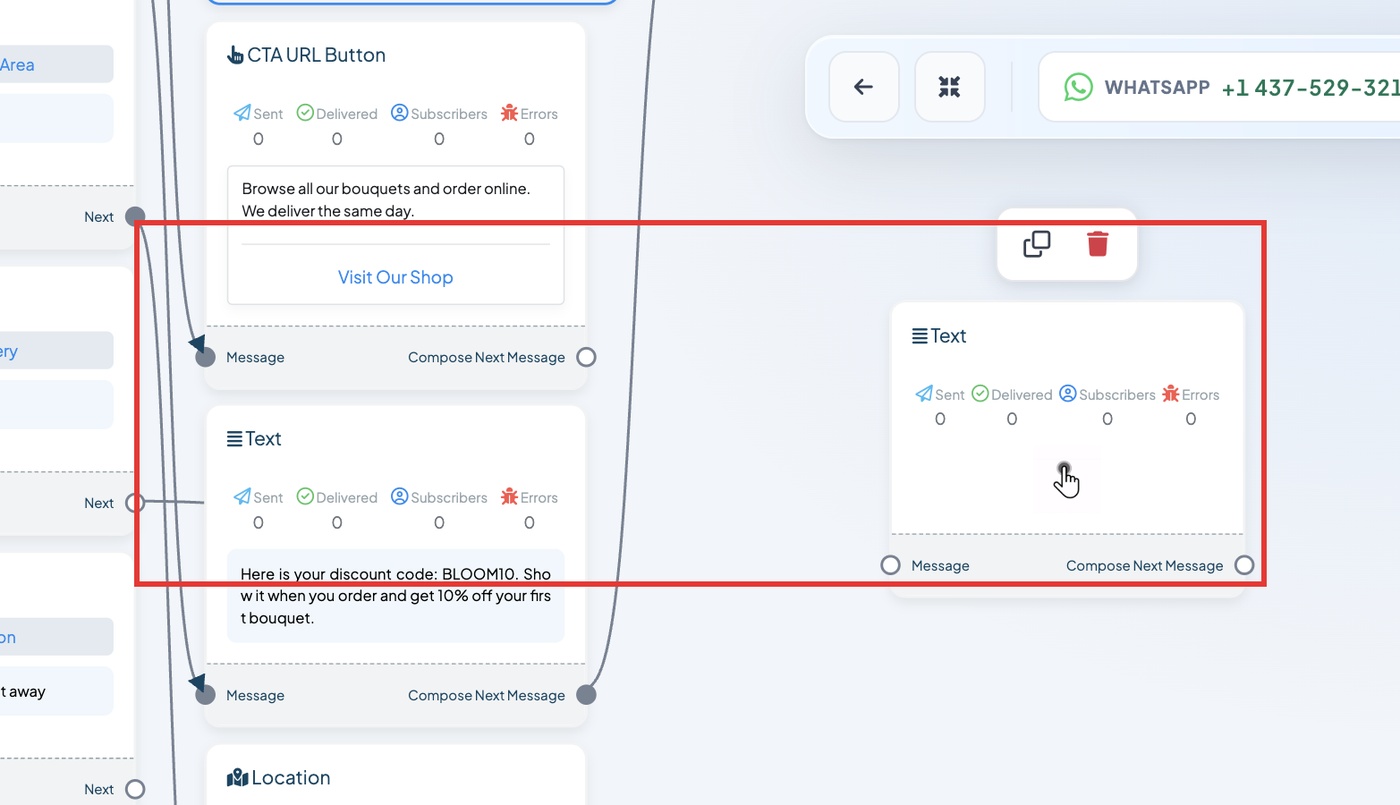 From Next to Message
Step 3. Type a line telling customers the questions are coming. Click Save Changes.
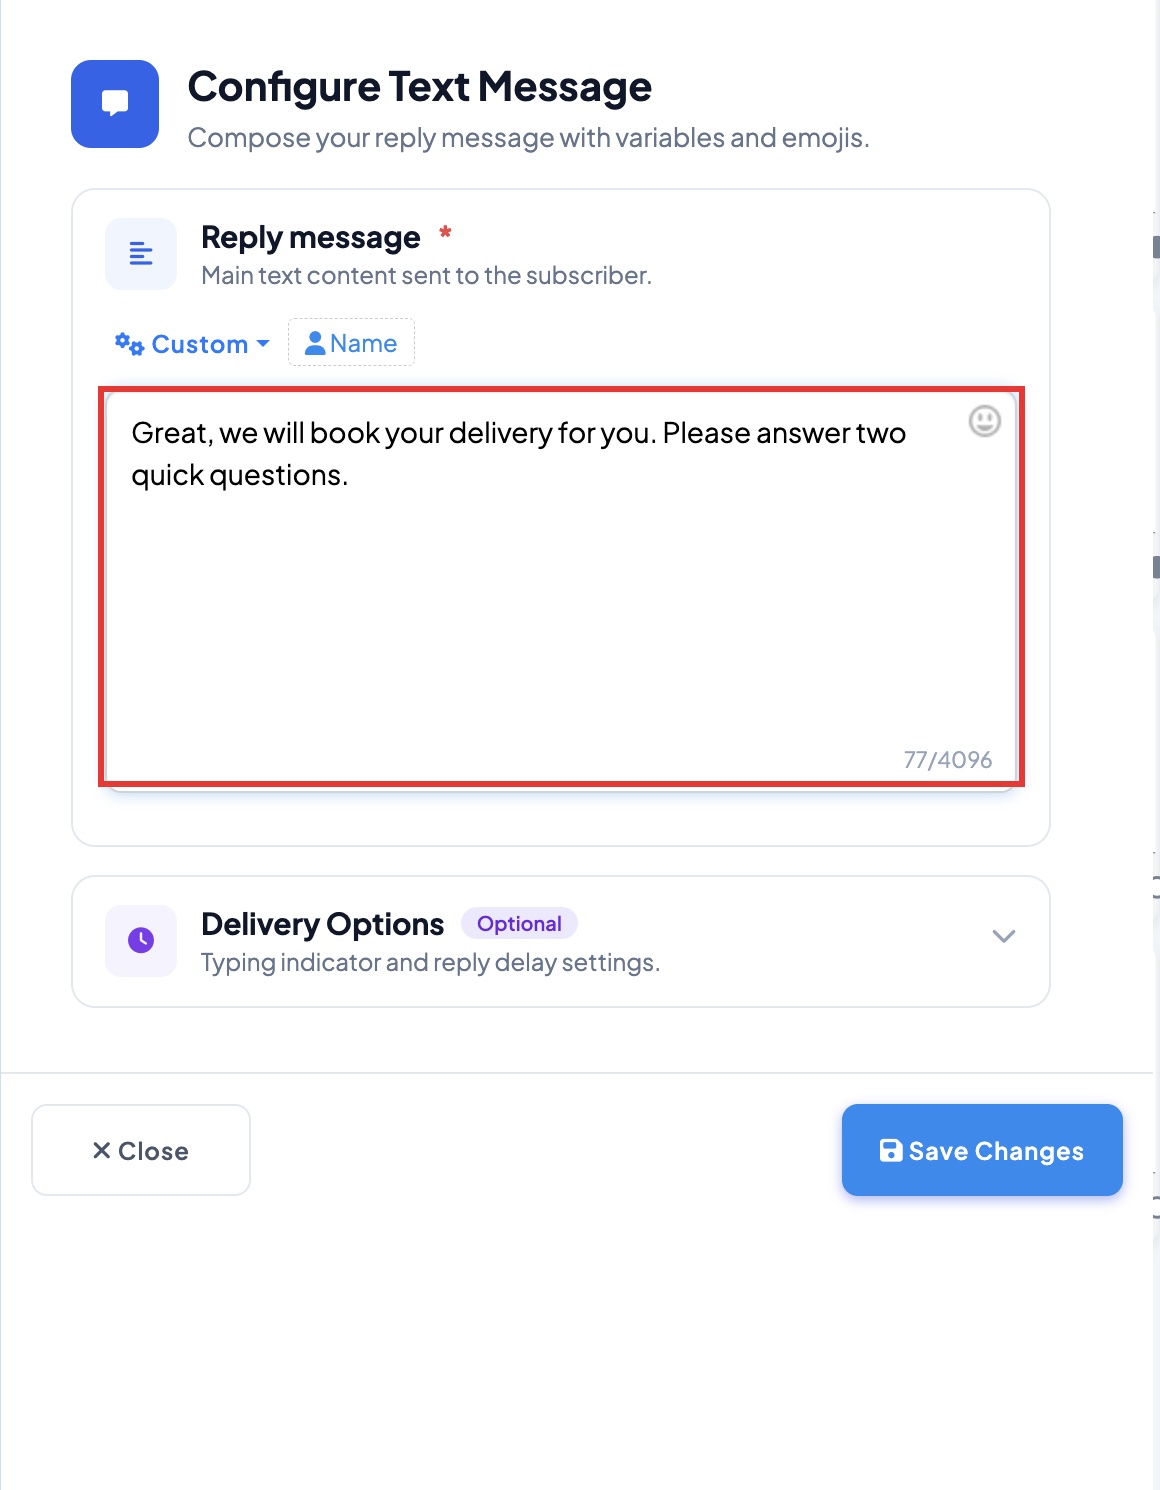 So the customer knows what comes next
Step 4. Drag a User Input Flow block onto the empty space, below the message.
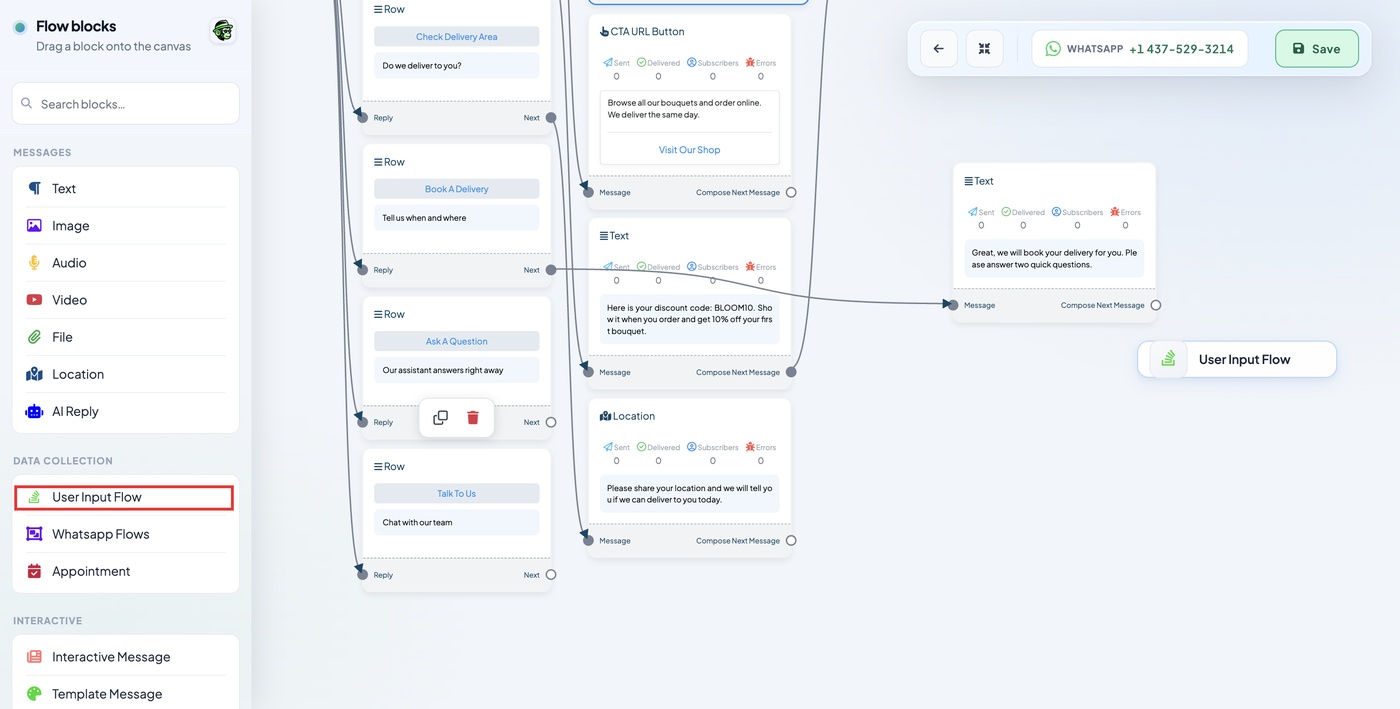 User Input Flow is in the list on the left
Step 5. Drag from the Compose Next Message dot on the message to the left dot on User Input Flow.
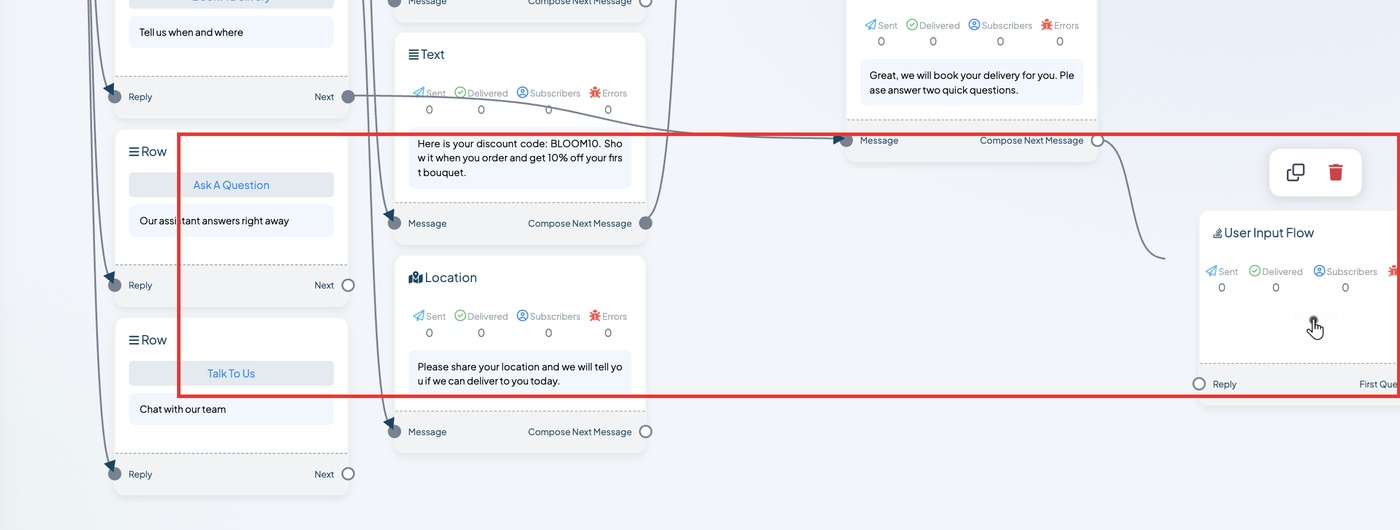 The form starts right after the message
Step 6. Click the box under User input flow to see your forms.
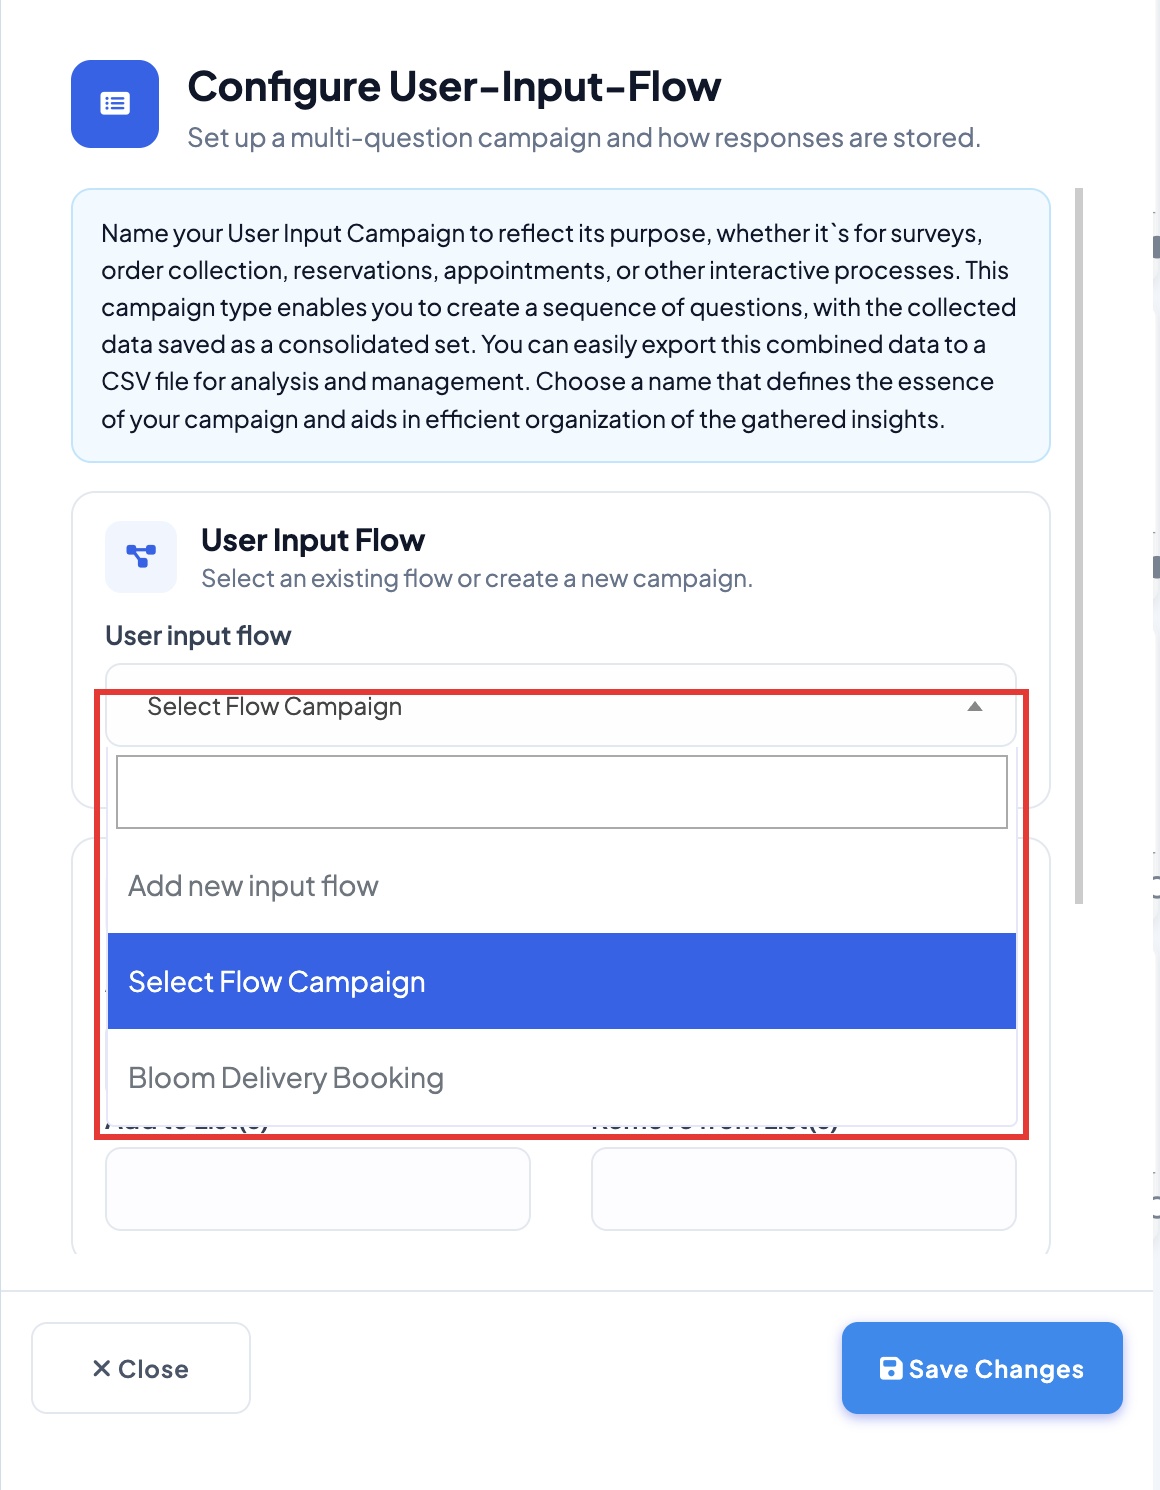 Your forms
Step 7. Click your form. Click Save Changes.
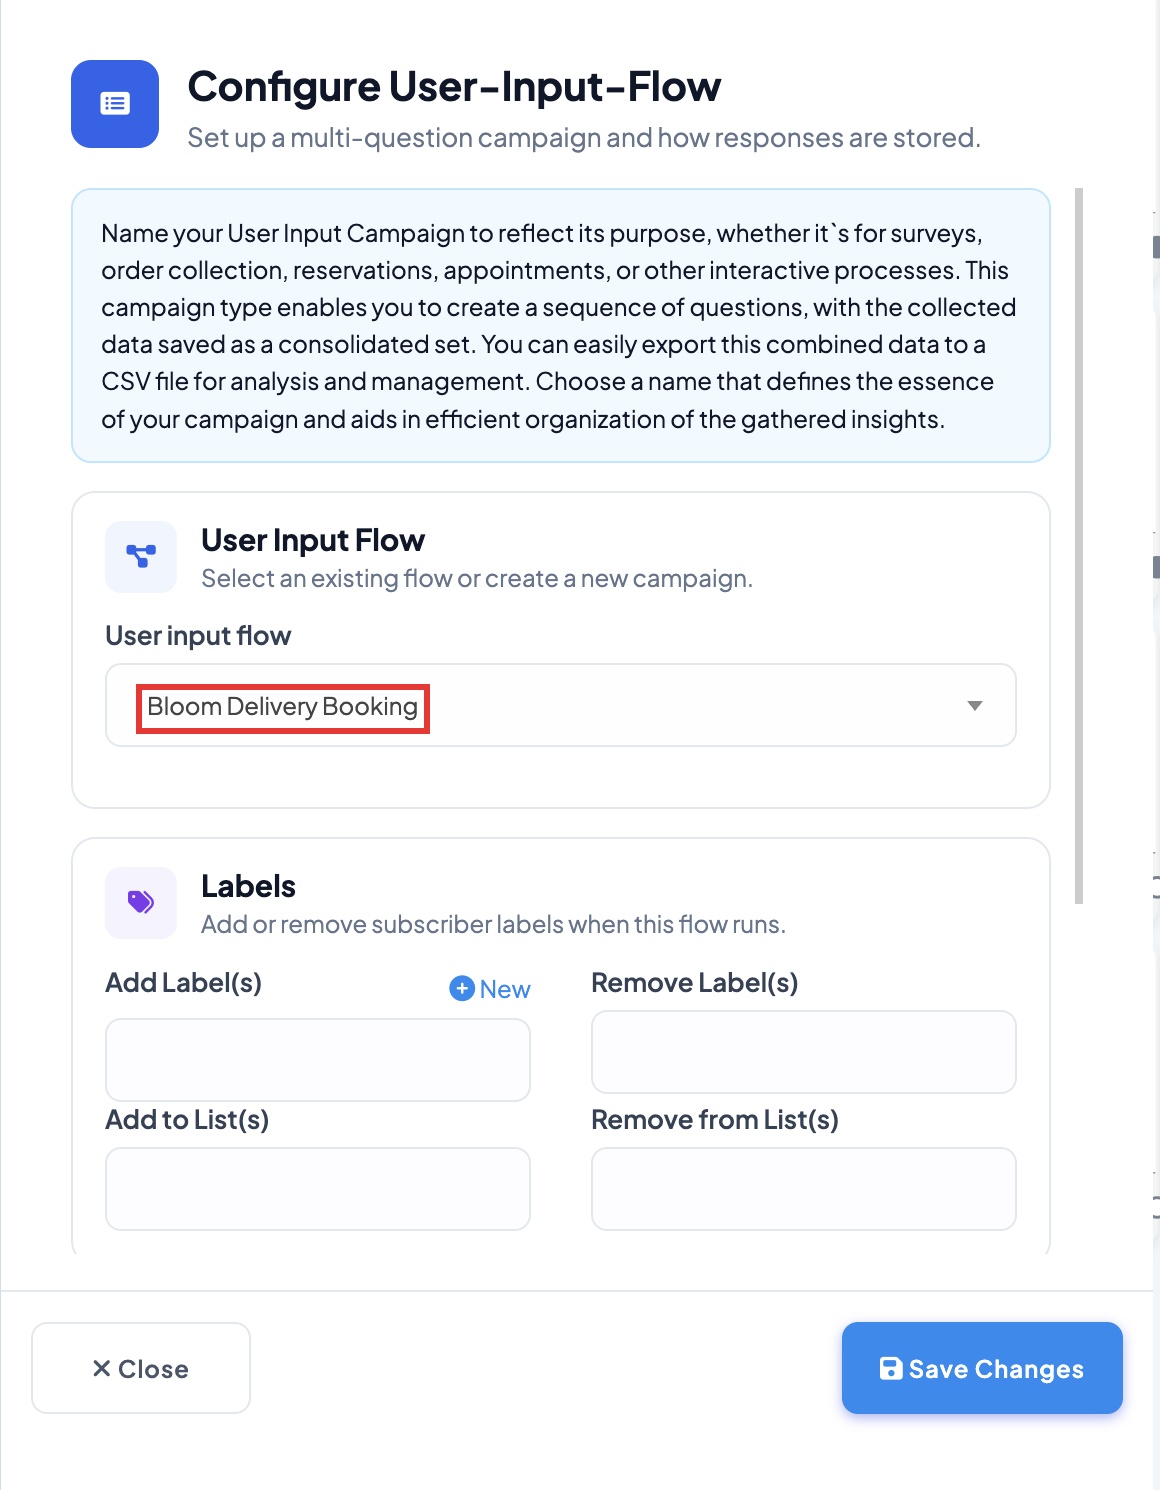 Our example: Bloom Delivery Booking
Step 8. Your booking option is ready.
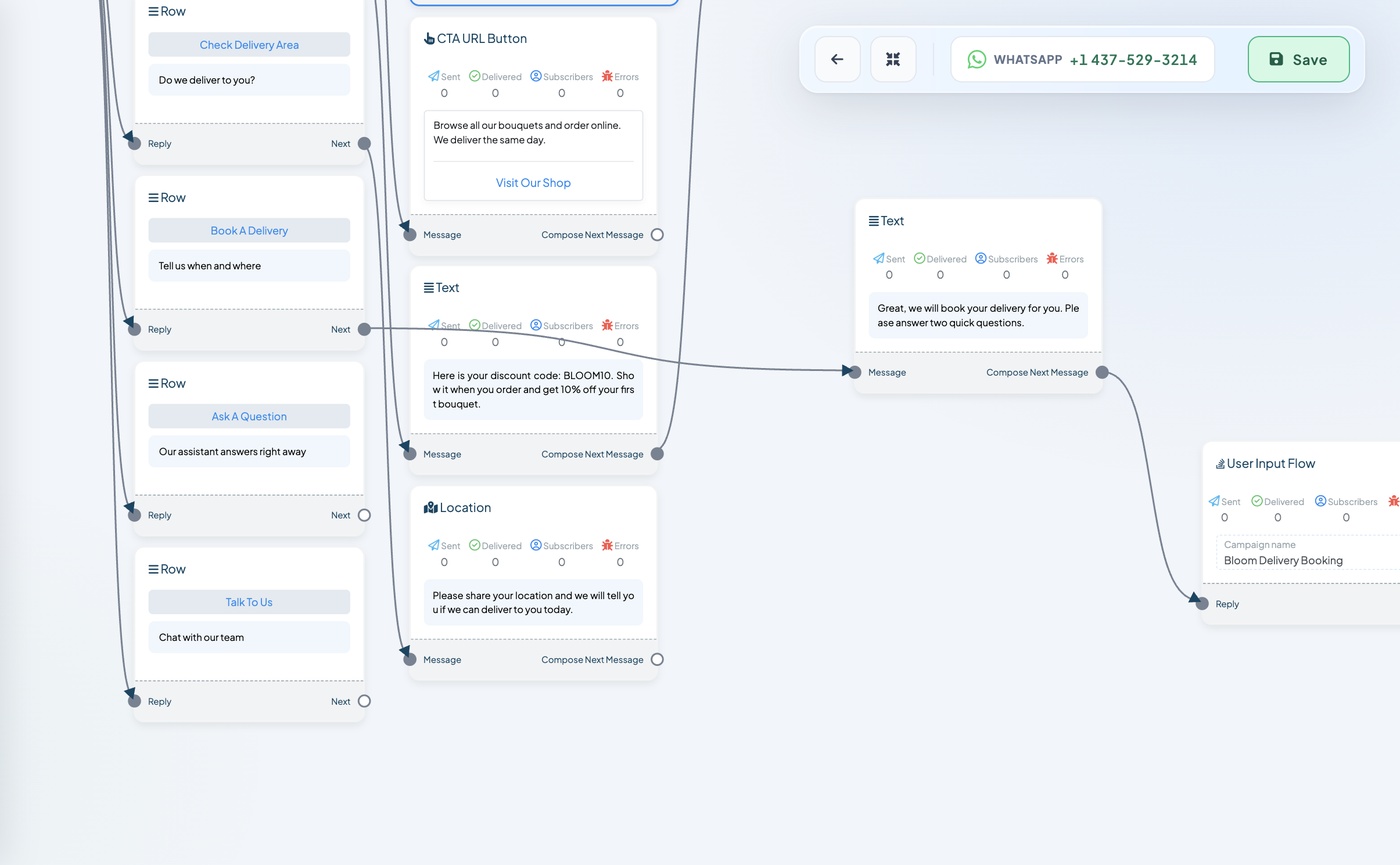 This option now takes bookings
What your customer sees:
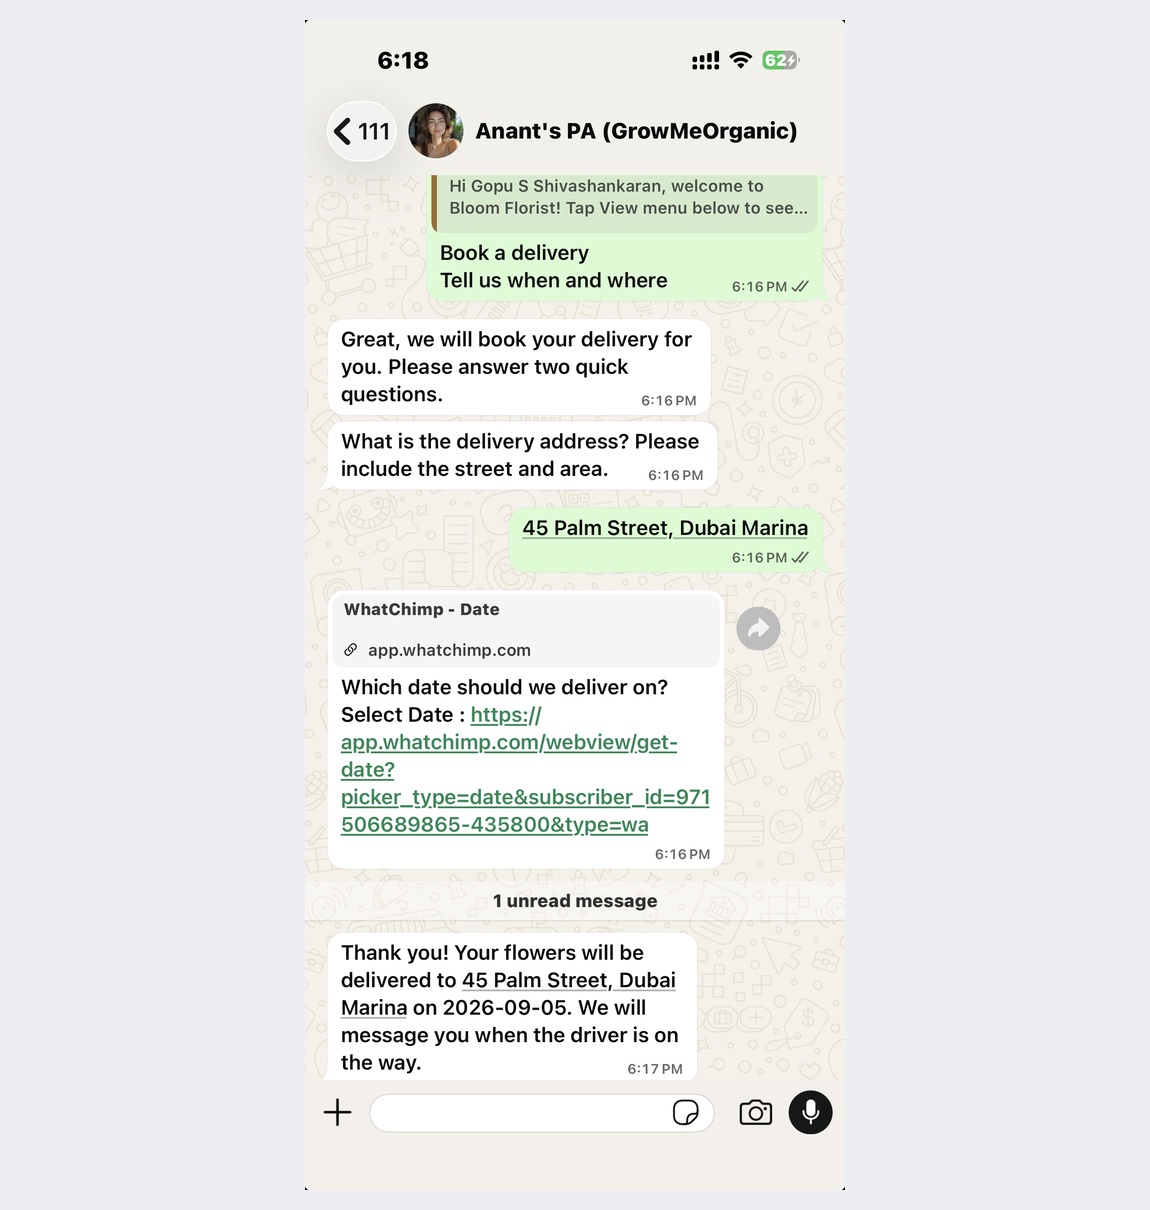 The customer answers each question, then gets a confirmation
Watch out: customers must type each answer. If they tap a menu option instead, that is saved as their answer, like this:
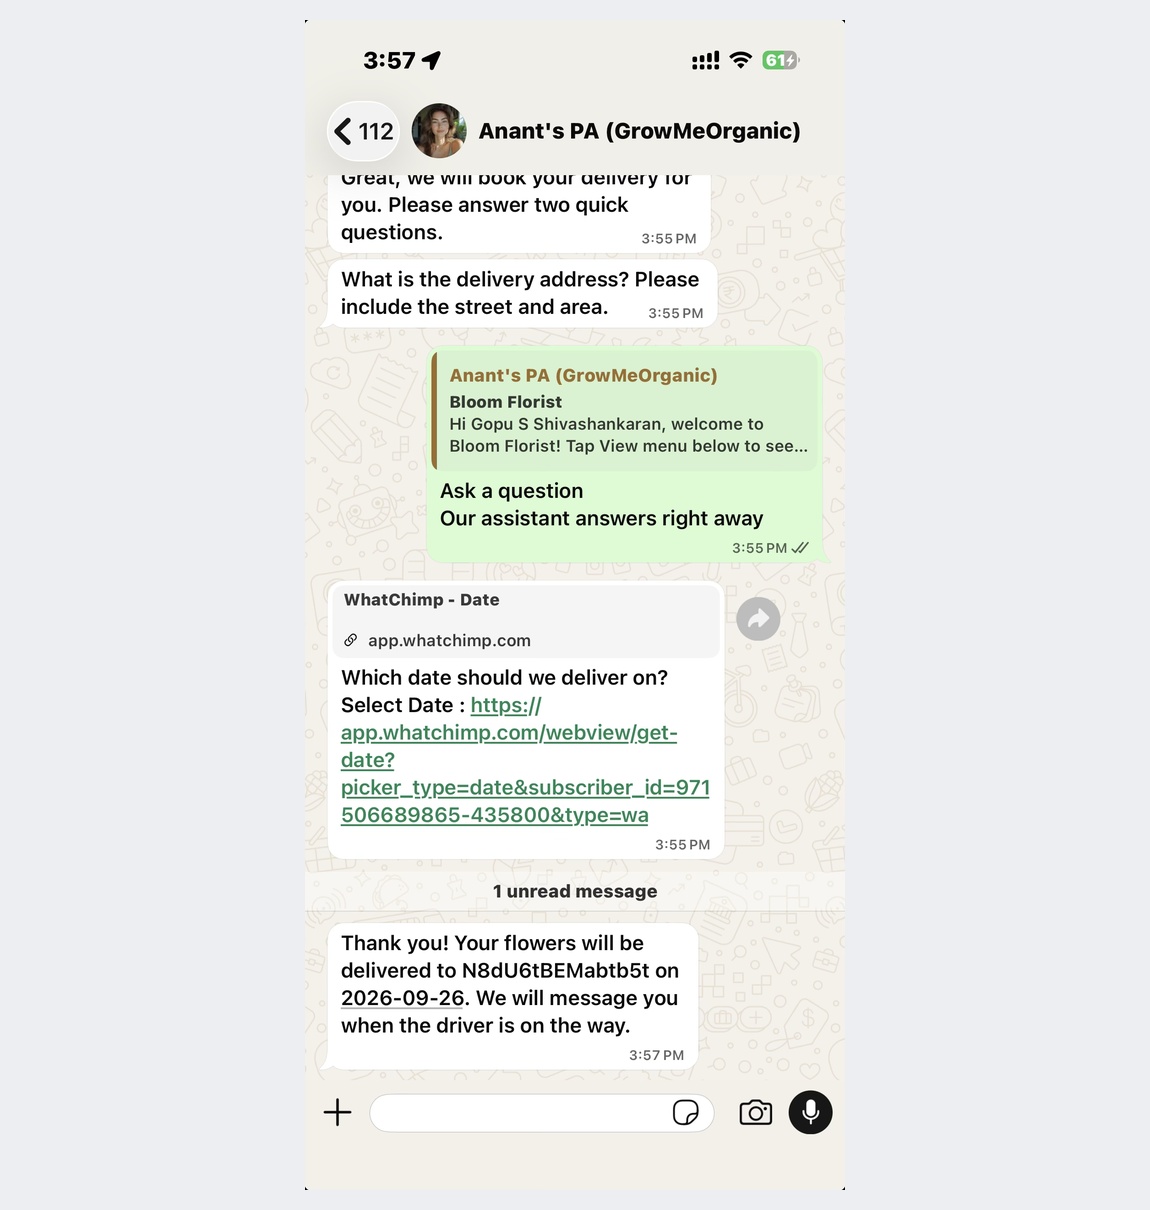 The address came out as a code, because a menu option was tapped
So in each question, tell customers exactly what to type.
Part 12: Let Customers Reach a Person (about 2 minutes)
Some customers want a real person. This option tells them your team will reply.
Step 1. Drag a Text block onto the empty space.
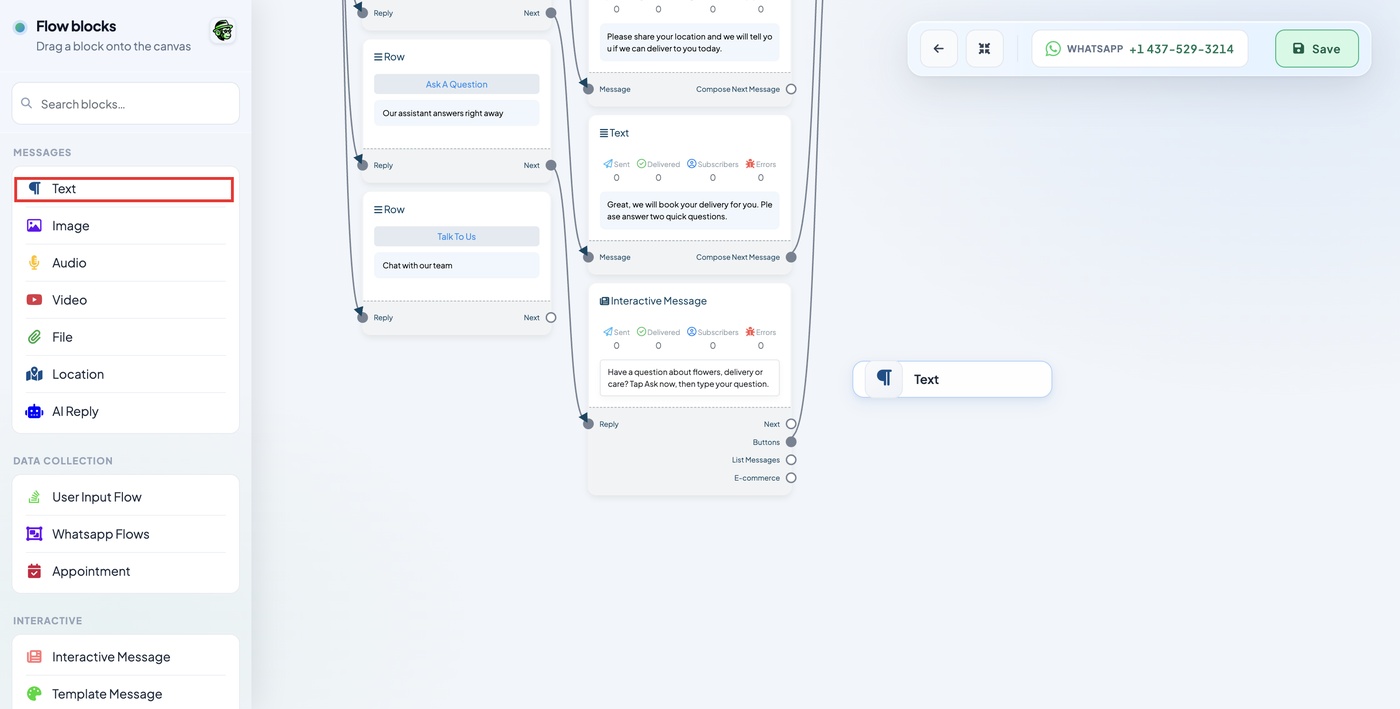 Text is first in the list
Step 2. Drag from your option's Next dot to the Message dot on the Text block.
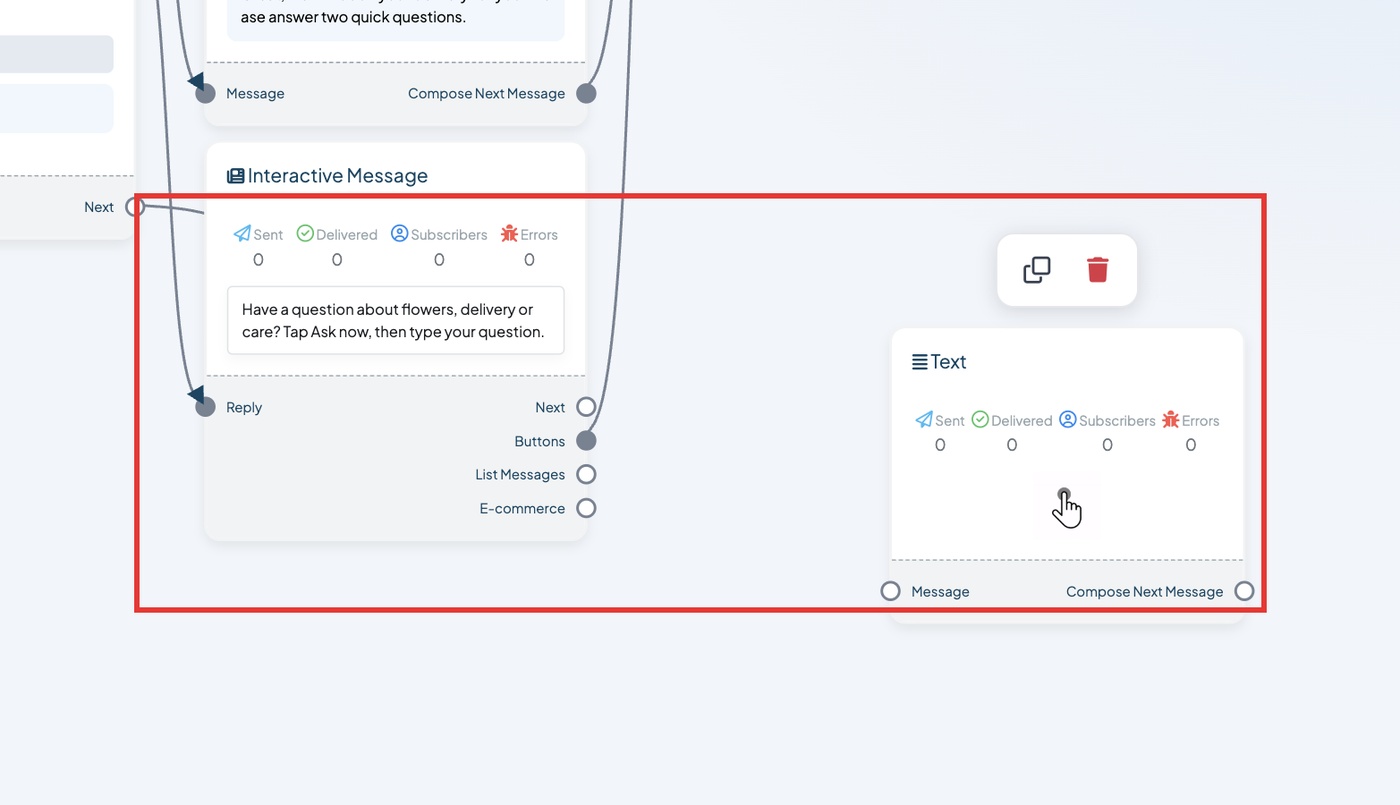 From Next to Message
Step 3. Type your message. Click Save Changes.
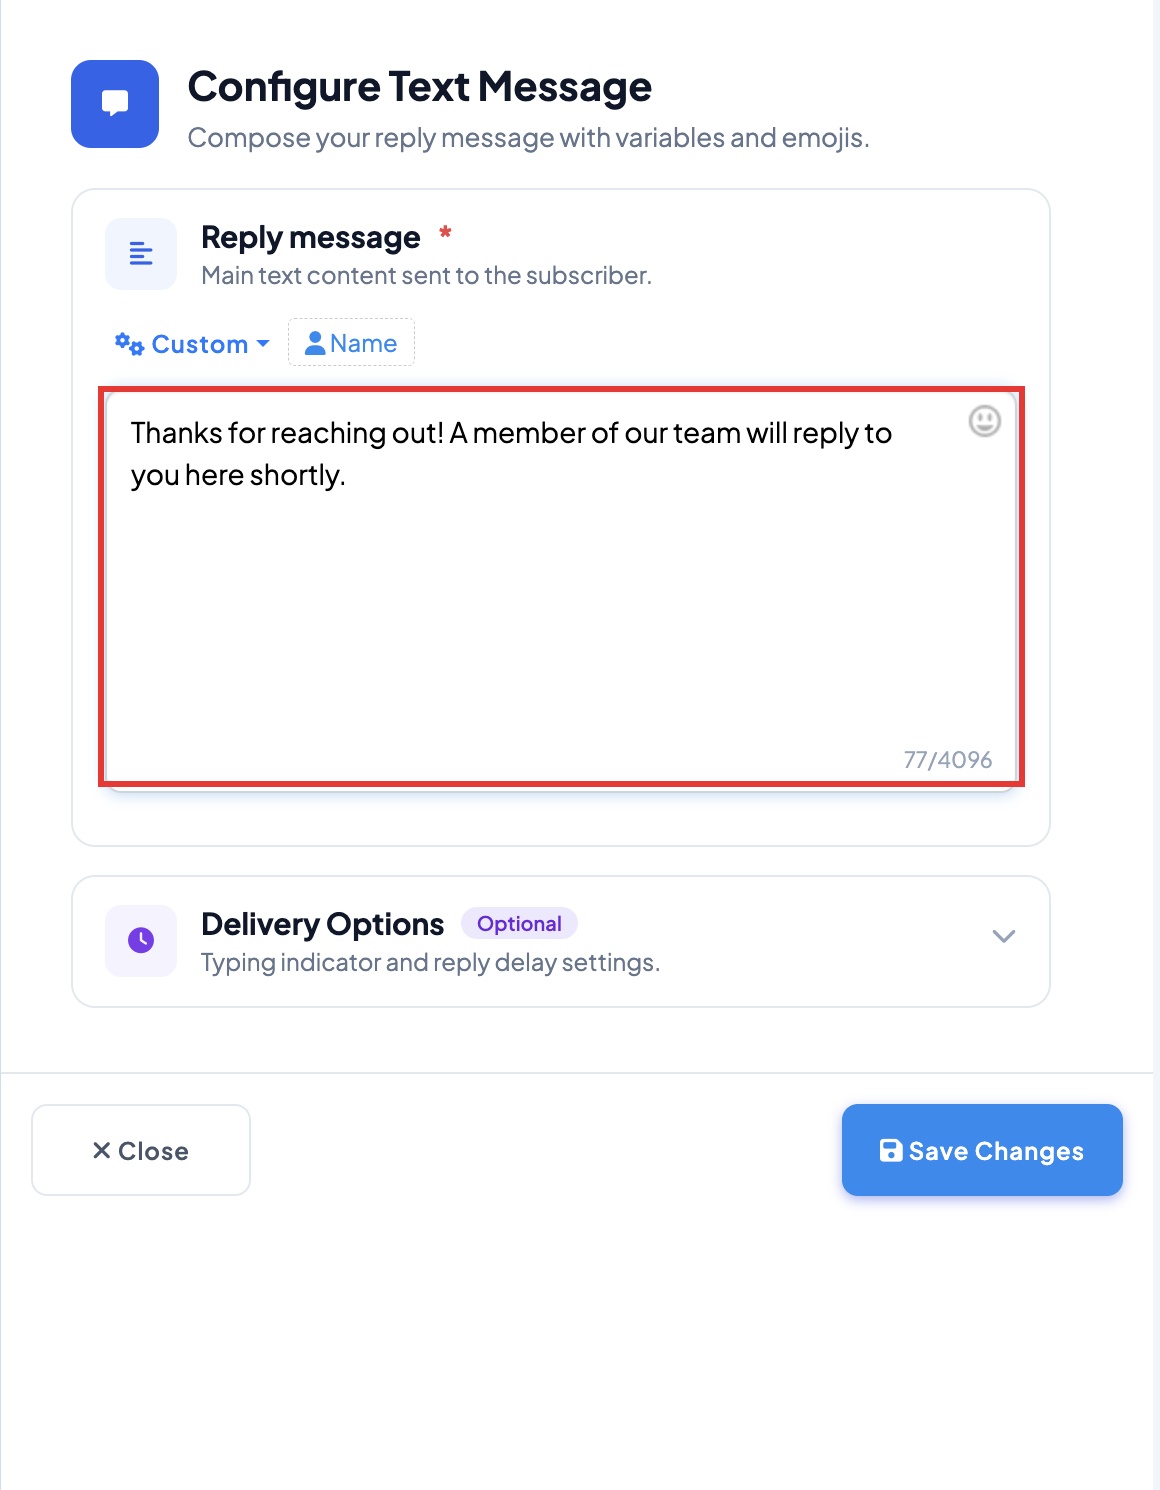 So the customer knows a person will reply
Step 4. Click the green Save button.
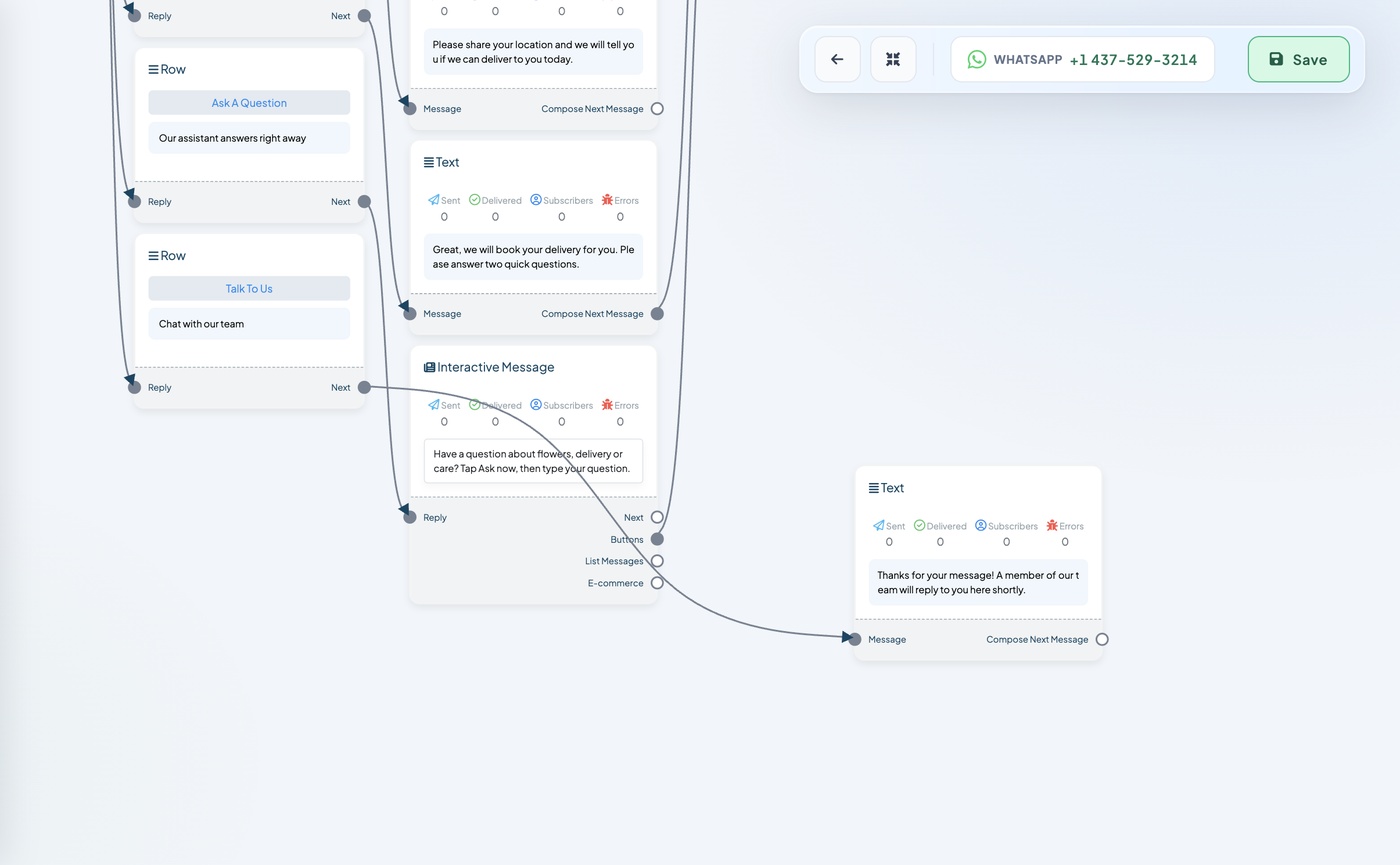 This option is ready
Your team replies from the Omnichannel Inbox.
What your customer sees:
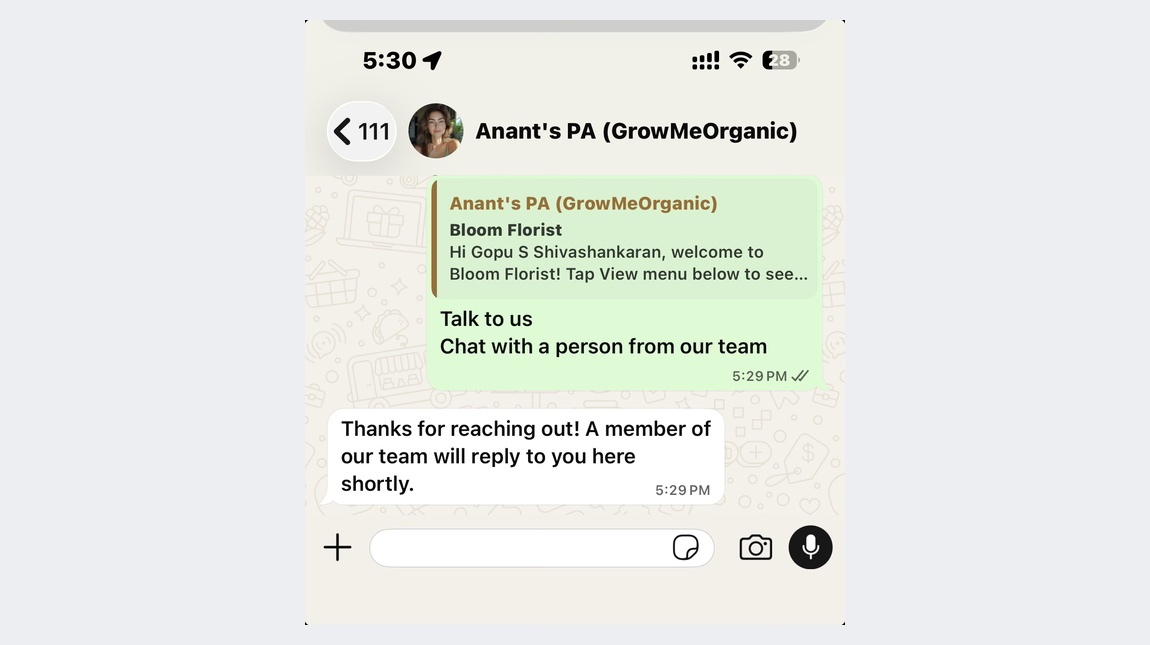 The customer knows a person will reply
Part 13: Welcome Back Returning Customers (about 6 minutes, optional)
Want returning customers to feel remembered? This part greets customers who have your label from Part 8 with "Welcome back". Everyone else sees your normal welcome.
It uses a Condition block. A Condition checks the customer. Yes follows the True dot. No follows the False dot.
Step 1. Drag your welcome message block to the right, to make space after Start Bot Flow.
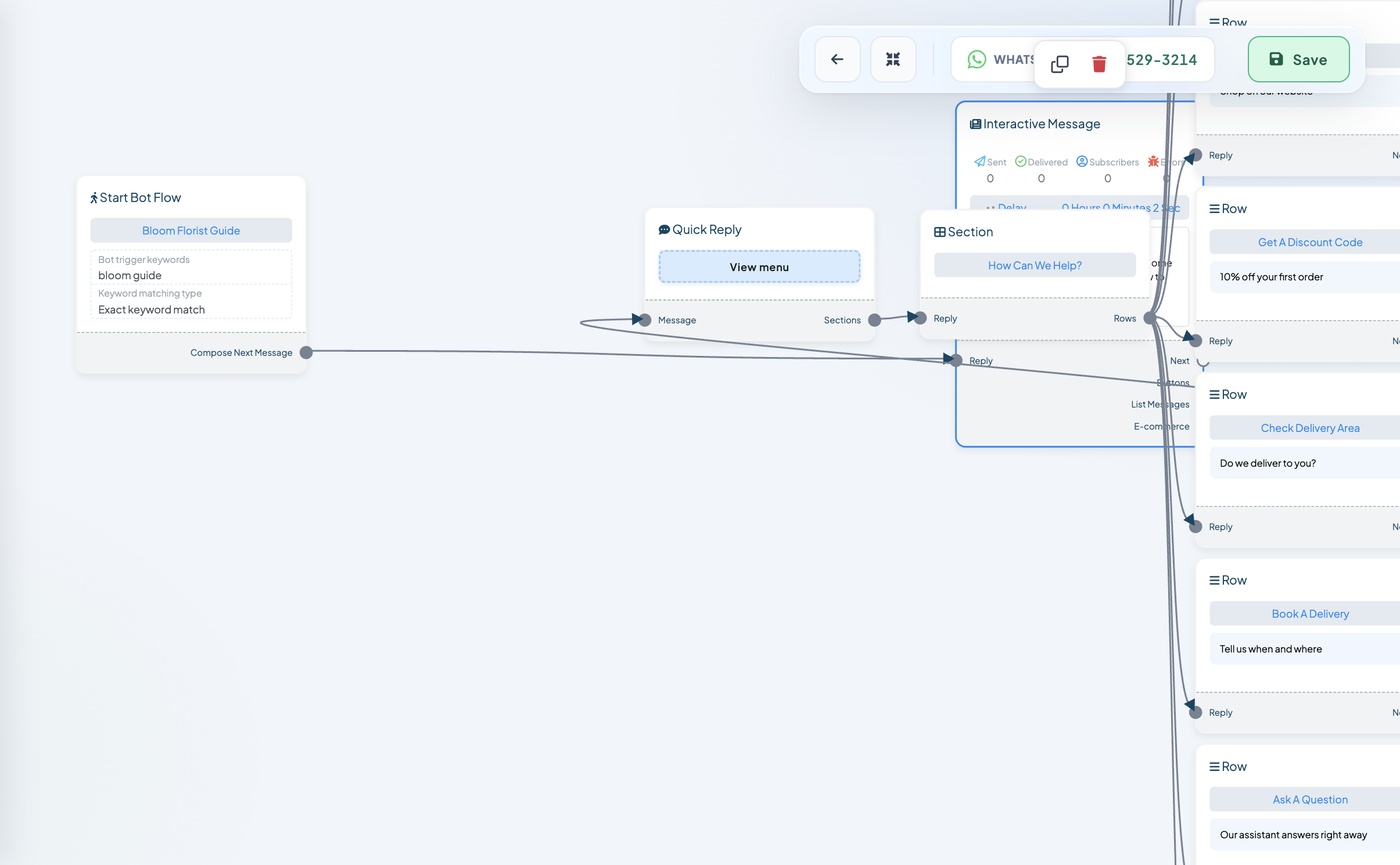 Make a gap after Start Bot Flow
Step 2. Drag the line off the Reply dot on your welcome message.
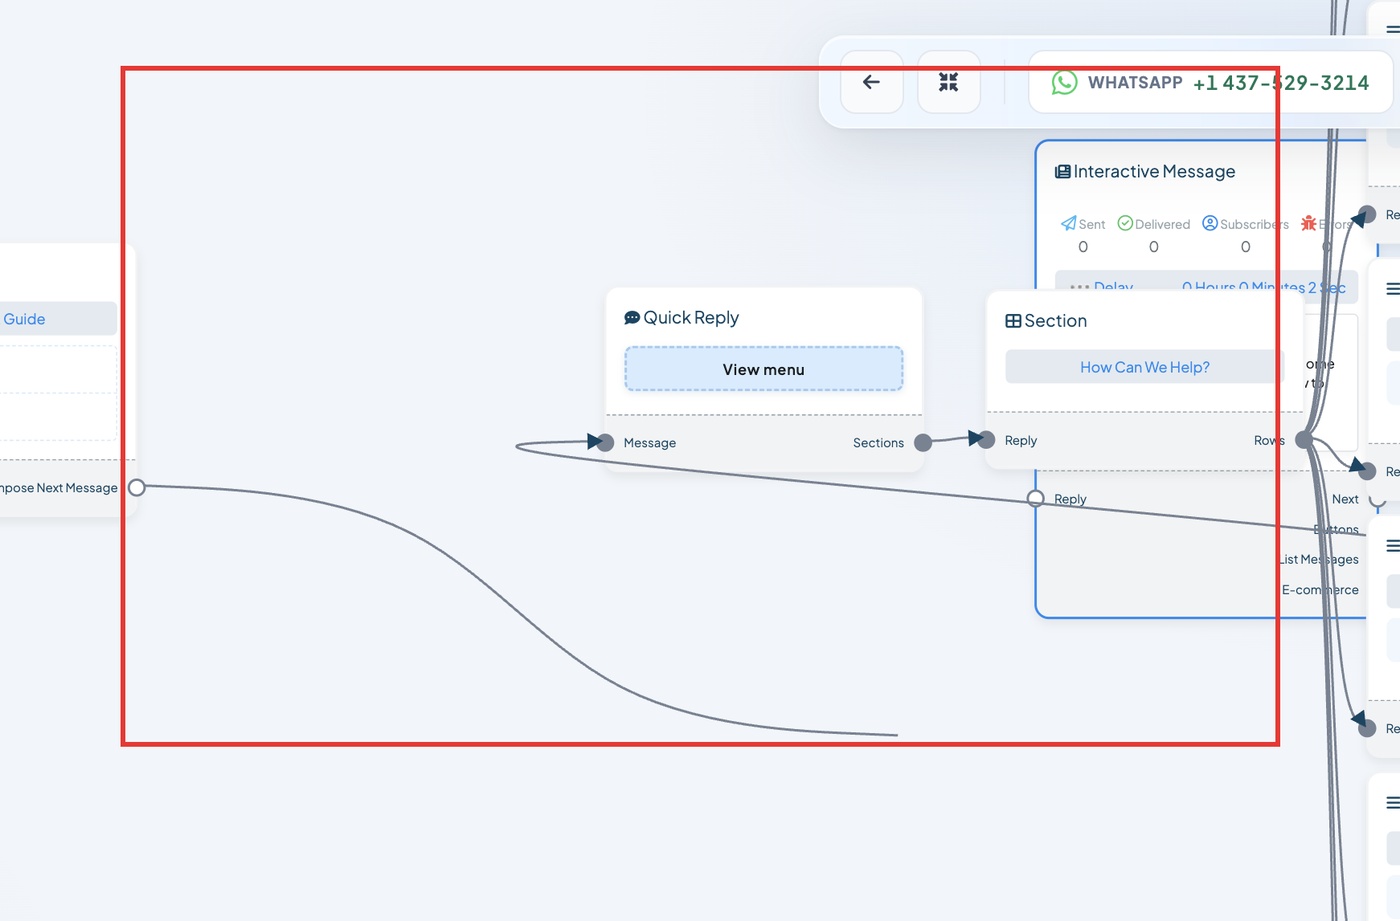 Pull the line away
Step 3. Let go in empty space. The line disappears.
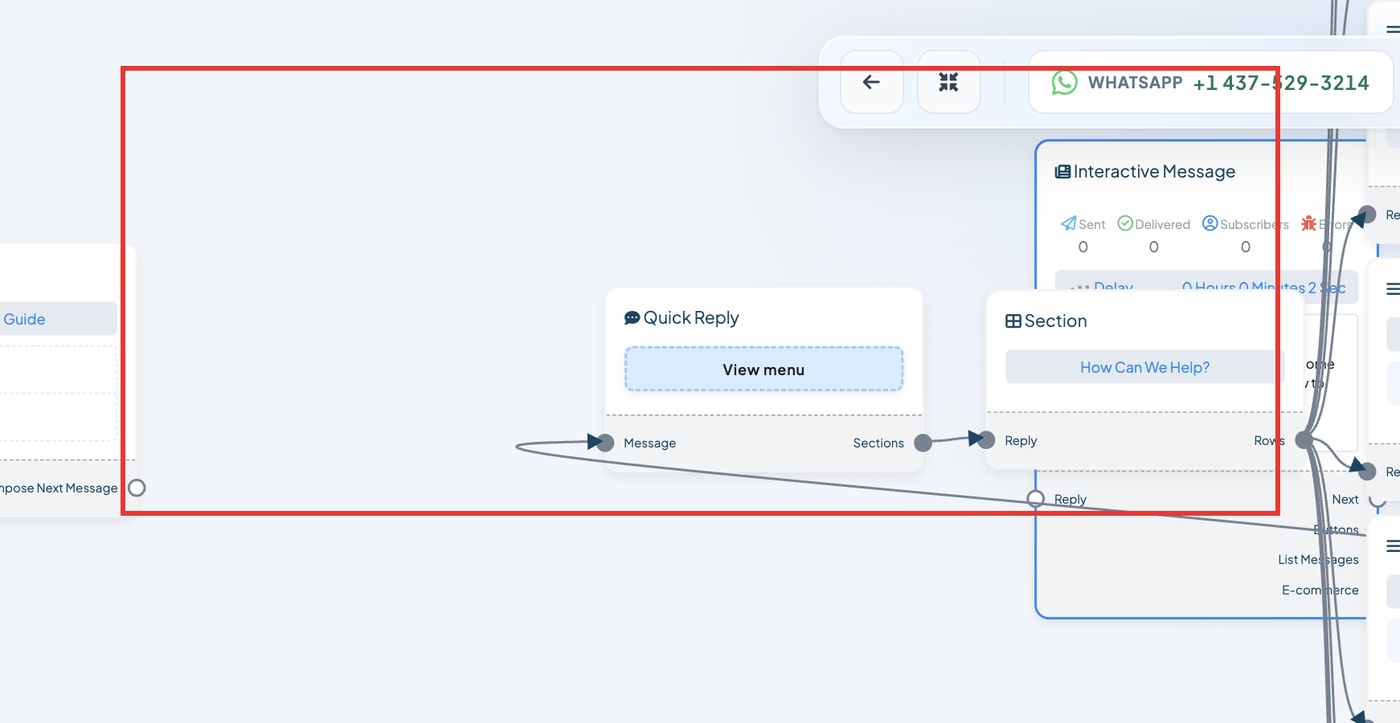 The blocks are no longer joined
Step 4. Type Condition in Search blocks.
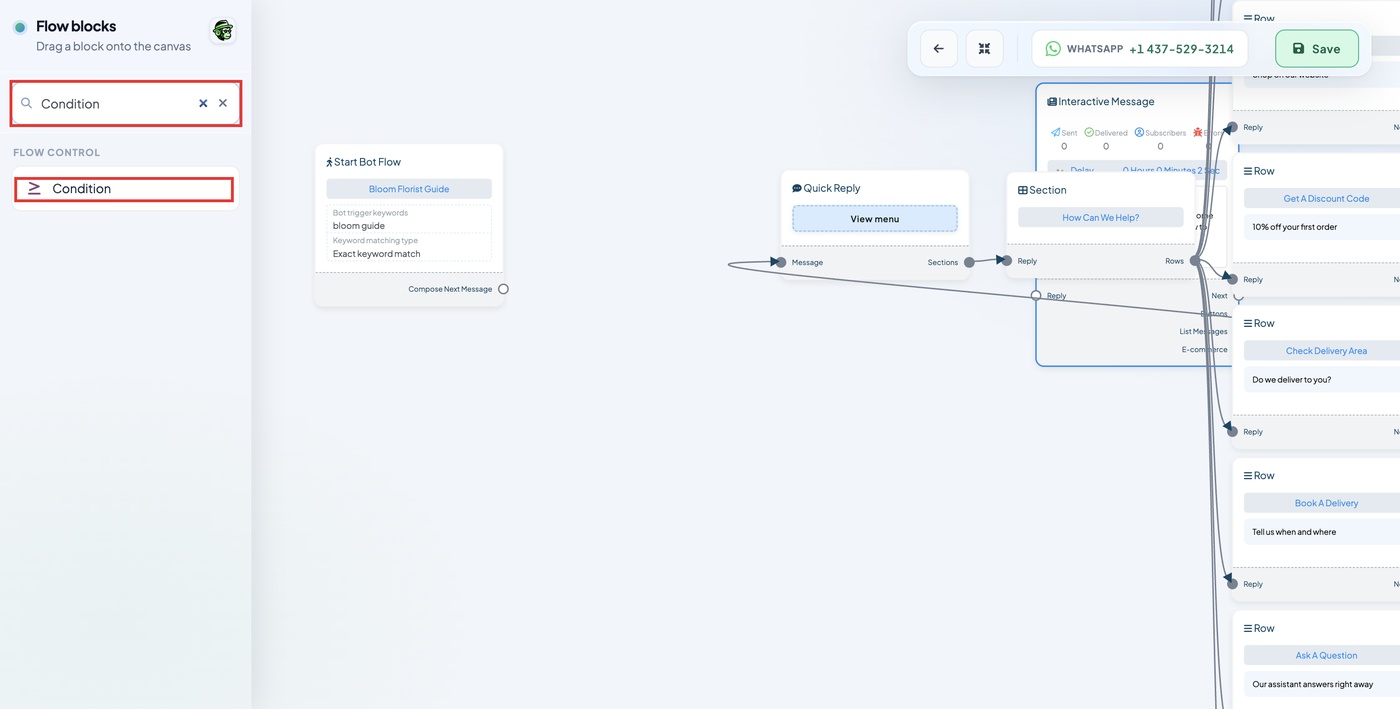 Condition appears
Step 5. Drag Condition into the gap.
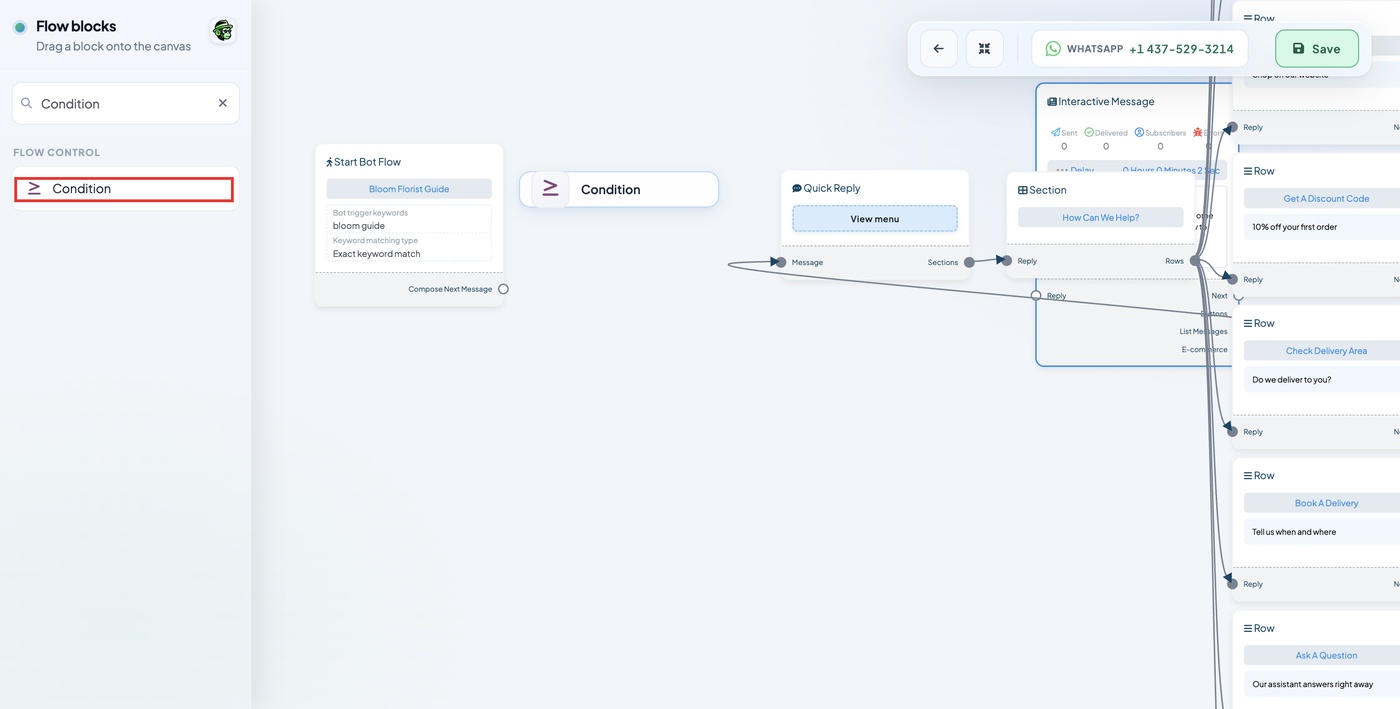 Put it in the gap
Step 6. Drag from the Compose Next Message dot on Start Bot Flow to the Reply dot on the Condition.
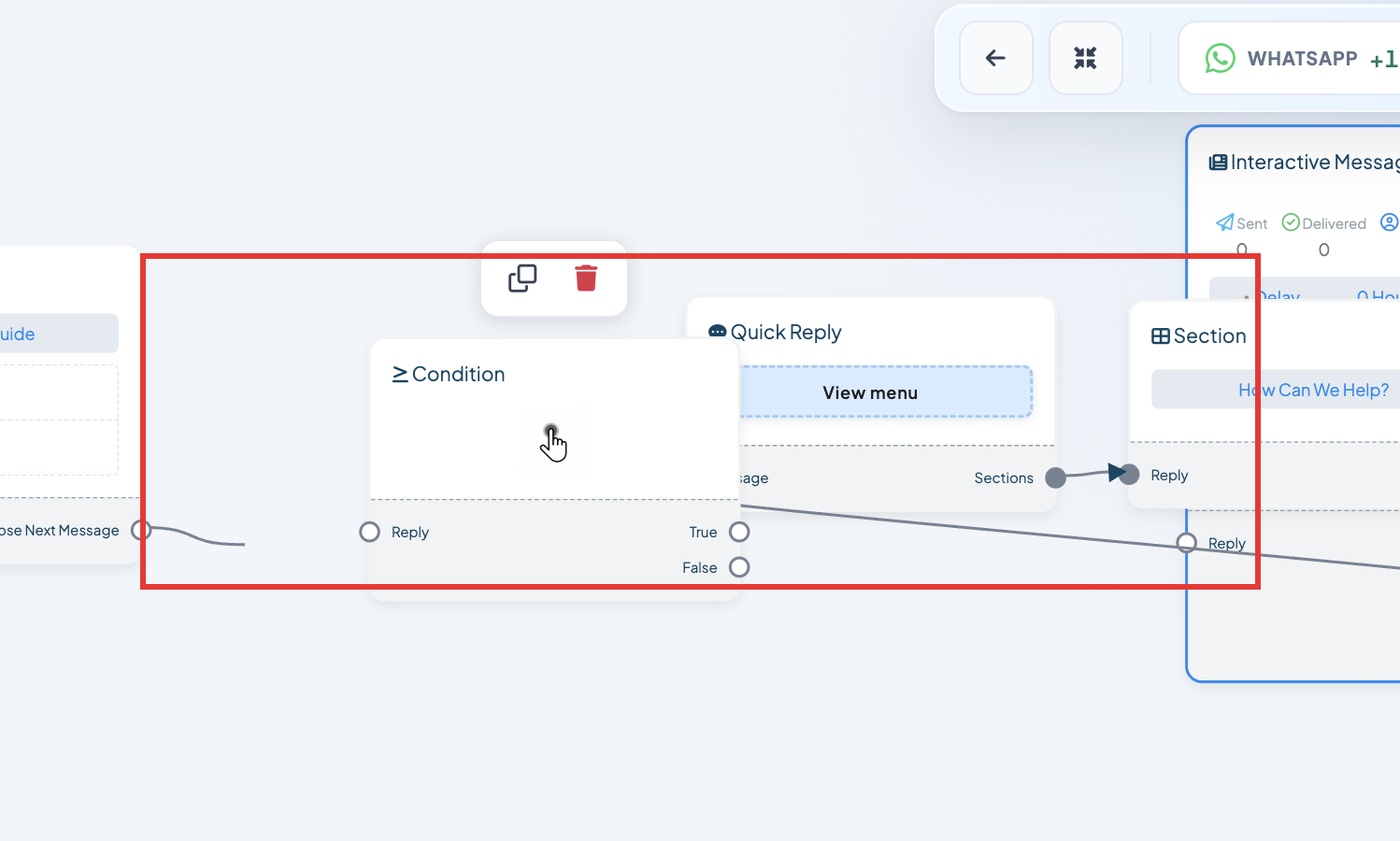 The check now runs first
Step 7. Click All Match. Set Variable to Label, Operator to Contains, and choose your label. Click Save Changes.
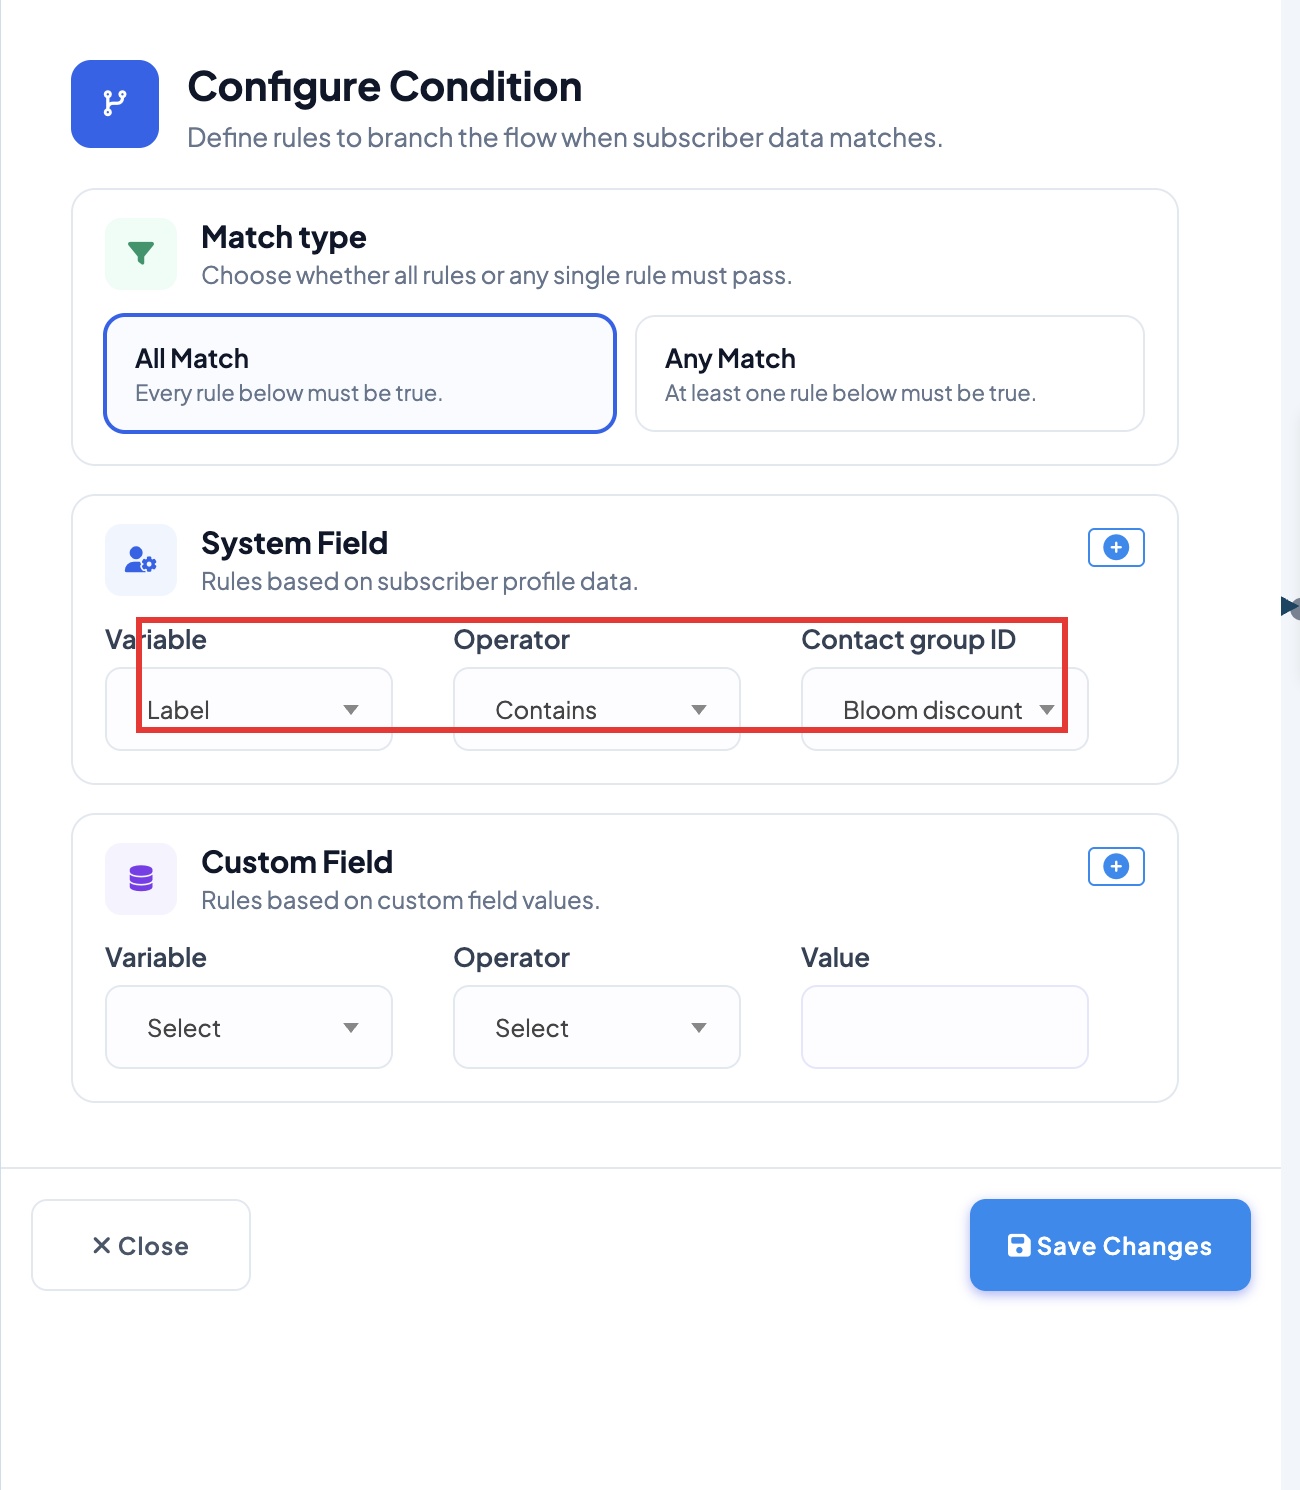 True if the customer has your label
Step 8. The Condition shows your check.
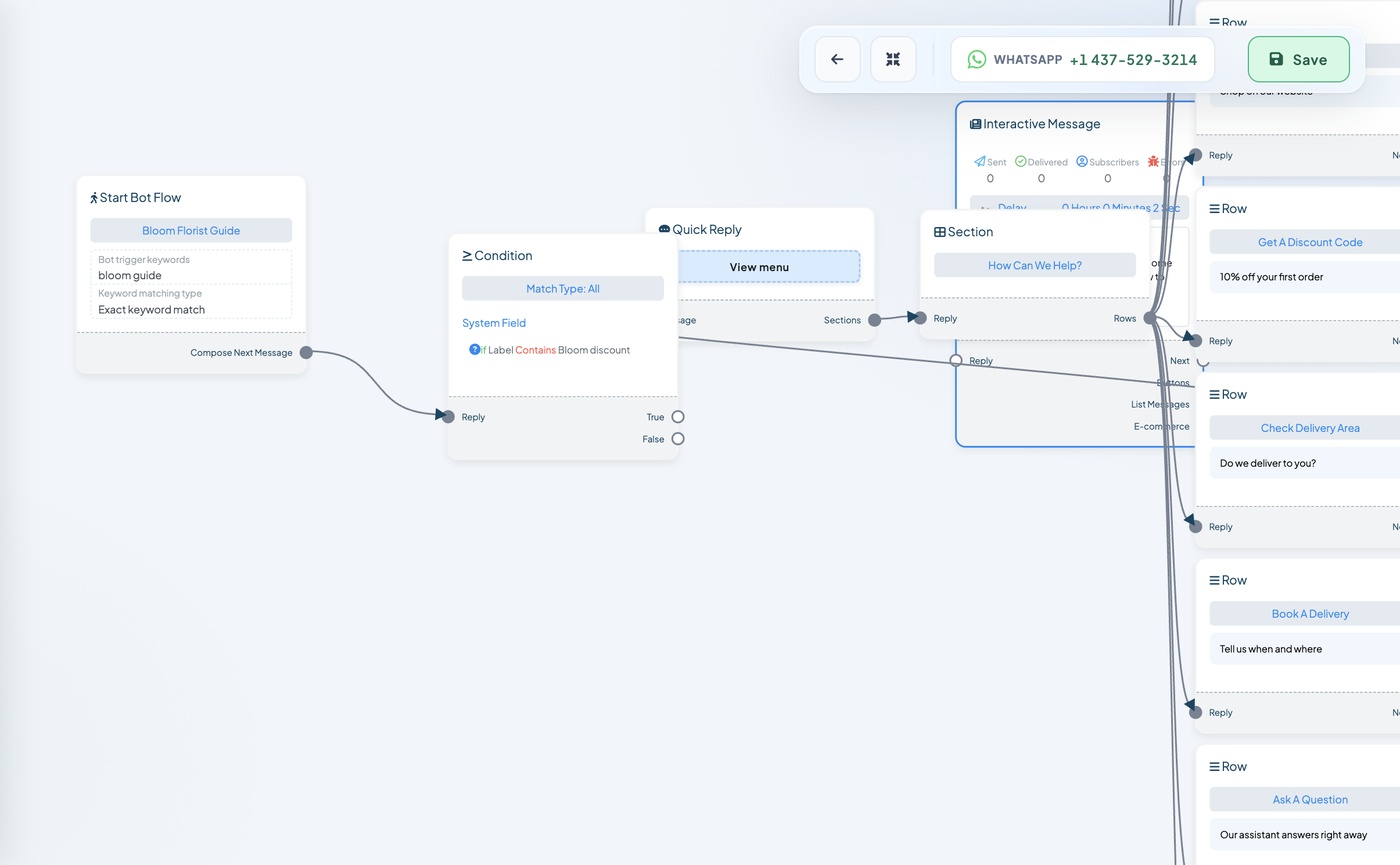 It has a True dot and a False dot
Step 9. Drag from False to the Reply dot on your welcome message. If its settings open, click Close.
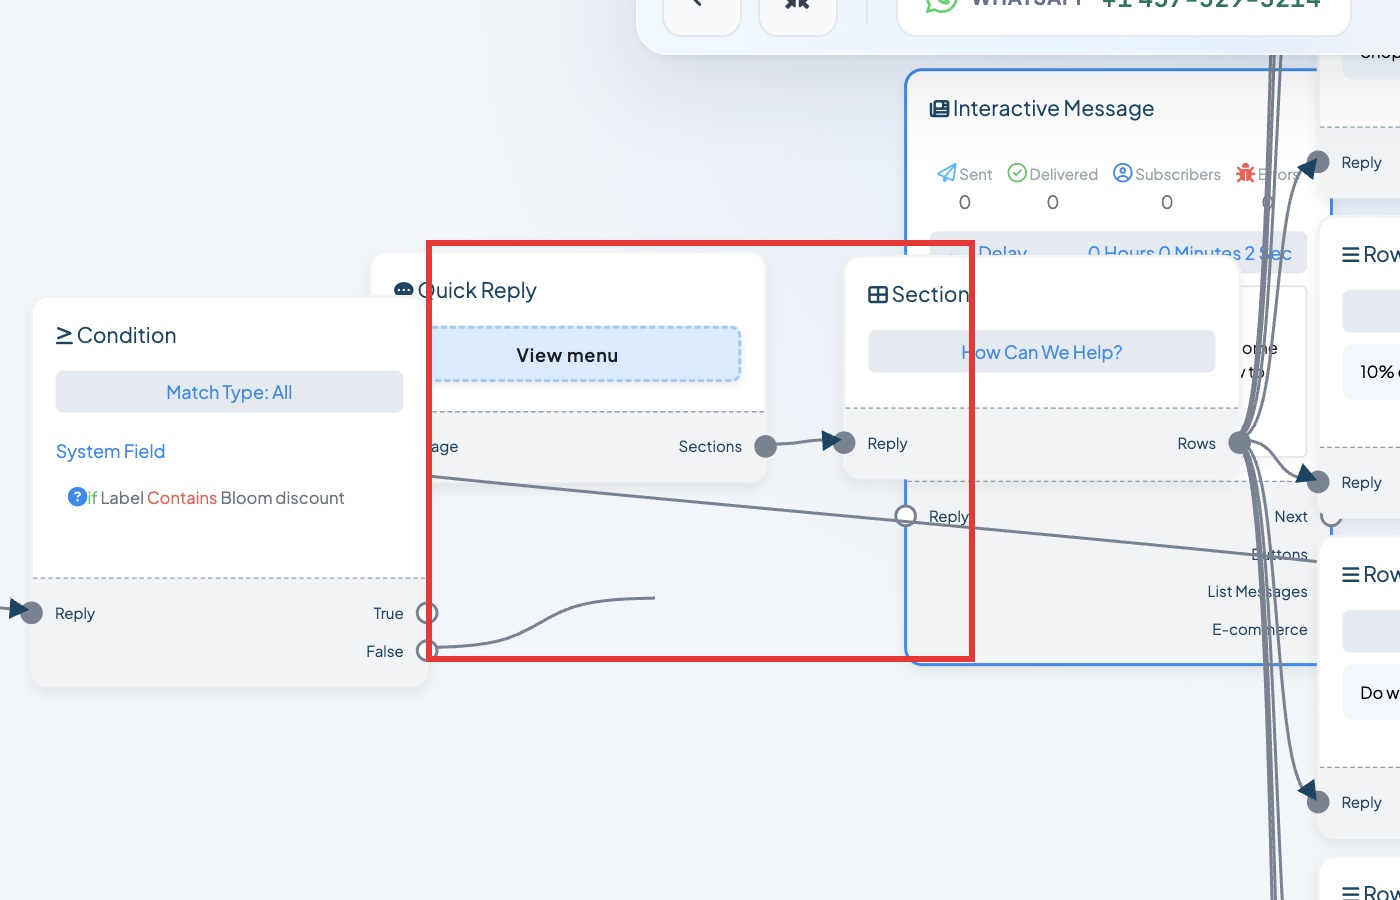 No label: show the normal welcome
Step 10. Drag a Text block below the Condition.
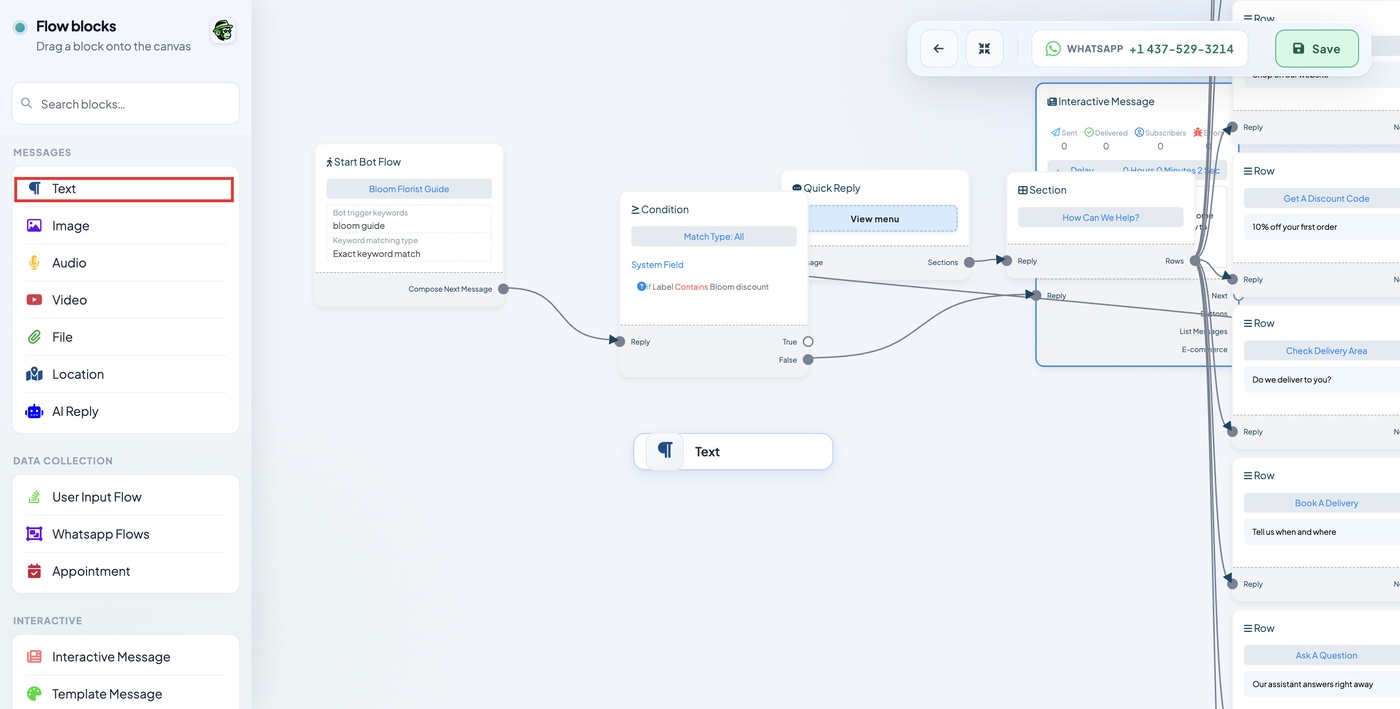 This becomes your welcome back message
Step 11. Drag from True to the Message dot on the new Text block.
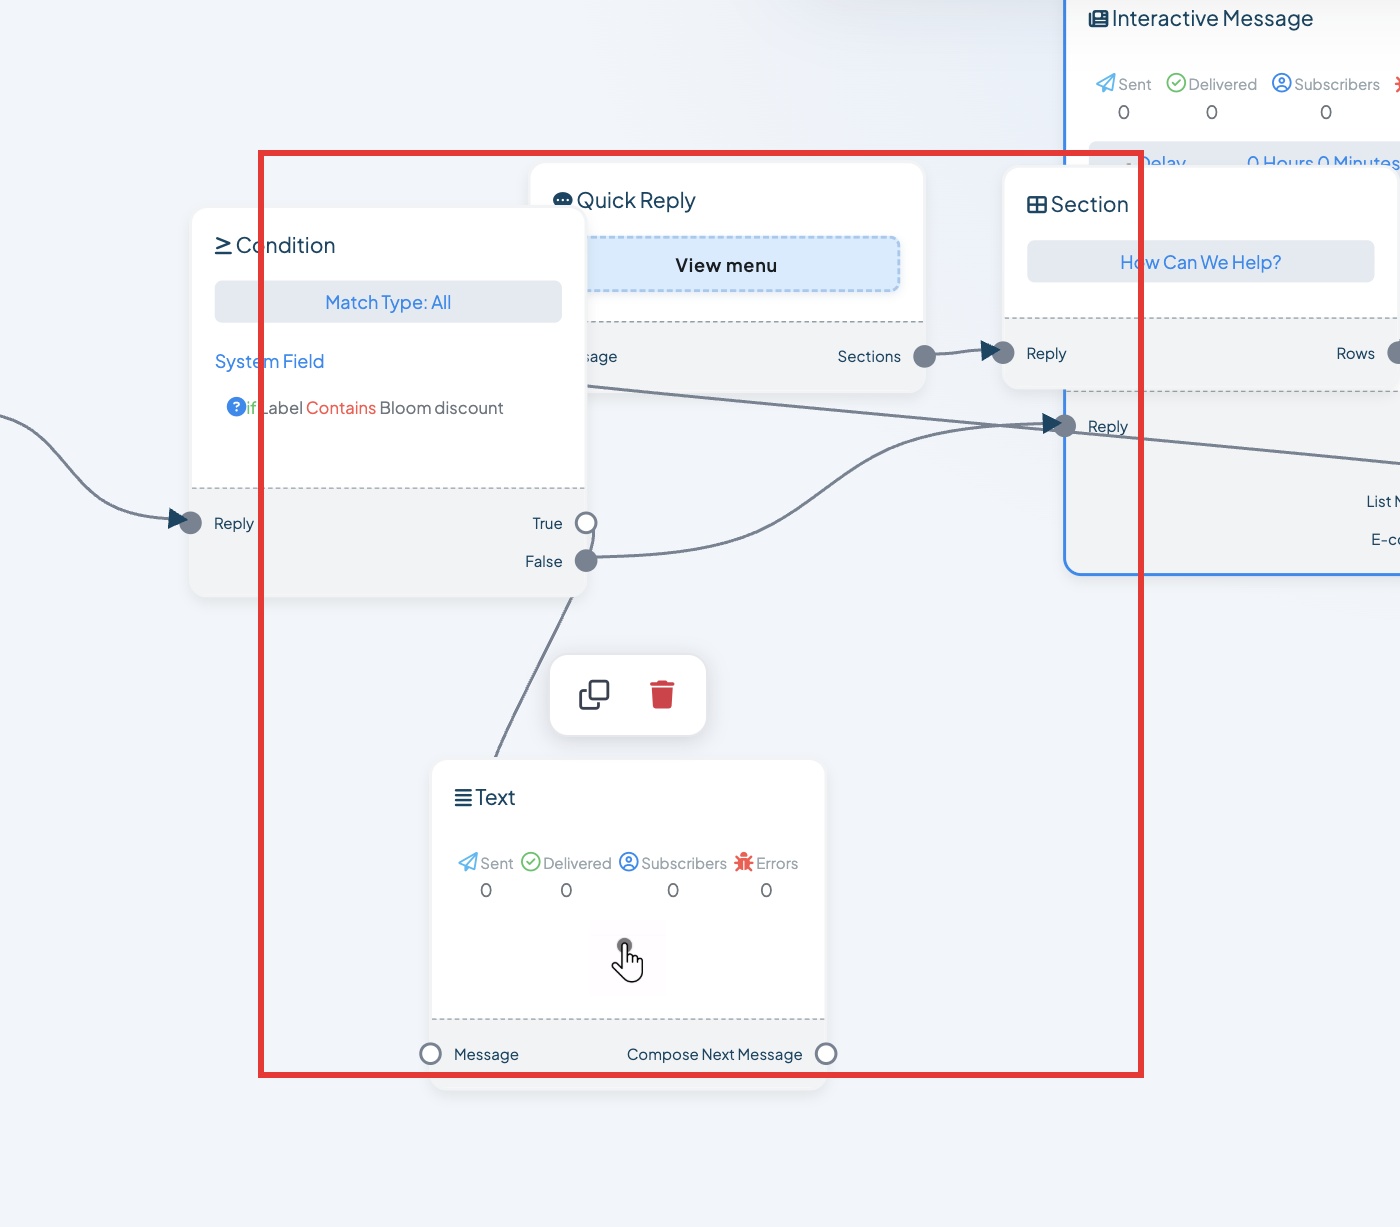 Has the label: say welcome back
Step 12. Type your welcome back message. Use the Name button for the customer's name. Click Save Changes.
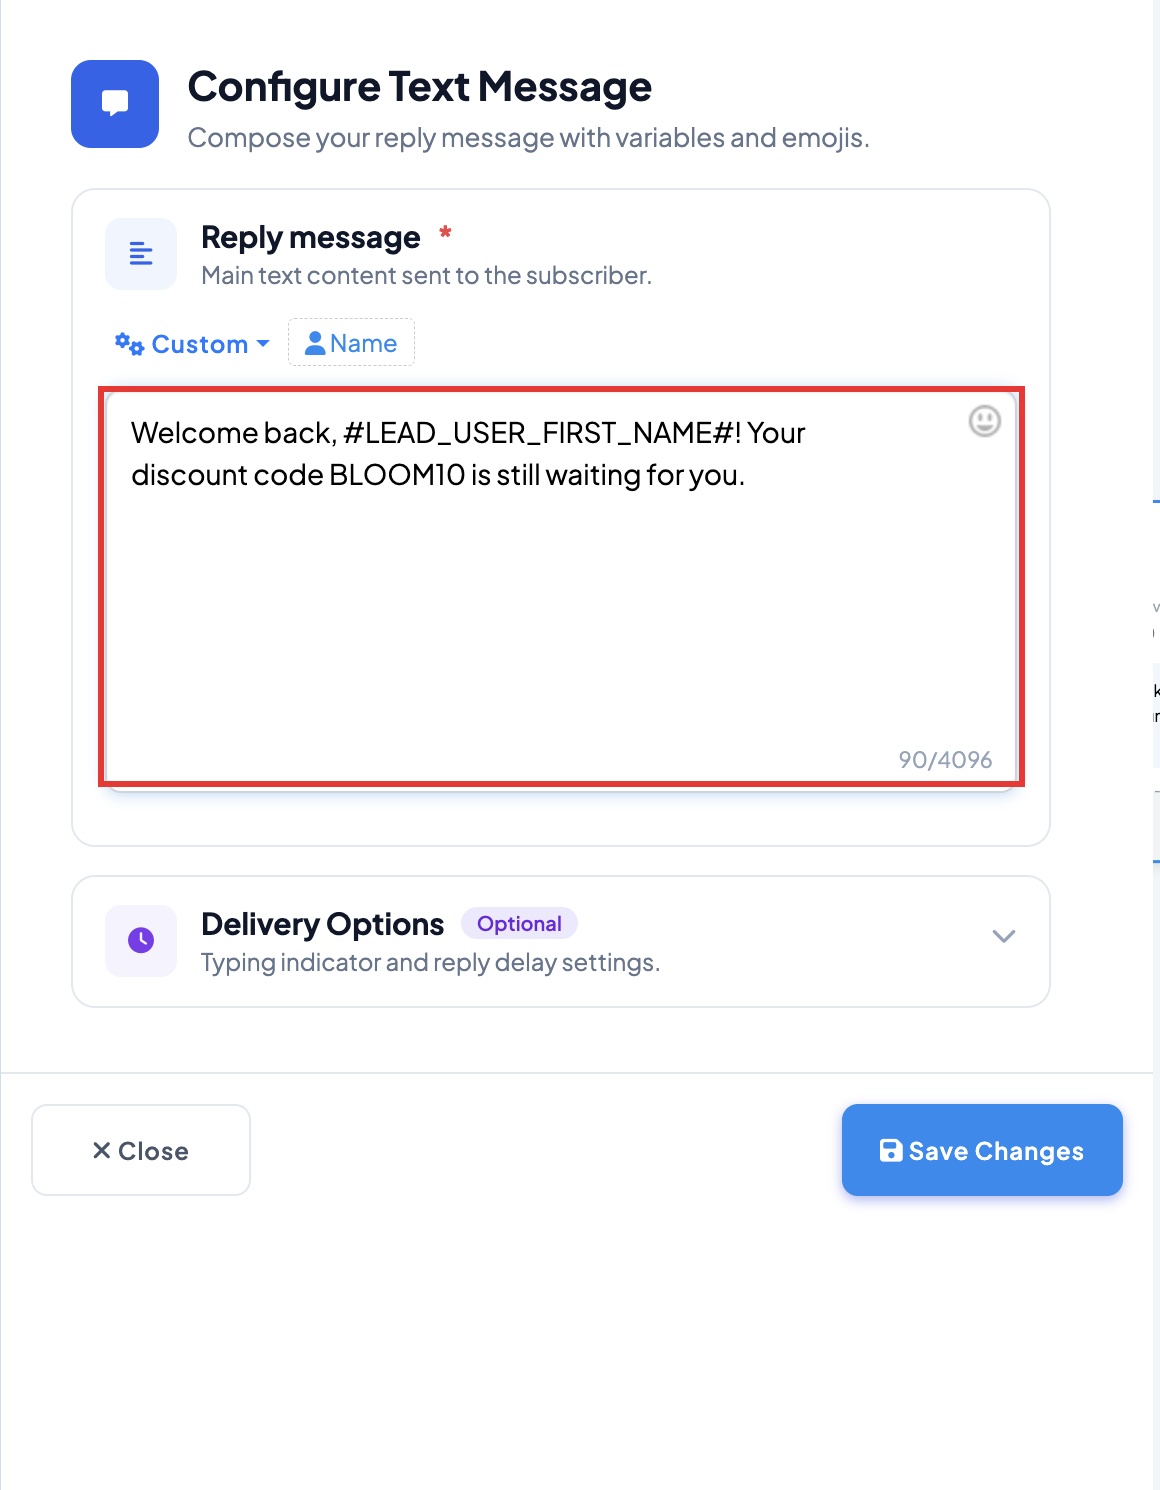 Only customers with your label see this
Step 13. Drag from its Compose Next Message dot to the Reply dot on your welcome message, so returning customers get the menu too. Click the green Save button.
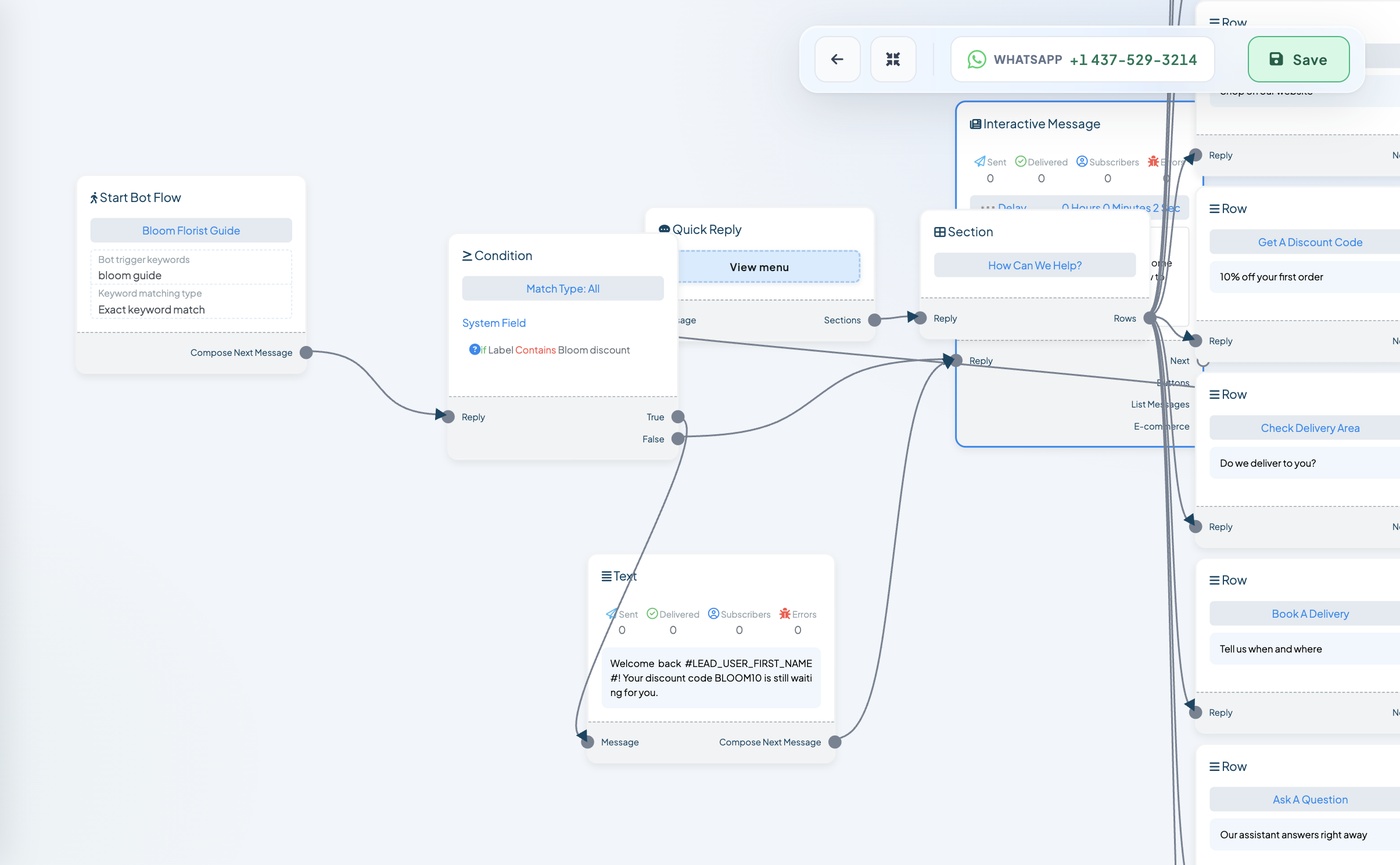 Keyword, check, welcome back, then your menu
What a returning customer sees:
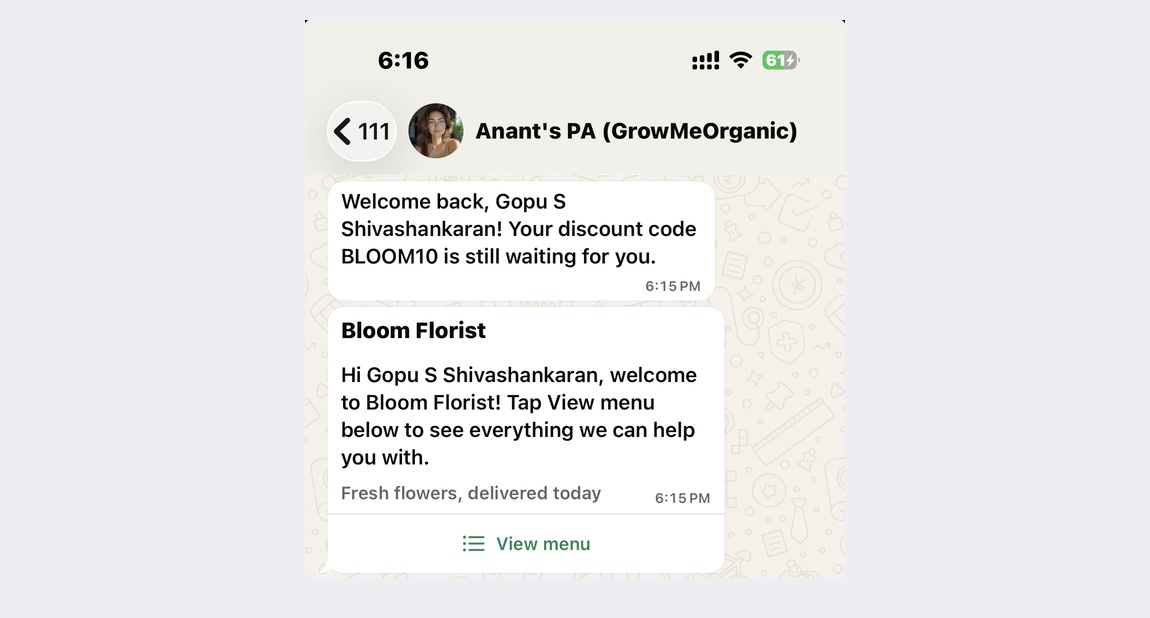 Welcome back first, then the menu
Part 14: Test Everything (about 5 minutes)
Step 1. Click the green Save button.
Step 2. From your personal phone, send your keyword to your business number.
Step 3. Tap View menu and try every option.
Here is our finished chatbot. Yours can look different. What matters is that every line joins the right dots.
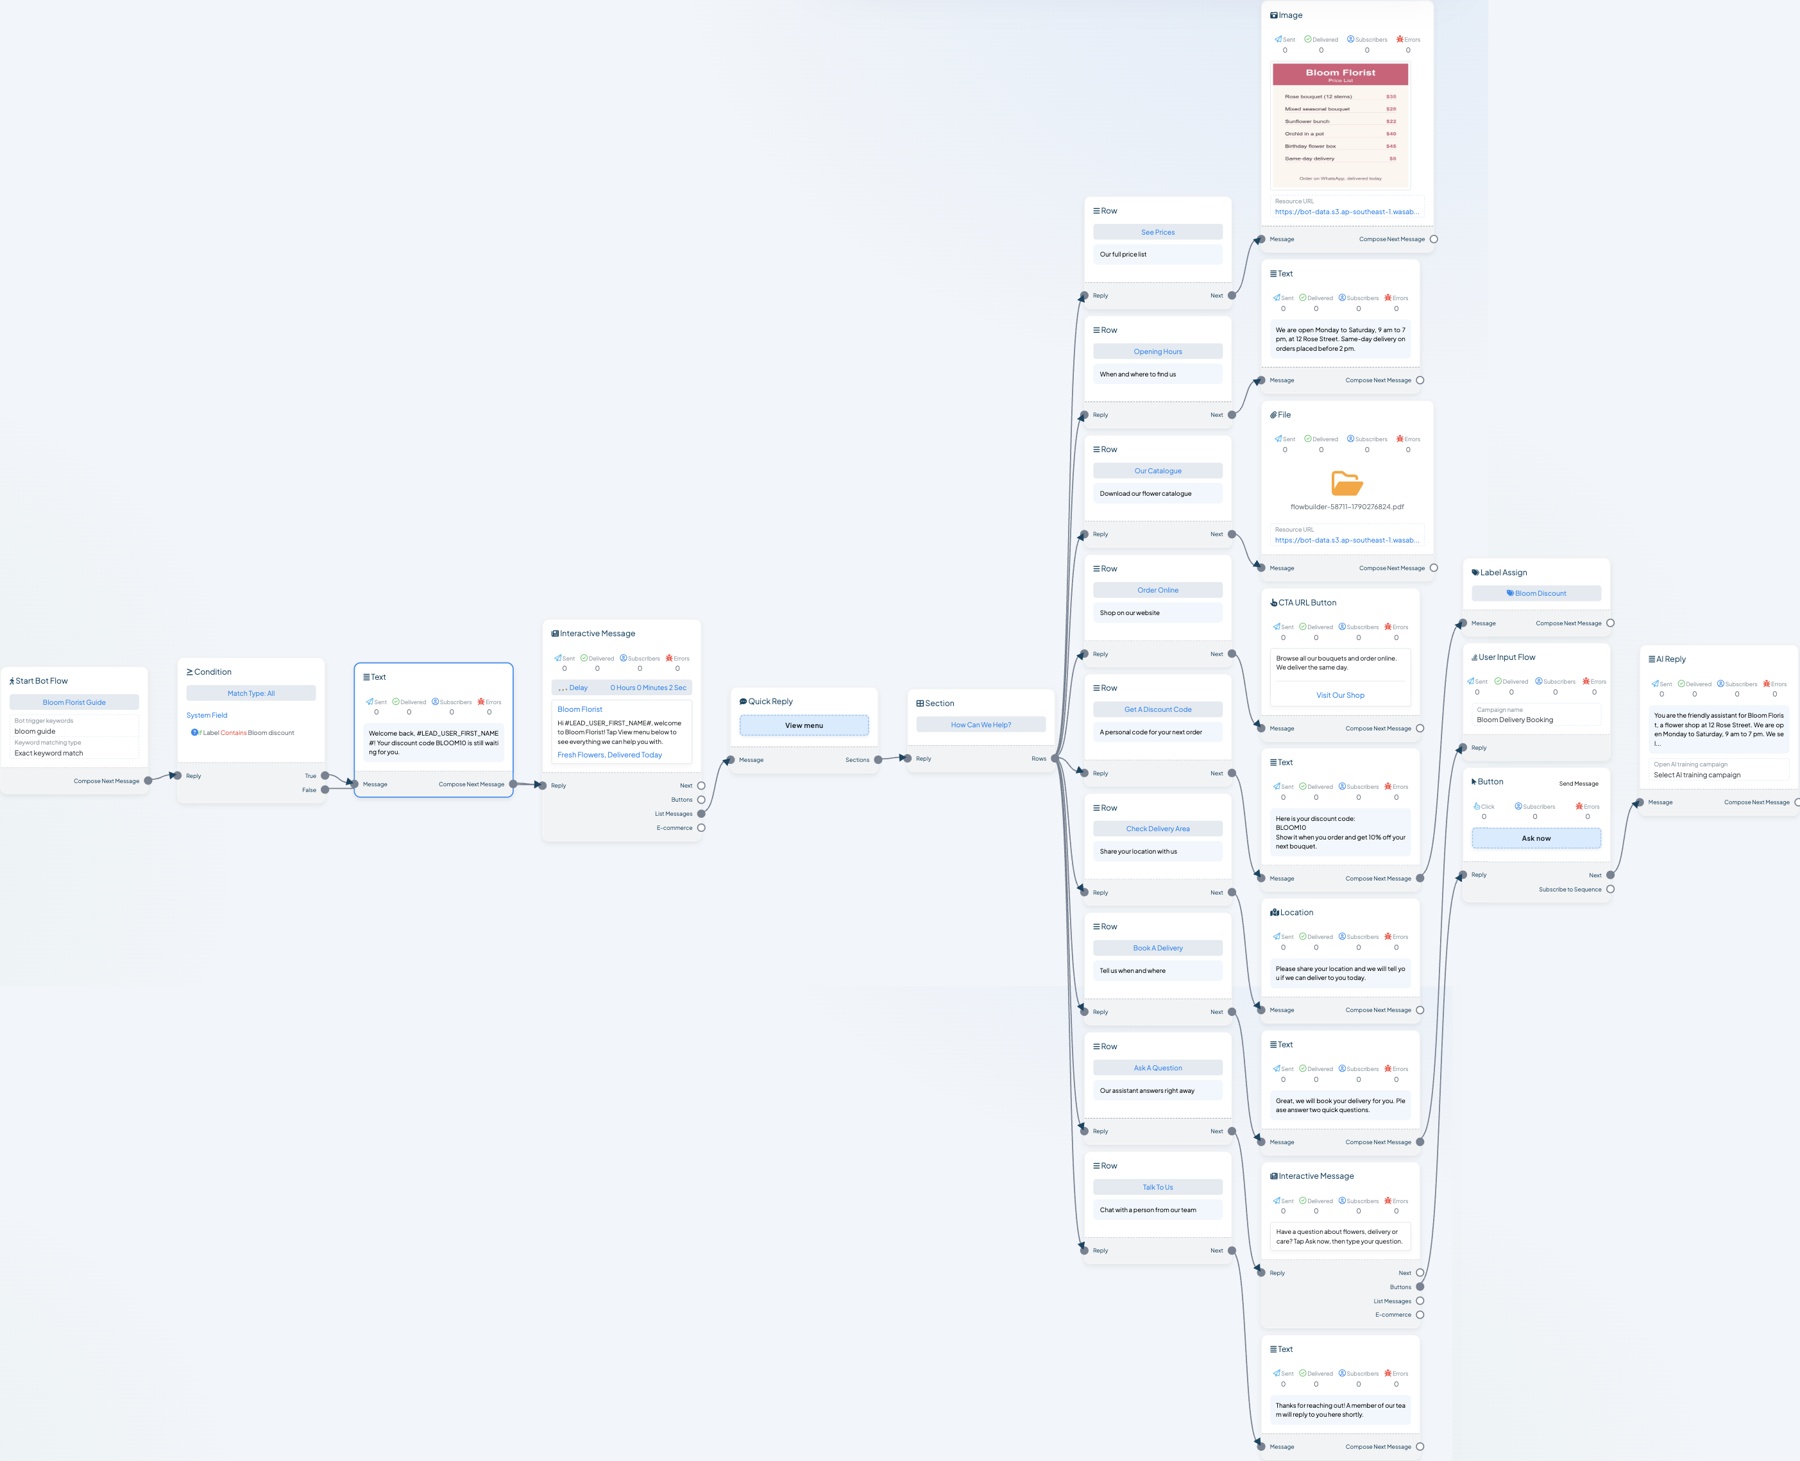 Start on the left, menu in the middle, what each option sends on the right
Now Make It Yours
Before you tell customers about your chatbot, check that:
- Every example text is replaced with your own words.
- You removed the options you don't need.
- Every option sends something when you tap it.
- The customer's name shows correctly in your welcome message.
- You clicked the green Save button.
Get Customers to Send Your Keyword
Your chatbot only starts when customers send your keyword, so tell them what it is. Put it anywhere customers see you, for example: "WhatsApp us the word bloom guide to see our menu."
These guides help:
- How to Add WhatChimp Chat Widget to WordPress: add a chat button to your website.
- How to Send Broadcast Messages in WhatChimp: tell your existing contacts about your menu.
- How to Make a Chatbot Reply to Any Keyword: reply even when customers send something else.
If Something Does Not Work
Nothing happens when I send my keyword. Click the green Save button, then check the keyword on Start Bot Flow. With exact match, customers must send the keyword on its own.
An option does nothing. Join that option's Next dot to a block.
An option is missing from the menu. Join the Section's Rows dot to that option's Reply dot.
Customers see "#name". Delete it and use the Name button.
A block won't join. AI Reply needs a button in front of it. A User Input Flow needs a message in front of it.
Related Articles
- Flow Builder Blocks Explained: every block, including the ones not used here
- How to Create a Keyword-Based WhatsApp Chatbot: a simple one-message chatbot