How to Connect Your Phone Number with WhatChimp (Embedded Signup)
Step-by-step guide to connect your WhatsApp Business phone number to WhatChimp using the embedded signup flow
Updated 16 June 2026
If you're ready to manage your WhatsApp Business conversations with WhatChimp, the first step is to connect your phone number. This process is quick and can be completed through the integration with WhatsApp Business.
Note: If you want to use an existing WhatsApp number, you'll need to delete that number from WhatsApp or the WhatsApp Business App before connecting it to the WhatsApp Business API. You can follow the steps in our guide here: Migrate an Existing WhatsApp Number to a Business Account.
Follow these steps to get started:
Log in to WhatChimp
- Log in to your WhatChimp account with your credentials.
- Once you're logged in, you'll see the main dashboard.
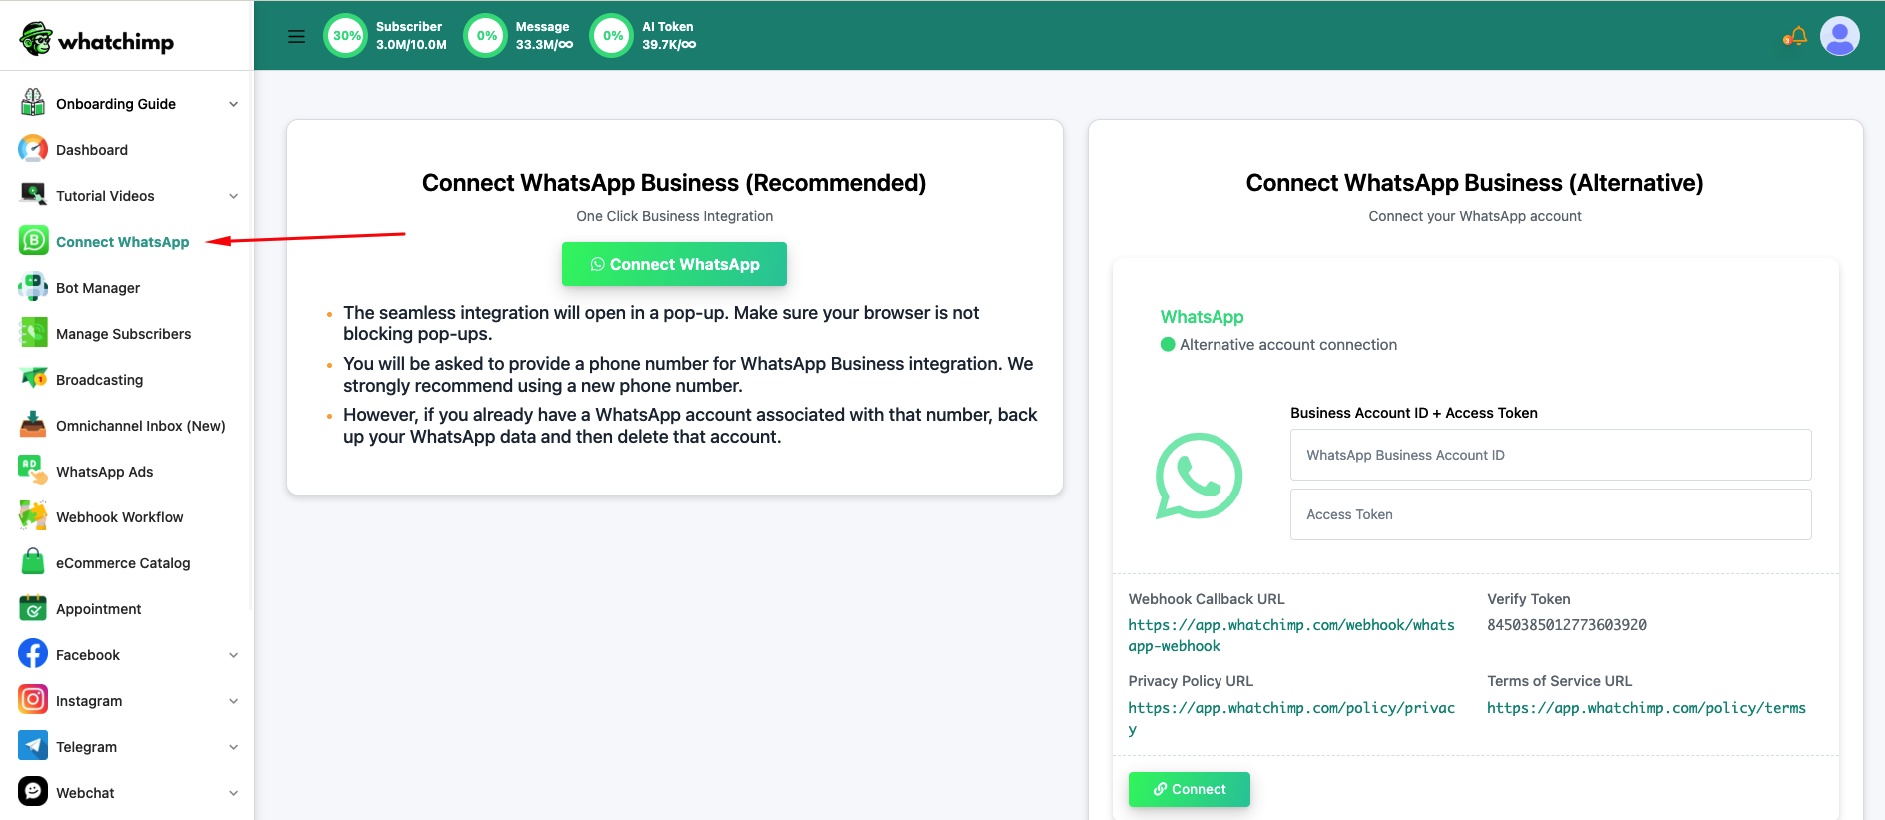
Go to Connect Account
- On the left-hand navigation bar, click Connect Account.
- Alternatively, you can visit this link to go directly to the phone number connection page.
Choose Your Connection Method
You'll see two ways to connect your WhatsApp number:
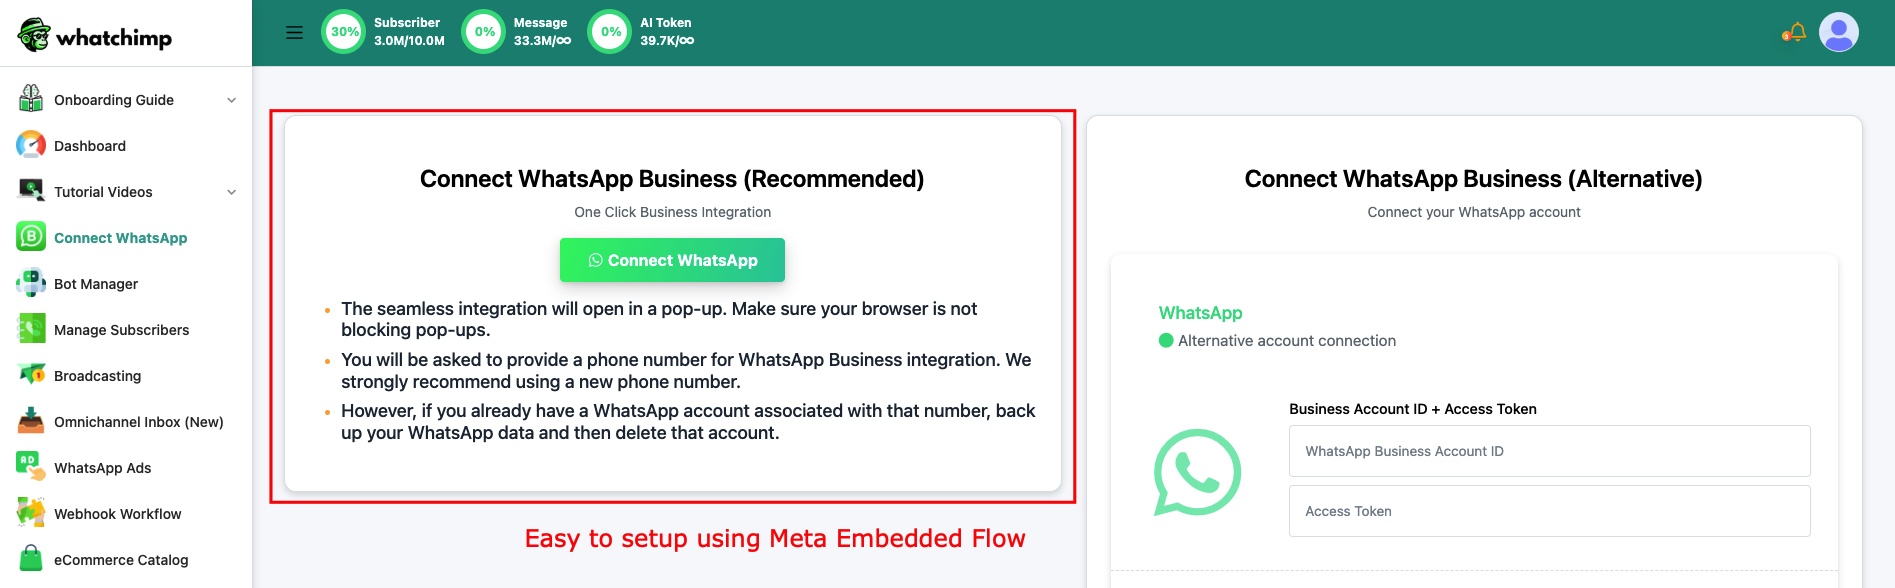
| Embedded Signup (Recommended) | Alternative (Manual) | |
|---|---|---|
| Best for | Everyone | Developers with existing Meta Apps |
| How it works | Click Connect WhatsApp and follow the guided popup | Enter your own Business Account ID and Access Token |
| Technical knowledge | None required | You need to create a Meta App, generate a permanent access token, and configure webhooks yourself |
| Setup time | 5 minutes | 30+ minutes |
| What we recommend | Use this | Only if you already have a Meta App set up and know what you're doing |
Click Connect WhatsApp on the left to begin the Embedded Signup flow. The rest of this guide follows that method.
Connect With or Without Catalog
You'll see two buttons — Connect WhatsApp With Catalog Permission and Connect WhatsApp Without Catalog Permission.
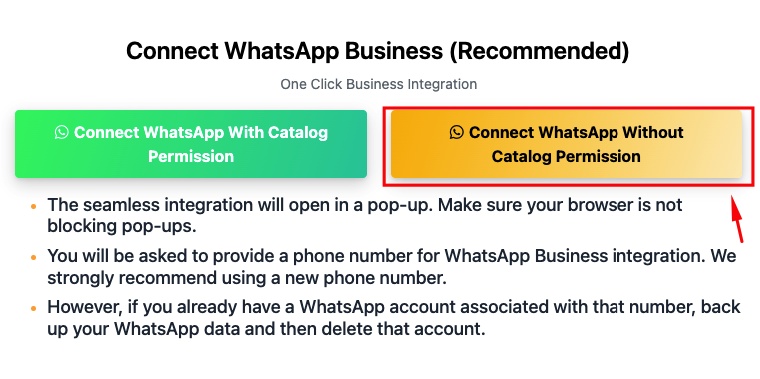
We strongly recommend clicking Connect WhatsApp Without Catalog Permission to get set up quickly. You can always connect your catalog later. To connect with catalog permission, you must already have a catalog created inside Meta — if you don't, the setup will fail.
Log in with Facebook
- After clicking Connect WhatsApp, you'll be prompted to log in with Facebook if you are not already logged in.
- If you're already logged into Facebook, you'll continue with your current account. If not, enter your Facebook credentials to proceed.

Business Selection
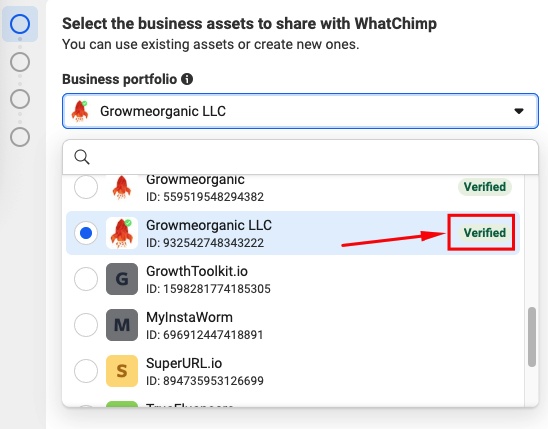
Don't rush through this step. Before filling anything, check the Business portfolio dropdown carefully. You'll see one of two situations — pick the one that matches yours.
Already Have a Business Portfolio?
If you've ever run Facebook or Instagram ads, used another WhatsApp BSP (like Interakt, Wati, AiSensy, etc.), or set up a Meta Business Suite for your company — you most likely already have a Business Portfolio. It will appear in the dropdown with your business name.
If you see your business name in the dropdown (with or without a green "Verified" badge), select it and follow this guide: Connect with an Existing Business Portfolio.
Don't Have One? Create a New Portfolio
If the dropdown is empty or you don't recognize any of the listed portfolios, select "Create a Business Portfolio" and fill in your details.
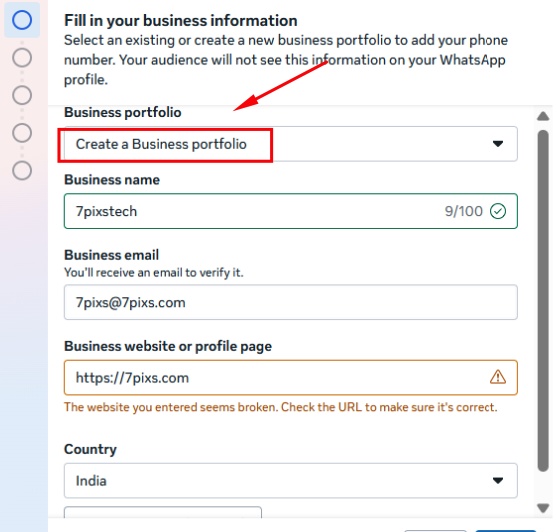
Business name: Use your legal entity name — Meta will ask for proof later (registration, bill, or bank statement). Sole proprietors can use their own name. Get it right — it's hard to change later.
Website: No website? Use your Facebook page, Instagram profile, or any public URL that represents your business.
After creating your portfolio, you'll see this screen:
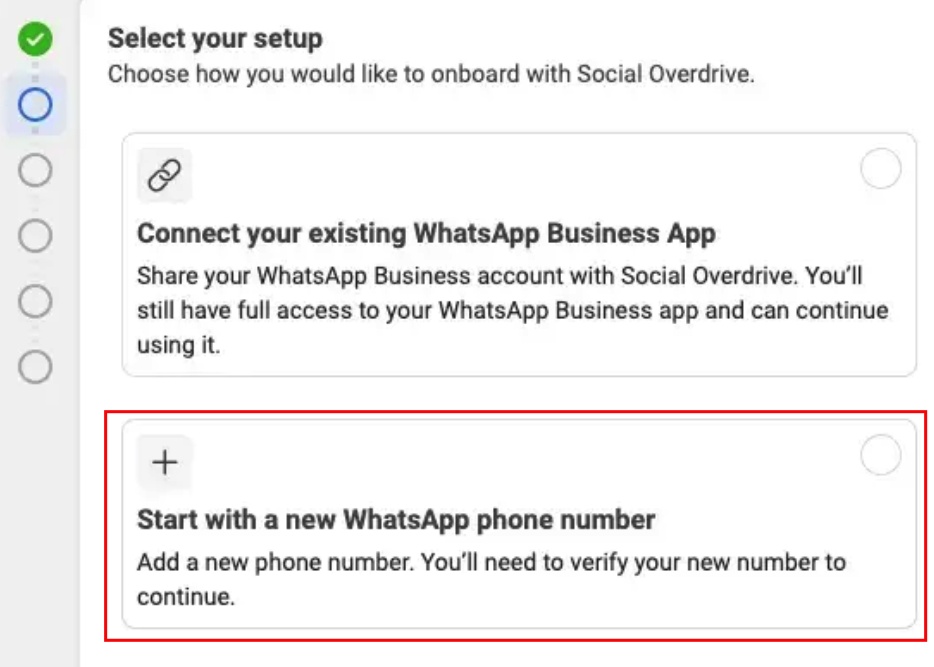
Connect your existing WhatsApp Business App — Links your current Business App number to the API. You keep using the app on your phone while WhatChimp handles automation through the API. This is WhatsApp's co-existence feature — for full details, see WhatsApp Co-Existence.
Start with a new WhatsApp phone number — Add a fresh number and verify it. Choose this if you have a new number that's not currently on WhatsApp.
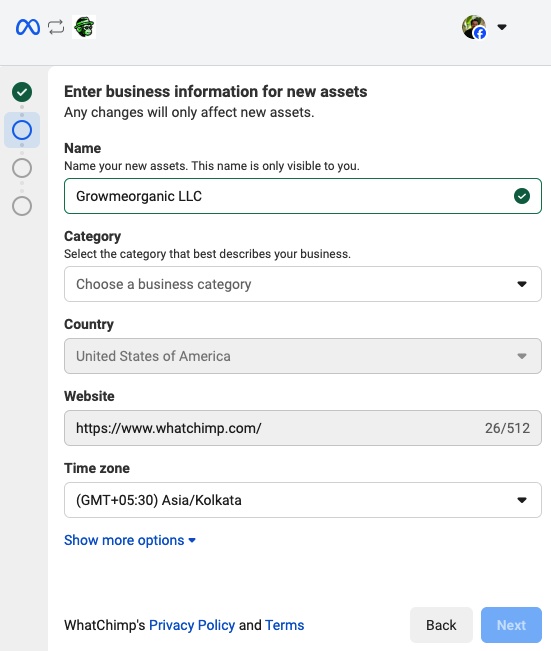
Create a WhatsApp Business Profile
Enter your business information — name, category, country, website, and time zone.
Verify Your Phone Number
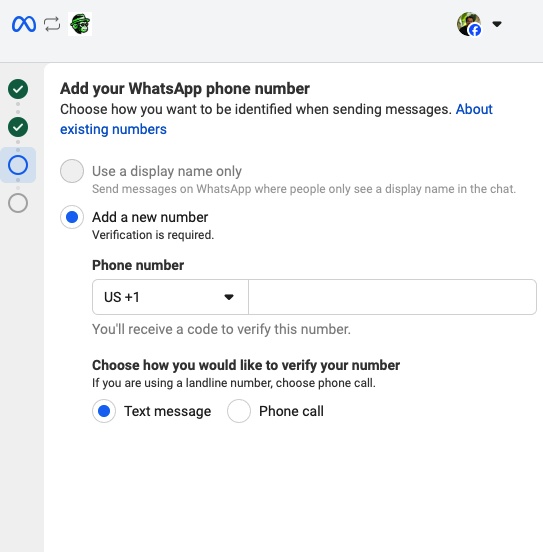
Enter the phone number you want to connect to WhatChimp. WhatsApp will send a verification code via SMS or call.

Enter the code to verify your phone number.
Permissions
You'll be prompted to review the permissions WhatsApp requires for your business. These are standard permissions that cannot be changed. Click Continue to proceed.

- Click Continue to acknowledge the permissions and proceed.
Restrictions to Keep in Mind
- The phone number you use must be new and not currently linked to WhatsApp or the WhatsApp Business App.
Next Step: Add Payment Method & Verify Your Business
Once your phone number is successfully connected, the next steps are to add a payment method for WhatsApp API billing and verify your business. These are essential to ensure smooth operations and uninterrupted access to the WhatsApp Business API.
Add Payment Method
To avoid any interruptions in service, you'll need to add a payment method to cover WhatsApp API usage charges. This step ensures that your WhatsApp Business API conversations are billed correctly based on WhatsApp's per-conversation pricing model.

For a detailed guide on adding a payment method, please refer to our support article:
How to Add Payment Method for WhatsApp API Billing
Verify Your Meta Business Manager
Verifying your Meta Business Manager is necessary to gain full access to WhatsApp's business features. Verification adds credibility to your account, ensures compliance, and helps you unlock higher messaging limits.

For a step-by-step guide on verifying your WhatsApp Business account, visit:
How to Verify Your Meta Business Manager
By completing these two steps, your WhatsApp Business account will be fully set up and ready to send and receive messages through WhatChimp. These are crucial steps to ensure your account runs smoothly without any disruptions.
Conclusion
By following these steps, you'll be able to quickly connect your phone number to WhatChimp and start managing your WhatsApp Business communications with ease.
For additional help, don't hesitate to contact WhatChimp Support.