WhatChimp API se Quick Reply Buttons ke saath Template Messages bhejiye
Bot flows trigger karne wale quick reply buttons ke saath templates bhejiye
Updated 10 February 2026
Quick Reply buttons customers ko ek button tap karke aapke template message ka jawab dene dete hain — aur aap har button ko ek Bot Flow se bind kar sakte hain, taki button tap karne se automatically ek specific chatbot sequence trigger ho jaye. Isi tarah aap outbound template messages se shuru hone wale conversations automate karte hain.
Shuru karne se pehle: Dhyan dijiye ki aapne Send Template Messages via WhatChimp API padh liya hai template messages bhejne ki basics ke liye.
Kaise kaam karta hai
- Aap WhatChimp mein Quick Reply buttons ke saath ek template banate hain (jaise "Aur Jaaniye", "Order Track Kariye", "Support se Baat Kariye")
- Aap Bot Manager mein har button ke liye ek Bot Flow banate hain
- Aap API ke zariye apne bot flows ke liye postback IDs lete hain
- Template bhejte waqt, aap
template_quick_reply_button_valuesuse karke har button se mapped postback IDs pass karte hain - Jab customer button tap karta hai, WhatChimp automatically corresponding bot flow trigger karta hai
Postback binding ke bina: Button sirf ek text reply bhejta hai (button label). Koi automation nahi hota.
Postback binding ke saath: Button ek poora chatbot flow trigger karta hai — menus, responses, data collection, API calls — jo bhi aapne Bot Manager mein banaya hai.
Step 1: Quick Reply Buttons ke saath Template banayiye
Step A. Bot Manager > Message Template par jayiye aur Create par click kariye
Step B. Apne template ki details bhariye — naam, category, header, body, footer
Step C. Button ke neeche, Quick Reply select kariye
Step D. Button text enter kariye (jaise "Aur Jaaniye"). Aap 3 tak Quick Reply buttons add kar sakte hain.
Step E. Save par click kariye aur Meta ke template approve karne ka intezaar kariye.
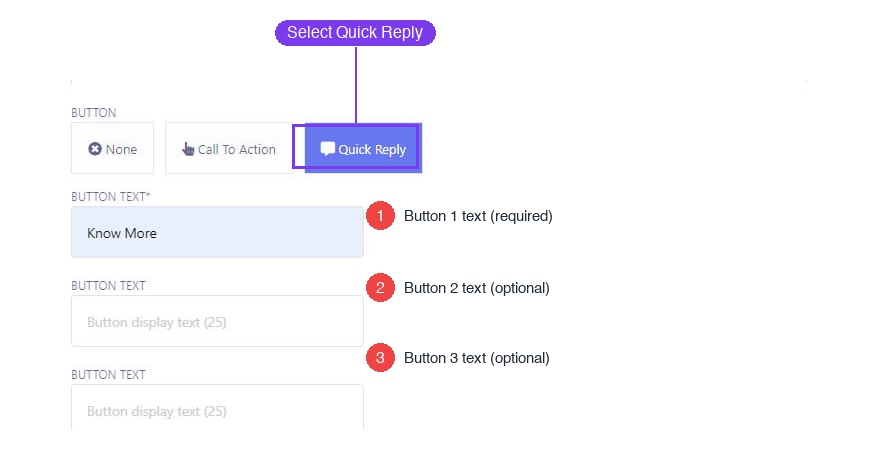
Tip: Button text chhota aur action-oriented rakhiye — "Order Track Kariye", "Madad Lijiye", "Catalog Dekhiye". Har button ke liye max 25 characters.
Video: https://www.youtube.com/watch?v=A3evOF5xIho
Step 2: Bind karne ke liye Bot Flow banayiye
Har Quick Reply button ko tap hone par trigger karne ke liye ek bot flow chahiye. Aap unhe Bot Manager mein banaenge.
Step A. Bot Manager par jayiye aur Bot Reply par click kariye

Step B. Visual Flow Bot Builder kholne ke liye Create par click kariye

Step C. Apna bot flow banayiye — wo messages, menus, ya actions add kariye jo aap trigger karna chahte hain jab customer Quick Reply button tap kare. Jaise ek "Aur Jaaniye" flow jo product details bhejta hai, ya ek "Order Track Kariye" flow jo order number maangta hai.
Step D. Bot flow save kariye. Har Quick Reply button ke liye repeat kariye jo apna flow chahta hai.
Bot flows banane par detailed guide ke liye, dekhiye How to Create a Keyword-Based WhatsApp Chatbot in WhatChimp.
Aasan tareeka: API Console use kariye
Ab aapke paas aapka template hai (Step 1) aur bot flows hain (Step 2), aapko unhe connect karna hai. API Developer Console sabse aasan tareeka hai — ye automatically Quick Reply buttons detect karta hai aur aapko har ek ko ek dropdown se bot flow map karne deta hai.
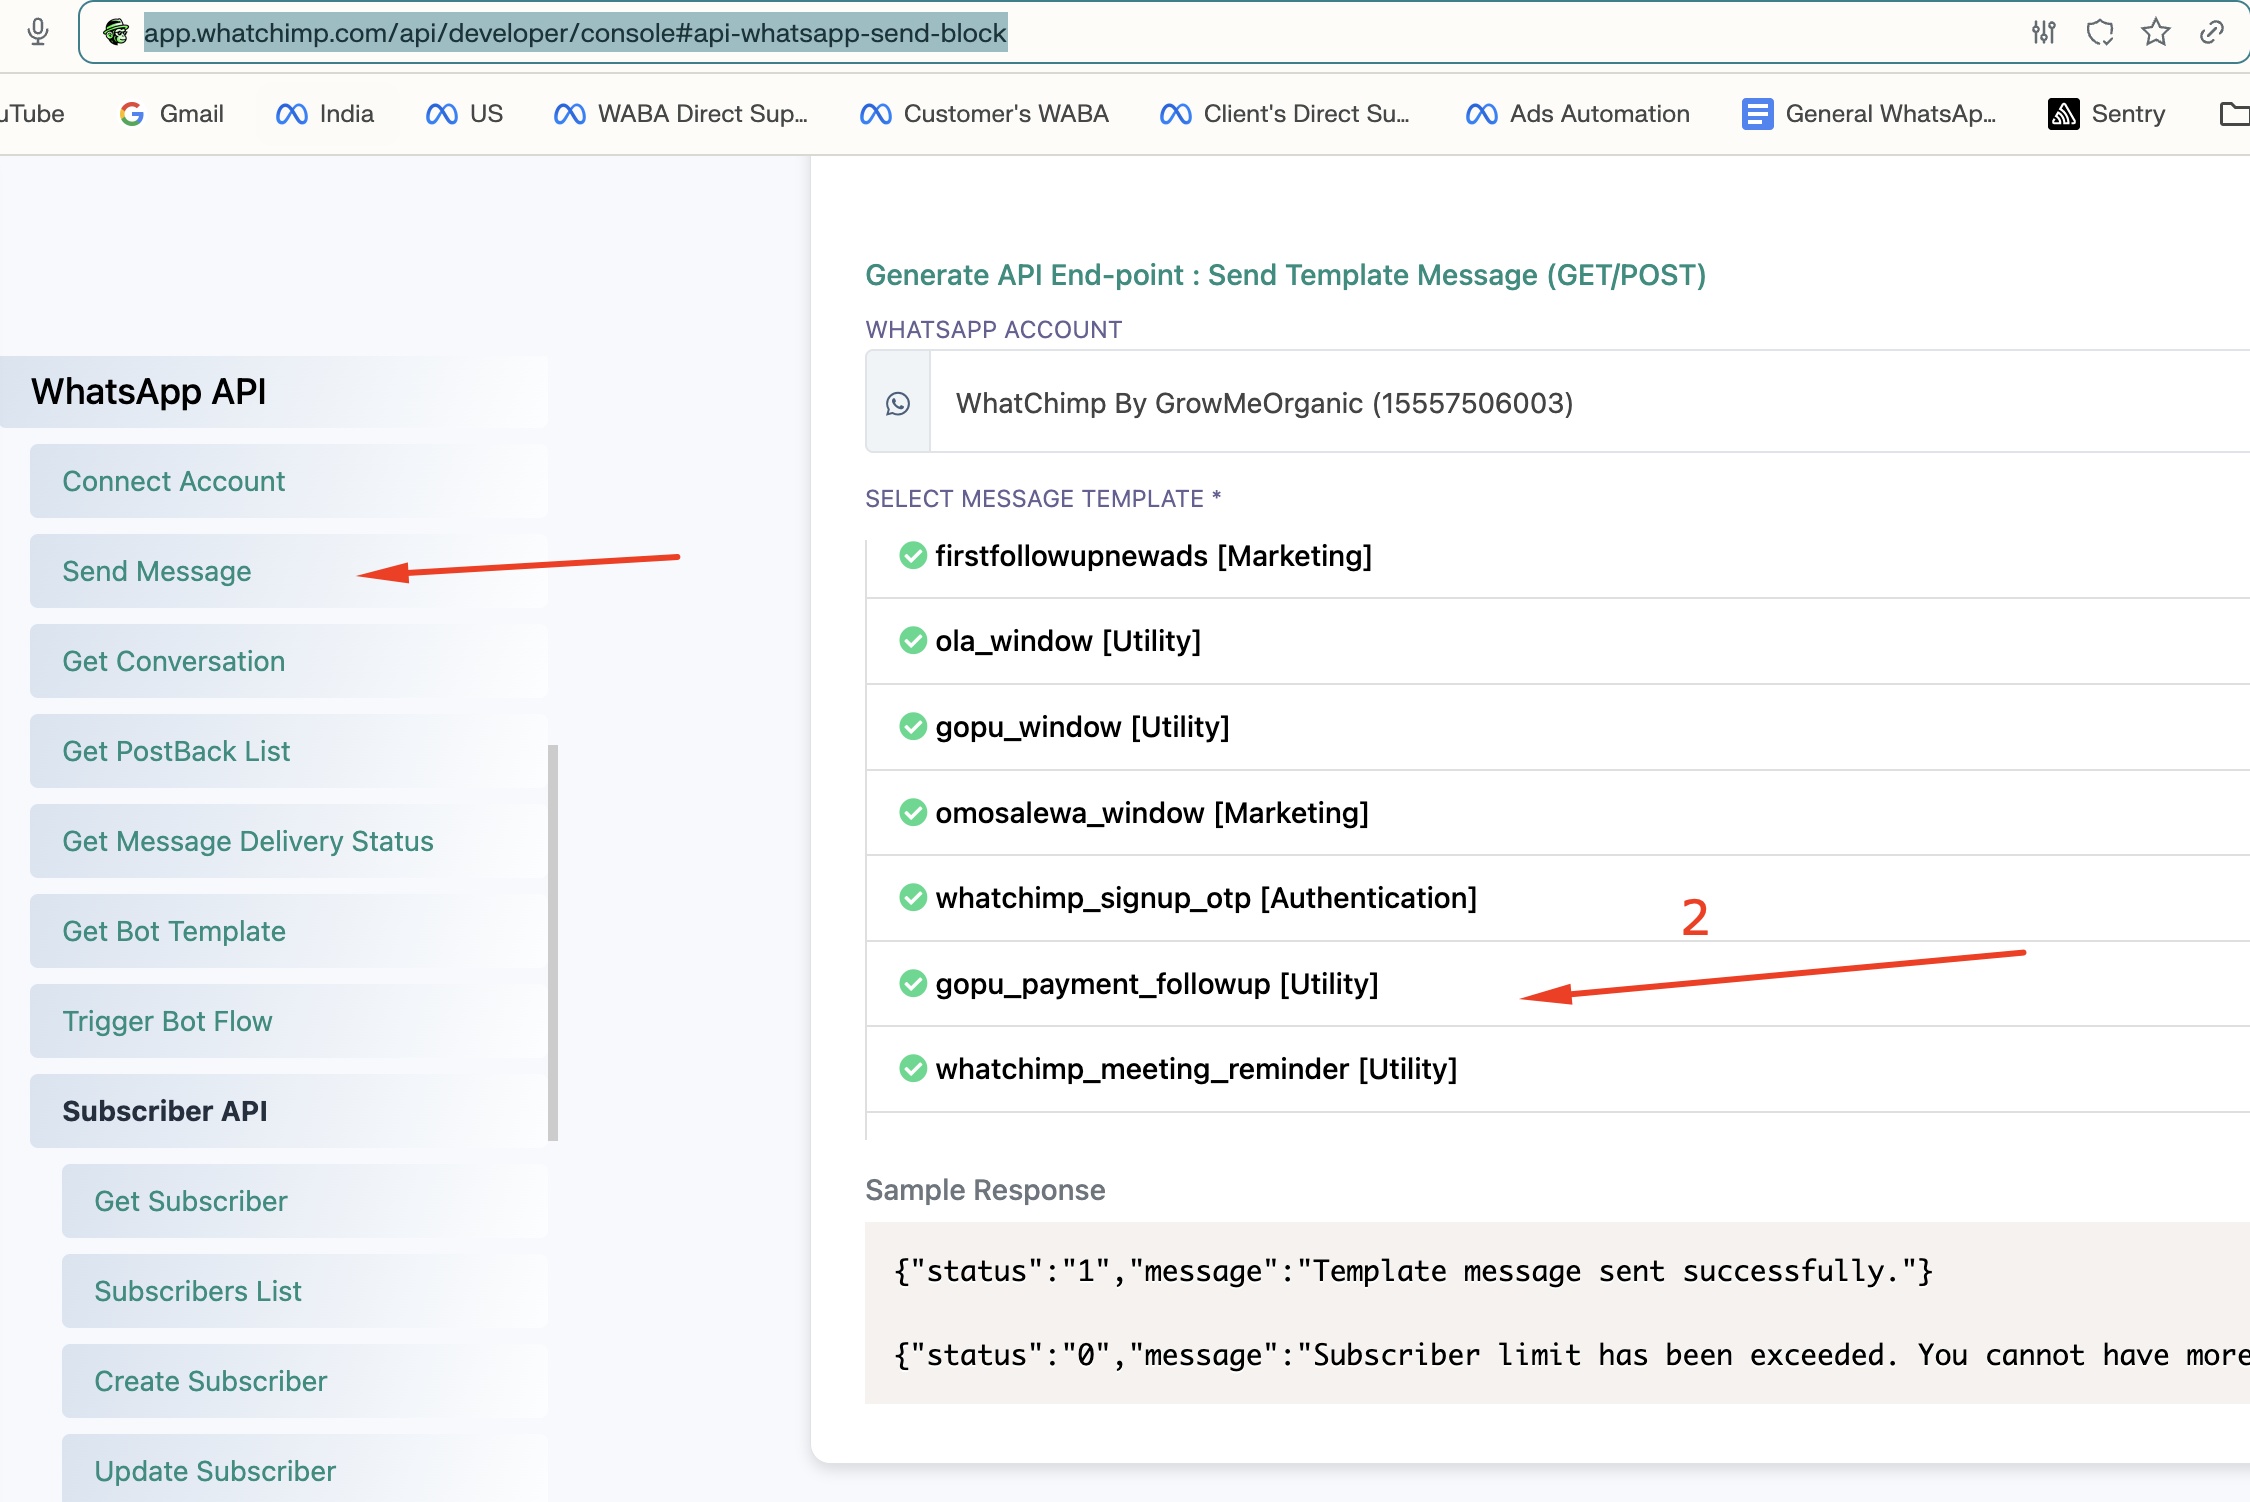
Step A. Settings > API Developer Console > Send Message par jayiye
Step B. Generate API End-point: Send Template Message ke neeche, apna WhatsApp Account select kariye, phir wo template select kariye jisme Quick Reply buttons hain.
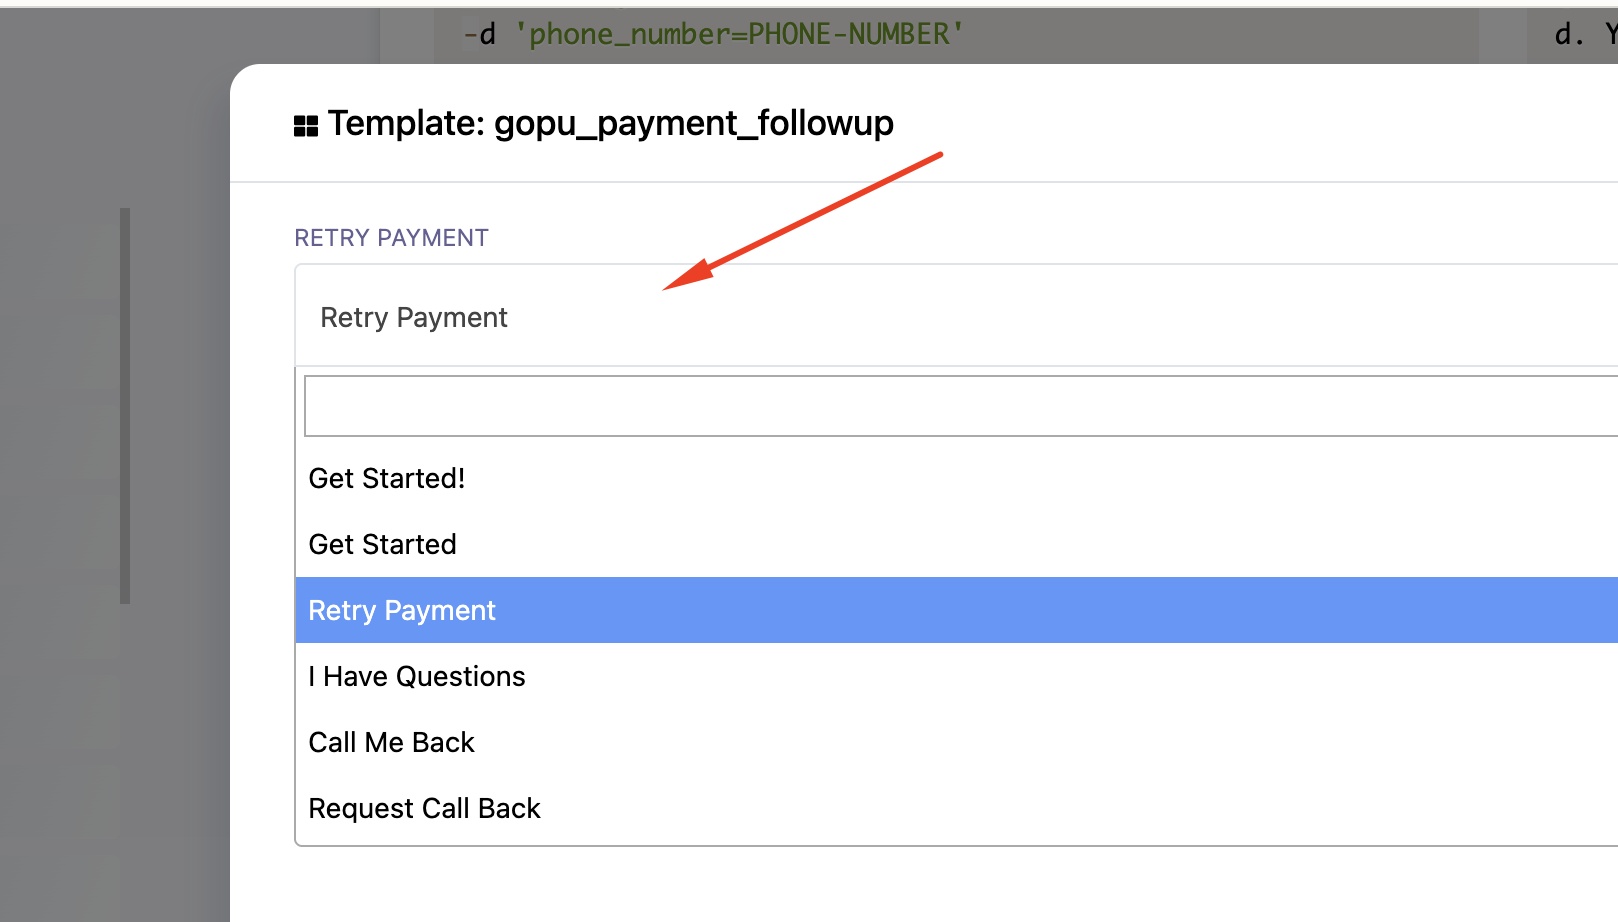
Step C. Ek template detail panel khulta hai. Har Quick Reply button ke liye, aapko aapke sabhi bot flows (postbacks) ke saath ek dropdown dikhega. Select kariye ki customer us button par tap kare to kaun sa bot flow trigger hona chahiye.
Step D. Console poora API endpoint URL generate karta hai template_quick_reply_button_values ke saath jo pehle se sahi postback IDs se bhara hai. Use copy kariye aur seedhe use kariye.
Bas itna hi! Zyada tar users ke liye, bas itna hi chahiye. Neeche ke sections manual approach explain karte hain — agar aap automated integrations bana rahe hain aur API calls programmatically construct karna hai to useful hai.
Manual approach: API Call khud banayiye
Agar aap WhatChimp ko apne khud ke system (CRM, e-commerce, custom app) mein integrate kar rahe hain, to aapko postback IDs fetch karni hongi aur API call programmatically banana hoga. Yahan kaise.
Step 3: Available Postback IDs lijiye
Postback IDs aapke bot flows identify karte hain. Aapko inki zaroorat hai Quick Reply buttons ko specific flows se bind karne ke liye.
Endpoint: GET /api/v1/whatsapp/get/post-back-list
https://app.whatchimp.com/api/v1/whatsapp/get/post-back-list?apiToken=API-TOKEN&phone_number_id=PHONE-NUMBER-IDExample Response:
{
  "status": "1",
  "message": [
    {
      "id": 1234,
      "name": "Know More Flow",
      "postback_id": "pb_know_more_abc123"
    },
    {
      "id": 1235,
      "name": "Track Order Flow",
      "postback_id": "pb_track_order_def456"
    },
    {
      "id": 1236,
      "name": "Talk to Support",
      "postback_id": "pb_support_ghi789"
    }
  ]
}
postback_id values note kar lijiye — aap inhe agle step mein apne Quick Reply buttons se map karenge.
Step 4: API ke zariye Quick Reply Buttons ke saath Template bhejiye
Endpoint: POST /api/v1/whatsapp/send/template
Content-Type: application/x-www-form-urlencoded
Parameters
| Parameter | Required | Description |
|---|---|---|
apiToken | Haan | Aapka API token |
phone_number_id | Haan | Aapka WhatsApp phone number ID |
template_id | Haan | Internal template ID (template list API se, Meta ki template ID nahi) |
phone_number | Haan | Recipient ka phone number country code ke saath, + sign ke bina |
template_quick_reply_button_values | Haan | Postback IDs ka JSON array, har Quick Reply button ke liye ek |
templateVariable-{Name}-{Index} | Agar template mein variables hain | Variable values (dekhiye Variables guide) |
template_header_media_url | Agar template mein media header hai | Header image/video/document ka URL |
Key parameter: template_quick_reply_button_values
Ye ek JSON array hai jahan har element ek postback ID hai. Order aapke template mein Quick Reply buttons ke order se match hona chahiye:
- Pehli postback ID → pehla Quick Reply button
- Doosri postback ID → doosra Quick Reply button
- Teesri postback ID → teesra Quick Reply button
["pb_know_more_abc123", "pb_track_order_def456", "pb_support_ghi789"]Poori example
Maan lijiye aapke template order_confirmation mein hai:
- Body: "Hi {{1}}, aapka order {{2}} confirm ho gaya hai!"
- Quick Reply button 1: "Order Track Kariye"
- Quick Reply button 2: "Aur Jaaniye"
cURL:
curl -X POST "https://app.whatchimp.com/api/v1/whatsapp/send/template" \
  -d "apiToken=YOUR-API-TOKEN" \
  -d "phone_number_id=YOUR-PHONE-NUMBER-ID" \
  -d "template_id=123" \
  -d "phone_number=919999999999" \
  -d "templateVariable-CustomerName-1=Rahul" \
  -d "templateVariable-OrderID-2=ORD-12345" \
  -d 'template_quick_reply_button_values=["pb_track_order_def456","pb_know_more_abc123"]'
Success Response:
{
  "status": "1",
  "wa_message_id": "wamid.HBgNODgwMTcyMzMwOTAwMxUCABEYEjlGQkY3MEFEMEVGODhCNDkxNQA=",
  "message": "Message sent successfully."
}
Jab recipient "Order Track Kariye" par tap karta hai, WhatChimp postback pb_track_order_def456 wala bot flow trigger karta hai. Jab wo "Aur Jaaniye" par tap karte hain, to pb_know_more_abc123 trigger hota hai.
Template ID kaise le
Internal template_id (Meta ki template ID nahi) lene ke liye, template list endpoint use kariye:
GET /api/v1/whatsapp/template/list?apiToken=API-TOKEN&phone_number_id=PHONE-NUMBER-IDWo templates dhundhiye jahan button_type "quick_reply" hai aur status "Approved" hai. Bhejte waqt id field use kariye (template_id nahi).
Step 5: Flow verify kariye
Bhejne ke baad, poora flow test kariye:
- Delivery check kariye — success par API ek
wa_message_idreturn karta hai - Button tap kariye recipient ke phone par — bot flow turant trigger hona chahiye
- Live Chat mein verify kariye — Omnichannel Inbox mein jayiye button tap aur bot response ke saath conversation dekhne ke liye
Code examples
Node.js
const axios = require('axios');
const qs = require('querystring');

const data = {
  apiToken: 'YOUR-API-TOKEN',
  phone_number_id: 'YOUR-PHONE-NUMBER-ID',
  template_id: '123',
  phone_number: '919999999999',
  'templateVariable-CustomerName-1': 'Rahul',
  'templateVariable-OrderID-2': 'ORD-12345',
  template_quick_reply_button_values: JSON.stringify([
    'pb_track_order_def456',
    'pb_know_more_abc123'
  ])
};

const response = await axios.post(
  'https://app.whatchimp.com/api/v1/whatsapp/send/template',
  qs.stringify(data)
);

console.log(response.data);
Python
import requests
import json

data = {
    'apiToken': 'YOUR-API-TOKEN',
    'phone_number_id': 'YOUR-PHONE-NUMBER-ID',
    'template_id': '123',
    'phone_number': '919999999999',
    'templateVariable-CustomerName-1': 'Rahul',
    'templateVariable-OrderID-2': 'ORD-12345',
    'template_quick_reply_button_values': json.dumps([
        'pb_track_order_def456',
        'pb_know_more_abc123'
    ])
}

response = requests.post(
    'https://app.whatchimp.com/api/v1/whatsapp/send/template',
    data=data
)

print(response.json())
PHP
$data = [
    'apiToken' => 'YOUR-API-TOKEN',
    'phone_number_id' => 'YOUR-PHONE-NUMBER-ID',
    'template_id' => '123',
    'phone_number' => '919999999999',
    'templateVariable-CustomerName-1' => 'Rahul',
    'templateVariable-OrderID-2' => 'ORD-12345',
    'template_quick_reply_button_values' => json_encode([
        'pb_track_order_def456',
        'pb_know_more_abc123'
    ])
];

$ch = curl_init('https://app.whatchimp.com/api/v1/whatsapp/send/template');
curl_setopt($ch, CURLOPT_POST, true);
curl_setopt($ch, CURLOPT_POSTFIELDS, http_build_query($data));
curl_setopt($ch, CURLOPT_RETURNTRANSFER, true);

$response = curl_exec($ch);
curl_close($ch);

echo $response;
Troubleshooting
| Problem | Fix |
|---|---|
| Button tap bot flow trigger nahi karta | Check kariye ki postback ID sahi hai. /whatsapp/get/post-back-list se naya list lijiye aur mapping verify kariye. |
| "Template not found" error | Aap Meta ki template_id use kar rahe hain WhatChimp ki internal id ki jagah. Template list endpoint se id field use kariye. |
| Button order galat hai | JSON array order template mein button order se match hona chahiye. Pehla array element = pehla button. |
Variables {{1}} dikhte hain | Aapki templateVariable-{Name}-{Index} parameters missing hain. Dekhiye Variables guide. |
| Quick reply buttons nahi dikhte | Template abhi approved nahi hua hoga, ya button_type quick_reply nahi hai. Template list API response check kariye. |
Related Articles
- How to Create a Keyword-Based WhatsApp Chatbot in WhatChimp — Bot flow banana ki detailed guide
- Send Template Messages via WhatChimp API — Basic template bhejne ka tarika
- Send Template Messages with Variables via WhatChimp API — Templates mein dynamic content
- Creating a WhatsApp Message Template in WhatChimp — Template banana ki guide
- Getting Started with WhatChimp Developer API — API setup aur authentication