Build a Multi-Agent AI Workforce with WhatChimp
Set up a team of specialised AI agents in WhatChimp, each with its own training and role, and route customer conversations to the right one automatically.
Updated 14 August 2026
Instead of one all-purpose chatbot that gets confused when a customer asks about pricing one minute and a technical issue the next, WhatChimp lets you run a team of specialised AI agents side by side. Each agent has its own role, its own training data, and its own rules for when to hand off to a human.
This guide walks you through building a full multi-agent setup end to end: three example agents (Sales, Support, and General), how they share the same platform without stepping on each other, and how the router decides which agent picks up which conversation.
What you get with a multi-agent setup
- Smart routing: WhatChimp reads the customer's intent from the incoming message and hands the conversation to the right specialist agent. No keyword tables to maintain.
- Specialised training: Each agent has its own Knowledge Campaign, so a Sales agent's answers pull from your pricing sheet while a Support agent's answers pull from your documentation.
- Autonomous actions: Agents can do more than just chat. They can qualify leads, tag customers with labels, send images on demand, and escalate to a human when the situation calls for it.
- No-code setup: The whole architecture is built through three sub-tabs in Bot Manager. No development required.
The three components you need to understand
A multi-agent setup is built on three pieces that work together. Skip any one and the chain breaks.
1. AI Knowledge Base (the training data)
Everything the agent references when answering a question lives here. Each agent has its own Knowledge Campaign, and mixing training data across agents reduces accuracy, so keep them separate.
You can train a Knowledge Campaign with:
- Static text (FAQs, product descriptions, policies)
- URLs (website pages, help centre articles)
- Uploaded files (PDFs, documents)
- Live Google Sheets that stay in sync as you update them
- Real-time HTTP API responses
- Uploaded images with descriptions, for AI Vision matching
2. AI Agent (the operator)
The AI Agent reads the customer's message, references its Knowledge Campaign, and responds. The most important part of an agent is its System Prompt, which is the instruction set that defines the agent's role, what customer information it must collect, how it should behave, and what backend actions it should take.
The System Prompt supports autonomous action commands. Type ## inside the editor and WhatChimp autocompletes the available commands: ##save_custom_field##, ##add_label##, ##assign_sequence##, ##assign_human##, ##send_image##, ##call_http_api##, and others. Place each action directly below the condition that should trigger it. That is what turns an agent from a passive chatbot into a digital worker.
Which actions work today: on the current AI agent, the System Prompt runs##remove_label##,##assign_sequence##,##remove_sequence##,##call_http_api##,##assign_human_member##,##assign_human_role##and##trigger_bot_flow##. The##add_label##and##save_custom_field##actions shown in the examples below come with our new AI agent. Until then, to add a label or save a custom field, point##trigger_bot_flow##at a bot flow that does it.
3. AI Configuration (the router)
Once you have more than one agent, WhatChimp needs to know which agent handles which conversation. This is where Agent Routing lives.
You set up rules by describing the type of message each agent should handle, in plain language ("pricing, plan, upgrade, budget" for the Sales agent; "bug, not working, error, refund" for the Support agent). When a message arrives, WhatChimp analyses the intent and dispatches the conversation to the best-matching agent. If the customer's intent shifts mid-conversation, the system smoothly hands off to the newly relevant agent.
Note: with the default AI setup, only one active agent can be selected at a time (the app shows this next to the Active Agents selector). To enable multiple active agents with routing between them, contact WhatChimp support and we will enable the multi-agent configuration on your account.
Before you start
Open the AI section in your bot: Sidebar > Bot Manager > AI tab. You will see three sub-tabs across the top: AI Configuration, Agents, and AI Knowledge Base. All the work below happens in these three sub-tabs.
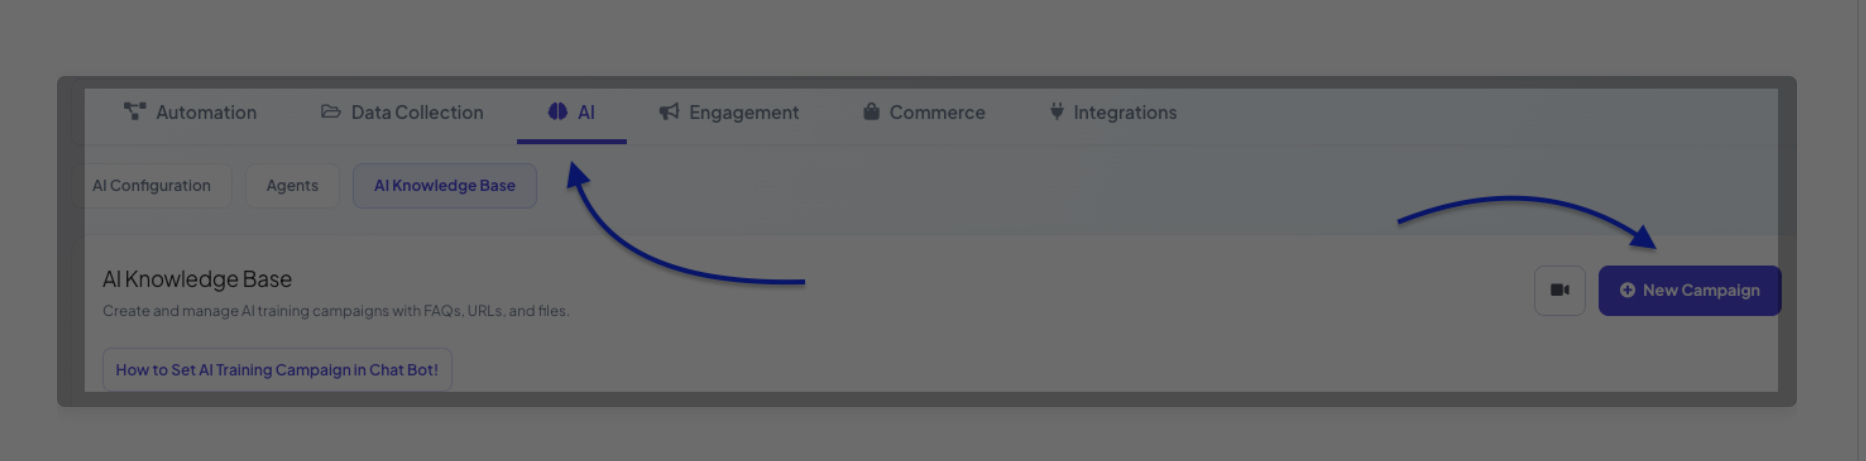 The AI tab in Bot Manager with its three sub-tabs: AI Configuration, Agents, and AI Knowledge Base.
For this guide we will build three example agents: a Sales agent, a Support agent, and a General agent (for photo and general enquiries). You have full flexibility to build any agent types your business needs.
Step 1: Build the Knowledge Campaigns
Go to the AI Knowledge Base tab. Click + New Campaign to create one campaign per agent you plan to build. Each campaign has two core fields you set on creation:
- Campaign Name: A clear, descriptive identifier so you can find it later. Examples: Sales Agent, Support Agent, Media Agent.
- Prompt Message: This sets the baseline role and tone the agent will use throughout every conversation. Be specific. Rather than writing "You are a support agent", write something like: "You are a support representative for our company. Always respond professionally, refer to the business as 'we', and never invent information that is not available in the training data."
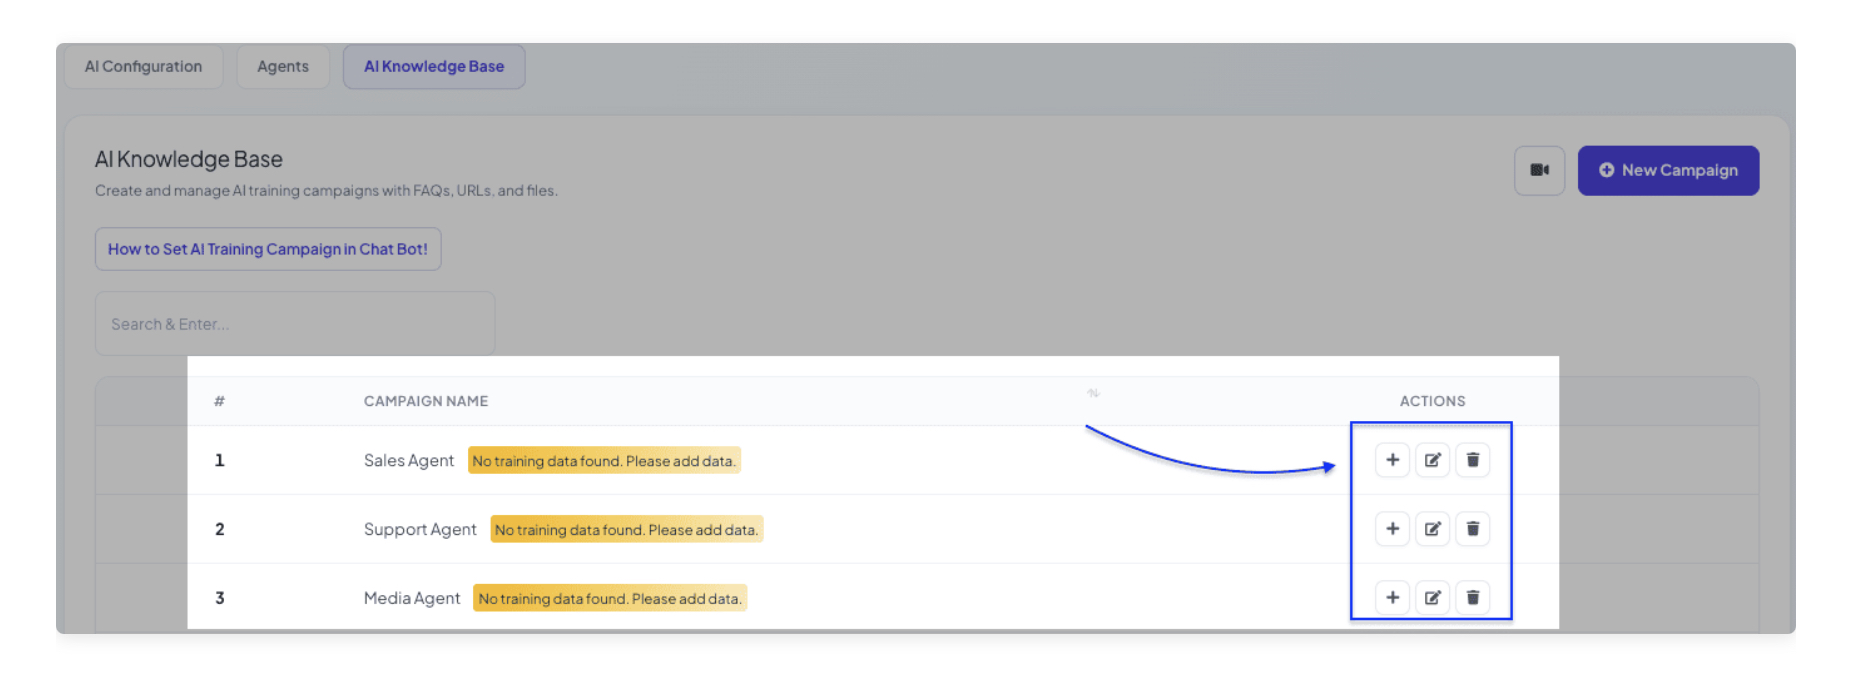 AI Knowledge Base with three campaigns ready. Click the plus icon in the Actions column to add training content.
Once the campaign is created, click the + icon in the Actions column to add training content.
For the Sales agent's Knowledge Campaign: paste your pricing plans, product tiers, and qualification criteria into the training text box. If your pricing changes often, connect a Google Sheet instead so the campaign stays in sync automatically.
For the Support agent's Knowledge Campaign: point it at your help centre or documentation URLs. WhatChimp scrapes and learns the content. If your pages have navigation bars or footers, use the CSS selector option to target only the sections you want.
For the General agent's Knowledge Campaign: upload product images through the Add Media modal so the agent can send the right photo when a customer asks to see a product.
On the campaign content page, find the Training Campaign Media section and click New. The Add Media modal opens with an Image 1 block ready.
For each image:
- Paste the image URL, or click Upload to upload a local file
- Add a short description in the Description field (product name, colour, size, price). Example: "Red cotton kurti, size M, price 1200 BDT"
Click + Add more image at the bottom of the modal to add another slot, and repeat for every image you want the agent to have access to. Click Save when you have added them all.
On save, WhatChimp's AI Vision analyses each image and enriches the description with visual details for better training. Once saved, the General agent can pull the matching photo whenever a customer asks to see a product.
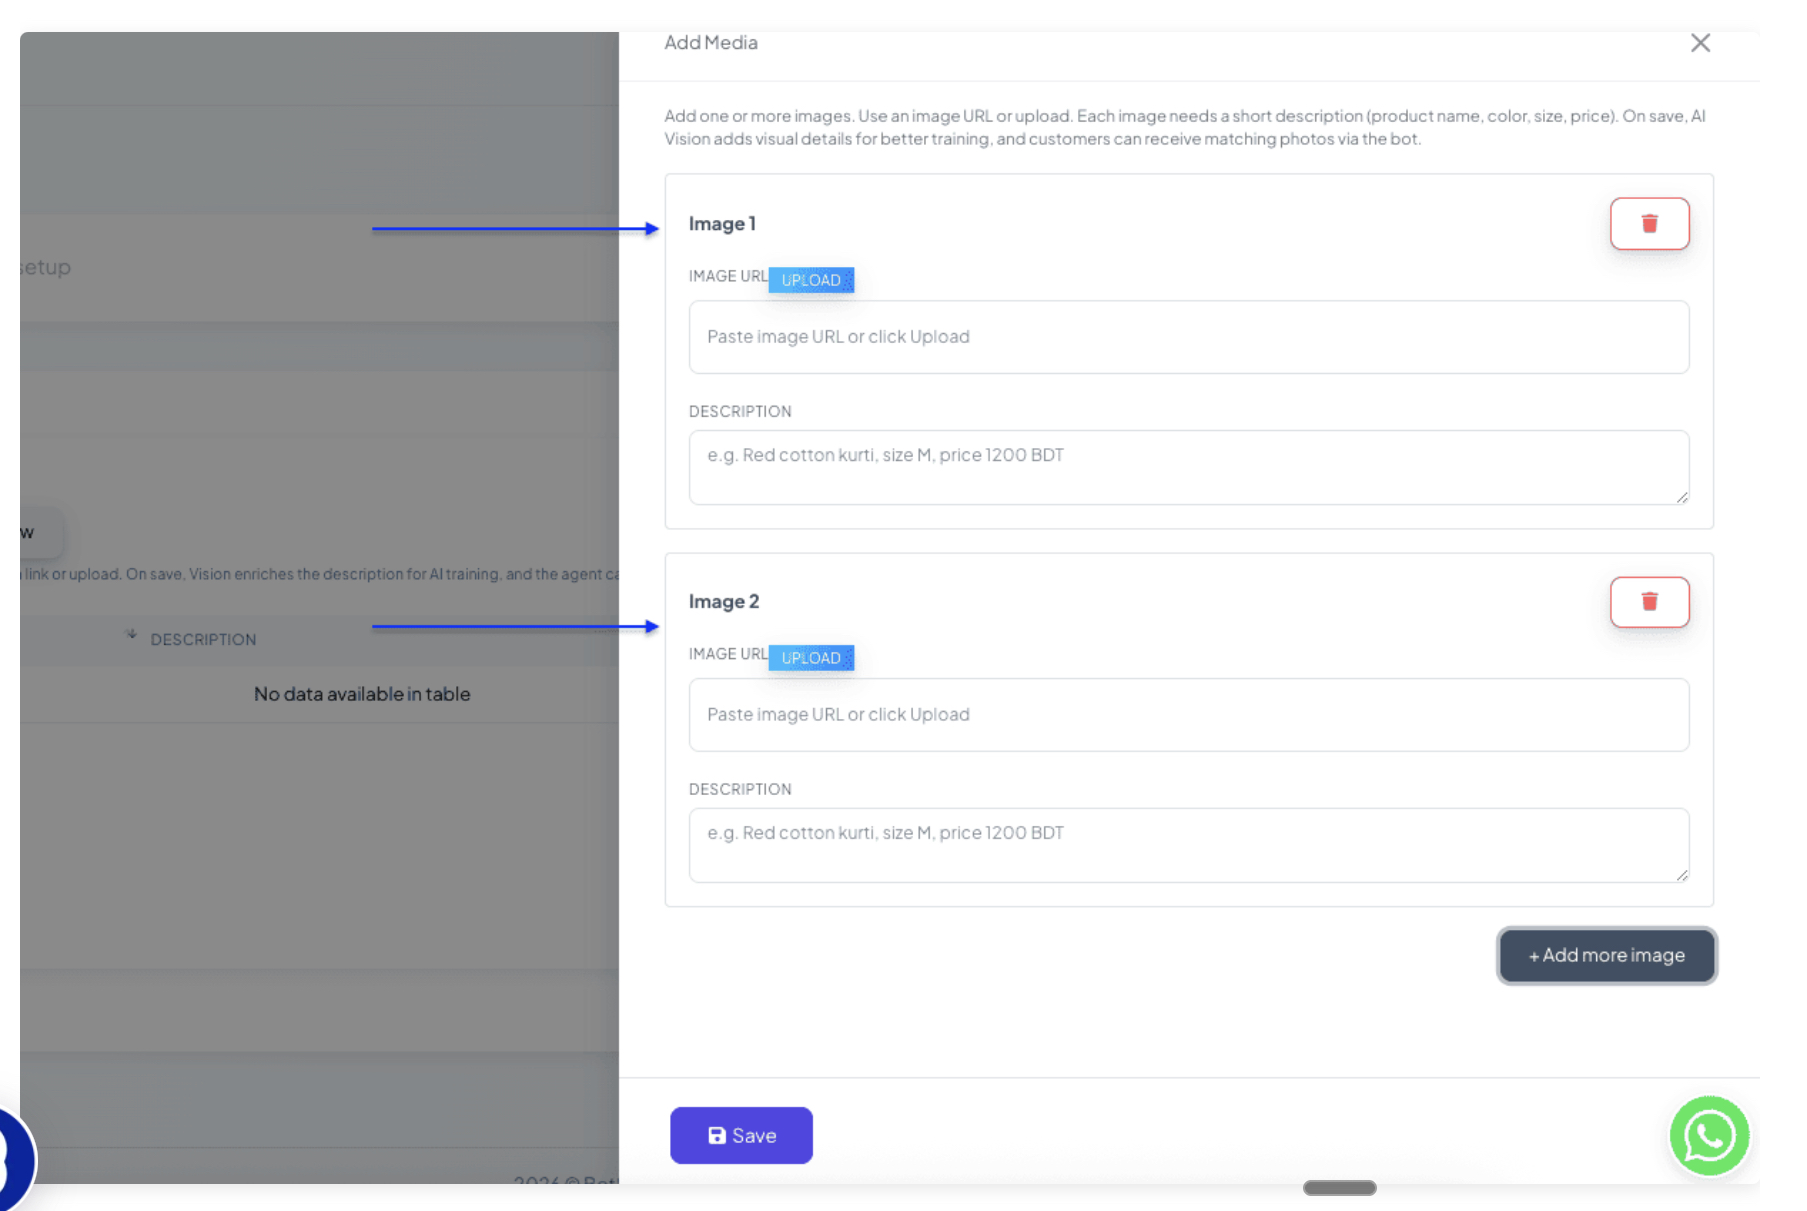 The Add Media modal. Upload an image or paste a URL, add a short description, click Add more image for extra slots, then Save.
Step 2: Create the AI Agents
Go to the Agents tab. Click Create Agent for each role. You will see the Create AI Agent form.
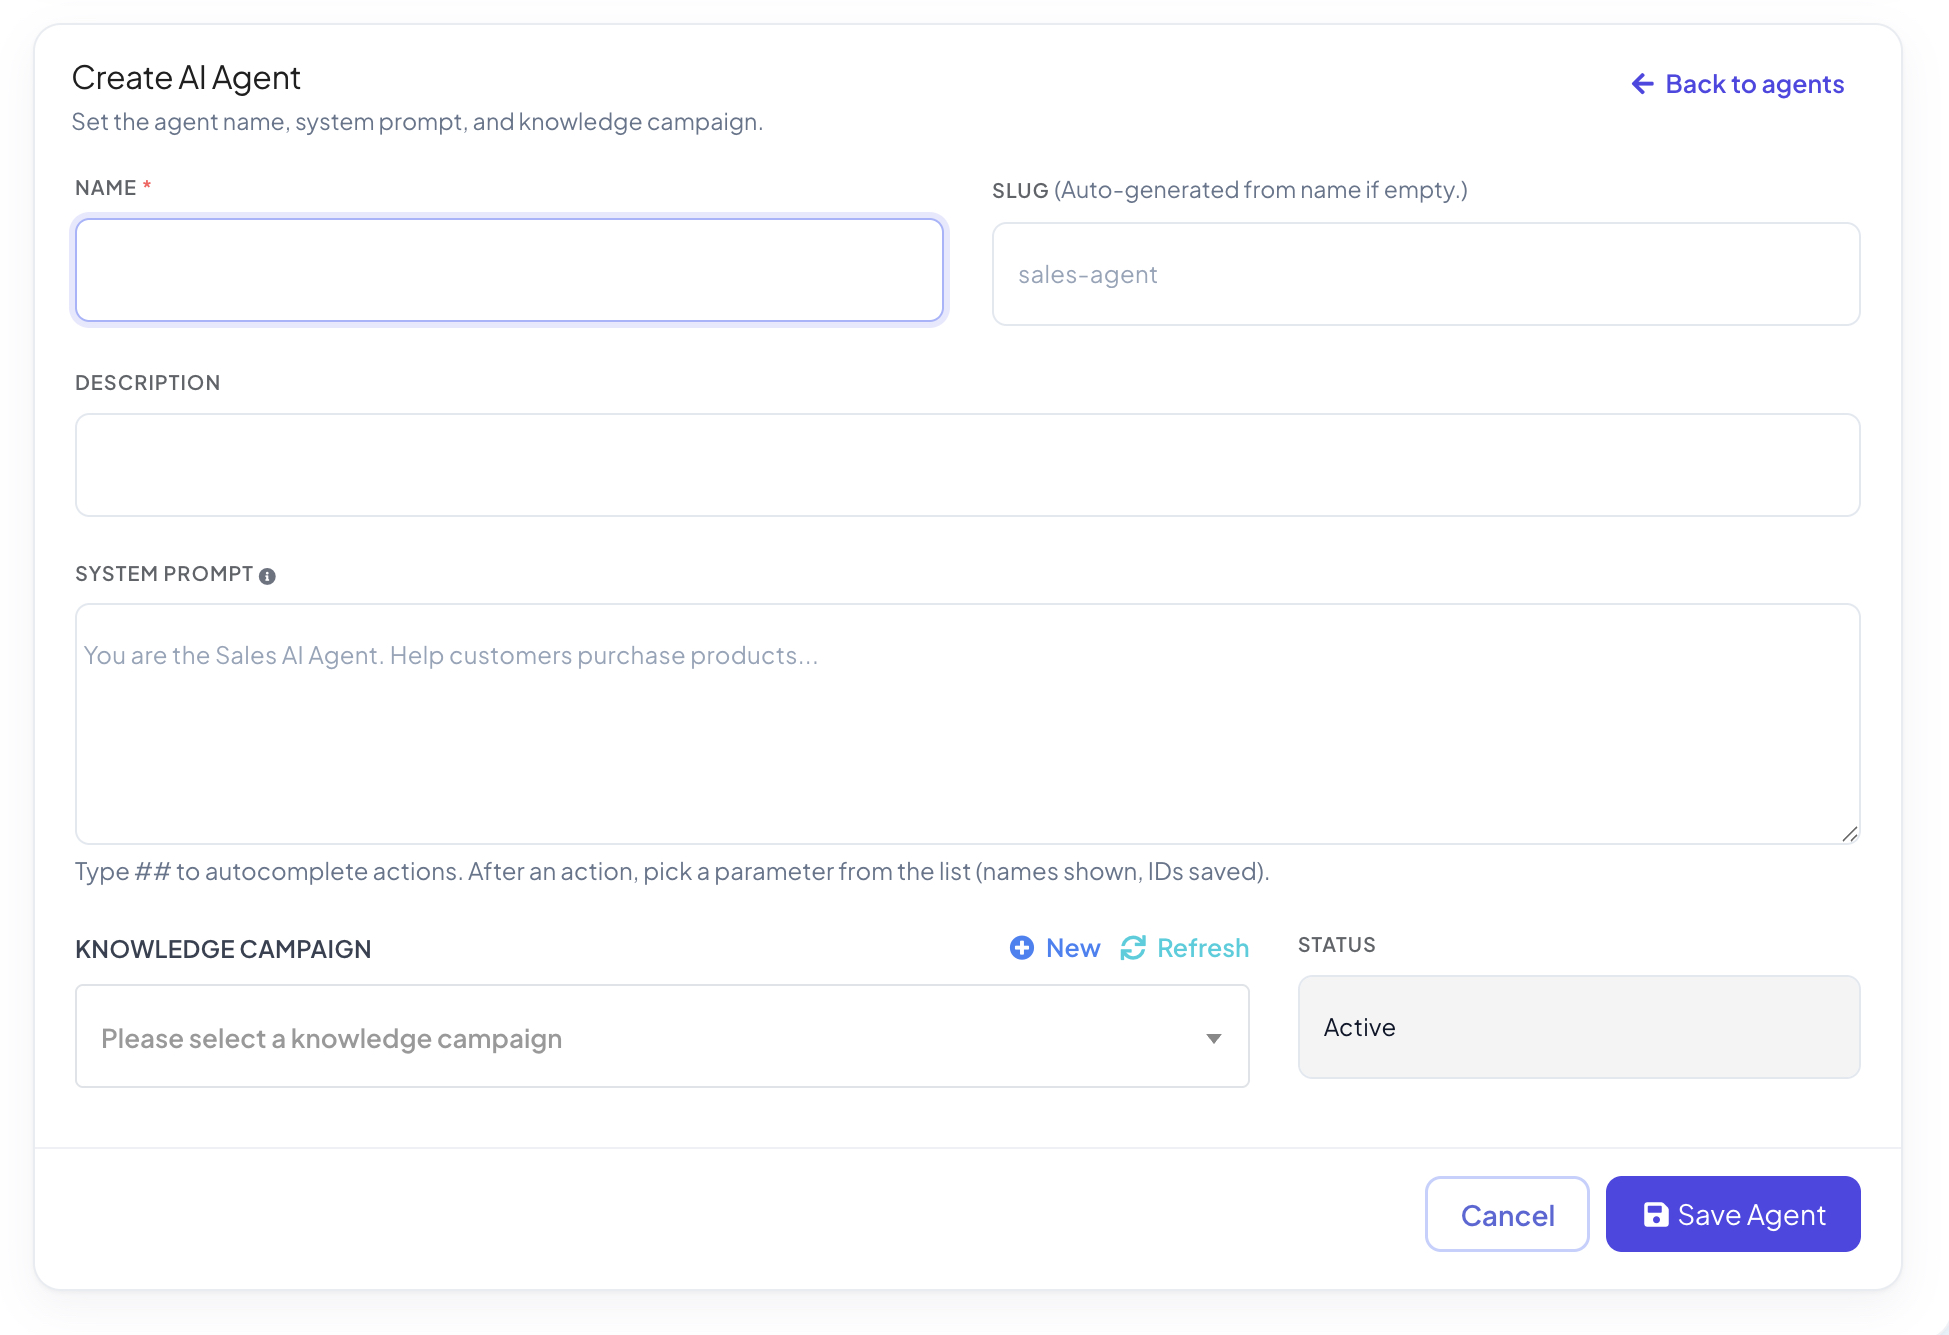 The Create AI Agent form. Fill in Name, Slug (auto-generated from name if empty), Description, System Prompt, Knowledge Campaign, and Status.
For each agent, fill in:
- Name: A descriptive name (e.g., Sales Support Agent, Customer Support Agent, General Agent)
- Slug: Auto-generated from the name if left empty (e.g.,
sales-support-agent) - Description: A one-line summary of what this agent does
- System Prompt: The full instruction set for the agent (examples below)
- Knowledge Campaign: Pick the campaign you created in Step 1
- Status: Set to Active
To trigger a backend action inside the System Prompt, type ## and WhatChimp autocompletes the available commands. Pick the action, choose the target (a specific label, team member, sequence, custom field, bot flow, image URL, or API endpoint), and place it directly below the condition that should trigger it.
The Sales agent: lead qualification with labelling
Configure the Sales agent with the following System Prompt, adapted to your business:
You are the Senior Sales Agent for [Your Company].

ROLE
Your primary objective is to understand the customer's needs, recommend the right plan, and qualify them as a lead. Be professional, persuasive, and helpful.

REQUIRED INFORMATION
Before recommending a plan, naturally collect the following details from the customer:
1. Business type (e.g., E-commerce, Agency, Retail)
2. Primary communication channel
3. Main automation requirement
4. Expected monthly message volume
5. Approximate budget

CONVERSATION RULES
- Ask one or two questions at a time to keep the conversation natural.
- Do not repeat questions if the customer has already answered.
- If the customer provides multiple details in one message, use all of them.
- Never invent pricing, features, or discounts.

KNOWLEDGE USAGE
Use your connected Knowledge Campaign to explain pricing, features, and the difference between platform subscriptions and message charges.

SAVE INFORMATION
When the customer mentions their approximate budget, save it:
##save_custom_field## : Budget

When the customer mentions their business type, save it:
##save_custom_field## : Business Type

QUALIFICATION AND ACTIONS
Once you have collected the required information and the customer shows clear intent to purchase or start a trial, label them:
##add_label## : Qualified Lead

If the customer is highly interested but says they need more time, enrol them in the follow-up sequence:
##assign_sequence## : Sales Follow-Up

HUMAN HANDOFF
If the customer asks for custom enterprise pricing or explicitly asks to speak with a human sales rep, apply a label and transfer the chat:
##add_label## : Sales Escalation
##assign_human## : Sales Team
Click Save Agent.
The Support agent: autonomous human escalation
For the Support agent, the setup is simpler. It answers questions from its Knowledge Campaign and escalates when it cannot resolve an issue.
You are the Customer Support Agent for [Your Company].

ROLE AND KNOWLEDGE USAGE
Use the connected Knowledge Campaign to answer questions about features, policies, integrations, and troubleshooting steps. Be patient, clear, and empathetic.

HUMAN HANDOFF (ESCALATION)
If the customer reports a billing issue, an unresolved technical problem after troubleshooting, or explicitly asks to speak with a human, escalate the conversation.

First, add the escalation label:
##add_label## : Escalated Support

Then assign the chat to the human support team:
##assign_human## : Support Team
Click Save Agent.
Because the Support agent collects the full context before executing the handoff, the human agent who picks up the conversation has everything they need to resolve it quickly. No repeat questions.
The General agent: photo and image requests
The General agent handles requests for photos, images, and product visuals. There are two ways it can deliver an image, and you can use them together on the same agent.
Method 1: Knowledge Campaign with AI Vision (the smart way). The images you uploaded to the Knowledge Campaign in Step 1 are automatically matched when a customer describes what they want. AI Vision scans your uploaded media, understands the context from your descriptions, and fetches the exact matching photo. Best for a large or frequently updated product catalogue.
Method 2: System Prompt with direct image URLs. For a small, fixed set of always-available images (a portfolio, a menu, a company brochure), reference the image URL directly inside the System Prompt using a ## action tag. When you type ## in the editor, WhatChimp's autocomplete shows the available send-image action. Pick it, then paste your image URL as the value, placed below the condition that should trigger it. Best for images that never change and should always be delivered on specific requests.
Configure the General agent with a System Prompt that combines both methods:
You are the General Agent for [Your Company].

ROLE
Answer general customer enquiries and, when a customer asks to see a product image, fetch the matching photo from your Knowledge Campaign.

MEDIA HANDLING RULE
Never send images automatically at the start of a conversation. Only deliver an image when a customer explicitly asks ("show me", "send me a photo", "what does the X look like").

METHOD 1: PRODUCT PHOTOS FROM THE KNOWLEDGE CAMPAIGN
When a customer asks to see a specific product, rely on your connected Knowledge Campaign. AI Vision matches the request against the uploaded images and delivers the right one.

METHOD 2: FIXED PORTFOLIO IMAGE FROM A DIRECT URL
When a customer asks for our general portfolio or asks "what does your work look like" or "can I see some examples", send them the portfolio image:
##send_image## : https://your-domain.com/portfolio.jpg
Click Save Agent.
Step 3: Set up Agent Routing
Go back to the AI Configuration tab.
Under Active Agents, select the agents you want live on this bot. All the agents you created are available in the dropdown. Add the ones you want the router to switch between.
Under Agent Routing, click + Add Rule for each routing rule. Each rule pairs a message-type description (in plain language) with the agent that should handle it.
Example rules that mirror the three-agent setup we built:
| Message type / When to use this agent | Assign agent |
|---|---|
| pricing, plan, upgrade, budget | Sales Agent |
| bug, not working, error, refund | Support agent |
| photo, image, show me, what does it look like | General Agent |
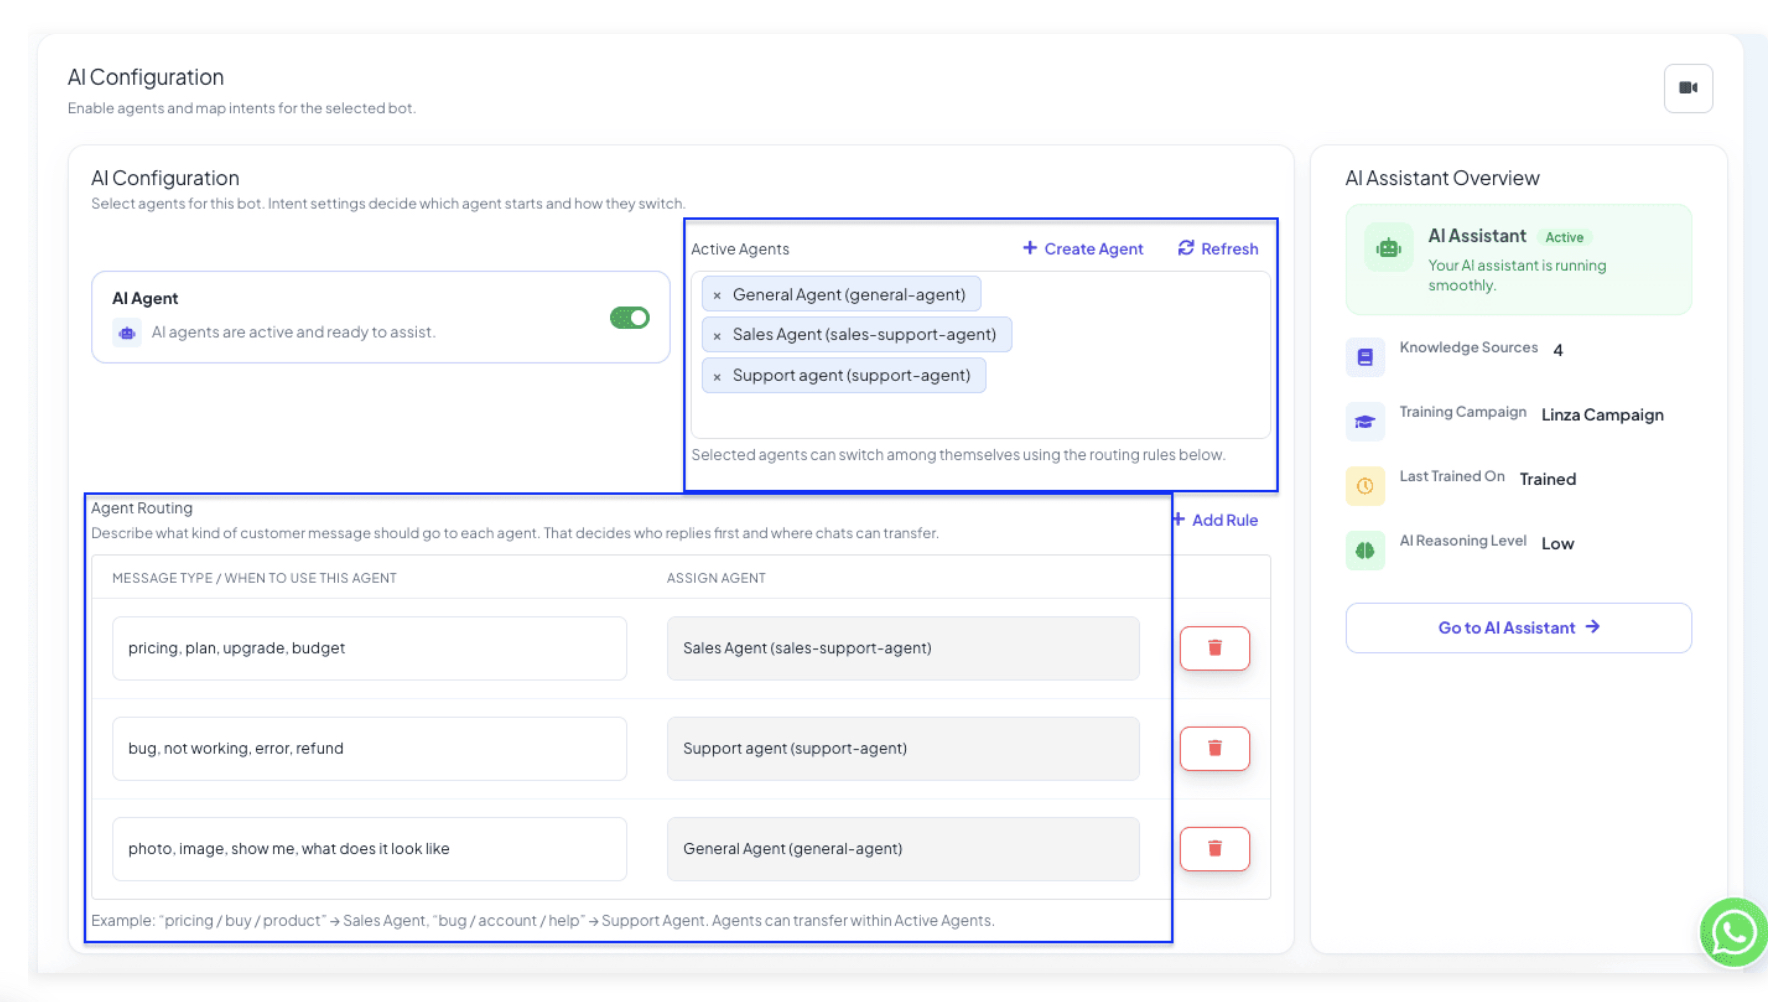 The AI Configuration tab with three active agents selected and three routing rules mapping message types to agents.
When a message arrives, WhatChimp reads the intent, matches it against your rules, and hands the conversation to the right agent. If the intent shifts mid-conversation (they were asking about pricing, then report a bug), the router hands the conversation over to the newly matching agent automatically.
Tips for a working multi-agent setup
- Keep each Knowledge Campaign focused. Do not train the Sales agent on support docs or vice versa. Mixed training data reduces accuracy and confuses the router.
- Write the System Prompt like a job description. Role, required information, conversation rules, actions, escalation paths. If the prompt reads like a job spec for a good hire, the agent will behave like one.
- Test the router with mixed messages. Send test messages that mix sales and support intent to see how the router decides. If it consistently picks the wrong agent, tighten the rule descriptions in Agent Routing.
- Use the escalation label as a tripwire. Every agent should have a label it applies on escalation. That gives your team a clear queue of conversations the AI could not close.
- Start with two agents before you build ten. Two agents is enough to exercise the router. Ten agents at once is enough to make debugging painful before you have learned the pattern.