Custom Fields ke saath Customer Data Manage Karein
Conversations mein custom fields use karke customer information store aur manage karein.
Updated 10 February 2026
Custom fields aapko har subscriber ke baare mein extra information store karne ki suvidha dete hain — jaise ki company name, order status, language preference, ya koi bhi cheez jo aapke business ko track karni ho. Aap yeh fields directly Omnichannel Inbox se dekh aur update kar sakte hain jab aap customers ke saath chat kar rahe ho.
Inbox mein Custom Fields Dekhna
Jab aap Omnichannel Inbox mein koi conversation open karte hain, right side ka Chat Actions panel subscriber ka saara data dikhata hai including custom fields.
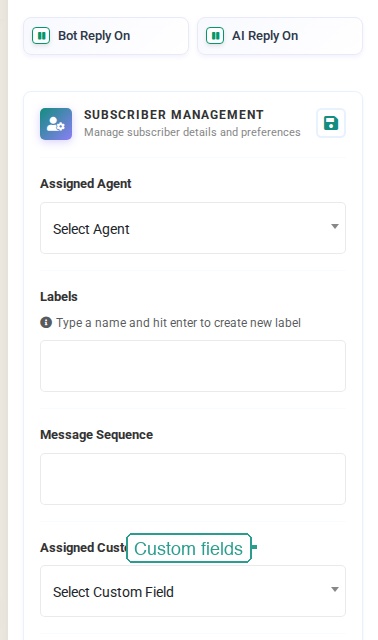 The full Chat Actions panel with Bot Reply toggles, Subscriber Management, Assigned Agent, Labels, Message Sequence, and Assigned Custom Fields
Panel ke top par, Subscriber Management section directly subscriber ki profile ko link karta hai jahan aap unki saari details dekh sakte hain.

Chat Actions panel mein neeche scroll karein Assigned Custom Fields section dhoondhne ke liye. Yeh dikhata hai ki current subscriber ko kaun se custom fields assign kiye gaye hain.

Subscriber ko Custom Fields Assign Karna
- Omnichannel Inbox mein koi conversation open karein
- Chat Actions panel mein, Assigned Custom Fields tak scroll karein
- Select Custom Field dropdown par click karein
- List se ek custom field choose karein
- Field us subscriber ko assign ho jaati hai
Ek baar assign hone ke baad, field ki value subscriber ki profile par store ho jaati hai aur templates, automations aur broadcasts mein use ho sakti hai.
Custom Fields Manage Karna
Custom fields Subscriber Manager mein create aur manage kiye jaate hain, inbox mein nahi.
Custom Fields Page Dhoondhna
- Left sidebar mein Manage Subscribers par jaayein
- Page ke top par Manage Custom Fields par click karein
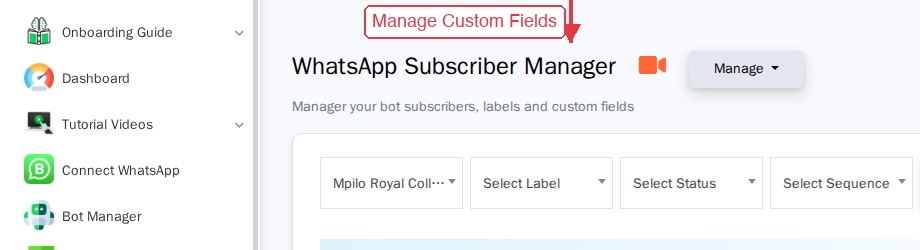 The WhatsApp Subscriber Manager showing subscribers with their phone numbers, labels, and custom field values
Yeh aapko WhatsApp Subscriber Custom Fields page par le jaata hai jahan aap apne saare existing fields dekh sakte hain.
Apne Custom Fields Dekhna
Custom fields list aapke banaye gaye saare fields, unki reply type aur kab create kiye gaye the yeh sab dikhati hai.
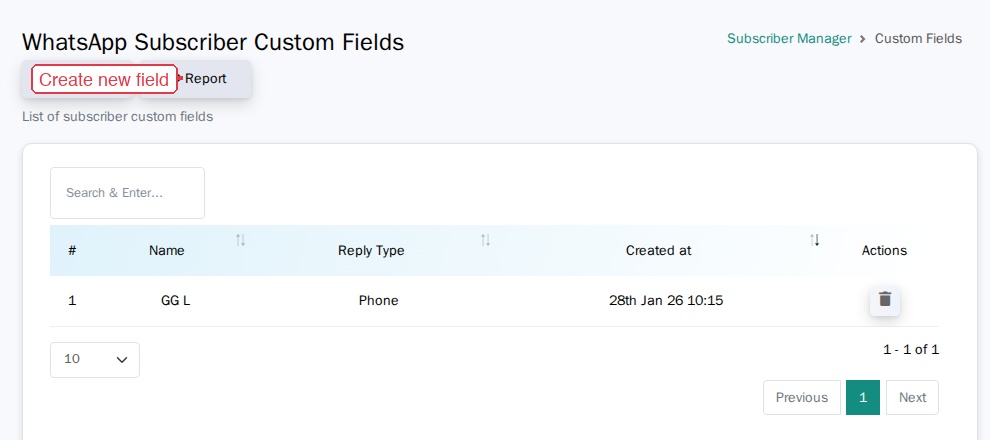 The WhatsApp Subscriber Custom Fields page with Create and Report buttons, a search bar, and a table listing custom fields
Har field dikhata hai:
- Name — field ka naam (jaise, "GG L")
- Reply Type — data ki type (Phone, Text, Number, Date, etc.)
- Created at — field kab create hua tha
- Actions — field delete karein
Naya Custom Field Banana
- Custom Fields list page par, green Create button par click karein
- Custom Field Name enter karein (jaise, "Company Name", "Budget", "Order Status")
- Dropdown se Reply Type select karein
- Save par click karein
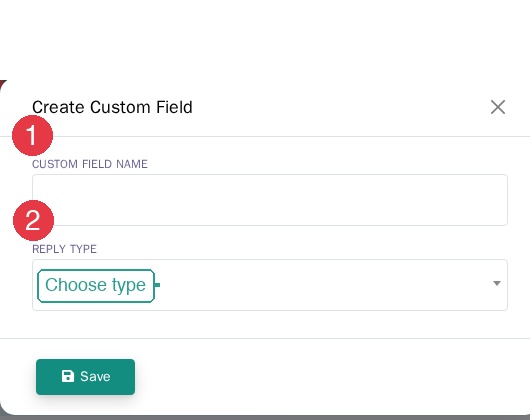 The Create Custom Field dialog showing a Custom Field Name input, a Reply Type dropdown, and a Save button
Available reply types mein shamil hain:
- Text — free-form text (company name, notes)
- Number — numeric values (budget, quantity)
- Phone — phone numbers
- Date — date values (subscription date, birthday)
Naya field turant saari conversations mein available ho jaata hai aur kisi bhi subscriber ko assign kiya ja sakta hai.
Custom Fields Dusre Features ke Saath Kaise Kaam Karte Hain
Templates Mein
Custom fields message templates mein named variables ke roop mein insert kiye jaate hain. For example, agar aapke paas "company" naam ka custom field hai, to aapka template {{company}} include kar sakta hai aur WhatChimp automatically subscriber ki profile se value pull karega jab send karega.
Chatbot Flows Mein
Bot flows subscribers se information collect kar sakte hain aur use automatically custom fields mein store kar sakte hain. For example, ek welcome flow pooch sakta hai "Aapki company ka naam kya hai?" aur response ko "Company" custom field mein save kar sakta hai.
Broadcasts Mein
Jab broadcasts bhejte hain, aap custom fields use kar sakte hain messages ko scale par personalize karne ke liye. Har subscriber ko message milta hai apni khud ki field values ke saath filled.
Filters Mein
Omnichannel Inbox mein, aap filter panel use karke conversations filter kar sakte hain specific criteria ke basis par subscribers dhoondhne ke liye, including label-based filtering jo custom fields ke saath kaam karti hai.
Custom Field Ideas
| Category | Field Name | Reply Type | Use Case |
|---|---|---|---|
| Sales | Company Name | Text | Track karein ki lead kaun si company mein kaam karta hai |
| Sales | Budget | Number | Prospect ki budget range jaanein |
| Sales | Industry | Text | Leads ko industry ke hisaab se segment karein |
| Support | Account Type | Text | Free vs Premium customers ko differentiate karein |
| Support | Preferred Language | Text | Sahi agent ko route karein |
| E-commerce | Order Number | Text | Support chats ke dauraan orders reference karein |
| E-commerce | Shipping Address | Text | Delivery details confirm karein |
| General | Country | Text | Geographic segmentation |
Tips
- Zaroorat se pehle fields banayein. Pehle apne custom fields set up karein, phir subscribers ko assign karein jaise conversations aati hain.
- Names clear aur consistent rakhein. Descriptive names use karein jaise "Company Name" abbreviations ki jagah jaise "CN".
- Sahi reply type use karein. Phone numbers ke liye "Phone" aur numeric values ke liye "Number" choose karna data ko clean rakhne mein madad karta hai.
- Conversations ke dauraan fields assign karein. Jab aap customer se chat kar rahe ho aur wo apni company ya order number mention karte hain, relevant custom field ko Chat Actions panel se directly assign karein.
- Labels ke saath combine karein. Quick categorization ke liye labels use karein aur detailed data ke liye custom fields. For example, conversation ko "VIP" label karein aur unki specific company name ko custom field mein store karein.
Related Articles
- How to Manage Custom Fields and Labels — Subscriber Manager mein custom fields create aur manage karne ki detailed guide
- Template Variables vs Custom Variables — template variables aur custom fields mein difference samjhein
- Send Template Messages with Custom Variables via API — API ke through messages bhejte waqt custom fields use karein
- Organize Conversations with Labels, Views & Search — organization ke liye labels ko custom fields ke saath use karein