Managing Customer Data with Custom Fields
Store and manage customer information using custom fields in conversations.
Updated 10 February 2026
Custom fields let you store extra information about each subscriber — things like company name, order status, language preference, or anything else your business needs to track. You can view and update these fields directly from the Omnichannel Inbox while chatting with customers.
Viewing Custom Fields in the Inbox
When you open a conversation in the Omnichannel Inbox, the Chat Actions panel on the right shows all the subscriber's data including custom fields.
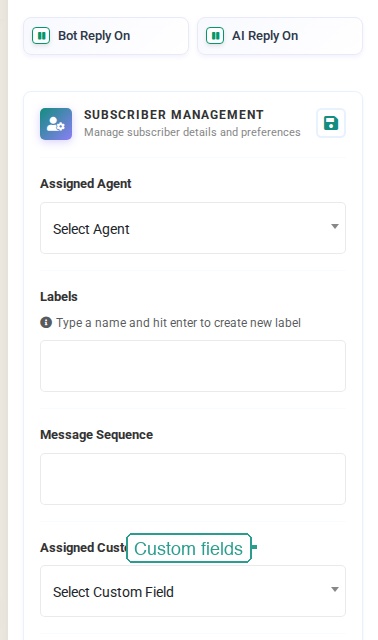 The full Chat Actions panel with Bot Reply toggles, Subscriber Management, Assigned Agent, Labels, Message Sequence, and Assigned Custom Fields
At the top of the panel, the Subscriber Management section links directly to the subscriber's profile where you can see all their details.

Scroll down in the Chat Actions panel to find the Assigned Custom Fields section. This shows which custom fields have been assigned to the current subscriber.

Assigning Custom Fields to a Subscriber
- Open a conversation in the Omnichannel Inbox
- In the Chat Actions panel, scroll to Assigned Custom Fields
- Click the Select Custom Field dropdown
- Choose a custom field from the list
- The field is assigned to that subscriber
Once assigned, the field's value is stored on the subscriber's profile and can be used in templates, automations, and broadcasts.
Managing Custom Fields
Custom fields are created and managed in the Subscriber Manager, not in the inbox itself.
Finding the Custom Fields Page
- Go to Manage Subscribers in the left sidebar
- Click Manage Custom Fields at the top of the page
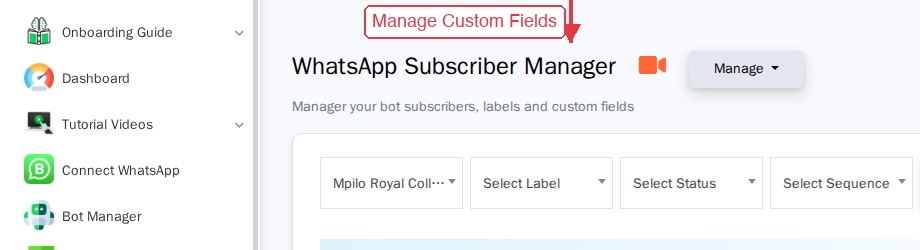 The WhatsApp Subscriber Manager showing subscribers with their phone numbers, labels, and custom field values
This takes you to the WhatsApp Subscriber Custom Fields page where you can see all your existing fields.
Viewing Your Custom Fields
The custom fields list shows all fields you've created, their reply type, and when they were created.
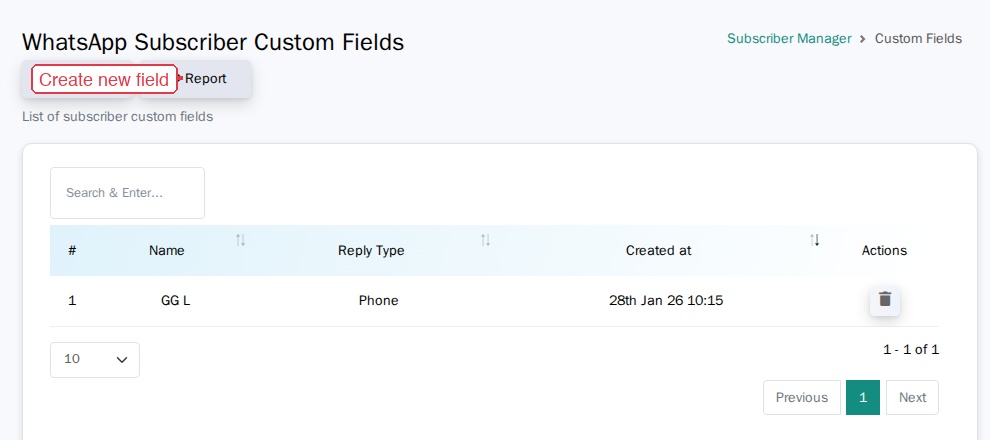 The WhatsApp Subscriber Custom Fields page with Create and Report buttons, a search bar, and a table listing custom fields
Each field shows:
- Name — the field name (e.g., "GG L")
- Reply Type — the data type (Phone, Text, Number, Date, etc.)
- Created at — when the field was created
- Actions — delete the field
Creating a New Custom Field
- On the Custom Fields list page, click the green Create button
- Enter the Custom Field Name (e.g., "Company Name", "Budget", "Order Status")
- Select the Reply Type from the dropdown
- Click Save
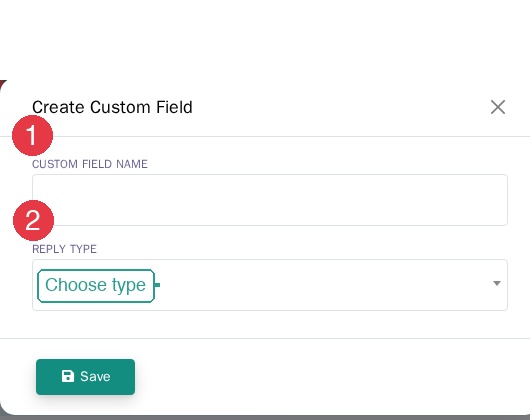 The Create Custom Field dialog showing a Custom Field Name input, a Reply Type dropdown, and a Save button
Available reply types include:
- Text — free-form text (company name, notes)
- Number — numeric values (budget, quantity)
- Phone — phone numbers
- Date — date values (subscription date, birthday)
The new field is immediately available in all conversations and can be assigned to any subscriber.
How Custom Fields Work with Other Features
In Templates
Custom fields are inserted into message templates as named variables. For example, if you have a custom field called "company", your template can include {{company}} and WhatChimp will automatically pull the value from the subscriber's profile when sending.
In Chatbot Flows
Bot flows can collect information from subscribers and store it in custom fields automatically. For example, a welcome flow might ask "What's your company name?" and save the response to a "Company" custom field.
In Broadcasts
When sending broadcasts, you can use custom fields to personalize messages at scale. Each subscriber receives the message with their own field values filled in.
In Filters
In the Omnichannel Inbox, you can filter conversations using the filter panel to find subscribers based on specific criteria, including label-based filtering that works alongside custom fields.
Custom Field Ideas
| Category | Field Name | Reply Type | Use Case |
|---|---|---|---|
| Sales | Company Name | Text | Track which company the lead works for |
| Sales | Budget | Number | Know the prospect's budget range |
| Sales | Industry | Text | Segment leads by industry |
| Support | Account Type | Text | Differentiate Free vs Premium customers |
| Support | Preferred Language | Text | Route to the right agent |
| E-commerce | Order Number | Text | Reference orders during support chats |
| E-commerce | Shipping Address | Text | Confirm delivery details |
| General | Country | Text | Geographic segmentation |
Tips
- Create fields before you need them. Set up your custom fields first, then assign them to subscribers as conversations come in.
- Keep names clear and consistent. Use descriptive names like "Company Name" rather than abbreviations like "CN".
- Use the right reply type. Choosing "Phone" for phone numbers and "Number" for numeric values helps keep data clean.
- Assign fields during conversations. When chatting with a customer and they mention their company or order number, assign the relevant custom field right from the Chat Actions panel.
- Combine with labels. Use labels for quick categorization and custom fields for detailed data. For example, label a conversation as "VIP" and store their specific company name in a custom field.
Related Articles
- How to Manage Custom Fields and Labels — detailed guide on creating and managing custom fields in Subscriber Manager
- Template Variables vs Custom Variables — understand the difference between template variables and custom fields
- Send Template Messages with Custom Variables via API — use custom fields when sending messages through the API
- Organize Conversations with Labels, Views & Search — use labels alongside custom fields for organization