WhatChimp ke saath apna Phone Number kaise connect karein (Embedded Signup)
WhatChimp ke saath apne WhatsApp Business phone number ko embedded signup flow use karke connect karne ki step-by-step guide
Updated 16 June 2026
Agar aap WhatChimp ke saath apni WhatsApp Business conversations ko manage karne ke liye ready hain, toh pehla step hai apna phone number connect karna. Yeh process quick hai aur WhatsApp Business ke saath integration ke through complete ho sakta hai.
Note: Agar aap existing WhatsApp number use karna chahte hain, toh aapko us number ko WhatsApp ya WhatsApp Business App se delete karna hoga WhatsApp Business API se connect karne se pehle. Aap hamare guide mein steps follow kar sakte hain yahan: Existing WhatsApp Number ko Business Account mein migrate karein.
Shuru karne ke liye in steps ko follow karein:
WhatChimp mein Login karein
- Apne WhatChimp account mein apne credentials ke saath login karein.
- Jaise hi aap login karenge, aapko main Dashboard dikhai degi.
Connect Account par jaayein
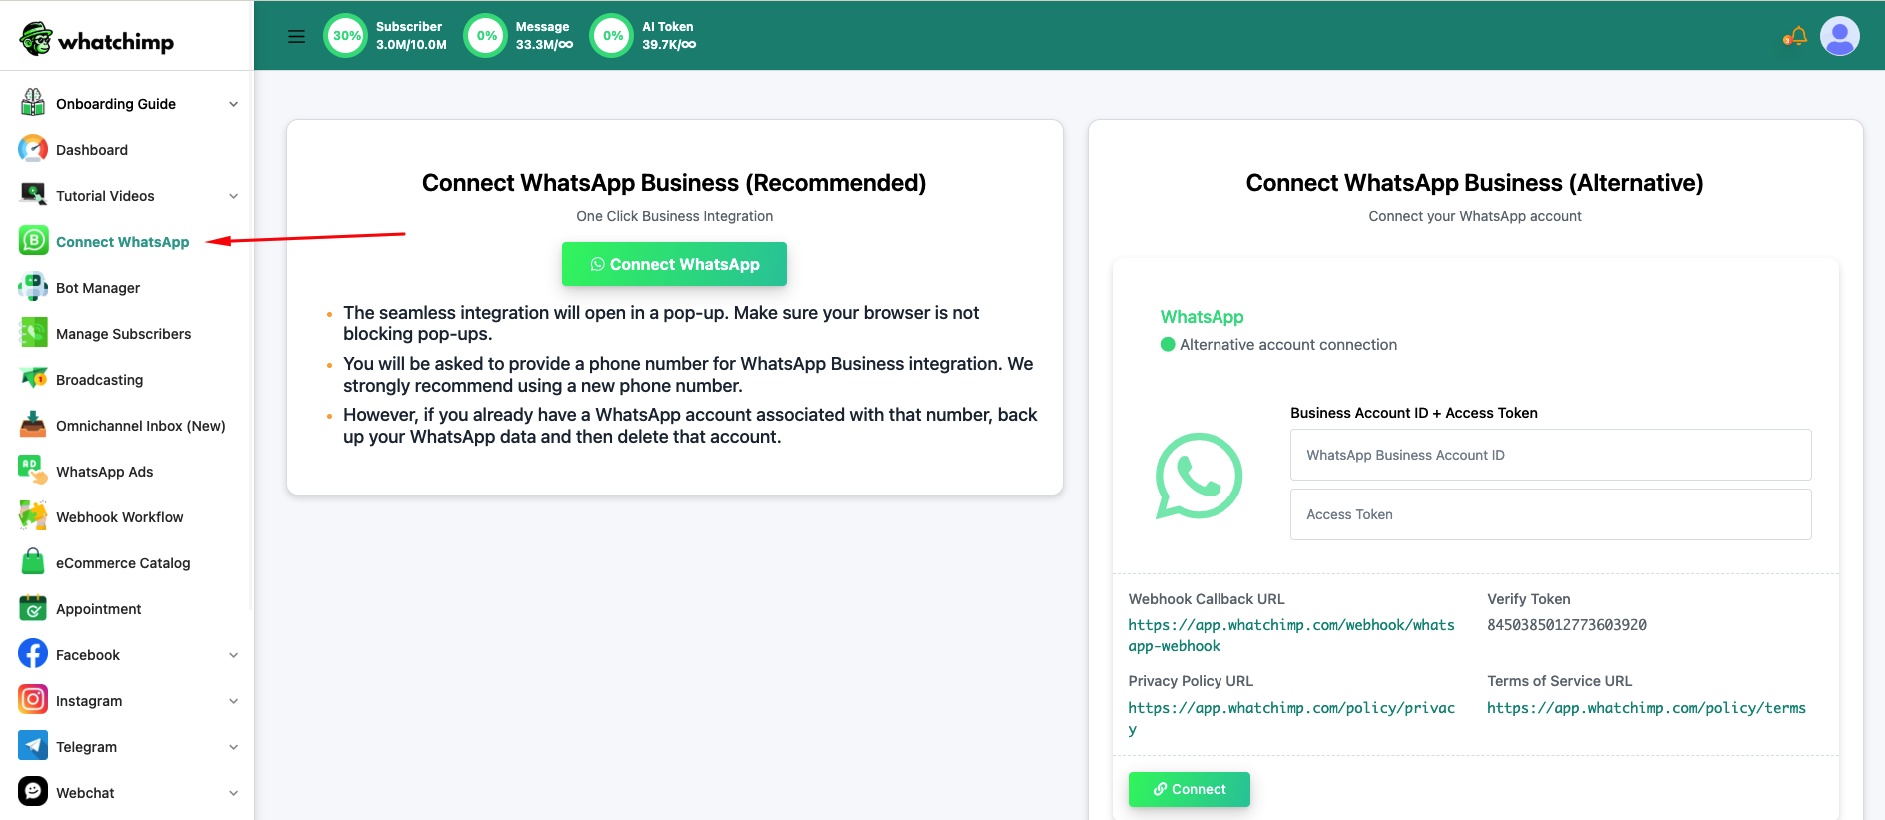
- Left-hand navigation bar mein, Connect Account par click karein.
- Alternatively, aap is link ko visit kar sakte hain phone number connection page par directly jaane ke liye.
Apna Connection Method choose karein
Aapko apna WhatsApp number connect karne ke do tarike dikhenge:
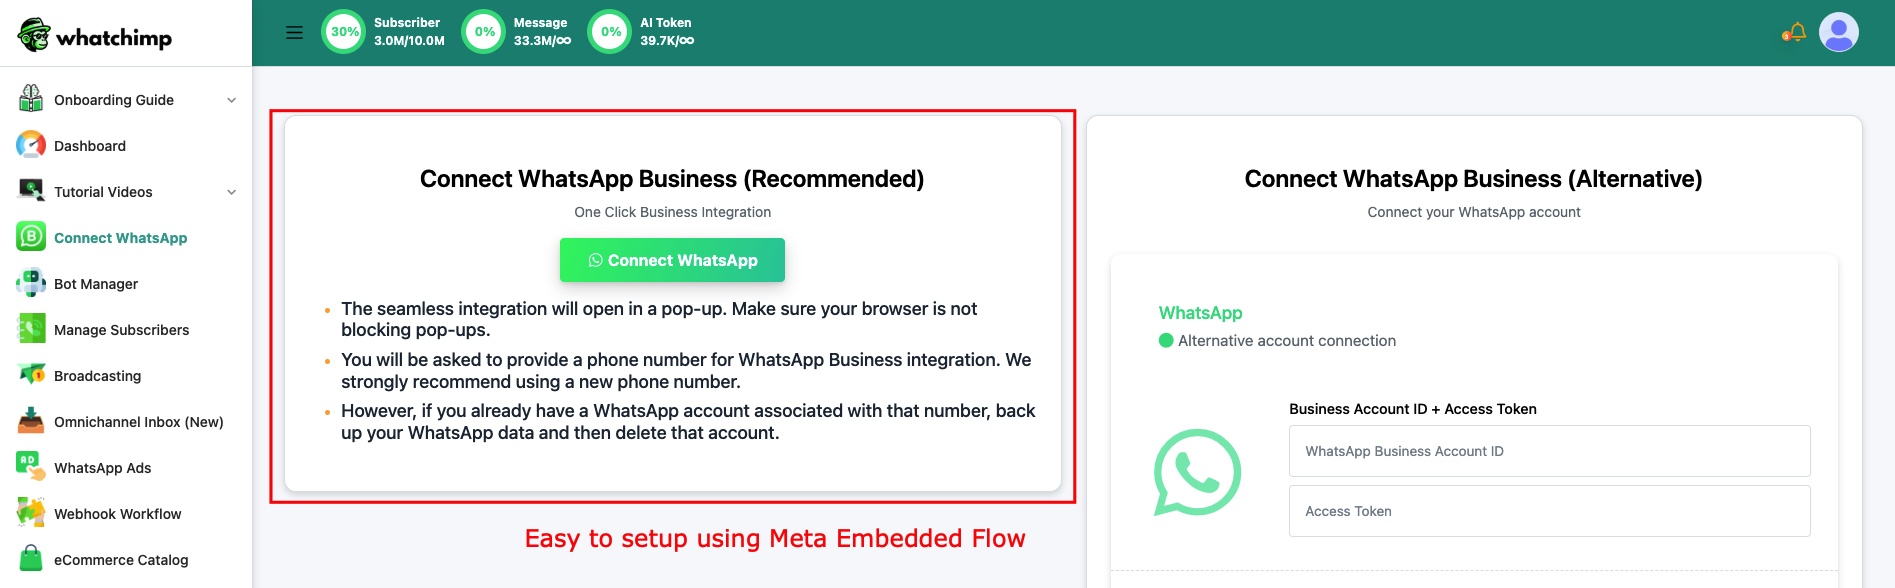
| Embedded Signup (Recommended) | Alternative (Manual) | |
|---|---|---|
| Best for | Sabke liye | Developers jinke paas existing Meta Apps hain |
| Kaise kaam karta hai | Connect WhatsApp par click karein aur guided popup follow karein | Apna khud ka Business Account ID aur Access Token enter karein |
| Technical knowledge | Koi zaroorat nahi | Aapko Meta App create karna hoga, permanent access token generate karna hoga, aur webhooks khud configure karna hoga |
| Setup time | 5 minutes | 30+ minutes |
| Hum kya recommend karte hain | Isko use karein | Sirf agar aapke paas pehle se Meta App setup hai aur aap jaante hain aap kya kar rahe hain |
Embedded Signup flow shuru karne ke liye left side mein Connect WhatsApp par click karein. Is guide ka baaki hissa us method ko follow karta hai.
Catalog ke saath ya bina connect karein
Aapko do buttons dikhenge — Connect WhatsApp With Catalog Permission aur Connect WhatsApp Without Catalog Permission.
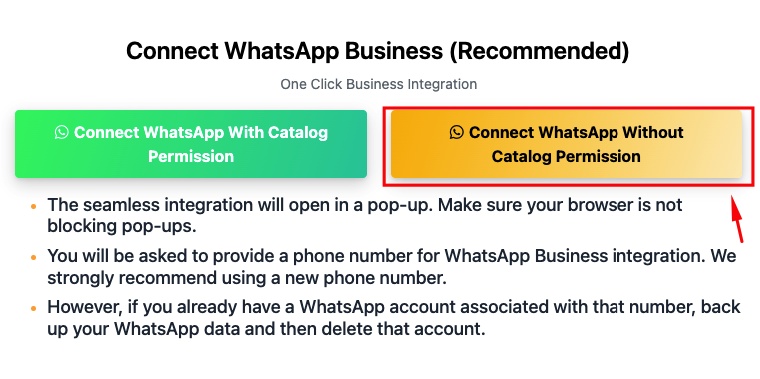
Hum strongly recommend karte hain ki aap Connect WhatsApp Without Catalog Permission par click karein quickly setup hone ke liye. Aap apni Catalog baad mein hamesha connect kar sakte hain. Catalog permission ke saath connect karne ke liye, aapke paas pehle se Meta ke andar Catalog create hona chahiye — agar nahi hai, toh setup fail ho jayega.
Facebook ke saath Login karein
- Connect WhatsApp par click karne ke baad, aapse Facebook ke saath login karne ke liye kaha jayega agar aap pehle se logged in nahi hain.
- Agar aap pehle se Facebook mein logged in hain, toh aap apne current account ke saath continue karenge. Agar nahi, toh proceed karne ke liye apne Facebook credentials enter karein.

Business Selection
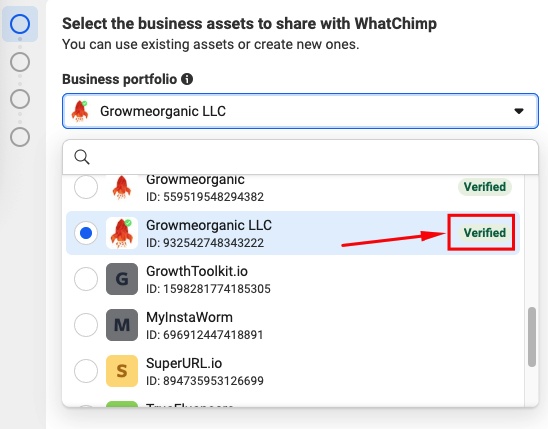
Is step mein jaldi mat karein. Kuch bhi fill karne se pehle, Business portfolio dropdown ko carefully check karein. Aapko do situations mein se ek dikhegi — jo aapke saath match kare use choose karein.
Kya aapke paas pehle se Business Portfolio hai?
Agar aapne kabhi Facebook ya Instagram ads chalaaye hain, koi aur WhatsApp BSP (jaise Interakt, Wati, AiSensy, etc.) use kiya hai, ya apni company ke liye Meta Business Suite setup kiya hai — toh most likely aapke paas pehle se Business Portfolio hai. Yeh dropdown mein aapke business name ke saath appear hogi.
Agar aapko dropdown mein apna business name dikhta hai (green "Verified" badge ke saath ya bina), toh use select karein aur is guide ko follow karein: Existing Business Portfolio ke saath connect karein.
Nahi hai? Nayi Portfolio create karein
Agar dropdown empty hai ya aap listed portfolios mein se kisi ko recognize nahi karte, toh "Create a Business Portfolio" select karein aur apni details fill karein.
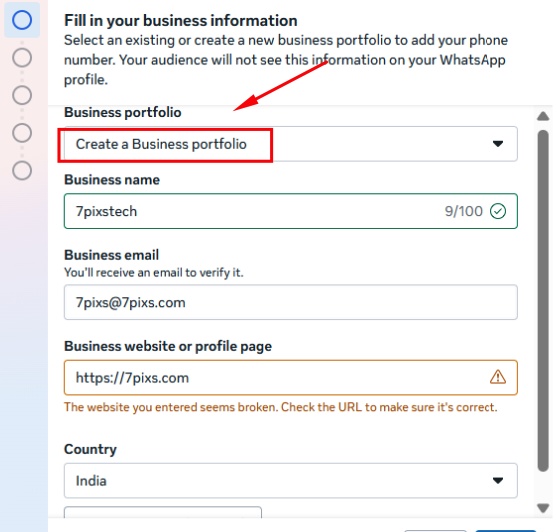
Business name: Apne legal entity name ka use karein — Meta baad mein proof maangega (registration, bill, ya bank statement). Sole proprietors apna khud ka naam use kar sakte hain. Sahi karein — baad mein change karna mushkil hai.
Website: Website nahi hai? Apna Facebook page, Instagram profile, ya koi bhi public URL use karein jo aapke business ko represent kare.
Apni portfolio create karne ke baad, aapko yeh screen dikhegi:
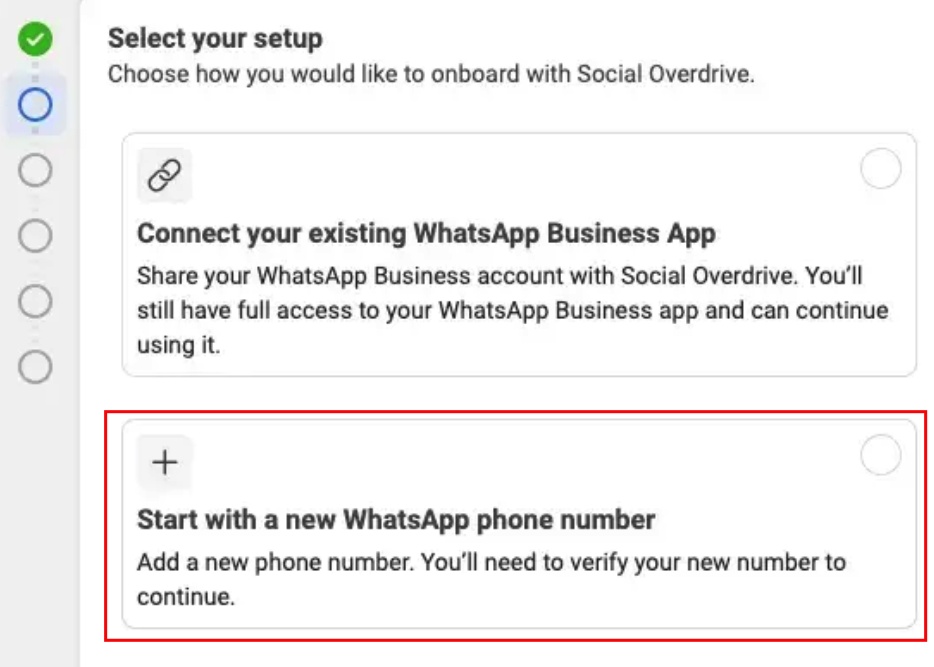
Connect your existing WhatsApp Business App — Aapke current Business App number ko API se link karta hai. Aap apne phone par app use karte rahen jabki WhatChimp API ke through automation handle karta hai. Yeh WhatsApp ka co-existence feature hai — full details ke liye dekhen WhatsApp Co-Existence.
Start with a new WhatsApp phone number — Ek fresh number add karein aur verify karein. Yeh choose karein agar aapke paas nayi number hai jo currently WhatsApp par nahi hai.
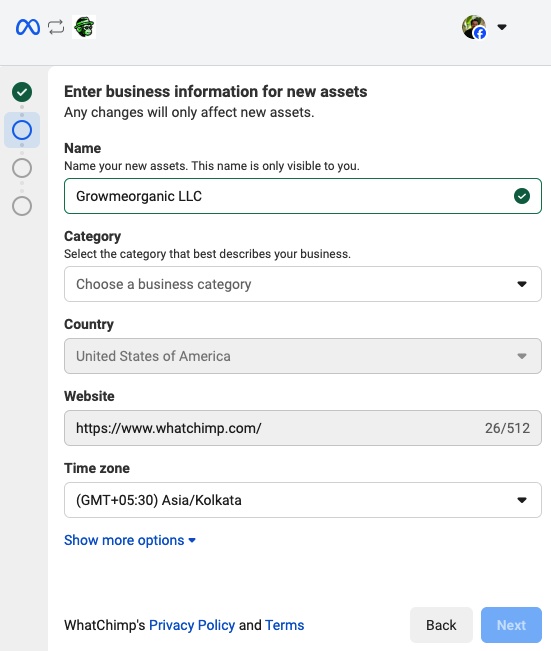
WhatsApp Business Profile create karein
Apni business information enter karein — name, category, country, website, aur time zone.
Apna Phone Number verify karein
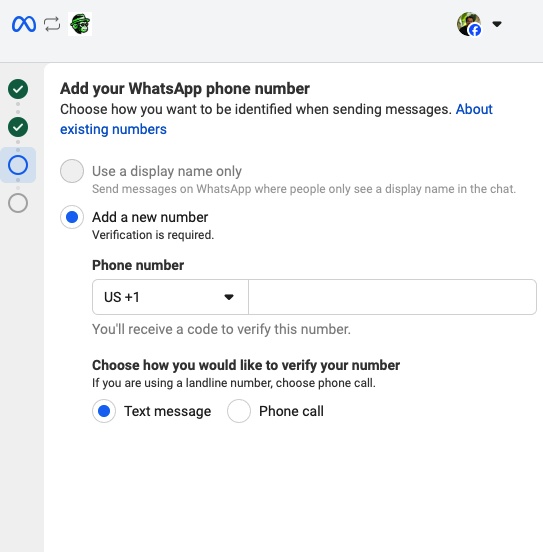
Woh phone number enter karein jo aap WhatChimp se connect karna chahte hain. WhatsApp SMS ya call ke through verification code bhejega.

Apne phone number ko verify karne ke liye code enter karein.
Permissions
Aapse un permissions ko review karne ke liye kaha jayega jo WhatsApp aapke business ke liye require karta hai. Yeh standard permissions hain jinhe change nahi kiya ja sakta. Proceed karne ke liye Continue par click karein.

- Permissions acknowledge karne aur proceed karne ke liye Continue par click karein.
Dhyaan rakhne wali Restrictions
- Jo phone number aap use kar rahe hain woh naya hona chahiye aur currently WhatsApp ya WhatsApp Business App se linked nahi hona chahiye.
Agla Step: Payment Method add karein aur apne Business ko verify karein
Ek baar aapka phone number successfully connect ho jaaye, agle steps hain WhatsApp API billing ke liye payment method add karna aur apne business ko verify karna. Yeh smooth operations aur WhatsApp Business API tak uninterrupted access ensure karne ke liye essential hain.
Payment Method add karein
Service mein kisi bhi interruption se bachne ke liye, aapko WhatsApp API usage charges cover karne ke liye payment method add karna hoga. Yeh step ensure karta hai ki aapki WhatsApp Business API conversations ko WhatsApp ke per-conversation pricing model ke basis par correctly bill kiya jaaye.

Payment method add karne par detailed guide ke liye, hamara support article dekhein:
WhatsApp API Billing ke liye Payment Method kaise add karein
Apne Meta Business Manager ko verify karein
Apne Meta Business Manager ko verify karna WhatsApp ke business features tak full access paane ke liye zaroori hai. Verification aapke account mein credibility add karta hai, compliance ensure karta hai, aur higher messaging limits unlock karne mein madad karta hai.

Apne WhatsApp Business account ko verify karne par step-by-step guide ke liye, visit karein:
Apne Meta Business Manager ko kaise verify karein
In dono steps ko complete karke, aapka WhatsApp Business account fully setup ho jayega aur WhatChimp ke through messages send aur receive karne ke liye ready ho jayega. Yeh crucial steps hain ensure karne ke liye ki aapka account smoothly chale bina kisi disruption ke.
Conclusion
In steps ko follow karke, aap jaldi se apna phone number WhatChimp se connect kar payenge aur apni WhatsApp Business communications ko easily manage karna shuru kar payenge.
Additional help ke liye, WhatChimp Support se contact karne mein hesitate mat karein.