Appointment Kaise Banayein
WhatChimp mein ek bookable appointment set up karein: calendar chunein, apni availability, duration, pricing, data actions, aur customers ke jawab dene wale questions set karein.
Updated 18 June 2026
Ek appointment woh bookable service hai jise aapke customers WhatsApp se reserve karte hain. Aap iska calendar, availability, duration, price, aur puchne wale questions define karte hain, aur WhatChimp aapke liye booking conversation aur calendar sync chalata hai. Shuru karne se pehle, apna Google account connect karein taaki bookings Google Calendar par sync ho.
Appointment Form Kholein
- Left sidebar mein, Appointment kholein.
- Create form kholne ke liye New Appointment par click karein. Pehle se bani hui ko edit karne ke liye, Appointment Manager mein edit icon use karein.
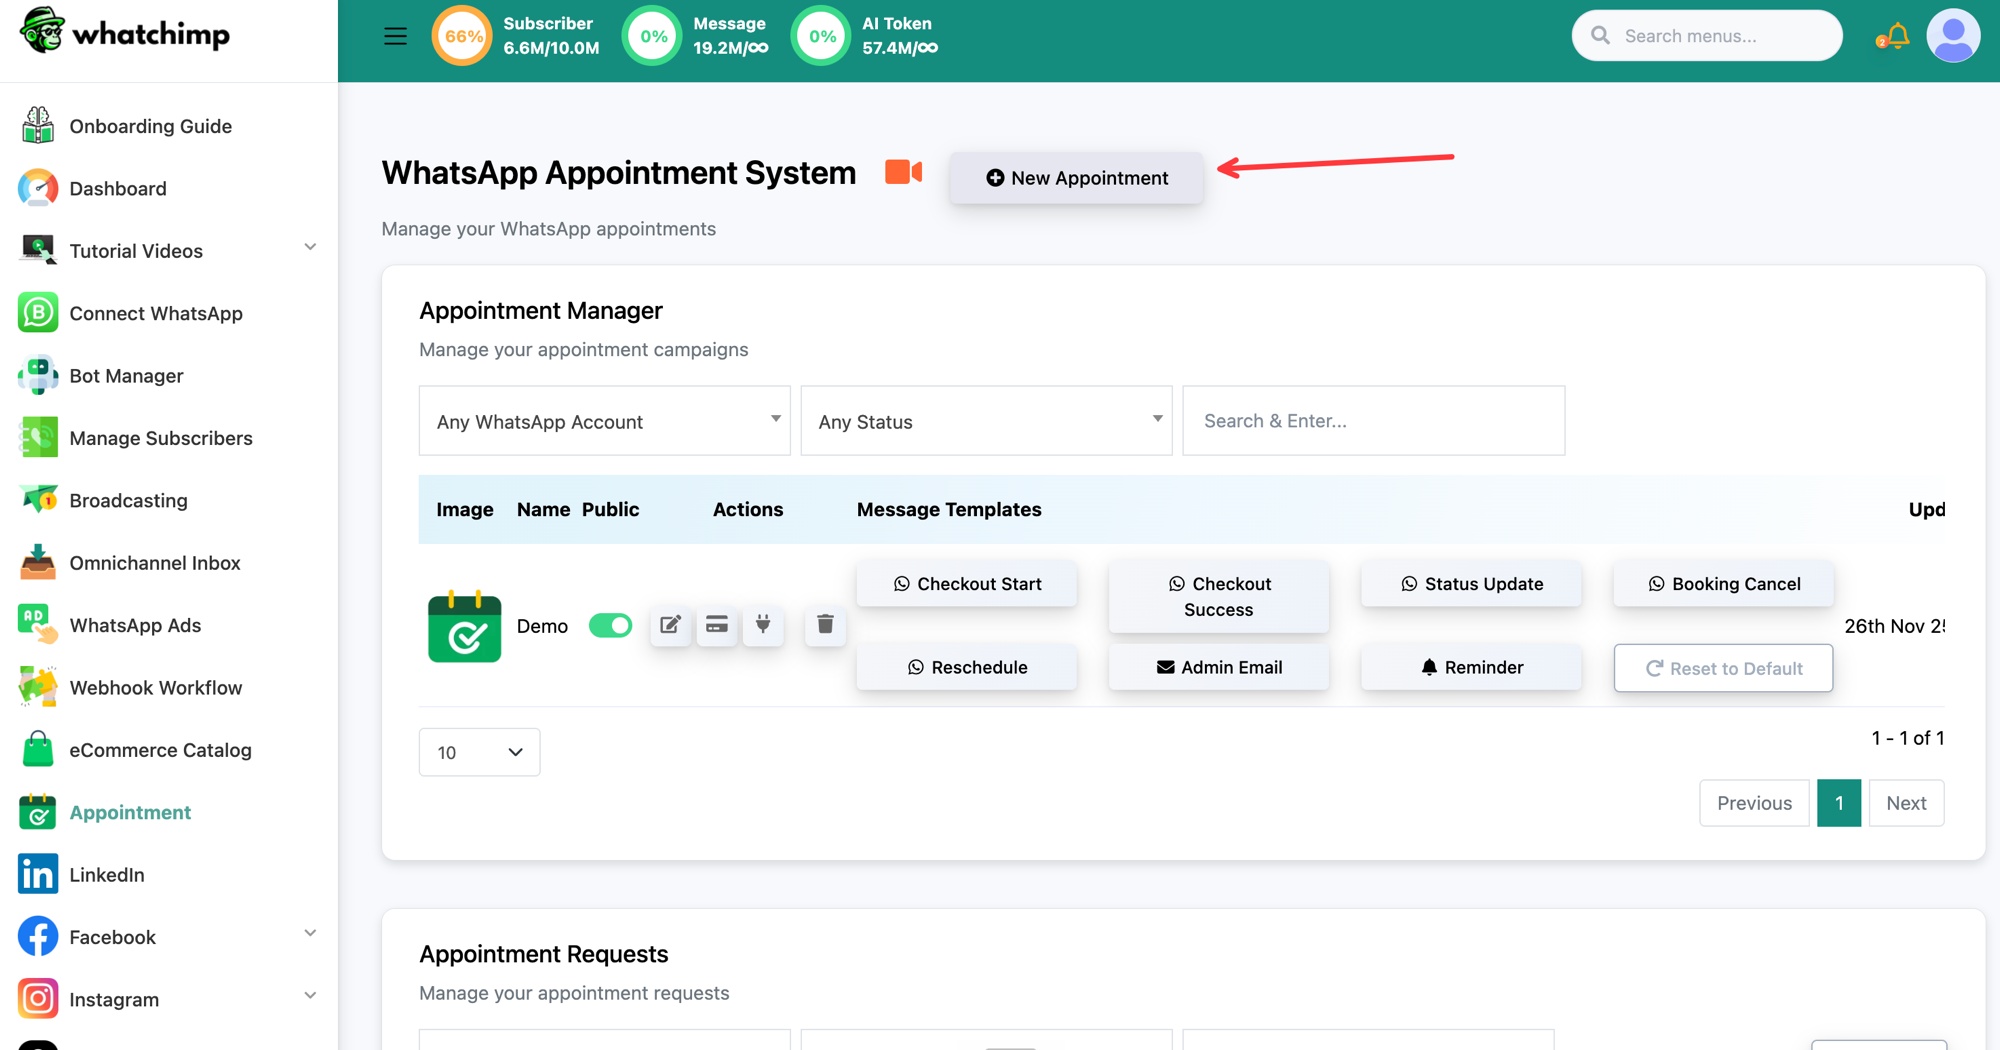 Appointment kholein, phir New Appointment par click karein
Form ke paanch sections hain jinke beech aap right side se jump kar sakte hain: Configuration, Time Slot, Checkout, Data Actions, aur Questionnaires.
Configuration
Yahan aap define karte hain ki appointment kya hai aur ise book karne ke rules.
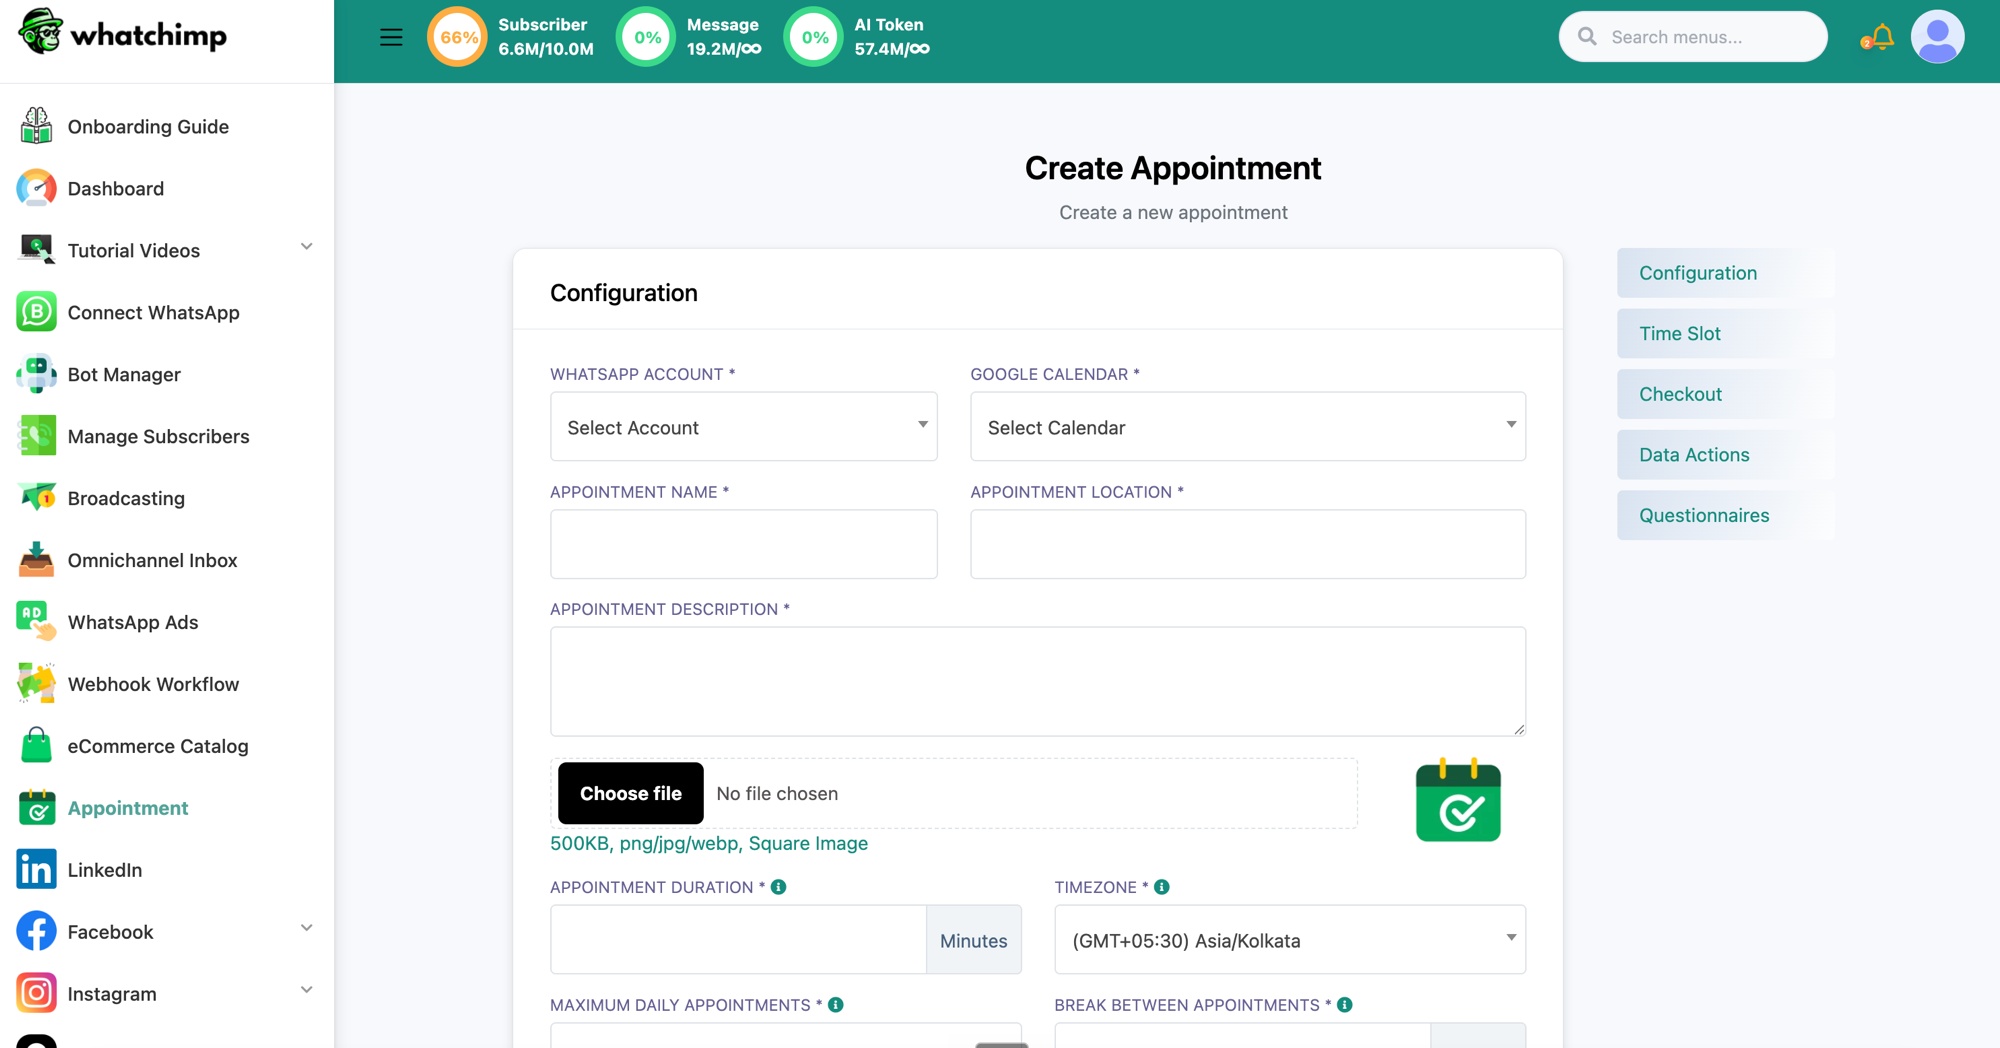 Appointment form ka Configuration section
- WhatsApp Account: woh WhatsApp number jo booking conversation chalata hai aur confirmation aur reminder messages bhejta hai. Woh number chunein jise aapke customers actually message karte hain.
- Google Calendar: woh connected calendar jahan confirmed bookings banti hain. Agar yeh dropdown khaali hai, toh pehle ek Google account connect karein. Har booking is calendar par ek event banti hai.
- Appointment Name: service ka naam, jaise "Demo" ya "Consultation". Yeh customer ko aur calendar event par dikhta hai.
- Appointment Location: appointment kahan hota hai. Virtual meeting ke liye "Online" use karein (WhatChimp ek Google Meet link attach kar sakta hai), ya in-person ke liye ek physical address.
- Appointment Description: ek short description, jo customer ko dikhti hai aur calendar event mein add hoti hai. Ise clear rakhein, jaise "Demo walkthrough".
- Image: appointment ke liye ek optional square image, 500KB tak, png, jpg, ya webp mein.
Agle fields timing aur availability control karte hain. App mein, kisi bhi field ke bagal mein chhote info icon par hover karein in-context hint ke liye.
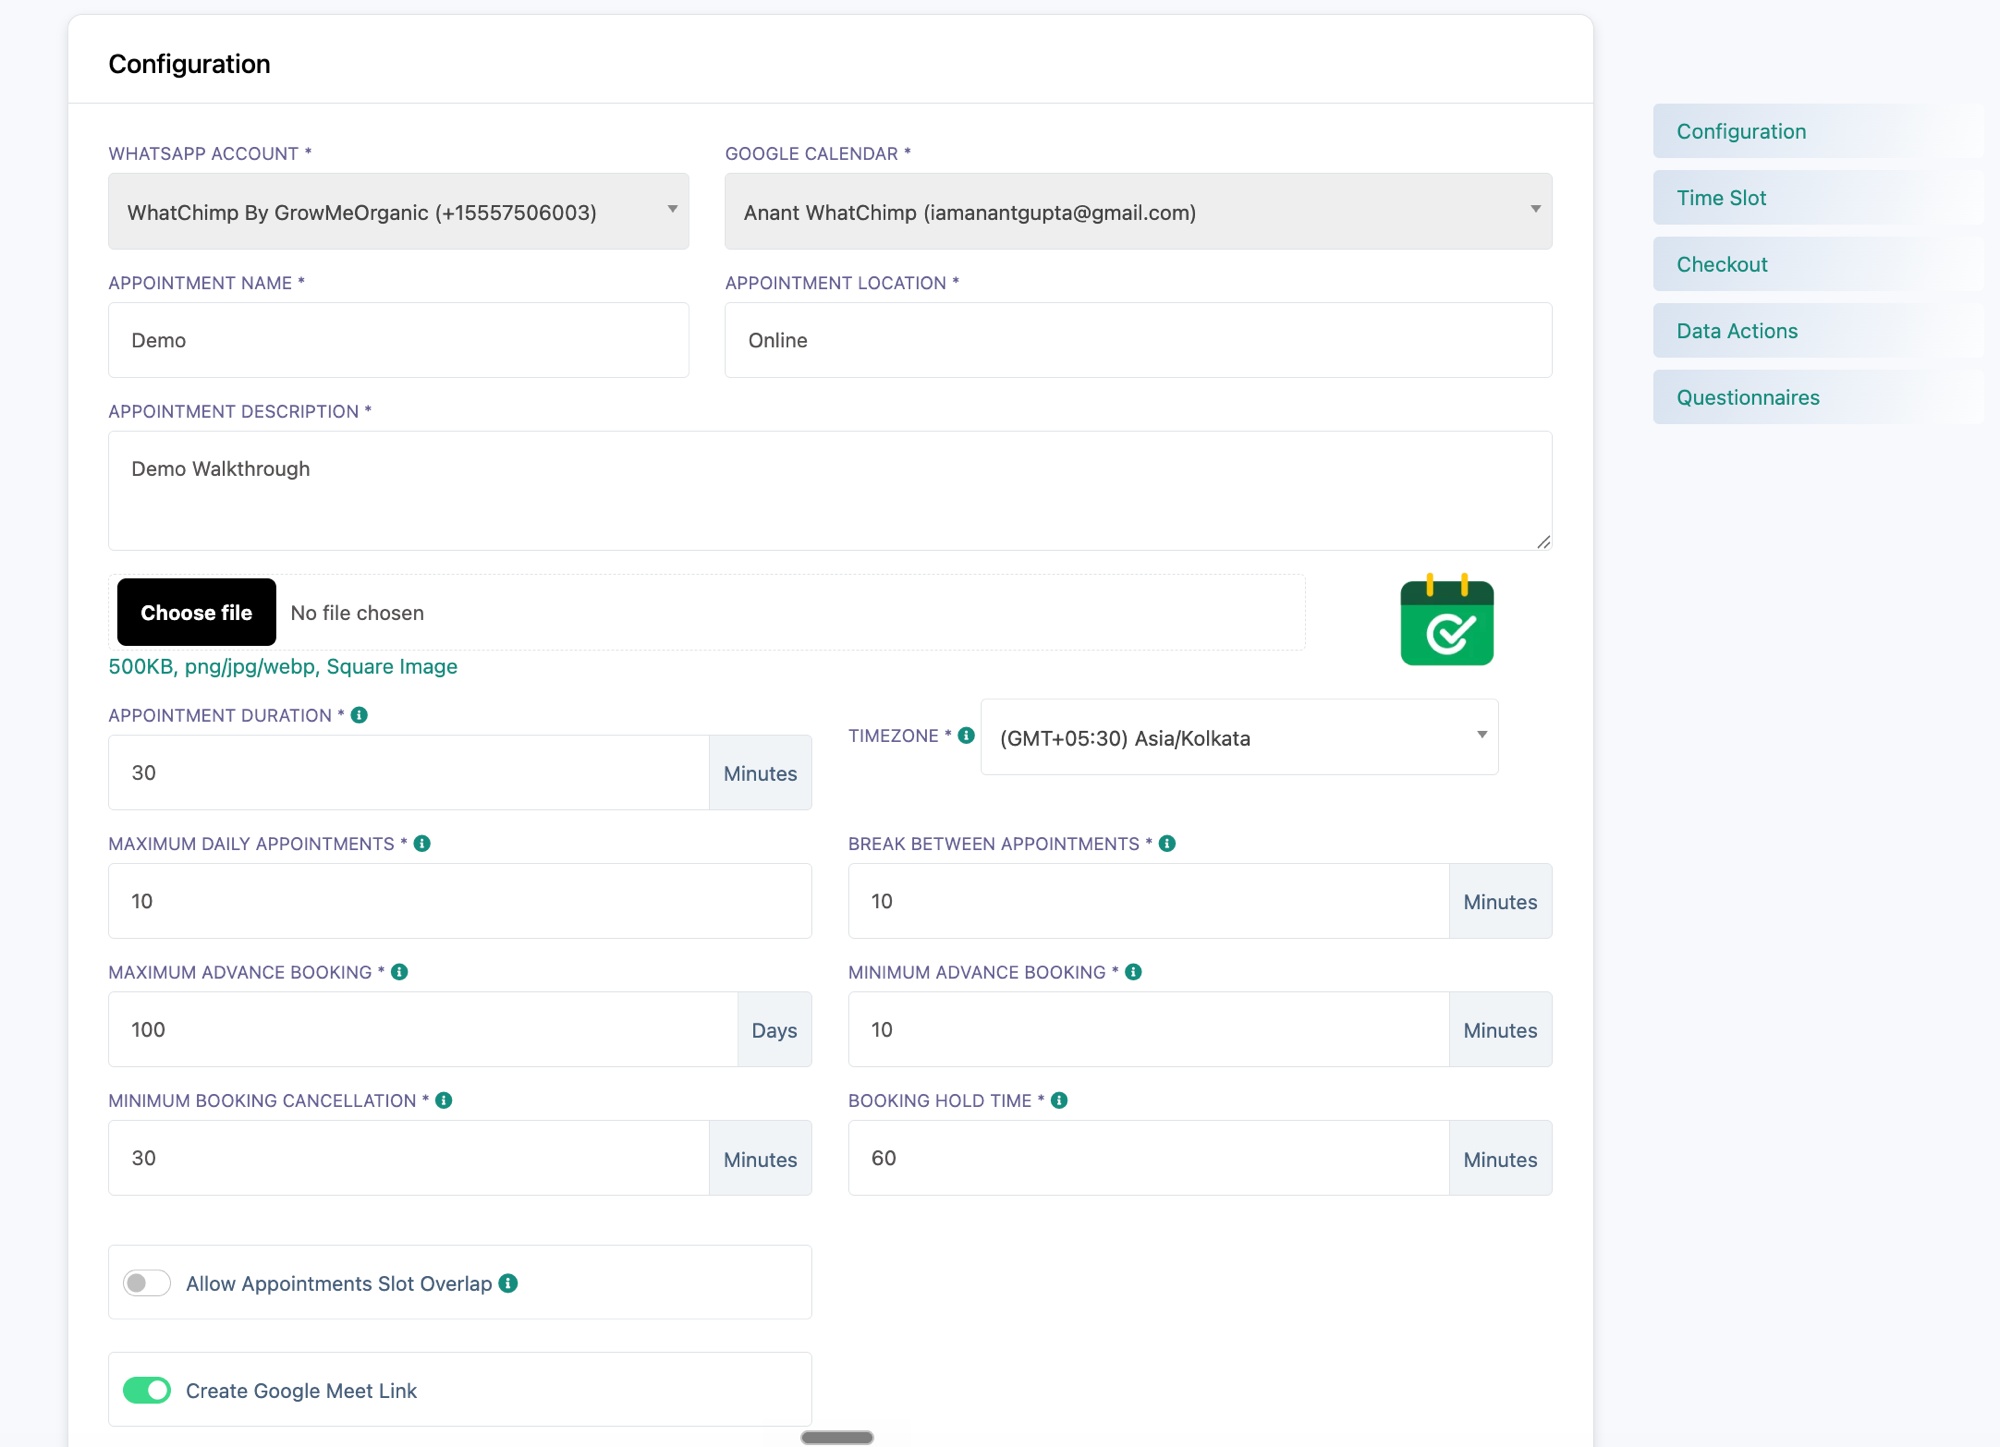 Duration, time zone, aur booking rules
- Appointment Duration (minutes): ek appointment kitni der chalta hai. Yeh har bookable slot ki length set karta hai, jaise 30 minutes.
- Timezone: woh time zone jis par aapki availability aur offered slots based hain. Ise us time zone par set karein jisme aap kaam karte hain, taaki "9:00" slot ka matlab aapke 9:00 ho.
- Maximum Daily Appointments: ek din mein aap zyada se zyada kitni bookings lenge. Yeh reach hote hi, woh din available dikhna band ho jaata hai. Apne workload ko cap karne ke liye use karein.
- Break Between Appointments (minutes): har appointment ke baad ek buffer taaki back-to-back bookings mein aapko reset karne ka time mile. 10 minute break ka matlab agla slot pichle ke khatam hone ke 10 minute baad hi shuru ho sakta hai.
- Maximum Advance Booking (days): customers kitna aage tak book kar sakte hain. Jaise, 100 days ka matlab koi 100 din se aage ka slot book nahi kar sakta.
- Minimum Advance Booking (minutes): appointment shuru hone se pehle aapko chahiye minimum notice, taaki koi aisa slot book na kare jo abhi shuru hone wala hai.
- Minimum Booking Cancellation (minutes): start time se kitni der pehle tak customer cancel kar sakta hai. Is window ke baad, booking lock ho jaati hai.
- Booking Hold Time (minutes): customer ke confirm karte waqt ek slot kitni der hold rehta hai. Agar woh is time mein confirm nahi karte, toh slot release ho jaata hai taaki woh doosron ko block na kare.
- Allow Appointments Slot Overlap: default off, taaki har slot ek baar book ho. Ise sirf tab on karein jab ek hi slot ek se zyada log le sakte hon, jaise group session.
- Create Google Meet Link: default on. On hone par, har confirmed online booking ko automatically ek Google Meet link milta hai, jo calendar event mein add aur customer ko bheja jaata hai.
Time Slot
Yahan aap apne available din aur ghante set karte hain. WhatChimp customers ko sirf woh slots offer karta hai jo in windows ke andar aate hain.
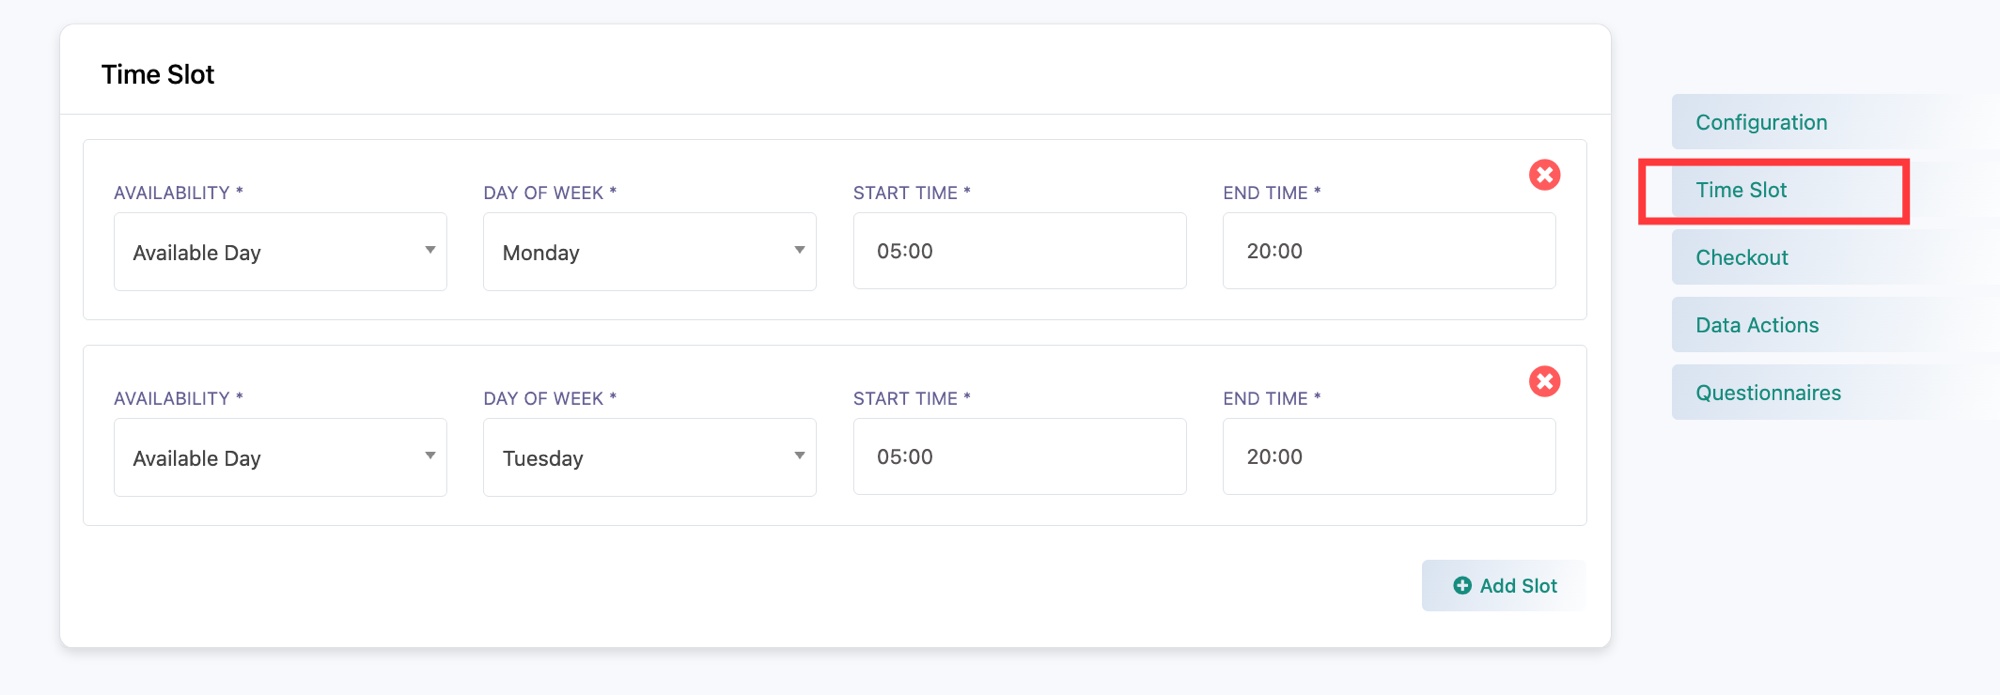 Apne available din aur ghante set karein
Har row ke liye:
- Availability: us din ko booking ke liye kholne ke liye Available Day chunein.
- Day of Week: woh din jis par yeh rule lagta hai, jaise Monday.
- Start Time aur End Time: us din aap jis window mein open hain, jaise 05:00 se 20:00.
Ek aur din ya window add karne ke liye Add Slot par click karein, aur har us din ke liye ek row add karein jab aap bookings lete hain. Configuration se duration aur break decide karte hain ki har window kaise individual slots mein bata jaata hai.
Checkout
Is section ka use karein agar aap appointment ke liye charge karna chahte hain. Free rakhne ke liye fees zero par chhod dein.
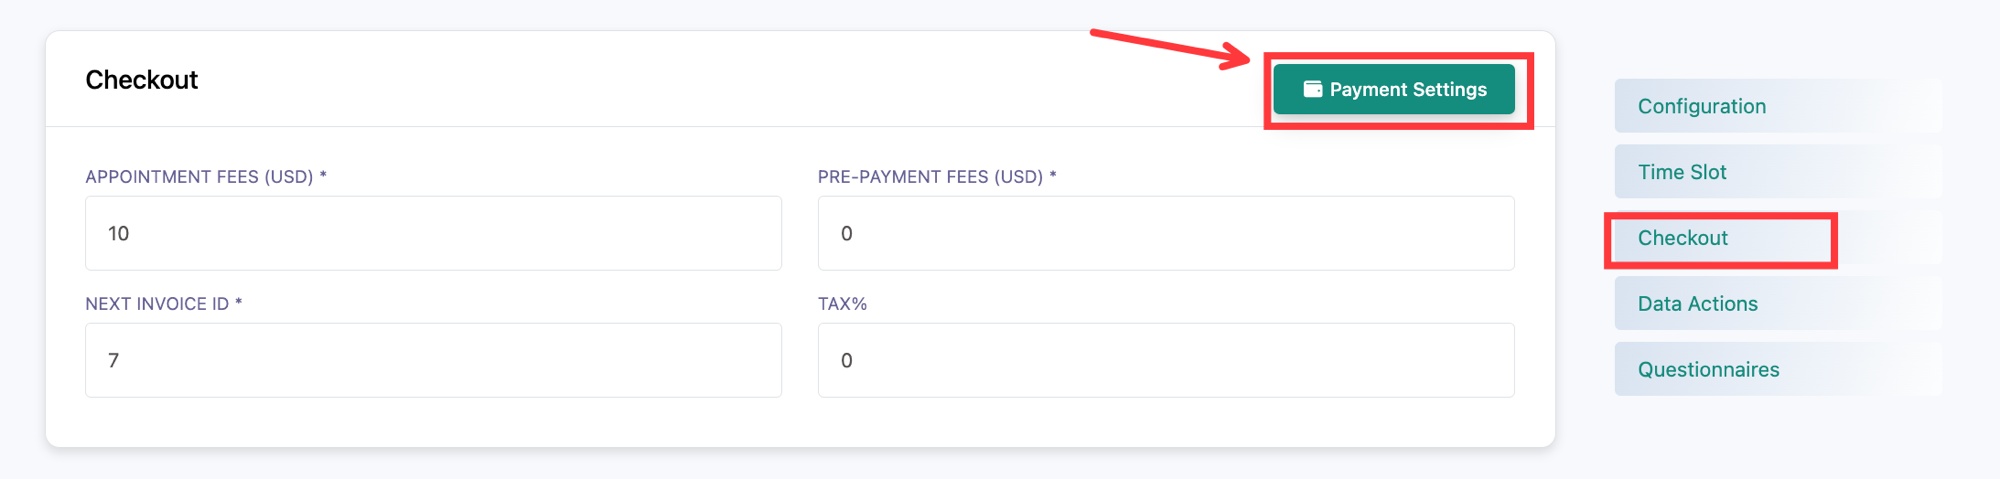 Apni fees, tax, aur invoice number set karein
- Appointment Fees (USD): appointment ki price. Aap ek price dikha sakte hain bhale hi collect na karein, ya poora collect karein.
- Pre-Payment Fees (USD): booking confirm karne ke liye customer ko up front jo amount dena hai. Deposit ke liye ise fee ka ek hissa set karein, ya zero set karein taaki woh baad mein pay karein.
- Next Invoice ID: agla invoice jo number use karega. WhatChimp ise yahan se automatically increment karta hai.
- Tax%: fee ke upar add hone wala ek optional tax percentage.
Sach mein paisa collect karne ke liye aapko ek payment gateway chahiye. Ise set up karne ke liye Payment Settings par click karein.
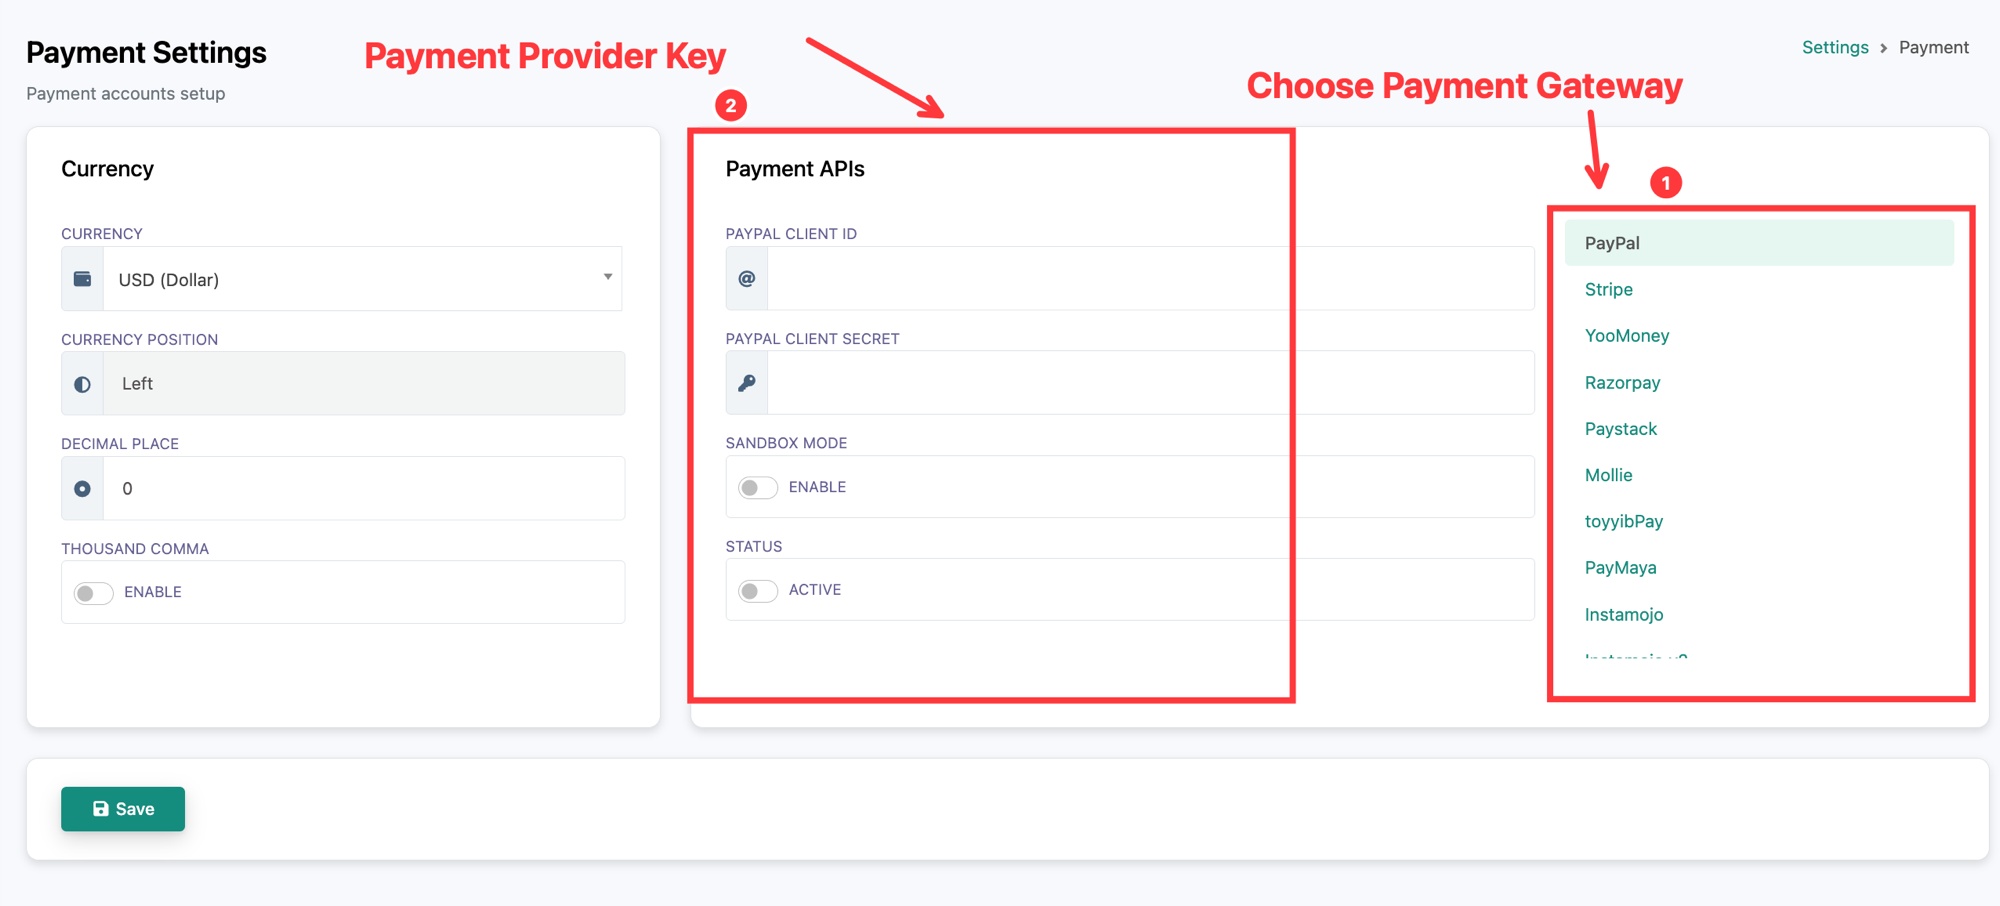 Ek gateway chunein aur uski keys enter karein
- Right side ki list se apna payment gateway chunein (PayPal, Stripe, Razorpay, Paystack, Mollie, aur more).
- Beech mein us gateway ke liye provider keys enter karein, jaise PayPal Client ID aur Secret.
- Testing ke liye Sandbox Mode on ya live payments ke liye off karein, Status ko Active set karein, apni Currency chunein, phir Save par click karein.
Data Actions
Yeh booking confirm hone par automatically chalti hain, taaki data aapke baaki tools mein flow ho.
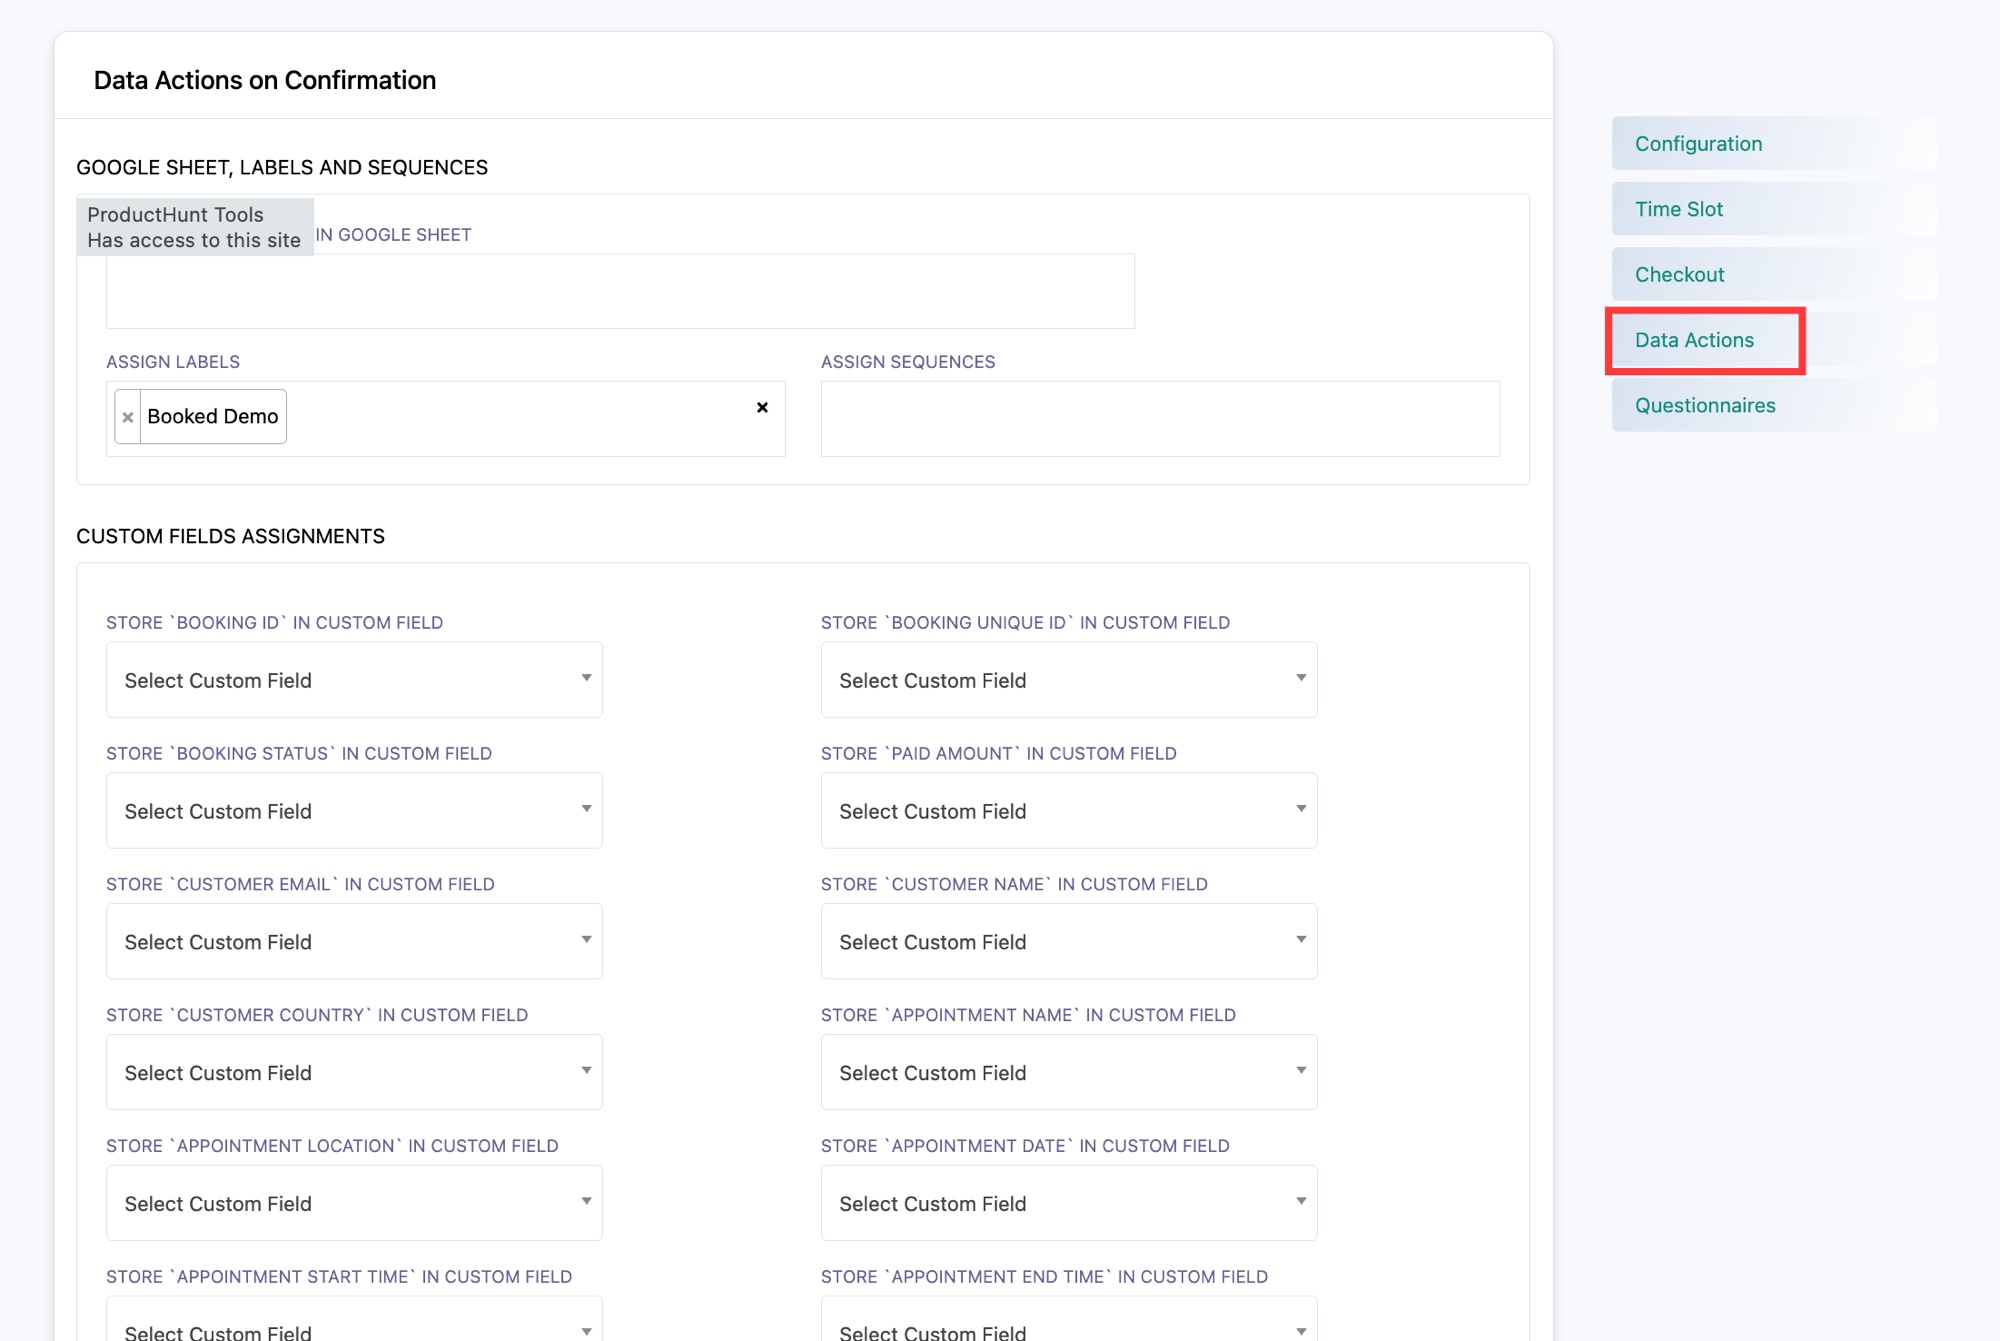 Bookings ko sheet mein save karein, contact ko tag aur sequence karein, aur fields map karein
- Save in Google Sheet: har confirmed booking ko ek connected Google Sheet mein bhejein.
- Assign Labels: customer ko ek label se tag karein, jaise "Booked Demo", taaki aap unhe baad mein segment kar sakein.
- Assign Sequences: booking ke baad customer ke liye ek message sequence shuru karein, jaise ek prep ya follow-up sequence.
- Custom Fields Assignments: booking details jaise Booking ID, Booking Unique ID, Booking Status, Paid Amount, Customer Email, Customer Name, Appointment Date, Start Time, aur End Time apne subscriber custom fields mein store karein. Sirf woh map karein jo aap rakhna chahte hain. Agar aapke paas abhi koi custom field nahi hai, toh pehle Manage Subscribers mein bana lein.
Questionnaires
Yeh booking conversation ki wording hai: jo messages bot bhejta hai aur jo questions puchta hai. Sensible defaults filled hain, toh aap sirf woh edit karein jo aap badalna chahte hain.
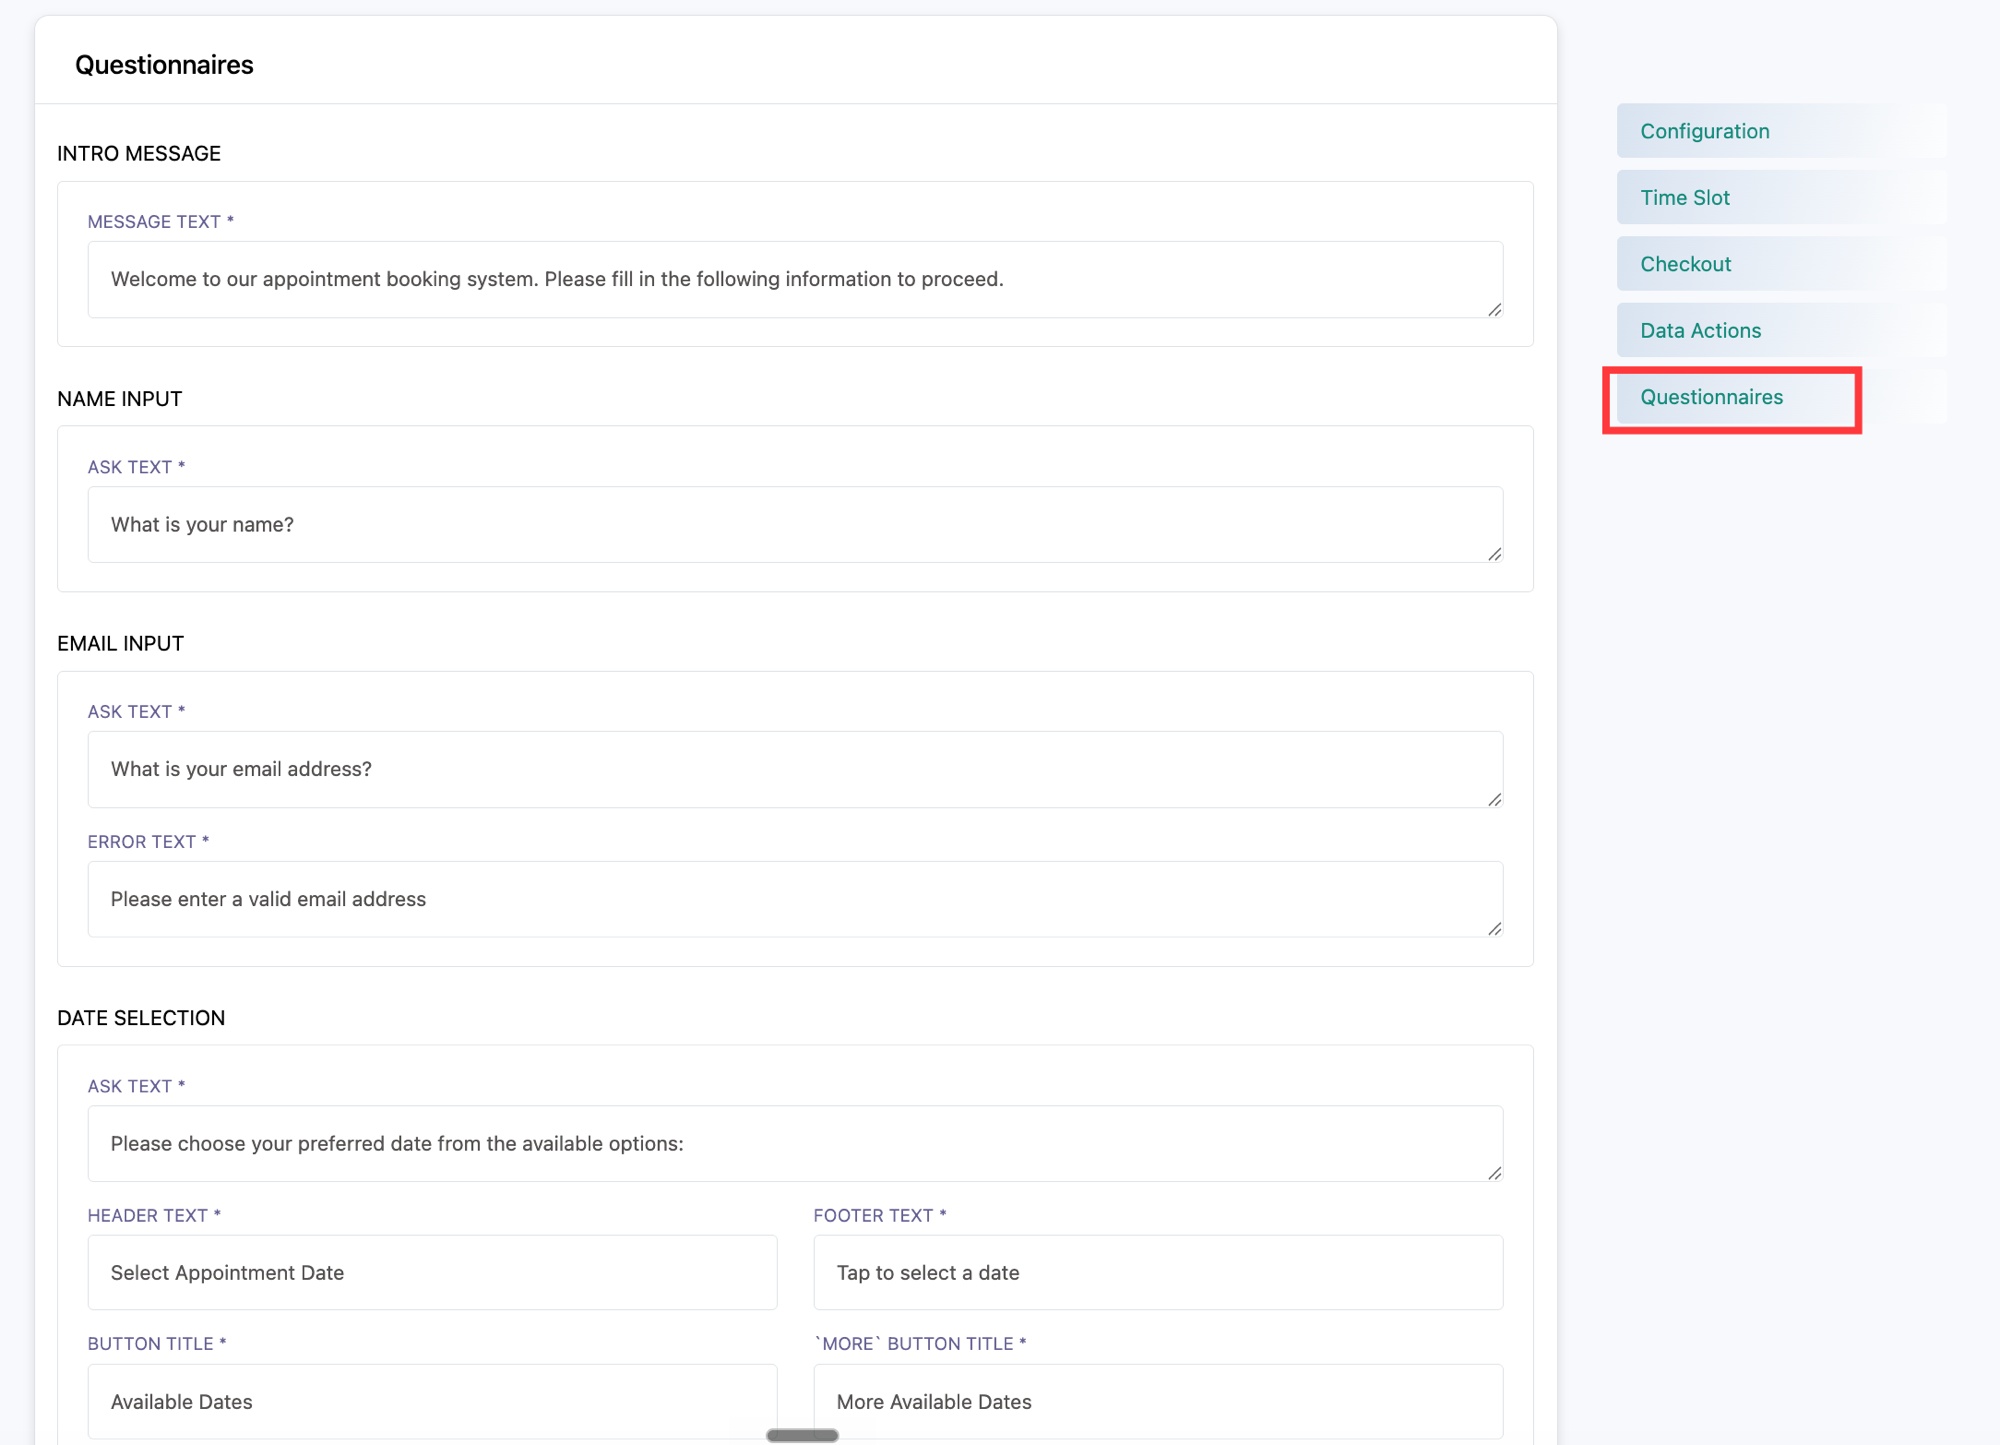 Bot jo messages aur questions bhejta hai unhe edit karein
- Intro Message: pehla message jo customer dekhta hai, jaise "Welcome to our appointment booking system. Please fill in the following information to proceed."
- Name Input: woh question jo unka naam collect karta hai, jaise "What is your name?".
- Email Input: woh question jo unka email collect karta hai, plus ek Error Text jo dikhta hai agar woh invalid address enter karein.
- Date Selection: date picker ke liye prompt aur labels (ask text, header, footer, button title, aur "more dates" button title).
- Time Selection: time picker ke liye wahi labels, plus jab koi time slot available na ho tab ke liye ek error message.
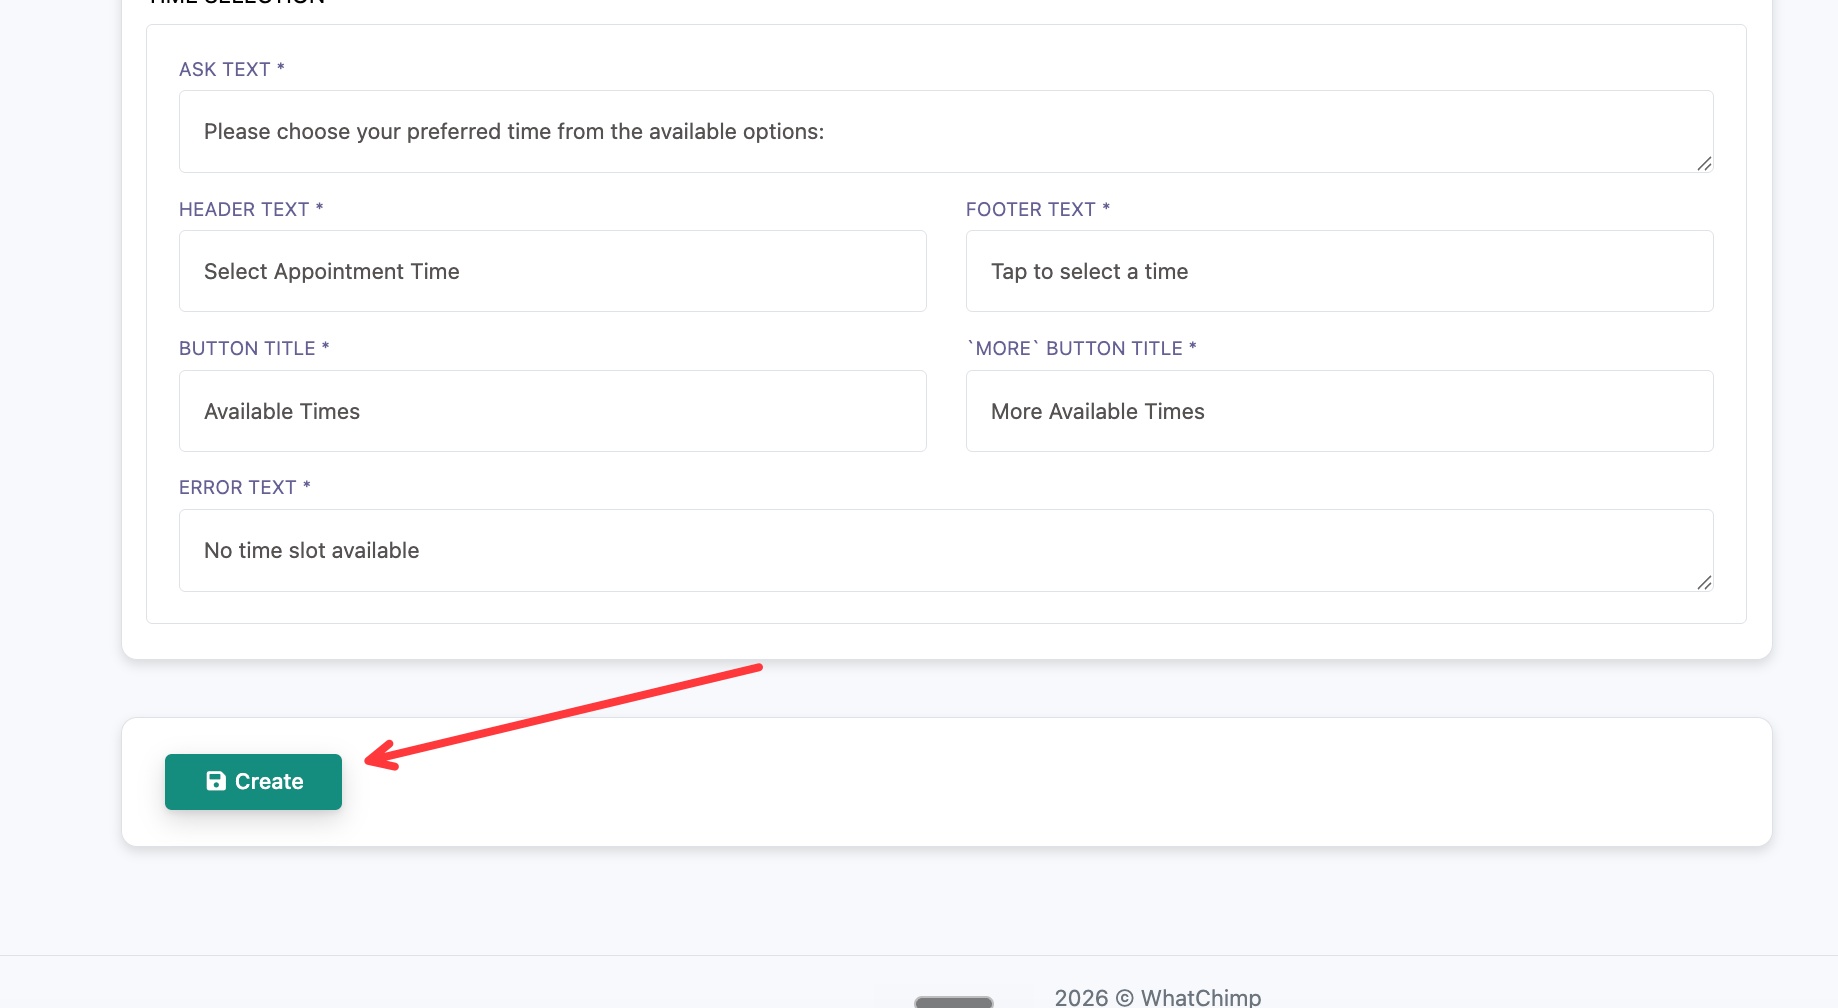 Wording poori karein, phir Create par click karein
Appointment Create Karein
Jab har section fill ho jaaye, bottom tak scroll karein aur Create par click karein. Ab aapka appointment Appointment Manager mein dikhta hai, ek chatbot se trigger hone ke liye taiyaar.